Frigidaire EW30EW55GW1 Owner's manual

Type
Owner's manual
Use 8t Care Guide
B-ui[t-ln Wail Ovc:n
Finding information
MAKEA RECORDFORFUTUREUSE
[] [] [] [] [] [] [] [] [] [] [] [] [] [] [] [] [] [] [] [] [] []
Brand
Purchase Date
Model Number
Serial Number
MODELANDSERIALNUMBERLOCATION
[] [] [] [] [] [] [] Ill [] [] [] [] [] [] [] [] [] [] [] [] [] []
[] [] [] [] [] [] [] [] [] [] [] [] [] [] [] [] [] [] [] [] [] []
For toll-free telephone support in the U.S. and Canada:
1-877-4ELECTROLUX (1-877-435-3287)
For online support and intemet product information:
www.electroluxappliances.com
@2008 Electrolux Home Products, Inc.
Post Office Box 212378, Augusta, Georgia 30917, USA
All rights reserved. Printed in the USA
TemperatureVisualDisplay............................12
OvenLight......................................................I3
ControlLock...................................................13
SettingtheKitchenTimer...............................13
Cooking Modes.................................................14
Baking............................................................14
CookTime......................................................15
EndTime........................................................15
Broiling...........................................................16
ConvectionBaking.........................................17
ConvectionConvert........................................18
RapidPreheat................................................18
ConvectionRoasting......................................19
ConvectionBroiling........................................20
KeepWarm.....................................................21
SlowCook......................................................22
Dehydrating....................................................23
Defrosting.......................................................23
BreadProofing...............................................24
PerfectTurkey................................................25
TemperatureProbe........................................26
MultiStage ................................................27-28
GeneralCleaning...........................................37
CareandCleaningofStainlessSteel ............38
ToRemoveand ReplaceOvenDoor .............38
SpecialDoorCareInstructions......................38
OvenLight......................................................39
BroilerPanCleaningTips...............................39
Solutions to CommonProblems.....................40
BakingProblems............................................40
Solutions....................................................41-42
Notes ..................................................................43
Warrantyinformation ........................................44
Safety
(MPORTANTSAFETY(NSTRUCT(ONS
[] [] [] [] [] [] [] [] [] [] [] [] [] [] [] [] [] [] []
Please read all safety instructions before using your new Electrolux wall oven.
[] []
Remove all tape and packaging wrap before using the appliance. Destroy the carton and
plastic bags after unpacking the appliance. Never allow children to play with packaging
material. Do not remove the wiring label and other literature attached to the back of the
wall oven. Do not remove model/serial number plate.
Proper Installation--Be sure yourappliance is properly installed and grounded by a qualified
electrician or installer in accordance with the National Electrical Code ANSI/NFPA No. 70
(U.S.A.) or CSA C22.1, PART 1 (Canada)--Iatest editions and local code requirements.
Install only per installation instructions provided in the literature package for this appliance.
Ask your dealer to recommend a qualified technician and an authorized repair service. Know
how to disconnect the electrical power to the appliance at the circuit breaker or fuse box in case
of an emergency.
Electronic controllers can be damaged by cold temperatures. When you use
your appliance for the first time, or if it has not been used for a long period of time, make sure
that it has been exposed to a temperature above 0°C/32°F for at least 3 hours before
connecting it to the power supply.
User Servicing--Do not repair or replace any part of the appliance unless specifically
recommended in the manuals. All other servicing should be done only by a qualified
technician to reduce the risk of personal injury and damage to the appliance.
Never modify or alter the construction of the appliance by removing panels, wire covers, or
any other part of the product.
Remove the oven door from any unused appliance if it is to be stored or discarded.
Stepping, leaning, sitting or pulling down on the door of this appliance can
result in serious injuries and may also cause damage to the appliance. Do not allow children
to climb or play around the appliance.
Storage in or on Appliance--Flammable materials should not be stored in an oven.
This includes paper, plastic and cloth items, such as cookbooks, plasticware and towels, as
well as flammable liquids. Do not store explosives, such as aerosol cans, in or near the
appliance.
Do not use the oven for storage.
Do not store items of interest to children in the cabinets above an
appliance. Children climbing on the oven can be seriously injured.
Safety
To reduce the risk of tipping of the appliance. The appliance must be
secured by properly installed anti tip device. To check if devices are installed properly open
the oven door and verify that the anti-tip devices are engaged. See installation instructions.
Do not leave children alone--Children should not be left alone or unattended in the area
where an appliance is in use. They should never be allowed to sit or stand on any part of
the appliance.
DO NOT TOUCH INTERIOR OVEN ELEMENTS OR INTERIOR SURFACES OF THE
WALL OVEN UNTIL THEY HAVE COOLED. The oven heating elements may be hot even
though the elements are dark in color. Areas near the elements may become hot enough
to cause burns. During and after use, do not touch, or let clothing or other flammable
materials touch these areas until they have had sufficient time to cool. Among these areas
are the oven vent openings, the surfaces near these openings, oven door and window.
Wear ProperAppareI--Loose-fitting or hanging garments should never beworn while using
the appliance. Do not let clothing or other flammable materials contact hot surfaces.
Never use your appliance for warming or heating the room.
Do Not Use Water or Flour on Grease Fires--Smother the fire with a pan lid, or use baking
soda, a dry chemical or foam-type extinguisher.
When heating fat or grease, watch it closely. Fat or grease may catch fire if allowed to
become too hot.
Use Only Dry Pot holders--Moist or damp pot holders on hot surfaces may result in burns
from steam. Do not let the pot holders touch the hot heating elements. Do not use a towel
or other bulky cloth instead of a pot holder.
Do Not Heat Unopened Food Containers--Build-up of pressure may cause the container
to burst and result in injury.
IMPORTANTINSTRUCTIONSFORUSINGYOUROVEN
* Use Care When Opening an Oven Door--Stand to the side of the appliance when opening
the door of a hot oven. Let hot air or steam escape before you remove or replace food in
the oven.
Keep Oven Vent Ducts Unobstructed. The wall oven is vented at the upper control panel or
at the center trim depending on the model. Touching the surfaces in this area when the wall
oven isoperating may cause severe burns. Also, do not place plastic or heat-sensitive items
near the oven vent. These items could melt or ignite.
Placement of Oven Racks. Always place oven racks in desired location while oven is cool.
Remove all utensils from the rack before removing rack. If rack must be moved while oven
is hot, use extreme caution. Use pot holders and grasp the rack with both hands to
reposition. Do not let pot holders contact the hot oven element or interior of the oven.
Do not use the broiler pan without its insert. The broiler pan and grid allow dripping fat
to drain and be kept away from the high heat of the broiler.
Safety
IMPORTANTSAFETYINSTRUCTIONS
Nil [] [] [] I! [] [] [] [] [] I! [] [] [] I! [] [] I! [] [] [] I!
Do not cover the broiler grid or oven bottom with aluminum foil. Exposed fat and
grease could ignite.
Do not touch a hot oven light bulb with a damp cloth. Doing so could cause the bulb to
break. Disconnect the appliance or shut off the power to the appliance before removing and
replacing the bulb.
IMPORTANTINSTRUCTIONSFOR CLEANINGYOUR
OVEN
Clean the appliance regularly to keep all parts free of grease that could catch fire. Exhaust
fan ventilation hoods and grease filters should be kept clean. Do not allow grease to
accumulate. Greasy deposits in the fan could catch fire. Refer to the hood manufacturer's
instructions for cleaning.
SELF CLEANING OVENS
Clean in the self-cleaning cycle only the parts of the appliance listed in this Owner's Guide.
Before using the self-cleaning cycle of the appliance, remove the broiler pan, oven racks and
any utensils stored in the appliance. Also the side rails of the oven racks must be removed
for the self-clean function to operate.
Do not clean the oven door gasket. The door gasket is essential fora good seal. Care should
be taken not to rub, damage or move the gasket.
Do not use oven cleaners. No oven cleaner oroven liner protective coating of any kind should
be used in or around any part of the appliance
I__ The health of birds is sensitive to the fumes off
some
extremely given during
the self-clean cycle of any wall oven. Move birds to another well ventilated room.
Feature Overview 7'
.YO.UR.W.AL.L.OV.E................
CONVECT,ONFAN
OVEN VENT
CONTROLPANEL
OVEN DOOR LATCH
BROILINGELEMENT
OVENRACKSLIDERS
OVENRACKS
OVENRACKSUPPORT
ow.L,O._
GLASSOVENDOOR
DOOR HANDLE
BROILERPAN
BROILERPANGRID
CONVECTION
ROASTINGRACK
Feature Overview
OVEN SUPPORTS&OVENVENTS
[] [] [] [] [] [] [] [] [] [] [] [] [] [] [] [] [] [] [] [] [] []
Installing Oven Rack Supports
ALWAYS INSTALL OVEN RACK SUPPORT
BEFORE TURNING ON THE 0 VEN (WHEN
THE OVEN IS COOL).
To install oven rack support, insert the
supports by pushing them downward into
the two brackets on each side of the oven
interior, as shown below,
To remove the oven rack support for a
self-clean cycle, pull up the support to
disengage them from the brackets, If the
rack supports are not removed, the self-
clean cycle won't start,
iiiiiiiiiiiiiiiiiiiiiiiiiiiiiiiiiiiiiiiiiiiiiiiiiiiiiiiiiiiiiiiiiiiiiiiiiiiiii
Oven Rack Positions
This oven isequipped with ladder racksupports
with 7 positions toaccomodate precisely every
mode of cooking,
Rack positions
(NON-SLIDING
RACK ONLY)
Oven Vents Location
The oven is vented above each door. When
the oven is on, warm air is released through
the vents, This venting is necessary for proper
air circulation in the oven and good baking
results,
Feature Overview
REMOVINGANDREP QNG OVEN CKS
[] [] [] [] [] [] [] [] [] [] [] [] [] [] [] [] [] []
RemovingSliding OvenRacks
1. With the rack in its closed position; grasp the rack and the sliders at once.
2. Slightly lift the rack and sliders and pull it to clear the first bracket.
3. Pull the rack and sliders until the second bracket stops the rack.
4. Lift the rack and sliders and carefully remove them from the oven.
Refer to the care and cleaning section for directions on how to clean the racks.
ReplacingSliding OvenRacks
To replace the oven racks, follow the intructions above in reverse order.
[] []
i LU
I LL=
Io
i <[
Ist Bracket
2nd Bracket
Oven Rack
Oven Rack Slider
Oven Rack Support
Removing Non-Sliding Oven Racks
Simply pull the rack and slightly tilt it upward when the rack hits its stop position.
Replacing Non-SlidingOvenRacks
Insert the rack into the oven rack supports by inserting the rack openings into the rack
supports. Be sure the rack is at the same position on each oven rack support on both sides.
Insert the openings
into the rack support
Always arrange the oven racks when the oven is cool (prior to operating the oven). Always use
loven m tts when us ng the oven.
Feature Overview
CONTROL PAD FUNCTIONS
[] [] [] [] [] [] [] [] [] [] [] [] [] [] [] [] [] [] [] [] [] []
'! Light Pad- Used to turn the oven light on and off.
2 Bake Pad- Used to enter the normal baking mode temperature.
3 Broil Pad- Used to select the variable broil mode.
4 Convection Bake Pad- Used to select the convection baking mode.
5 Convection Roast Pad- Used to select the convection roasting mode.
6 Convection Broil Pad- Used to select the convection broil mode.
'7 Control Lock Pad- Used to disable all oven function.
8 Perfect Turkey Pad- Used to select the perfect turkey cooking mode.
9 Defrost Pad- Used to select the defrost mode.
10 Dehydrate Pad- Used to select the dehydrate mode.
11 Bread Proof Pad- Used to select the bread proof mode.
12 My Favorite 1 Pad- Used to save or recall the favorite 1 cooking mode.
13 Multi Stage Pad- Used to enter up to three subsequent modes.
14 Cook Options Pad- Used to light up the cooking options pads.
15 Cook Time Pad- Used to set a cooking duration time.
16 End Time Pad- Used to select the time at which the cooking will end.
17 Probe Pad- Used to activate the meat probe mode.
Feature Overview
CONTROL PADFUNCTIONS(coNT NuEm
[] [] [] [] [] [] [] [] [] [] [] [] [] [] [] [] [] [] [] [] [] []
18 Keep Warm Pad- Used to select the keep warm mode.
19 Slow Cook Pad- Used to select the slow cook mode.
20 Clean Pad- Used to select the self-cleaning mode.
2'! My Favorite 2 Pad- Used to save or recall the favorite 2 cooking mode.
22 My Favorite 3 Pad- Used to save or recall the favorite 3 cooking mode.
23 Oven Pad- Used to light up the available cooking modes pads.
24 Lite Pad- Used to start a 2 hours self-clean cycle.
25 Meal Pad- Used to start a 3 hours self-clean cycle.
26 Heavy Pad- Used to start a 4 hours self-clean cycle.
27 Rapid Preheat Pad- Used to preheat the oven to the desired temperature.
Cony. Convert Pad- Used to convert a standard temperature to a convection
28 temperature.
29 User Preference Pad- Used to bring the user preference menu in the display.
Timer Pad- Used to set or cancel the minute timer. The minute timer does
3() not start or stop cooking.
Cancel Pad- Used to cancel any function previously entered except the time of day
and minute timer. Push Cancel pad to stop cooking.
Start Pad- Used to start all oven functions.
31
32
33
34
35
0 Thru 9 Number Pads- Used to enter temperature and times.
- Io Pad- Used to lower the temperature and times.
+ hi Pad- Used to raise the temperature and times.
Getting Started
SE ING CLOCKATPOWERUP
[] [] [] [] [] [] [] [] [] [] [] [] [] [] [] [] [] [] [] [] [] []
When the unit is first plugged in, or when the power supply to the range has been interrupted,
the timer in the display will flash with "12:00". The clock cannot be set when the oven is on.
If an invalid time of day is entered, the control will triple beep to prompt you to re-enter a valid
time of day.
To set the clock (example for 1:30):
1. _ress,\lS_jj.\Uj pads toset the time ofdayto 1:30. The pads hi or io can also be pressed
to raise or lower the actual time displayed.
2. Press START <_ to accept the changes or CANCEL (@) to start with a time of 12:00.
CONTROLPANELDISP Y MODES
m [] [] [] [] [] [] [] [] [] [] [] [] [] [] [] [] [] [] [] [] []
Sleep Mode:
Your control will remain ina sleep mode when not in use. Only the clock will display during this
mode. You will need to wake the control to begin any function.
Wake Mode:
To wake the control, touch within the display panel. After 2 minutes without activity the control
will beep and go back into sleep mode.
To start a cooking feature you must first select the oven pad. User preferences will be available
during this mode as well as timer, oven light and the control lock.
TEMPE TURE VISUALDISP Y
[] [] [] [] [] [] [] [] [] [] [] [] [] [] [] [] [] [] [] [] [] []
Your oven is equipped with a temperature visual display. When a cooking mode is set, the
actual temperature will be shown in the display and will rise as the unit preheats. When the
unit has reached its target temperature, a chime will sound to remind you to place the food in
the oven. This feature will be active with some cooking modes; bake, convection bake,
convection roast and perfect turkey. The cooking modes which does not feature the
temperature visual display will be noted in their descriptions.
NOTE: The lowest temperature that can be displayed is IO0°F.
Getting Started
OVENLIGHT
[] [] [] [] [] [] [] [] [] [] [] [] [] [] [] [] [] [] [] [] [] []
Your appliance includes "theater" style oven lighting feature that gradually lights the oven
interiors to full brightness. The oven is equipped with 2 halogen lights. The oven lights will turn
on automatically, when the oven door is opened. The oven light may be turned on when the
door is closed by using the oven light pad located on the control panel. The oven light key will
toggle the lights at full intensity.
To toggle the Oven Lights ON and OFF:
1. Press OVEN LIGHT
CONTROLLOCK
[] [] [] [] [] [] [] [] [] [] [] [] [] [] [] [] [] [] [] [] [] []
The Control Lock feature automatically locks the upper oven door, control panel. The Control
Lock is only allowed when the oven is turned OFF (not active). DOOR LOCK will flash in the
display for 20 seconds or until the door has finished locking. Once the door has been locked,
Loc message will appear in the upper display. Do not attempt to open the oven door while
DOOR LOCK is flashing.
Totoggle the Control Lock ON and OFF:
1. Keep CONTROL LOCK [] pressed for 3 seconds.
SETTINGTHEKITCHENTIMER
[] [] [] [] [] [] [] [] [] [] [] [] [] [] [] [] [] [] [] [] [] []
This unit is equipped with a kitchen timer which serve as an extra timer in the kitchen that will
beep when the set time has run out. It does not start or stop cooking. The Timer feature can
be used during any of the other oven control functions and cooking modes.
To set the Timer (example for 5 minutes):
1. Press TIMER (_. "00:00" will appear in the display.
2. Press :5_:padtosetthetimerto5minutes. Thepads hi or locanalsobepressedtoraise
or lower the actual time displayed.
3. Press again TIMER (_) to accept and start the countdown.
4. When the set time has run out, "00:00" will be displayed and the TIMER Q pad will flash.
The clock will sound a chime that will be repeated at regular intervals until the TIMER (_
pad is pressed.
To cancel the Timer before the set time has run out:
Press TIMER C). The display will return to the time of day.
Cooki Modes
[] [] [] [] [] [] [] [] [] [] [] [] [] [] [] [] [] [] [] [] [] []
This mode is best used for your standard recipes. The hidden bake element is used to heat
the air and maintain temperature. The temperature probe can be used in this cooking mode.
The oven can be programmed to bake at any temperature from 170°F to 550°F with a default
temperature of 350°F.
Baking Tips:
, Always preheat your oven before using the bake mode.
, During preheat, the 3 elements and the convection fan are used in cycle to quickly heat the oven.
, Use only one rack and center the pans as much as possible.
, If using two racks, place the oven racks in positions 2 and 6.
, Allow 2" to 4" (5,1 to 10,2cm) around the utensil(s) for proper air circulation.
, Be sure the pans do not touch each other, the door, sides or back of the oven.
If using multiple pans or racks, stagger as shown.
To set a Bake Temperature of 350°F:
1. Arrange interior oven racks.
2. Press OVEN _ OVEN to light up the available cooking modes pads.
3. Press BAKE _].
4. Press START _,_. The oven display shows PRE-HEATING.
5. Place food in the oven when the chime signals and temperature display shows that the
oven has reached the set target temperature and the PRE-HEATING message disappear.
6. The Temperature Probe, Cook Time, Timer, End Time and Rapid Preheat features can
be set to control your cooking time (read their sections for directions).
7. Remove food. Always use oven mitts when removing hot pans from the oven.
8. Press CANCEL _) to stop or cancel the Bake feature at any time.
Tochangeto a Bake Temperatureof 425°F:
1. Press OVEN _ OVEN to light up the available cooking modes pads.
2. Press BAKE _].
3. Press the HI +
hi or LO Io pads to get to the desired temperature.
4. Press START <_>.
Baking Problems
Refer to the Baking Problems Table in the Solutions to Common Problems section of this
manual.
Cooking Modes
COOKTIME
[] [] [] [] [] [] [] [] [] [] [] [] [] [] [] [] [] [] [] [] [] []
Cook Time allows the oven to be set to cook for a set length of time and shut off automatically.
The time remaining will always be shown in the timer section of the display. The oven will shut
off and will beep when the countdown is finished. This feature can be used with Bake,
Convection Bake, Convection Roast, Slow Cook, Keep Warm, Defrost, Bread Proof, Dehydrate
and Perfect Turkey cooking modes. It can also be part of a Multi-Stage sequence.
To set a timed cooking (exampleis a 450°F Bake for 30minutes):
1. Press OVEN I> OVEN to light up the available cooking modes pads.
2. Press BAKE []. The temperature numbers will blink in the display.
3. Enter temperature needed; _4.__5_0_.
4. Press COOK OPTIONS @ to bring up the cook options items.
5. Press COOK TIME
6. Enter time needed; _3/_/0_.
7. Press START _1"z_.The oven will start heating. The cook time will start counting down for
the set time.
8. Press CANCEL @ to stop the audible alarm or to cancel the cook time at anytime.
ENDTIME
[] [] [] [] [] [] [] [] [] [] [] [] [] [] [] [] [] [] [] [] [] []
End Time allows the oven to be set to shut off automatically at a set time of day. The oven
control will calculate the remaining time by itself. The time remaining will always be shown in
the timer section of the display. The oven will shut off and will beep when the countdown is
finished. This feature can be used with Bake, Convection Bake, Convection Roast, Slow
Cook, Keep Warm, Defrost, Dehydrate, Clean and Bread Proof cooking modes. This oven
can be programmed with Cook Time and End Time to start and stop by itself at the right time.
To set a delayed timed cooking (exampleis a 450°F Bake for 30 minutes which will
end at 6:00PM):
1. Press OVEN _ OVEN to light up the available cooking modes pads.
2. Press BAKE [_. The temperature numbers will blink in the display.
3. Enter temperature needed; _4_!__/N_
4. Press COOK OPTIONS @ to bring up the cook options items.
5. Press COOK TIME (3").
6. Enter time needed; '_i/N "_
7. Press END TIME (3").
-..--YI
8. Enter time of day needed; \v-JL,-,)_-,)
9. Press START <_. The time remaining will be shown in the display.
10. Press CANCEL @ to stop the audible alarm or to cancel the cook time at anytime.
Use caution with the COOK TIME or END TIME features. Use the automatic timer when
cooking cured or frozen meats and most fruits and vegetables. Foods that can easily spoil such as milk,
eggs, fish, meat or poultry, should be chilled in the refrigerator first. Even when chilled, they should not stand
in the oven for more than 1 hour before cooking begins, and should be removed promptly when cooking is
completed. Eating spoiled food can result in sickness from food poisoning.
Cooki
[] [] [] [] [] [] [] [] [] [] [] [] [] [] [] [] [] [] [] [] [] []
This mode is best for meats, fish and poultry up to 1" thick. Broiling is a method of cooking
tender cuts of meat by direct heat under the broil element of the oven. The high heat cooks
quickly and gives a rich, brown outer appearance. The temperature probe cannot be used
with this mode. The oven can be programmed to broil at any temperature from 300°F to
550°F with a default temperature of 550°F.
Broiling Tips:
For optimum browning, preheat the broil element for 2 minutes.
Broil one side until the food is browned; turn and cook on the second side. Season and serve.
Always pull the rack out to the "stop" position before turning or removing food.
Always use the broiler pan and its grid when broiling. It allows the dripping grease to be kept
away from the high heat of the broil element (see Figure 1).
For best broiling results, broil with the oven door slightly open.
o DO NOT use the broil pan without the insert. DO NOT cover the broil pan insert with foil.
The exposed grease could catch fire, DO NOT use the roasting rack when broiling,
To seta Broil Temperature of 550°F:
1. Arrange interior oven racks,
2. Press OVEN _' OVEN to light up the available cooking modes pads,
Press BROIL [_-].
Press START _.
Place food in the oven after 2 minutes, Grid
Turn food when the top side isbrowned and cook on the
second side,
7. Remove food, Always use oven mitts when removing
hot pans from the oven,
8. Press CANCEL @ to stop or cancel the Broil feature
at any time,
Broiling Times
Figure 1
Broiler Pan
Electric Wall Oven Broiling Table Recommendations
Food Rack Temp Cook Time
Item Position Setting 1st side 2nd side Doneness
Steak 1" thick 7 550 ° F 6:00 4:00 Rare
7 550 ° F 7:00 5:00 Medium
Pork Chops 3/4" thick 7 550 ° F 8:00 6:00 Well
Chicken - Bone In 5 450 ° F 20:00 10:00 Well
Chicken - Boneless 7 450 ° F 8:00 6:00 Well
Fish 7 500 ° F 13:00 n/a Well
Shrimp 5 550 ° F 5:00 n/a Well
Hamburger 1" thick 7 550 ° F 9:00 7:00 Medium
5 550 ° F 10:00 8:00 Well
Should an oven fire occur, close the oven door and turn off the oven. If the fire
baking soda on the fire or use a fire extinguisher. DO NOT put water or flour on the fire. Flour
and water can cause a grease fire to spread and cause personal injury.
continues, throw
may be expos veI
Cooking Modes
CONVECTIONBAKING
[] [] [] II! [] [] [] [] [] [] [] [] [] [] [] [] [] [] [] [] [] []
This mode of cooking enables you toobtain the best culinary results when baking with multiple pans
and racks. Multiple rack baking mayslightly increase cooktime forsome foods but theoverall result
is time saved. Most foods cooked in a standard oven will cook faster and more evenly with
Convection Bake. Convection baking uses the three elements and a fan to circulate the oven's
heat evenly and continuously within the oven. The temperature probe can be used in this cooking
mode. The oven can be programmed for Convection baking at any temperature between 170°F
to 550°F with a default temperature of 350°F.
Convection Baking Tips:
Always preheat your oven before using the Convection Bake mode.
During preheat, the 3 elements and the convection fan are used in cycle to quickly
heat the oven.
If your recipe cooking temperature has already been converted for convection
baking there is no need to reduce your oven temperature. If your recipe has
not had the temperature converted for convection baking you can easily
reduce using the Convection Convert feature. Please see Convection Convert
section on next page for further instruction on temperature conversion.
Use tested recipes with times adjusted for convection baking when using this
mode. With single rack convection baking the some foods may have as much
as a 25% reduction in cook time, check food at minimum time. Time
reductions will vary depending on the amount and type of food to be cooked.
When using Convection Bake with a single rack, place oven rack in position 3 or 4. If
cooking on multiple racks, place the oven racks in positions 2 and 6 or 1,4 and 7.
Most bakeries (except cakes) should be baked on pans with no sides or very low sides to
allow heated air to circulate around the food.
Food baked on pans with a dark finish will cook faster.
Convection Bake
Air Flow
To set a Convection Bake Temperatureof 350°F:
1. Arrange interior oven racks.
2. Press OVEN _ OVEN to light up the available cooking modes pads.
3. Press CONVECTION BAKE _.
4. Press START <_. The oven display shows PRE-HEATING.
5. Place food in the oven when the chime signals and temperature display shows that the
oven has reached the set target temperature and the PRE-HEATING message disappear.
6. The Temperature Probe, Cook Time, Timer, End Time and Rapid Preheat features can
be set to control your cooking time (read their sections for directions).
7. Remove food. Always use oven mitts when removing hot pans from the oven.
8. Press CANCEL (_) to stop or cancel the Convection Bake feature at any time.
Cooki Modes
CONVECT(ONCONVERT
[] [] [] [] [] [] [] [] [] [] [] [] [] [] [] [] [] [] [] [] [] []
The Convection Convert pad is used to automatically convert a standard baking recipe for
convection baking. When set properly, this feature is designed to display the actual converted
(reduced) temperature inthe display. Convection Convert may ONLY be used with a Convection
Bake cooking mode. It can be used with the features End Time and Cook Time (see their sections
for directions). If convection conversion is used with the cook time and end time features, "CF"
(check food) will be displayed when 75% of the bake time complete. At this time the oven control
will sound 3 long beeps at regular intervals until baking had finished. When the bake time has
completely finished the control will beep at regular interval until the CANCEL @ pad is pressed.
NOTE: Tousethis feature with the COOK TIME _ option, the COOK TIME _ pad mustbe pressed
before the CONVECTION CONVERT >_(_:_pad.
Chang(ng from a normal bake temperature to a convection bake temperature:
1. Press OVEN _' OVEN to light up the available cooking modes pads,
2. Press CONVECTION BAKE [_.
3. Press COOK OPTIONS @. The cook options items will light up.
4. Press CONVECTION CONVERT >_(_.The temperature displayed will be 25°F lower than
what it used to be.
5. Press START <_ to begin the convection baking (see Convection Baking section for
more informations).
P)D PREHEAT
[] [] [] [] [] [] [] [] [] [] [] [] [] [] [] [] [] [] [] [] [] []
The Preheat feature will bring the oven up to temperature faster than a regular preheat and
then indicate when to place the food in the oven. Preheating is not necessary when roasting
or cooking casseroles. The oven can be programmed to preheat at any temperature between
170°F to 550°F with some of the cooking modes; Bake, Convection Bake and Convection
Roast.
IMPORTANT: The rapid preheat feature is for single rack ONLY. The heat distribution with
multiple rack will be uneven,
To set a rapid preheat (exampleis for a 350°F Bake):
1. Press OVEN I_ OVEN to light up the available cooking modes pads.
2. Press BAKE [_.
3. Press COOK OPTIONS @. The cook options items will
light
up,
4. Press RAPID PREHEAT _.
5. Press START <_ to begin the baking with the rapid preheat feature enabled,
6. Place food inthe oven when the chime signals and PRE-HEATING message disappears
indicating that the oven has reached the set target temperature.
Cooking Modes
CONVECT)ONROAST(NG
[] [] [] [] [] [] [] [] [] [] [] [] [] [] [] [] [] [] [] [] [] []
This mode is best for cooking tender cuts of beef, lamb, park and poultry. Use this mode when
cooking speed is desired. The Convection Roasting gently browns the exterior and seals in
the juices. Convection roasting uses the hidden bake element, the hidden convection
element, the broil element and a fan to circulate the oven's heat evenly and continuously within
the oven. The temperature probe can be used in this cooking mode. The oven can be
programmed for Convection Roasting at any temperature between 170°F to 550°F with a
default temperature of 350°F.
Convection Roasting Tips:
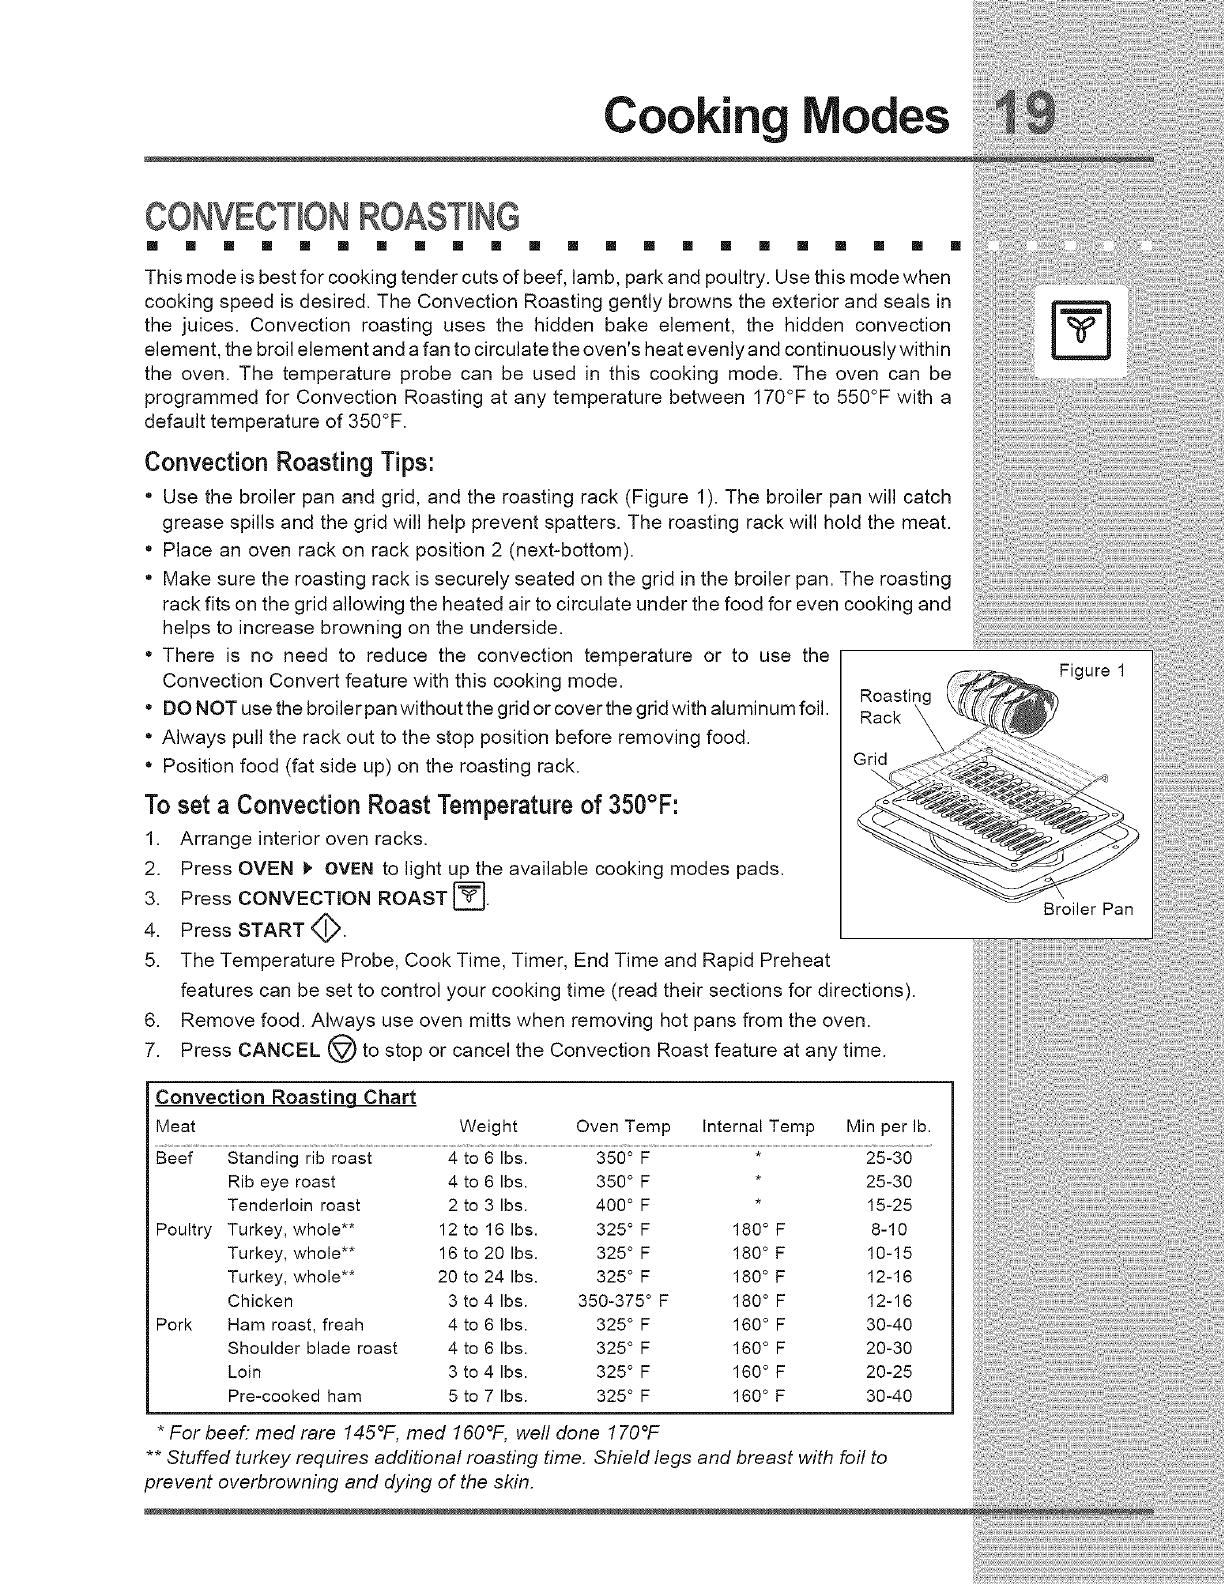
Use the broiler pan and grid, and the roasting rack (Figure 1). The broiler pan will catch
grease spills and the grid will help prevent spatters. The roasting rack will hold the meat.
Place an oven rack on rack position 2 (next-bottom).
Make sure the roasting rack is securely seated on the grid in the broiler pan. The roasting
rack fits on the grid allowing the heated air to circulate under the food for even cooking and
helps to increase browning on the underside.
There is no need to reduce the convection temperature or to use the
Convection Convert feature with this cooking mode.
DO NOT use the broiler panwithout the grid or cover the grid with aluminum foil.
Always pull the rack out to the stop position before removing food.
Position food (fat side up) on the roasting rack.
To set a Convection Roast Temperature of 350°F:
1. Arrange interior oven racks.
2. Press OVEN _, OVEN to light up the available cooking modes pads.
3. Press CONVECTION ROAST_.
4. Press START _,_.
5. The Temperature Probe, Cook Time, Timer, End Time and Rapid Preheat
Roastinc
Rack
Figure 1
Broiler Pan
features can be set to control your cooking time (read their sections for directions).
6. Remove food. Always use oven mitts when removing hot pans from the oven.
7. Press CANCEL @ to stop or cancel the Convection Roast feature at any time.
Poultry
Pork
Tenderloin roast 2 to 3 Ibs. 400 ° F * 15-25
Turkey, whole** 12 to 16 Ibs. 325 ° F 180 ° F 8-10
Turkey, whole** 16 to 20 Ibs. 325 ° F 180 ° F 10-15
Turkey, whole** 20 to 24 Ibs. 325 ° F 180 ° F 12-16
Chicken 3 to 4 Ibs. 350-375 ° F 180 ° F 12-16
Ham roast, freah 4 to 6 Ibs. 325 ° F 160 ° F 30-40
Shoulder blade roast 4 to 6 Ibs. 325 ° F 160 ° F 20-30
Loin 3 to 4 Ibs. 325 ° F 160 ° F 20-25
Pre-cooked ham 5 to 7 Ibs. 325 ° F 160 ° F 30-40
* For beef: med rare 145°F, med 160°F, well done 170°F
** Stuffed turkey requires additional roasting time. Shield legs and breast with foil to
prevent overbrowning and dying of the skin.
Cooki Modes
CONVECT)ONBRO(L(NG
[] [] [] [] [] [] [] [] [] [] [] [] [] [] [] [] [] [] [] [] [] []
Use this mode for thicker cuts of meat, fish and poultry. The Convection Broiling gently
browns the exterior and seals in the juices. Convection broiling uses the broil element and
a fan to circulate the oven's heat evenly and continuously within the oven. The temperature
probe cannot be used in this cooking mode. The oven can be programmed for Convection
Broiling at any temperature between 300°F to 550°F with a default temperature of 550°F.
Convection Broiling Tips:
, For optimum browning, preheat the broil element for 2 minutes.
, Broil one side until the food is browned; turn and cook on the second side. Season and
serve.
Always pull the rack out to the "stop" position before turning or removing food.
Always use the broiler pan and its grid when broiling. It allows the dripping grease to be
kept away from the high heat of the broil element (see Figure 1).
DO NOT use the broil pan without the insert. DO NOT cover the broil pan insert with
foil. The exposed grease could catch fire. DO NOT use the roasting rack when broiling.
= Convection broiling is generally faster than conventional broiling. Check for doneness at
the minimum recommended time.
Grid Figure 1
IMPORTANT: Always use this cooking mode with the
oven door closed or the fan will not turn on.
To set a Convection Broil Temperature of 550°F:
Broiler Pan
1. Arrange interior oven racks.
2. Press OVEN !_ OVEN to light up the available cooking modes pads.
3. Press CONVECTION BROIL [_].
4. Press START <_.
5. Place food in the oven after 2 minutes.
6. Turn food when the top side is browned and cook on the second side.
7. Remove food. Always use oven mitts when removing hot pans from the oven.
8. Press CANCEL @ to stop or cancel the Convection Broil feature at any time.
Should an oven fire occur, leave the oven door closed and turn off the oven. If the fire
continues, throw baking soda on the fire or use a fire extinguisher. DO NOT put water or flour on the fire.
Flour may be explosive and water can cause a grease fire to spread and cause personal injury.
  • Page 1 1
  • Page 2 2
  • Page 3 3
  • Page 4 4
  • Page 5 5
  • Page 6 6
  • Page 7 7
  • Page 8 8
  • Page 9 9
  • Page 10 10
  • Page 11 11
  • Page 12 12
  • Page 13 13
  • Page 14 14
  • Page 15 15
  • Page 16 16
  • Page 17 17
  • Page 18 18
  • Page 19 19
  • Page 20 20
  • Page 21 21
  • Page 22 22
  • Page 23 23
  • Page 24 24
  • Page 25 25
  • Page 26 26
  • Page 27 27
  • Page 28 28
  • Page 29 29
  • Page 30 30
  • Page 31 31
  • Page 32 32
  • Page 33 33
  • Page 34 34
  • Page 35 35
  • Page 36 36
  • Page 37 37
  • Page 38 38
  • Page 39 39
  • Page 40 40
  • Page 41 41
  • Page 42 42
  • Page 43 43
  • Page 44 44

Frigidaire EW30EW55GW1 Owner's manual

Type
Owner's manual

Ask a question and I''ll find the answer in the document

Finding information in a document is now easier with AI