Polar E 600 Owner's manual
- Category
- Heart rate monitors
- Type
- Owner's manual
This manual is also suitable for

Polar Electro Oy
Professorintie 5
FIN-90440 Kempele
Tel +358 8 5202 100
Fax +358 8 5202 300
www.polar.fi
179351 ENG E
HEART RATE MONITOR
USER MANUAL
ENG
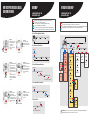
HOW TO START THE E600 HEART
RATE MONITOR
Start from the
Time of Day
screen.
Press and hold
the red button.
Measure Mode
Time in Target Zone
Exercise Time
Heart Rate

= One press of the red button. It allows you to enter modes.
= One press of the right side buttons.
These allow you to scroll through different screens.
= Press and hold the upper left button.
= At any point you can press the blue button to exit the displayed
mode, or, you can press and hold it to get back to the Time of Day.
HOW TO STOP THE EXERCISE & RECALL
DATA FROM THE E600
Step 1:
After exercise press
the BLUE button
twice to stop
recording.
Time of Day will
appear.
Step 3:
Press the RED button
twice. Your screen
will read In Zone.
The middle row will
show the time you
spent in your target
zone.
The lower row will
show your average
heart rate during the
exercise.
Step 5:
Press the UPPER
RIGHT button.
Your screen will read
Below, and you will
see the time you spent
below your target
zone.
Press 2x
Press 1x
Press 2x
Press 1x
Press 1x
Step 6:
Return to Time of Day
by pressing and
holding the BLUE
button.
Step 2:
Press the UPPER
RIGHT button once.
Your screen will read
FILE.
Step 4:
Press the UPPER RIGHT
button.
Your screen will read
Above, and you will see
the time you spent
above your target
zone.
Press and hold
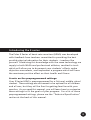
ROAD MAP
A REFERENCE FOR THE
ADVANCED USER
File Options Connect
To Scroll Through Basic Modes
Options
Exercise Set
Limits Recovery Timer 1 (Timer 2)
To Set Exercise Functions
Options
Exercise Set Memory Set Watch Set
Time Date
To Set the Watch Functions
To Set the Memory Function
Options
Exercise Set Memory Set
Recording Rate 5/15/60 seconds
(To Confirm Selection)
Time
Set
Date
Set
Recording
Rate
5/15/60s
File Options Connect
Stand by
heart rate
measurement
Measurement
Recording
Lap
Recording
Time in Target
Zone
Time Above
Target Zone
Time Below
Target Zone
Recovery Time
Laps
Total Exe.
Time
Target Zone
Limits
Samples
Latest file
Exercise
Set
Set Limits
Set Recovery
Time
Set Timer 1
Set Timer 2
Lap 1
Further
Laps
Sample 1
Further
Samples
Memory
Set
Watch
Set
NOTE: Whenever you are in the File or Options mode, pressing and holding the blue
button will bring you back to the Time of Day screen.
Pause
Mode
Recovery
Older
files
= Press and hold the red button.
= One press of the red button. It allows you to enter modes.
= One press of the right side buttons. These allow you to scroll through different screens.
At any point you can press the blue button to exit the displayed mode.
To Delete Files
File
Delete File# Exercise File#
(To Confirm Selection)
INTEGRATED ROAD MAP
A REFERENCE FOR THE
ADVANCED USER

3
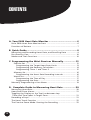
The Polar E Series of heart rate monitors (HRMs) was developed
with feedback from teachers committed to providing the best
possible physical education for their students – teachers like
yourself. Combining this knowledge with the same technology we
supply to both NASA and professional athletes, resulted in tools
which will allow you to document your students’ efforts, make
objective assessments, and implement a program which will have
the maximum positive effect on their health and fitness.
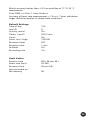
A note on the preprogrammed settings:
Your E Series HRM is preprogrammed for a fictional middle school
student. These settings are not meant to be optimal for all children
and all uses, but they will be fine for getting familiar with your
monitor. As you read this manual, you will learn how to customize
these settings to fit the goals of your program. For a list of these
preprogrammed settings, please see the “Technical Specification”
section at the back of this manual.
Introducing the E series

4
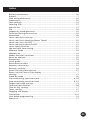
CONTENTS
A. Your E600 Heart Rate Monitor ........................................ 6
Polar E600 Heart Rate Monitor Parts ...................................................... 6
Functions of Buttons ................................................................................. 7
B. Quick Guide ....................................................................... 8
Measuring and Recording Heart Rate, and Recalling Data .................. 8
Post Exercise Care .................................................................................... 10
Modes and Their Functions .................................................................... 10
C. Programming the Wrist Receiver Manually ................. 12
Exercise Set .......................................................................................... 12
Programming the Target Heart Rate Limits ................................. 13
Programming the Recovery Calculation ....................................... 14
Programming Timer 1 and Timer 2 ............................................... 15
Memory Set .......................................................................................... 16
Programming the Heart Rate Recording Intervals ...................... 16
Watch Set ............................................................................................. 17
Programming the Time of Day ...................................................... 17
Programming the Date .................................................................. 18
Manually Programming a User Name ................................................... 19
D. Complete Guide to Measuring Heart Rate ................. 20
Measuring Heart Rate ............................................................................. 20
Heart Rate Zone Alarms .......................................................................... 21
Toggling the Display on the Top Line between Lap
Times and Time Spent in Target Zone .................................................. 21
Recording of Laps .................................................................................... 21
The Heart Touch Function ...................................................................... 22
The Exercise Pause Mode: Pausing the Recording ............................... 22

5
Activating the Recovery Calculation .................................................... 23
Restarting or Stopping the Recording ................................................. 23
E. Complete Guide to Recalling Data
from the File Mode ........................................................ 24
Deleting Files .......................................................................................... 27
F. Care and Maintenance ................................................... 28
G. Precautions ..................................................................... 32
H. Frequently Asked Questions ......................................... 35
I. Technical Specification .................................................. 38
J. Limited Polar International Guarantee ....................... 40
K. Disclaimer ....................................................................... 41
L. Polar Glossary..................................................................42
Display Symbols ...................................................................................... 43
Display Texts ........................................................................................... 44
Index ........................................................................................................ 45

6
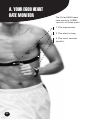
A. YOUR E600 HEART
RATE MONITOR
The Polar E600 heart
rate monitor (HRM)
consists of three parts:
1. The transmitter.
2. The elastic strap.
3. The wrist receiver
(watch).
6

7
Blue
Button
Upper
Right
Button
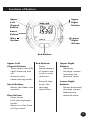
Functions of Buttons
Lower
Right
Button
Upper
Left
(Signal)
Button
Red Button
Upper Left
(Signal) Button:
Turns heart rate (HR)
zone alarm on and
off.
Accesses user
name setting mode.
Reset Button:
Resets the heart rate
monitor.
Blue Button:
Stops timer.
Exits the displayed
mode.
Returns to the Time
of Day screen.
Reset
Button
Red Button:
Starts
measurement
of heart rate.
Locks in your
selection.
Records laps.
Starts the
recovery
calculation.
Upper Right
Button:
Advances
through screens.
Increases the
selected value.
Lower Right
Button:
Moves backward
through screens.
Reduces the
selected value.

8
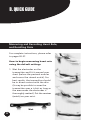
B. QUICK GUIDE
For complete instructions, please refer
to pages 20-27.
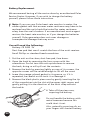
How to begin measuring heart rate
using the default settings
1. Wet the electrodes on the
transmitter and fit it around your
chest (below the pectoral muscles
and across the sternal notch). For
best results, the transmitter should
be in direct contact with the skin.
(It may be possible to wear the
transmitter over a t-shirt as long as
the area under the electrodes is
thoroughly wetted.) Put the receiver
(watch) on your wrist.
Wet
8
Measuring and Recording Heart Rate,
and Recalling Data

9
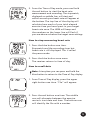
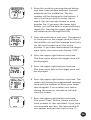
2. From the Time of Day mode, press and hold
the red button to start the heart rate
measurement and recording. The stopwatch,
displayed on middle line, will start and
within seconds your heart rate will appear at
the bottom. The top line of the display will
calculate how much of your total elapsed
exercise time you have spent in your target
heart rate zone. The HRM will beep and
the numbers on the lower line will flash if
you are above or below the target zone settings.
How to stop measuring heart rate
1. Press the blue button one time.
Stopwatch and the recording stops but
heart rate is still displayed. This is called
the pause mode.
2. Press the blue button once more.
The receiver returns to time of day.
How to recall data
Note: At anytime you can press and hold the
blue button to return to the Time of Day display.
1. From Time of Day display, press the upper
right button one time. “File” will appear.
2. Press the red button one time. The middle
row will alternate between the exercise
session’s start date and time. The bottom row
will identify the file with a number.

10
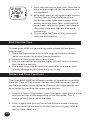
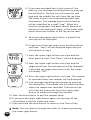
3. Press the red button one time. The time in
zone and average HR for the exercise will
be displayed.
4. With each press of the upper right button,
further data will be displayed in the
following order: time above zone, time
below, recovery time, laps, total exercise
time, heart rate limits, heart rate samples.
(Recovery time and laps are displayed
optionally.)
5. To return to the Time of Day, press and
hold the blue button.
Post Exercise Care
To keep your HRM in top working order, please follow these
simple steps.
1. Wash the transmitter with a mild soap and water solution.
Never use alcohol or alcohol based cleansers.
2. Rinse the transmitter with clean water.
3. Dry the transmitter before storing as this will help to extend
the life of the battery.
4. The elastic strap can be machine washed in cold water with
laundry detergent, and then hung up to dry.
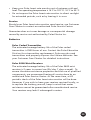
Modes and Their Functions
The Polar E600 HRM has different modes of operation accessible
from the Time of Day display. Besides the Measure mode, which
can be entered by pressing the red button, the other modes can
be accessed by pushing the upper right button.
1. From the Time of Day screen, press the upper right button once
and you will be at the beginning of the File mode. This is
where you will recall all of the data.
2. Press it again and you will be at the Options mode. Entering
this mode will allow you to set the functions of your HRM as
well as time, date, etc.

11
press
upper
right
button
press
upper
right
button
press
upper
right
button
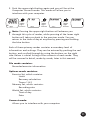
3. Push the upper right button again and you will be at the
Computer Connect mode. This mode will allow you to
interface with your computer.
Note: Pressing the upper right button will advance you
through this cycle of modes, while pressing of the lower right
button will take you back to the previous mode. You can
return to the time of day at anytime by pressing and holding
the blue button.
Each of these primary modes contains a secondary level of
information and settings. They can be entered by pushing the red
button, and scrolled through by using the buttons on the right
side. Below is a brief listing of the contents of each mode. They
will be covered in detail, mode by mode, later in this manual.
File mode contains:
Recorded exercise information
Options mode contains:
Exercise Set, which contains:
Limits
Recovery calculation
Timers 1 & 2
Memory Set, which contains:
Recording rate
Watch Set, which contains:
Time of day
Date
Connect mode:
Allows you to interface with your computer.

12
C. PROGRAMMING
THE WRIST RECEIVER
MANUALLY
Note: You can also upload settings from your computer as
described in the E Series Software Manual. The software
makes programming multiple HRM's simpler and quicker.
Programming the Wrist Receiver Manually, Options Mode
This section describes how to manually program your wrist
receiver by pressing its buttons.
The Options mode is divided into three parts, which are then
further subdivided:
1) Exercise Set: You will be able to set the target heart rate zone
limits, the recovery calculation, and two independent timers.
2) Memory Set: You will be able to set the recording interval.
3) Watch Set: You will be able to set the correct time of day
and date.
Note: Once you have set any of the features below, pressing
and holding the blue button will bring you back to the Time of
Day screen.
Exercise Set
The exercise setting loop is accessed from the Options mode. You
can scroll through the setting loop by pressing either right side
button. The red button will allow you to start programming, and
then lock in your settings. Please see the directions below for
complete instructions.

13
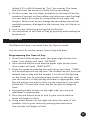
Programming the Target Heart Rate Limits
The E600 allows you to program an ideal heart rate zone within
which your students can exercise. If a student goes above the
upper limit or below the lower limit, the student will be alerted
in two ways: the receiver will begin beeping and the heart rate
display will flash.
1. From Time of Day display, press the upper right button two
times. Your display will read,"OPTIONS".
2. Enter the Options mode by pressing the red button two times.
Your display will read, "Limits", with two rows of numbers
beneath it. These are the upper and lower limits of the zone.
3. Press the red button one time.
The upper limit will begin to flash.
4. Press the upper right button to increase the value of this
number or press the lower right button to decrease it.
5. Once you have reached the number you want, press the red
button once to lock it in. The lower number will now begin
to flash.
6. Press the upper right button to increase the value of this
number or press the lower right button to decrease it.
7. Once you have reached the number you want, press the red
button once to lock it in.
8. At this point you can either return to the Time of Day display
by holding down the blue button, or you can begin to set the
recovery calculation by pressing the upper right button. If this
is your choice, begin with step 3 of the section on programming
the recovery calculation, below.
Note: You can also deactivate the heart rate target zone.
To do this, press and hold the upper left button when you are
in the Limits display. The display will read, "OFF". The limits
are now deactivated. If OFF is flashing, lock it in by pressing the
red button. At this point, continue from step 8.
To reactivate the limits, enter the limits setting mode as
described in steps 1-2. Press and hold the upper right button
and the limits will appear.

14
Finding the target heart rate zone.
To find the target heart rate zone for your students, you’ll need
to estimate their maximum heart rate (HR
max
). To do this, use the
following formula.
220 - the age of the student = (HR
max
)
For the general activities of children, a zone of 70 to 85% of HR
max
has a positive effect on their heart and aerobic fitness, without
being too strenuous.
To find the correct zone:
.70 x HR
max
= (lower limit)
.85 x HR
max
= (upper limit)
Note: If you teach children of different ages, use the average
to estimate their HR
max
, as long as their ages do not vary by
more than three or four years.
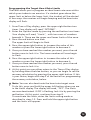
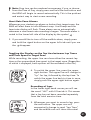
Programming the Recovery Calculation
The E600 will calculate how many beats your heart rate recovers
(drops) in a given amount of time after exertion. The rate at which
the heart can recover is a measure of one’s fitness.
1. From Time of Day display, press the upper right button two
times. Your display will read, "OPTIONS".
2. Enter this mode by pressing the red button twice and then
press the upper right button once. The top line will read,
"Recovery", with a timer in the middle and "On" or "OFF" at
the bottom.
3. Press the red button once more and the bottom row will
begin to flash.
4. Press either right side button to turn the recovery calculation
on or off. (If you choose OFF, you will not be able to set time.)
5. Lock in this choice by pressing the red button. The upper line
will now read, "RecoTime" and the minutes on the middle line
will flash.

15
6. Using either button on the right will alter the value of this
number. Lock in your choice by pressing the red button.
The seconds will now begin to flash.
7. Using either button on the right will alter the value
of this number.
8. Lock in your choice by pressing the red button.
At this point you can either return to the Time of Day display by
holding down the blue button, or you can press the upper right
button one time to set Timer 1. If this is your choice, begin with
step 3 below.
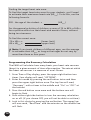
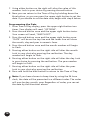
Programming Timer 1 and Timer 2
Your E600 heart rate monitor comes with two interval timers. This
feature can be used to alert your students to switch exercise stations
or to go from warm up, to exercise, to cool down. If you are
coaching athletes, you can use these timers to regulate the length of
their hard efforts and the duration of their recovery in between.
Once set, the first timer will begin when the stopwatch is started
in the measuring mode. When Timer 1 is finished the receiver will
beep and Timer 2 will automatically start. When Timer 2 is
finished the monitor will sound a different beep and Timer 1 will
automatically begin again, and so on.
1. From the Time of Day display, press the upper right button two
times. Your display will read, "OPTIONS".
2. Enter this mode by pressing the red button twice and then
press the upper right button twice. The top line will read,
"Timer 1", the middle will show a timer and "On" or "OFF"
at the bottom.
3. Press the red button once more and the bottom line will
begin to flash.
4. Press either right side button to turn the timer on or off.
(If you set the timer off, you will not be able to set the time.)
5. Lock in this choice by pressing the red button. The minutes
in the middle line will begin to flash.
6. Using either button on the right will alter the value of this
number. Lock in your choice by pressing the red button.
The seconds will now begin to flash.

16
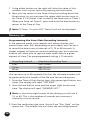
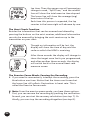
Memory Set
Programming the Heart Rate Recording Intervals
In the measure mode, your receiver will always display your
current heart rate. But, depending on your needs, you can set it
to record the heart rate at intervals of 5, 15 or 60 seconds. A
longer interval will give you more recording time, but a shorter
interval will allow you to capture more heart data in a given
amount of time. The preprogrammed setting is 15 seconds.
Recording Interval Maximum Recording Time
5 sec 22h 10 min
15 sec 66h 32 min
60 sec 99h 59 min
You can save up to 99 separate files but the ultimate number will
be governed by the length of the file and the recording rate.
1. From the Time of Day display, press the upper right button two
times. The display will read, “OPTIONS.”
2. Press the red button once and the upper right button one
time. The display will read, “MEMORY SET.”
Note: In the lower right corner of the display you will see 5,
15, or 60. This is the number of seconds your receiver is
currently set at to record.
3. Press the red button one time. You will see “Rec. Rate” on the
upper line. The middle line will show the recording interval
7. Using either button on the right will alter the value of this
number. Lock in your choice by pressing the red button.
8. Now you can return to the Time of Day by holding down the
blue button, or you can press the upper right button once to
set Timer 2. This timer is set in exactly the same way as Timer 1.
When you have set Timer 2, press and hold the blue button to
return to the Time of Day.
Note: If Timer 1 is set to OFF, Timer 2 will not be displayed.

17
(either 5,15 or 60) followed by “Sec” for seconds. The lower
line will show the amount of time left for recording.
4. On this screen, the only digits available for setting will be the
number of seconds on the middle row (which are now flashing).
You can adjust this value by using either of the right side
buttons. Notice that as you change the recording interval the
available memory, displayed on the bottom line, will shrink or
expand.
5. Lock in your choice by pressing the red button.
6. You can return to the Time of Day by pressing and holding the
blue button.
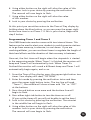
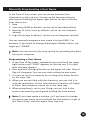
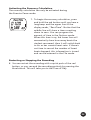
Watch Set
The Watch Set loop is accessed from the Options mode.
You can use it to set the correct time of day and date.
Programming the Time of Day
1. From Time of Day display, press the upper right button two
times. Your display will read, "OPTIONS".
2. Press the red button once and the upper right button twice.
Your screen will read, "WATCH SET".
3. Enter this mode by pressing the red button two times. "TIME"
will be displayed on the top row. The middle line will show the
default time of day and the number 12 or 24 will be flashing
on the lower line. By pressing either button on the right side
you can switch it to the setting whichever is appropriate. Press
the red button one time to lock in your selection. If you have
picked the 12 hour time clock, the am (or pm) will beginto
flash.
4. By pressing either button on the right side, you can pick
whichever is appropriate.
5. Press the red button once to lock in your choice and the
hours will begin to flash.
6. Using either button on the right will alter the value of this
number. Lock in your choice by pressing the red button.
The minutes will begin to flash.

18
7. Using either button on the right will alter the value of this
number. Lock in your choice by pressing the red button.
8. Now you can return to the Time of Day by holding down the
blue button, or you can press the upper right button to set the
date. If you decide to set the date now, begin with step 4 below.
Programming the Date
1. From Time of Day display, press the upper right button two
times. Your display will read, "OPTIONS".
2. Press the red button once and the upper right button twice.
Your screen will read, "WATCH SET".
3. Press the red button once and the upper right button once.
"DATE" will be on the top line and the lower line will show
the month, day and year in numeric form.
4. Press the red button once and the month number will begin
to flash.
5. Pressing either button on the right side will alter the month.
Lock in your choice by pressing the red button. The day
number will begin to flash.
6. Pressing either button on the right side will alter the day. Lock
in your choice by pressing the red button. The year number
will begin to flash.
7. Pressing either button on the right side will alter the year.
Lock in your choice by pressing the red button.
8. Press and hold the blue button to return to the Time of Day.
Note: If you have chosen to keep time by using the 24 hour
clock, the date will be presented in a different order. The order
will now be day, month, year. Regardless of order, you can set
the date by the directions above.

19
Manually Programming a User Name
In the Time of Day screen, you can choose between four
alternatives in the top row. You can switch between them by
pressing and holding the upper right button for each selection.
Your choices are:
1. Date
2. User name (E600 as default, can be set as described below)
3. Monitor ID (set to zero by default, can be set via Computer
Upload)
4. Logo (Polar logo as default, can be set via Computer Upload)
You can manually program a user name into your E600. For
example, if you teach at George Washington Middle School, you
might put "GWMS".
Note: You can also do this more quickly by uploading this data
from your computer.
Programming a User Name
1. In the Time of Day screen, repeatedly press and hold the upper
right button until "E600" appears on the top row. (It is right
after the date display.)
2. Press and hold the signal button on the upper left side. Time of
Day will disappear. You can now start setting the user name.
3. You can set the first character by scrolling with either button
on the right side.
4. When you are satisfied with the character, you can lock it in
with the red button. At this time the next character will begin
to flash. Each character can be set in the same way.
5. When everything is set to your liking, you can lock in the
entire user name by pressing and holding the blue button.
Note: If you have made a mistake, or if you want to change
the entire user name, press and hold the blue button to get to
the Time of Day, and start again from step one.

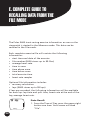
20
D. COMPLETE GUIDE TO
MEASURING HEART RATE
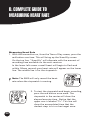
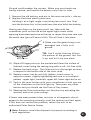
Measuring Heart Rate
1. With the transmitter on, from the Time of Day screen, press the
red button one time. This will bring up the Stand By screen.
On the top line, "Stand By" will alternate with the amount of
recording time available on the wrist receiver.
In the lower left corner a small heart will begin to flash and
within fifteen seconds your heart rate will appear on the lower
line. The middle line is for the stopwatch.
Note: The E600 will only record the heart
rate when the stopwatch is running.
2. To start the stopwatch and begin recording,
press the red button once more. The
stopwatch in the center will show the
elapsed exercise time. Notice that the
upper row is labeled "Tz". This line will
show the accumulated time that the
student stays in his or her target zone.
Page is loading ...
Page is loading ...
Page is loading ...
Page is loading ...
Page is loading ...
Page is loading ...
Page is loading ...
Page is loading ...
Page is loading ...
Page is loading ...
Page is loading ...
Page is loading ...
Page is loading ...
Page is loading ...
Page is loading ...
Page is loading ...
Page is loading ...
Page is loading ...
Page is loading ...
Page is loading ...
Page is loading ...
Page is loading ...
Page is loading ...
Page is loading ...
Page is loading ...
-
 1
1
-
 2
2
-
 3
3
-
 4
4
-
 5
5
-
 6
6
-
 7
7
-
 8
8
-
 9
9
-
 10
10
-
 11
11
-
 12
12
-
 13
13
-
 14
14
-
 15
15
-
 16
16
-
 17
17
-
 18
18
-
 19
19
-
 20
20
-
 21
21
-
 22
22
-
 23
23
-
 24
24
-
 25
25
-
 26
26
-
 27
27
-
 28
28
-
 29
29
-
 30
30
-
 31
31
-
 32
32
-
 33
33
-
 34
34
-
 35
35
-
 36
36
-
 37
37
-
 38
38
-
 39
39
-
 40
40
-
 41
41
-
 42
42
-
 43
43
-
 44
44
-
 45
45


Polar E 600 Owner's manual
- Category
- Heart rate monitors
- Type
- Owner's manual
- This manual is also suitable for
Ask a question and I''ll find the answer in the document
Finding information in a document is now easier with AI
Related papers
Other documents
-
Polar Electro E30 User manual
-
BLADEZ E600 Owner's manual
-
Vision Fitness VF-II Owner's manual
-
-
Seiko S351 Operating instructions
-
Harbor Freight Tools Watch Case Press with Nylon Dies User manual
-
Polar Electro RS300X User manual
-
-
-
Suunto Vector HR User guide