Page is loading ...

INSTALLATION AND OPERATION
MANUAL FOR SERIAL/AUDIO MODEL

LIMITED WARRANTY
Rose Electronics warrants CrystalView to be free from defects in materials and
workmanship and in good working order for a period of one year from the date of
purchase from Rose Electronics or an authorized dealer. Should this product fail
to be in good working order at any time during this one-year warranty period,
Rose Electronics will, at its option, repair or replace the Unit as set forth below.
Repair parts and replacement units will be either reconditioned or new. All
replaced parts or Units become the property of Rose Electronics. This limited
warranty does not include service to repair damage to the Unit resulting from
accident, disaster, abuse, static discharge, power surges, or unauthorized
modification of the Unit.
Limited Warranty service may be obtained by delivering this Unit during the one
year warranty period to Rose Electronics or an authorized repair center with
proof of purchase. If this Unit is delivered by mail, you agree to insure the Unit or
assume the risk of loss or damage in transit, to prepay shipping charges to the
warranty service location, and to use the original shipping container or its
equivalent. Please contact Rose Electronics for return authorization. Under no
circumstances will a Unit be accepted without prior authorization. Contact an
authorized repair center or Rose Electronics for further information.
All expressed and implied warranties for this product including the warranties of
merchantability and fitness for a particular purpose are limited in duration to a
period of one year from the date of purchase, and no warranties, whether
expressed or implied, will apply after this period.
Some states do not allow limitations on how long an implied warranty lasts, so
the above limitation may not apply to you.
If this product is not in good working order as warranted above, your sole remedy
shall be repair or replacement as provided above.
In no event will Rose Electronics be liable to you for any damages including any
lost profits, lost savings or other incidental or consequential damages arising out
of the use of or the inability to use such product, even if Rose Electronics or an
authorized dealer has been advised of the possibility of such damages, or for any
claim by any other party.

LIMITED WARRANTY
Copyright
Rose Electronics 1990-2001. All rights reserved.
No part of this manual may be reproduced, stored in a retrieval system, or transcribed in any form or
any means, electronic or mechanical, including photocopying and recording, without the prior written
permission of Rose Electronics.
Rose Electronics Part # MAN-CRV/SER
Printed In the United States of America
Some States do not allow the exclusion or limitation of incidental or
consequential damages for consumer products, so the above may not apply to
you. This warranty gives you specific legal rights and you may also have other
rights that may vary from state to state.
NOTE: This equipment has been tested and found to comply with the limits for a
Class A digital device, pursuant to Part 15 of the FCC Rules. These limits are
designed to provide reasonable protection against harmful interference when the
equipment is operated in a commercial environment. This equipment generates,
uses, and can radiate radio frequency energy and, if not installed and used in
accordance with the instruction manual, may cause harmful interference to radio
communications.
Operation of this equipment in a residential area is likely to cause harmful
interference in which case the user will be required to correct the interference at
his own expense.
IBM, AT, XT and PS/2 are trademarks of International Business Machines Corp.
IntelliMouse, Microsoft and Microsoft Windows are registered trademarks of
Microsoft Corp.
MAC is the trademark of Macintosh Corp.
Pentium is a registered trademark of Intel Corporation.
Any other trademarks mentioned in this manual are acknowledged to be the
property of the trademark owner.

FCC/IC STATEMENTS, EU DECLARATION OF CONFORMITY
FEDERAL COMMUNICATIONS COMMISSION AND INDUSTRY CANADA
RADIO-FREQUENCY INTERFERENCE STATEMENTS
This equipment generates, uses and can radiate radio frequency energy and if
not installed and used properly, that is in strict accordance with the
manufacturer’s instructions, may cause interference to radio communication. It
has been tested and found to comply with the limits for a Class A computing
device in accordance with the specifications in Subpart J of Part 15 of FCC rules,
which are designed to provide reasonable protection against such interference
when the equipment is operated in a commercial environment. Operation of this
equipment in a residential area is likely to cause interference, in which case the
user at his own expense will be required to take whatever measures may be
necessary to correct the interference.
Changes or modifications not expressly approved by the party responsible for
compliance could void the user’s authority to operate the equipment.
This digital apparatus does not exceed the Class A limits for radio noise emission
from digital apparatus set out in the Radio Interference Regulation of Industry
Canada.
Le présent appareil numérique n’émet pas de bruits radioélectriques dépassant
les limites applicables aux appareils numériques de la classe A prescrites dans
le Règlement sur le brouillage radioélectrique publié par Industrie Canada.
EUROPEAN UNION DECLARATION OF CONFORMITY
This equipment complies with the requirements of the European EMC directive
89/336/EEC in respect of EN55022 (Class B), EN50082-1 and EN60555-2
standards and the Low Voltage Directive.

TABLE of CONTENTS
I
Contents
Quick Start Guide................................................................................................. 1
Introduction........................................................................................................... 6
Features............................................................................................................7
Compatibility...................................................................................................... 8
Package Contents.............................................................................................9
Rose Electronics Web Site................................................................................9
About this Manual.............................................................................................. 9
System Overview................................................................................................ 10
CrystalView Models............................................................................................13
CrystalView Cables............................................................................................13
Installation.......................................................................................................... 16
Step 1: Setting the Cable Length Jumpers......................................................16
Step 2: Connecting the Cables........................................................................19
Step 3: Applying Power ................................................................................... 20
Step 4: Adjusting Video Compensation...........................................................20
Installing Serial Devices................................................................................... 22
Installing Audio Devices...................................................................................23
User Selectable Settings .................................................................................24
Operating Instructions- All Units.........................................................................26
Operating Instructions – Dual Unit...................................................................... 26
KVM Switching ................................................................................................26
Private Mode (Dual model only) ......................................................................27
Out-of-Sync Mouse.......................................................................................... 27
Hot Key Summary ...........................................................................................28
Enter Private Mode (Dual models only) ........................................................28
Reset Keyboard/Mouse ................................................................................28
Send Null Mouse Command.........................................................................28
Troubleshooting..................................................................................................29
Service Information.............................................................................................33
Maintenance and Repair..................................................................................33
Technical Support............................................................................................33
Safety.................................................................................................................34
Safety and EMC Regulatory Statements.........................................................35
Glossary.............................................................................................................44
Index...................................................................................................................45

TABLE of CONTENTS
II
Figures
Figure 1. Typical Installation...............................................................................12
Figure 2. CrystalView Serial/Audio Model ..........................................................13
Figure 3. CrystalView Rear Connectors .............................................................15
Figure 4. CrystalView Remote PCB (w/Daughter board)....................................18
Tables
Table 1. Compatibility...........................................................................................8
Table 2. SW1 Switch Setting..............................................................................24
Table 3. Hot Key Summary ................................................................................28
Appendixes
Appendix A. General Specifications...................................................................37
Appendix A1. Serial Option Specifications .........................................................38
Appendix A2. Audio Option Specifications .........................................................38
Appendix B. UTP/STP Connection..................................................................... 39
Appendix C. Parts and Cables ...........................................................................40
Appendix D. Firmware Updates..........................................................................41
Appendix E. Video Compensation...................................................................... 41
Appendix F. Rack Mount Instructions.................................................................42
Appendix G. Rack Mount Illustration ..................................................................43

QUICK START
CrystalView Installation and Operations Manual
1
Quick Start Guide
Step 1- Set Jumpers
(See Page 16 for details)
1. Remove case on Remote Unit, exposing the PCB.
2. Orient PCB with the cable connections away from you.
3. Set JP3, JP4, and JP5 according to the CAT-5 cable length used.
4. If you are using a non-powered microphone, install the “MIC” jumper on the
daughterboard.
5. Set Sharp and Bright controls fully counterclockwise.

QUICK START
CrystalView Installation and Operations Manual
2
Step 2 – Connect Local Units Cables
(See Page 19 for details)
1. Connect CPUs keyboard, Video, and Mouse ports to the Local Unit.
2. Connect CPUs DB9 serial port to the Local Units serial connector.
3. Connect CPUs sound cards “LINE OUT” to the Local Units “LINE IN”
connector.
4. Connect CPUs sound card “MIC” input to the Local Units “LINE/MIC OUT”
connector.

QUICK START
CrystalView Installation and Operations Manual
3
Step 3 – Connect Remote Units Cables
(See Page 19 for details)
1. Connect KVM station to Remote Unit.
2. Connect speakers or headphones to Remote Units “LINE OUT” connector.
3. Connect Microphone to Remote Units “LINE/MIC IN” connector.
4. Connect serial device to Remote Units “SERIAL” connector.
5. Connect power transformer to 110V/220V source and to Remote Units 9V
DC power input jack.

QUICK START
CrystalView Installation and Operations Manual
4
Step 4– Connect CAT-5 Cable
(See Page 19 for details)
1. Connect Local Unit to Remote Unit with up to 1,000 feet of CAT-5 UTP/STP
“Solid Core” cable.

QUICK START
CrystalView Installation and Operations Manual
5
Remote Unit
Step 5 – Adjust the Video Compensation
(See Page 20 for details)
Turn Bright and Sharp controls fully counterclockwise. Boot the CPU and start a
windows application. Look at the right edge of large horizontal objects (title bar) and if
there is black smearing on this edge, the Video is under compensated. Rotate the
Sharp control clockwise until the smearing disappears and the edge starts to become
very bright. At this point, the Units’ Video is overcompensated. Rotate the Sharp
control counterclockwise until the edge has no smearing or over brightness. The Video
compensation is now adjusted correctly.
The Bright control adjusts the brightness of the overall picture. Adjust the Bright
control to suit your needs. The Sharp control may have to be slightly readjusted after
adjusting the Bright control.

INTRODUCTION
CrystalView Installation and Operations Manual
6
Introduction
Thank you for choosing the Rose Electronics
CrystalView
KVM station
extender. The CrystalView is the result of Rose Electronics commitment to
providing state-of-the-art solutions for today’s demanding workplace. The
CrystalView has proven to be a valuable investment for all businesses, big and
small, that has the need to access CPUs from Remote locations.
Please refer to the Safety section first before proceeding with any installation or
configuration of the CrystalView.
The CrystalView system consists of two units, a Local Unit and a Remote Unit.
The Local Unit connects to your CPU and the Remote Unit connects to the
Keyboard, Video monitor and Mouse or KVM station. The Local and Remote
Units are connected together with up to 1,000 feet of industry standard CAT-5
shielded or unshielded, solid core, twisted-pair cable terminated with RJ45
connectors. You can order the CAT-5 cable from Rose Electronics in 25 – 1,000
feet lengths.
Video brightness and sharpness controls and Video equalization settings on the
Remote Unit adjust to compensate for image quality loss over long cable lengths.
Using the CrystalView to remotely access your computer has several
applications that make it convenient for the users. You can access computers
from up to 1,000 feet away, locate your computers in a secure area and access
them from other unsecured areas and computers used in hazardous industrial
environments can be accessed remotely, keeping the users safe and unexposed
to any hazards.
NOTE: A
K
eyboard,
V
ideo monitor and
M
ouse are referred to throughout this
manual as a
KVM
station.

INTRODUCTION
CrystalView Installation and Operations Manual
7
With the CrystalView, you can reduce noise and heat, increase desk and floor
space, place all of your computers in a common area, allowing for convenient
maintenance and simplified electrical requirements for the workplaces and
computer areas.
Features
• Locate a KVM station away from a CPU with up to 1,000 feet of CAT-5
twisted pair, solid core cable.
• Supports PS/2 Keyboard/Mouse and all PC Video formats.
• Video resolutions up to 1024 x 768 at 1,000 feet, 1280 x 1024 at 300
feet.
• Video brightness and sharpness controls on the Remote Unit adjust
brightness and clarity.
• The CrystalView uses a microprocessor to emulate the Keyboard and
Mouse for plug and play operation. Keyboard and Mouse on the
Remote Unit do not have to be connected for the PC to boot; only the
Local Unit must be connected to the PC.
•
Compatible with the Rose Electronics family of KVM switches such as
ServeView, UltraView and UltraMatrix.
• Compatible with Windows, Windows NT, OS/2, Unix, Linux and other
operating systems.
• Fully automatic KVM sharing on a first-come first-serve basis using the
dual model.
• On a Dual Unit, computers Video is displayed on both KVM stations
monitors except in the private mode.
• Local or remote KVM station can inhibit the other KVM station.
• Plug and Play Serial and Audio options.
• Many serial devices like a Touchscreen can plug directly into the
Remote Unit.
• Stereo audio can be transmitted in either direction across the CAT5
link simultaneously.
•
Rack mount kits available in 19”, 23” and 24” sizes.

INTRODUCTION
CrystalView Installation and Operations Manual
8
Compatibility
Computers
PCs with standard PC Keyboards and PS/2 mice,
286, 386, Pentium, etc.
Monitors
VGA, Super VGA
XGA
RGB (sync on green)
Keyboards
US, International and Japanese with or without Windows keys
(101, 102, 104, 105, 106, 109 keys)
(Some older XT/AT auto-sensing Keyboards may not be
compatible.
Mouse
Standard PS/2 Mouse
Microsoft IntelliMouse
Logitech 3-buton PS/2 Mouse
Serial Devices
Touchscreen
Serial printers/plotters
Computer Terminals
Serial Mouse
Other standard asynchronous serial devices
Audio
Compatible sound cards
Amplified or non-amplified microphone
Amplified stereo computer speakers
Other audio devices that transmit/receive signals less than 5
volts peak-to-peak.
Table 1. Compatibility

INTRODUCTION
CrystalView Installation and Operations Manual
9
Package Contents
The package contents consists of the following:
• The CrystalView Local/Remote Units.
• HD15FF gender changer (Installed on local unit)
•
Power transformer for Remote Unit.
• Installation and operations manual.
CPU, Serial, Audio and CAT-5 cables are usually ordered separately. If the
package contents are not correct, contact Rose Electronics or your distributor so
the problem can be quickly resolved.
Rose Electronics Web Site
Visit our web site at www.rose.com for additional information on CrystalView and
other products offered by Rose Electronics that are designed for server room and
data centers applications, classroom environments and many other switching
applications.
About this Manual
This manual covers the installation and operation of the CrystalView serial and
audio model.

SYSTEM OVERVIEW
CrystalView Installation and Operations Manual
10
System Overview
The CrystalViews two Units, (Local and Remote) work together to extend the
distance between a KVM station and a CPU. Up to 1,000 feet of
CAT-5 cable can be used to connect the two units.
The Local Unit connects to a CPUs Keyboard, Video, and Mouse ports with the
appropriate CPU cable. The Local Unit communicates data from the Remote Unit
to the CPU and CPU to the Remote Unit. Power is provided to the Local Unit
from the Keyboard port of the CPU, eliminating the need for an external power
source. The Local Unit is available in two versions, a Single Unit and a Dual Unit.
The Dual Unit allows for a second KVM station to be connected to the Local Unit.
The Remote Unit connects directly to the PS/2 Keyboard, Video monitor and the
PS/2 Mouse cables of your KVM station. The Remote Unit sends Keyboard, and
Mouse signals to the Local Unit, which in turn, sends the signals to the CPU.
The Remote Unit adjusts Video brightness and sharpness and provides Video
equalization settings to enhance the image quality. Power is supplied to the
Remote Unit from an external power transformer.
Both the Single and Dual models have serial and audio capabilities. The audio
option allows you to transmit the “Line Out” audio from a CPUs sound card to
speakers or headphones connected to the Remote Unit. You can also connect a
microphone to the “Line In” connector on the Remote Unit.
The Serial option allows the CPUs DB9 serial ports data to be transmitted to the
Remote Units serial connector.
Figure 1 shows a typical configuration using stereo audio speakers, a
microphone and a serial device. The installation section explains the proper way
to connect and install these.

SYSTEM OVERVIEW
CrystalView Installation and Operations Manual
11
Changing SW1 position 2 can change the default “Hot Key” from the right control
key to the left control key.
See Table 3 for the ”Hot Key” summary.
If you need advice in designing your system layout or have a special request,
contact Rose Electronics by phone or e-mail to discuss your particular remote
accessing needs.
The CrystalView uses a “Hot Key” that establishes communication to the
CrystalView and not the CPU. The default “Hot Key” is the right control key.
To communicate instructions to the CrystalView, press and release the “Hot
Key” and within 2 seconds issue the needed command.
Example:
If you want to enter the Private Mode on a Dual model CrystalView, first press
and release the right control key and within 2 seconds press the Scroll Lock
key. This will place the unit in the Private mode. To exit the private mode,
press and release the right control key and within 2 seconds, press the Scroll
Lock key again.

SYSTEM OVERVIEW
CrystalView Installation and Operations Manual
12
In this configuration, the local unit can be either a Dual or Single model.
Figure 1. Typical Installation
A powered or non-powered microphone can be connected to the Remote Units
“Line In” connector. The Local Unit “Line Out” is connected to the MIC input on
the CPUs sound card.
A standard DB9MF serial cable is used to connect the serial port on the Local
Unit to the DB9 serial port on the CPU. A serial device is then connected to the
Serial port on the Remote Unit.
Custom cables are available, contact Rose’s technical support for assistance.

MODELS/CABLES
CrystalView Installation and Operations Manual
13
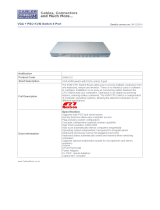
CrystalView Models
(Top) Remote Unit – (Middle) Single Local Unit – (Bottom) Dual Local Unit
Figure 2. CrystalView Serial/Audio Model
CrystalView Cables
CrystalView Local Unit to CPU Cables
CPU cables connect from the Local Unit to a CPUs Keyboard, monitor and
Mouse ports. The most common CPU cable used for connecting to a CPU is a
male-to-male cable configured with a HD15 VGA connector and a PS/2
Keyboard and Mouse connector on both ends.
CrystalView Remote Unit to KVM station Cable
The Keyboard, monitor, and Mouse cables on a KVM station can connect directly
to the CrystalView Remote or Local Units connectors if they are a HD15 Video
connector and PS/2 Keyboard and Mouse connectors.

MODELS/CABLES
CrystalView Installation and Operations Manual
14
CrystalView to Rose switch Cable
To connect a CrystalView Unit to a Rose switch such as a ServeView,
UltraMatrix or UltraView, use Rose cable part number
CAB-CX0606Cnnn. This cable is configured with a DB25M connector on one
end and a VGA connector, PS/2 Keyboard and PS/2 Mouse connector on the
other end. A HD15 gender changer (included) must be used on the Video
connector.
Local Unit to Remote Unit Cable
To connect the Local Unit to the Remote Unit, use up to 1,000 feet of standard
CAT-5 UTP/STP “solid core” cable terminated with RJ45 connectors. Connect
this cable into the “Twisted Pair Link” connector on the local and remote unit.
CrystalView has been tested with all major makes of CAT-5 cables, including
BICC-VERO
, Mohawk
and AT&T
.
CrystalView has also been tested on CAT-3 cable and on pairs within a 25-pair
UTP trunk cable.
Serial Cables
CrystalView models with the serial option are configured with (DCE) DB9 female
connector on the Local Unit and (DTE) DB9 male connector on the Remote Unit.
A standard DB9 Male-Female cable is used between the Local Unit and the
CPUs DB9 serial port.
Typical applications for the serial link are touchscreens, serial printers and
industrial controls. If a null-modem cable is required, it must be connected to the
remote units serial connector.
Audio Cables
CrystalView models with the audio option are configured with two 3.5mm stereo
jacks on both the Local and Remote Unit. Standard 3.5mm stereo audio cables
are used to connect between the Local Units “Line In” connector and a sound
card’s “Line Out” connector. The Remote Units “Line Out” connects to a pair of
computer speakers.
See Appendix C. Parts and Cables for a list of cable part numbers.
/