Page is loading ...

Atomic Projection Clock
with Temperature
(PCR11ELW)
USER MANUAL
INTRODUCTION
Thank you for selecting the Honeywell Atomic Projection Clock
with Temperature. This device includes precise time keeping,
alarm, moonphase, temperature monitoring and projection
features that you can use from the comfort of your home.
In this package you will find:
¥ Atomic Projection Clock with Temperature
¥ AC/DC adaptor
Please keep this manual handy as you use your new item. It
contains practical step-by-step instructions, as well as technical
specifications and precautions you should know.

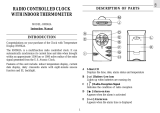
Battery cover
SNOOZE/ Backlight/ Projection Light key
+ / — key
MODE key
Rotate
key
Flip
key
Focus
key
Projector Lens
Adjustable
projector
Adapter
socket
ALARM 2
ALARM 1
ROTATE
FOCUS
FLIP
DC 3V
CONTINUE
PROJECTION
LIGHT / SNOOZE
Continuous
Projection
key
MODE
PM
DATE
MONTH
2
SET
1
SET
ATOMIC CLOCK
FEATURES
*Current time image is projected onto the wall or ceiling in
bright red digits.
* Precise time and date are set via RF signal from the US
Atomic Clock in Colorado.
*US map with designated Time Zones
* Projected image rotation, flip and focus control
*Calendar displays date with month
*Weekday in English, Spanish and French
* Indoor temperature
*Moon phase display
*Dual crescendo alarm with snooze
*Blue backlight

1
2
3
4
DISPLAYING PROJECTED INFORMATION CONTINUOUSLY
Connect AC/DC adapter as shown below.
Battery cover
Battery
compartment
Please make sure your household voltage matches the voltage
supported by the adapter, or it will damage your clock and adapter.
Use 2 X AA, 1.5V batteries and AC-DC adapter
(AC120V, 60Hz-DC3V, 100mA) included.
Important:
ROTATE
FOCUS
FLIP
SIZE AA/UM3
SIZE AA/UM3
DC 3V
CONTINUE
PROJECTION
MODE
PM
DATE
MONTH
2
SET
1
SET
ATOMIC CLOCK

GETTING STARTED
*After batteries are installed, the WWVB time
signal receiver will automatically search for the
time signal. This will take about 5 – 8 minutes.
Always place clock by the window for better
reception.
*If the radio signal is received, the date and time will
be set automatically and the icon [ ] will appear.
*If after 8 minutes the time signal has not been
received, press the “MODE” button to set the
time manually. The clock will continue to search
for the WWVB time signal daily from 1:00am
to 4:30am. When the signal has been successfully
received, the time and date will be updated
automatically.
PM
DATE
MONTH
Z
Z
INDICATOR STANDING FOR STANDING FOR
INDICATOR
RADIO SIGNAL
DATE
ALARM 1
ALARM 2
TIME ZONES
PM (12 HR DISPLAY ONLY)
AM
AM (12 HR DISPLAY ONLY)
MONTH
MOONPHASE
DEGREE CELSIUS
DEGREE FAHRENHEIT
REPEAT ALARM INDICATION
1
2
ATOMIC TIME AND WWVB SIGNAL
The NIST (National Institute of Standards and Technology) radio
station is located in Ft. Collins Colorado. It transmits an exact time
signal continuously throughout the continental United States at
60 KHz frequency. The Atomic Projection Clock with Temperature
can receive this WWVB signal through its internal antenna from up
to 2,000 miles away. Due to the nature of the Earth’s ionosphere,
reception can be limited during the daylight hours. The radio
controlled clock will search for an alternate station that derives its
signal from the NIST Atomic clock in Boulder, Colorado.
The WWVB tower icon on the main unit’s display will flash
indicating radio signal reception from the WWVB station. If the
tower icon is not fully lit, or if the time is not set automatically,
please consider the following:
* During night-time hours, atmospheric disturbances are typically less
severe and reception may be improved. A single daily reception is
sufficient enough to keep the clock accuracy reading within 1 second.
* Make sure the main unit is positioned at 8 feet minimum distance
from any interference source such as a TV, computer monitor,
microwave, etc.
* The successful reception of the atomic time signal depends on the
positioning and location of the clock. Always place the main unit
by the window for better reception.
* Within concrete wall rooms such as basements or office buildings,
the received signal may be weakened. Always place the unit
near the window.
PM
PM
AM
AM
Z
Z
DATE
MONTH YEAR
1
2
ALARM 2
ALARM 1
PM
PM
AM
AM
Z
Z
DATE
MONTH YEAR
1
2
ALARM 2
ALARM 1

SETTING TIME AND DATE MANUALLY
The time piece date and time can be set by pressing and holding the
MODE buttons for 3 seconds in Time/Temperature display with the
atomic time receiver disabled. To disable atomic time receiver, press
and hold [ — ] key until the atomic reception icon will appear from
the display.
DISPLAYING TEMPERATURE AND ALARMS
*Press MODE to display the ALARM 1 time:
*Press MODE again to display the Alarm 2 time:
*Press MODE the third time to display the
Temperature:
Setting the Time
*
Press MODE
: the year digits will flash and year can
be set by pressing UP [+] or
DOWN [—] key.
*Press MODE one last time: the normal time
display appears.
*
Press MODE again
: the month digits will flash and
month can be set by pressing
UP [+] or DOWN [—] key.
*
Press MODE again
:the date digits will flash and
date can be set by pressing
UP [+] or DOWN [—] key.
*
Press MODE again
:the hour digits will flash and
hour can be set by pressing
UP [+] or DOWN [—] key.
*
Press MODE again
:
the minute digits
will flash
and
minute can
be set by pressing
UP [+] or DOWN [—] key.
*
Press MODE again:
the temperature display between
Celsius or Fahrenheit will flash
and measurement unit can be set
by pressing UP [+] or
DOWN [—] key.
DATE
MONTH
DATE
MONTH
PM
ALARM 1
PM
ALARM 2
PM
DATE
MONTH YEAR
DATE
MONTH YEAR
DATE
MONTH YEAR
DATE
MONTH YEAR
DATE
MONTH YEAR
DATE
MONTH
DATE
MONTH
DATE
MONTH

ALARM 2 setting
-In the ALARM 2 Display,
*Press and hold SET 2 for about 3 seconds: the alarm hour digits will
flash and alarm hour can be set by pressing UP [+] or DOWN [–] key.
*Press SET 2 again: the alarm minute digits will flash and minute
can be set by
pressing
UP [+] or DOWN [–] key.
*Press SET 2 for the third time, the alarm minute digits “04” will
flash to set snooze time interval. Press UP [+] or DOWN [–] key to
set the required time period.
*Press SET 2 again, the Alarm 2 time is set and the [ ] icon will
turn on.
Enable Alarm 1/Alarm 2:
*Press SET 1 to enable ALARM 1 with
[ ] icon to enabled.
*Press SET 2
to enable ALARM 2 with
[ ] icon to turned on.
1
2
2
SETTING 12 OR 24 HOUR TIME FORMAT
*Pressing "+" will display time in 12 or 24 hour format.
N.B.:1. If no key pressed within 30 seconds, the clock returns to the
Time / Temperature Display setting.
2. During any programming press and hold UP [+] or DOWN [–]
key for 2 seconds for faster scrolling through the digits.
Calendar
To change the weekday display from one language to another, press
and hold DOWN [–] key for 3 seconds - the display will show the
current language
To set weekday on another language, press & Hold DOWN key for
2 seconds.
SETTING ALARMS
ALARM 1 setting
-In the ALARM 1 Display:
*Press and hold SET 1 for about 3 seconds: the alarm hour digits will
flash and then hour can be set by pressing UP [+] or DOWN [–] key.
*Press SET 1 again: the alarm minute digits will flash and then minute
can be set by pressing UP [+] or DOWN [–] key.
*Press SET 1 the third time, and the alarm minute digits “04” will flash
to set snooze time interval. Press UP [+] or DOWN [–] key. key to set
the required time period.
*Press SET 1 again, the Alarm1 time is set and [ ] icon will be displayed.
1
PM
PM
AM
AM
Z
Z
DATE
MONTH YEAR
1
2
ALARM 2
ALARM 1
PM
PM
AM
AM
Z
Z
DATE
MONTH YEAR
1
2
ALARM 2
ALARM 1

Time Zone setting
*Press and hold UP (+) key for 3 seconds, to select the corresponding
time zone.
*Keep holding the UP (+) button to switch to the time zone in
the following sequence:
Pacific time Mountain time Central time Eastern time.
Press MODE to confirm the selected Time Zone
EL Backlight ON / OFF (PCR11ELW)
*Press top button 1 [LIGHT / SNOOZE] key-light and EL
backlight will come on and turns off after 5 seconds.
Projection Light and Adjustment
*Press button 1 [LIGHT / SNOOZE]- projection light will come on
and turn off after 5 seconds.
*After adapter is connected and "CONTINUE - PROJECTION"
button is pressed, the projection light will be enabled for continuous
projection.
*Turn the 4 [FOCUS] key knob to adjust the focus of projected image.
*Press 3 [FLIP] key to rotate the projection image 180˚ clockwise.
*Turn the 2 [ROTATE] key knob to rotate the image manually.
Activating the Alarm
When the ALARM 1 or ALARM 2 is ringing, the relative alarm icon
[ ] or [ ]
will be flashing.
* Press SET1 / SET2 key to turn the alarm off.
* Press button 1 - alarm stops and the backlight will turn on for 5 seconds
with the repeat alarm indicator ( ) flashing.
* If the alarm is not turned off, it will stop in 4 minutes.
1
2
Z
Z
CARE OF YOUR ATOMIC PROJECTION CLOCK
WITH TEMPERATURE
This product is engineered to give you years of satisfactory service
if you handle it carefully. Here are a few precautions:
1. Do not immerse the unit in water.
2. Do not use any corrosive cleanser or chemical solution on the unit.
They may scratch the plastic parts and corrode the electronic circuit.
3. Do not subject the unit to excessive force, shock, dust,
temperature or humidity, which may result in malfunction,
shorter electronic life span, damaged batteries and distorted parts.
4. Do not tamper with the unit’s internal components. Doing
so will invalidate the warranty on the unit and may cause
unnecessary damage. The unit contains no user-serviceable parts.
MOON PHASE INDICATOR
Displayed in accordance with the calendar
New
Moon
Waning
Crescent
Waning
Crescent
First
Quarter
Waxing
Gibbous
Full
Moon
Waning
Gibbous
Last
Quarter

5. Only use fresh batteries as specified in the user’s manual.
Do not mix new and old batteries as the old ones may leak.
Always replace both batteries at the same time.
6. Always read the user’s manual thoroughly before operating the unit.
7. Replace the batteries promptly when necessary (display becomes
dim) or store the batteries when not in use.
8. A soft cloth or paper towel may be used to clean your unit.
9. Keep the unit clean and dry to avoid any problems.
SPECIFICATIONS
Temperature Measurement
Indoor Temperature :+23˚F to +122˚F with
operating range 0.2˚F resolution
-5˚C to 50˚C with
0.1˚C resolution
Temperature display unit :˚C or ˚F
Temperature update interval
Indoor Temperature : every 15 seconds
Calendar and Clock
12/24 hour display in hh : mm format
Date Format: Month – Day format
Day of week: User- selectable in 3 languages
(English, French, Spanish)
Dual 4-minute crescendo alarm with snooze
Moon Phase Indicator
Moon Phase in 8 graphic icons
Moon Phase scanner from 200 to 2099
Moon Phase history for the last 39 days
Power source
(Alkaline batteries recommended)
Main unit :2 x UM-3 /AA (1.5V)
batteries-alkaline alkaline
(not included)
AC/DC Adapter :AC120V, 60Hz-DC3A, 100mA
Dimensions: :5.6”(L) x 4.05”(H) x 1.31”(W) /
141mm(L) x 102mm(H) x 33mm(W

STANDARD WARRANTY INFORMATION
This product is warranted from the manufacturing defects for one
year from date of retail purchase. It does not cover damages or wear
resulting from accident, misuse, abuse, commercial use, or
unauthorized adjustment and repair.
Note that online product registration is required to ensure valid
warranty protection.
To register your product, go to our Company website at:
www.hidekielectronics.us. Click Online Product Registration
under the Customer Service menu.
Should you require assistance with this product and its operation,
please contact our Customer Service Hotline 1(866) 443 3543
Please direct all returns to the place of the original purchase. Should
this not be possible, contact Customer Service Hotline for assistance
and to obtain a Return Merchandise Authorization (RMA). Returns
without a return authorization will be refused. Please retain your
original receipt as you may be asked to provide a copy for proof of
purchase. Hideki Electronics, Inc. reserves the right to repair or
replace the product at our option.
Copyright (2005) Hideki Electronics Inc. All Rights Reserved.
The Honeywell Trademark is used under license from
Honeywell Intellectual Properties Inc.
Honeywell International Inc.
makes no representations or warranties with respect to this product.
/