Smeg CO301 User guide

Type
User guide

This manual is also suitable for

INSTRUCTIONS FOR USE
EN
1. Lid handle
2. Lock (if provided)
3. Seal
4. Defrost water drain plug (if present)
5. Control panel
6. Basket (if present)
7. Condenser (located at the rear)
INSTALLATION
Please refer to the chapter “BEFORE USING
THE APPLIANCE”.
Unpack the appliance.
Remove the 4 protection pieces inserted
between lid and appliance.
Ensure that the defrosting water drainage plug (if
provided) is correctly positioned (4).
For best operation of the appliance and in order to
avoid damage when the lid is opened, leave a space
of at least 7 cm from the rear wall and 7 cm at the
sides.
Fit the accessories (if provided).
1. Thermostat: it can be used to adjust the internal
temperature of the appliance.
2. Red LED (if provided): Indicates that the appliance
temperature is not suciently low.
3. Green LED (if provided): indicates that the appliance is
on.
4. Yellow LED (if provided): when on, it indicates that the
fast freeze function has been activated.
5. Fast freeze pushbutton (if provided): activates/
deactivates the fast freeze function.
The exact conguration of the controls may vary
according to the model.
Switching on the appliance
The appliance is factory set for optimum operation at a
temperature of -18°C.
Plug in the appliance.
The green LED lights up (if provided).
Also the red LED (if provided) will switch on because the
temperature inside the appliance is not yet suciently
low for food storage. The red LED will normally switch o
within the rst six hours after the appliance is switched
on.
After connecting the appliance to the mains supply and
when the optimal temperature has been reached (this
phase takes about 1 hour during which the lid will not
open), ensure that the fast freeze button is not pressed
(the yellow LED, if provided, is o).
Place food inside the product only when the red LED (if
provided) has switched o.
Thanks to the ecient lid seal, the appliance lid will not
re-open easily immediately after closing. Wait a few
minutes before re-opening the lid of the appliance.
Temperature Adjustment
Use the thermostat to select the ideal storage temperature.
To adjust the internal temperature, proceed as follows:
Turn the thermostat knob to 1 for a storage temperature
that is less cold.
Turn the thermostat knob to 6 /
for a colder storage
temperature.
For partial loads, or when the load indicator is below the
“e” symbol inside the appliance (if present), it is advisable
to move the thermostat to the lower position (on “e”, if
present on the thermostat scale).
Climatic Class Amb. T. (°C) Amb. T. (°F)
SN From 10 to 32 From 50 to 90
N From 16 to 32 From 61 to 90
ST From 16 to 38 From 61 to 100
T From 16 to 43 From 61 to 110
CO Small
INSTRUCTIONS FOR USE
BEFORE USING THE APPLIANCE
Your new appliance is designed exclusively for domestic
use and for storing frozen food, freezing fresh food and
making ice cubes.
Regulations require that the appliance is earthed.
The manufacturer declines all liability for injury to
persons or animals and for damage to property
resulting from failure to observe the above
procedures and reminders.
1. After unpacking, make sure that the appliance is
undamaged and that the lid closes perfectly tight. Any
damage must be reported to your dealer within 24
hours after delivery of the appliance.
2. Wait at least two hours before switching the appliance
on in order to ensure the refrigerant circuit is fully
ecient.
3. Installation of the appliance and electrical
connections must be carried out by a qualied
electrician, in accordance with the manufacturer’s
instructions and local safety regulations.
4. Clean the inside of the appliance before using it.
• Before connecting the appliance to the mains supply,
ensure that the voltage corresponds to that given on
the rating plate located on the rear of the appliance.
Electrical connections must be made in
accordance with local regulations.
FREEZING FOOD
Preparation of fresh food for freezing
• Before freezing, wrap and seal fresh food in:
aluminium foil, cling lm, air and water-tight plastic
bags, polyethylene containers with lids, provided they
are suitable for freezing foods.
• Food must be fresh, mature and of prime quality in
order to obtain high quality frozen food.
• Fresh vegetables and fruit should preferably be frozen
as soon as they are picked to maintain the full original
nutritional value, consistency, colour and avour.
• Always leave hot food to cool before placing in the
appliance.
Freezing fresh food
• Place foods to be frozen in direct contact with the
walls of appliance:
A) - foods to be frozen,
B) - foods already frozen.
• Avoid placing foods to be
frozen in direct contact with
food already frozen.
• For best and fastest freezing,
foods should be split into
small portions; this will also
be useful when the frozen
items are to be used.
1. At least 24 hours before
storing fresh food in the
appliance, press the fast
freeze button. For appliances
without this button, turn the
thermostat to
.
2. Place the food to be frozen
and keep the lid of the appliance closed for 24 hours.
At the end of this period, switch o the fast freeze
button (if provided).
FOOD STORAGE
Refer to the table on the appliance (if provided).
Classication of frozen foods
Put the frozen products
into the appliance and
classify them; The
storage date should be
indicated on the packs,
to allow use within expiry
dates.
Advice for storing
frozen food
When purchasing frozen food products:
• Ensure that the packaging is not damaged (frozen
food in damaged packaging may have deteriorated).
If the package is swollen or has damp patches, it may
not have been stored under optimal conditions and
defrosting may have already begun.
• When shopping, leave frozen food purchases until
last and transport the products in a thermally insulated
cool bag.
• Once at home, place the frozen foods immediately in
the appliance.
• Avoid, or reduce temperature variations to the
minimum. Respect the best-before date on the
package.
• Always observe the storage information on the
package.
Note:
Eat fully or partially defrosted foods immediately.
Do not refreeze unless the food is cooked after it
has thawed. Once cooked, the thawed food can be
refrozen. If there is a long power failure:
Do not open the appliance lid except to place ice
packs (if provided) over the frozen foods on the right
and left of the appliance. This will slow down the rise
in temperature.
MONTHS
FOOD
INSTRUCTIONS FOR USE
PRECAUTIONS AND ADVICE
After installation, make sure the appliance is not
resting on the power cable.
Do not store glass containers with liquids in the
appliance, as they could burst.
Do not eat ice cubes or ice lollies immediately after
taking them out of the appliance, since they could cause
cold burns.
Before carrying out any maintenance or cleaning
operation, unplug the appliance or disconnect the
electrical power supply.
Do not install the appliance in places exposed to direct
sunlight or near heat sources, as this will result in higher
energy consumption.
Do not store or use petrol or other ammable liquids and
gases in the vicinity of this or other electrical appliances.
The fumes can create a re hazard or explosion.
Install and level the appliance on a oor able to take its
weight and in a place suitable for its size and use.
Install the appliance in a dry and well-ventilated
place. The appliance is arranged for use in places
with temperatures inside the following ranges dened
according to the climatic class given on the dataplate
located on the back. The appliance may not work
properly if left for a long time at temperatures outside
the range provided for.
It is advisable to leave the appliance connected, even if
empty even for short periods.
Be careful not to damage the oors (e.g. parquet)
when moving the appliance. To facilitate moving, it
is advisable to empty the appliance beforehand, if
possible.
Do not use mechanical devices or any means other
than those recommended by the manufacturer to speed
up the defrosting process.
Do not use electrical appliances inside it, unless they
are of the type recommended by the manufacturer.
This appliance is not intended for use by people
(including children) with limited physical, sensory
or mental abilities or without experience and
knowledge of it, unless they are supervised or
instructed in its use by a person responsible for
their safety.
To prevent the risk of children becoming trapped
and suocating, do not let them play or hide inside
the appliance.
The power cable must only be replaced by an
authorised person.
Do not use extension leads or multi-adapters.
It must be possible to disconnect the power supply
by unplugging or by means of a double-pole mains
switch installed ahead of the socket.
Make sure the voltage specied on dataplate
matches the voltage in your home.
Do not swallow the liquid (non-toxic) contained in
the ice packs (if provided).
Limit the number of times the appliance door is
opened.
DEFROSTING THE APPLIANCE
The appliance should be
defrosted when the thickness of
ice on the walls reaches 5-6 mm.
Disconnect the appliance from
the mains power supply.
Remove the packs of food from
the appliance and wrap them
close together in newspaper
and store in a very cool place or
thermally insulated bag.
Leave the appliance lid open.
Remove the internal defrost water drain plug
(depending on model).
Remove the external defrost water drain plug
(depending on model) and reposition it as shown in the
gure.
Place a bowl beneath the drainage channel to collect
the residual water. If available, use the divider.
Speed up defrosting by using a spatula to detach the
ice from the appliance walls.
Remove the ice from the bottom of the appliance.
In order to avoid permanent damage to the
appliance interior, do not use pointed or sharp
metal instruments for removing the ice.
Do not use abrasive products or heat up the
interior articially.
Dry the interior of the appliance thoroughly.
On completion of the defrosting, ret the plug.
CARE AND MAINTENANCE
Remove the ice from the upper edge (see the
Troubleshooting Guide).
Clean the inside after defrosting, using a sponge
dampened with warm water and/or mild detergent.
Clean the side motor cooling grille (depending on model).
Remove dust from the condenser on the rear of the
appliance.
Before carrying out maintenance, unplug the
appliance. Do not use abrasive products, scourers
or stain-removers (e.g. acetone, trichloroethylene) to
clean the appliance.
To obtain the best results from your appliance, carry
out cleaning and maintenance at least once a year.
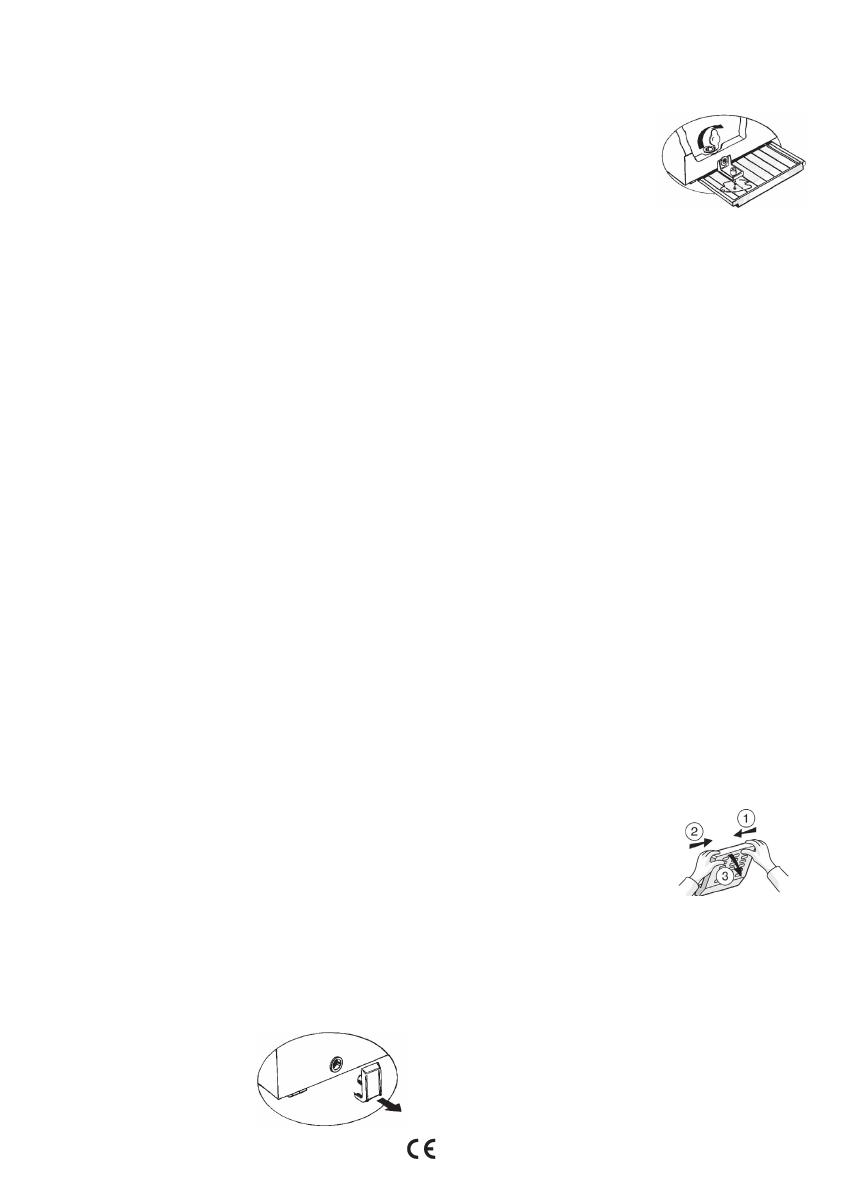
CHANGING THE LID LIGHT BULB (if provided)
Disconnect the appliance from the mains power supply.
Remove the diuser by following
the sequence of steps shown in
the gure.
Unscrew the light bulb and
replace it with an identical bulb of
the same wattage and voltage.
Ret the diuser and plug in the
appliance.
TROUBLESHOOTING GUIDE
1. The red LED (if provided) remains alight.
Is there a power failure?
Is defrosting in progress?
Is the appliance lid properly closed?
Is the appliance positioned near a heat source?
Is the thermostat setting correct?
Are the ventilation grille and condenser clean?
2. The appliance is too noisy.
Is the appliance perfectly horizontal?
Is the appliance in contact with other furniture or objects
that may cause vibrations?
INSTRUCTIONS FOR USE
Has the packaging been removed from under the appliance?
Note: gurgling noises from the refrigerating circuit after the
compressor cuts out are perfectly normal.
3. The green LED (if provided) is o and the appliance
is not working.
Is there a power failure?
Is the plug properly inserted in the socket?
Is the electric cable intact?
4. The green LED (if provided) is o and the appliance
is working.
The green LED is not working. Contact the After Sales
Service for a replacement.
5. The compressor runs continuously.
Have hot foods been put in the appliance?
Has the appliance lid been left open for a long time?
Is the appliance positioned in a very warm room or near
heat sources?
Is the thermostat setting correct?
Has the fast freeze function (depending on model) been
pressed by mistake?
6. Too much ice on the upper edge.
Are the defrost water drainage plugs correctly positioned?
Is the appliance lid properly closed?
Is the appliance lid seal damaged or deformed? (See
chapter “Installation”)
Have the 4 protection pieces been removed? (See chapter
“Installation”)
7. Condensation forms on the external walls of the
appliance
It is normal for condensation to form under certain
atmospheric conditions (humidity above 85%) or if the
appliance is located in a damp or poorly ventilated room.
The performance of the appliance is in no way aected.
8. The layer of ice on the internal walls of the appliance
is not uniform.
This phenomenon is quite normal.
SAFEGUARDING THE ENVIRONMENT
1. Packing
The packaging material is entirely recyclable, and marked
with the
recycling symbol. Follow local regulations for
scrapping. Keep the packaging materials (plastic bags,
polystyrene parts, etc.) out of reach of children, as they are
potentially dangerous.
2. Scrapping
The appliance is manufactured using recyclable material.
This appliance is marked according to the European directive
2002/96/EC on Waste Electrical and Electronic Equipment
(WEEE).
By ensuring this product is disposed of correctly, you will
help prevent potential negative consequences for the
environment and human health, which could otherwise be
caused by inappropriate waste handling of this product.
The symbol
on the product, or on the documents
accompanying the product, indicates that this appliance
may not be treated as household waste. Instead it shall
be handed over to the applicable collection point for the
recycling of electrical and electronic equipment.
Before scrapping, make the appliance unusable by cutting o
the power cable and removing the doors and shelves so that
children cannot easily climb inside the appliance.
Disposal must be carried out in accordance with local
environmental regulations for waste disposal. Deliver the
appliance immediately to an authorized dump; do not leave
it unattended even for a few days, since it is potentially
dangerous for children. For more detailed information about
treatment, recovery and recycling of this product, please
contact your local city oce, your household waste disposal
service or the shop where you purchased the product.
Information:
This appliance does not use CFC. The refrigerant system
contains either R134a (HFC) or R600 (HC). Refer to the
rating plate inside the appliance.
Appliances with Isobutane (R600a): isobutane is a natural
gas without environmental impact, but is ammable.
Therefore, make sure the refrigerant circuit pipes are not
damaged.
This product may contain Fluorinated Greenhouse Gases
covered by the Kyoto Protocol; the refrigerant gas is inside a
hermetically sealed system.
Refrigerant gas: R134a has a Global Warming Potential of
(GWP) 1300.
Declaration of conformity
This appliance is intended for storing food and is
manufactured in conformity with European regulation (EC)
No. 1935/2004.
This product has been designed, manufactured and
marketed in compliance with:
- the safety objectives of Low Voltage Directive 2006/95/
EC (replacing 73/23/EEC and subsequent amendments);
- the protection requirements of Directive “EMC” 2004/108/
CE.
• The electrical safety of the appliance can only be
guaranteed if the product is connected to an approved
earth connection.
AFTER-SALES SERVICE
Before contacting After-Sales Service:
1. See if you can solve the problem yourself.
2. Switch the appliance on again to see if the problem
has been solved. If it has not, disconnect the appliance
from the power supply and wait for about an hour before
switching on again.
3. If the problem persists after this course of action, contact
After-Sales Service.
Specify:
• the nature of the fault,
• the model,
• the service number (the number after the word SERVICE
on the rating plate on the rear of the appliance)
• your full address,
• your telephone number and area code.
400010914750
  • Page 1 1
  • Page 2 2
  • Page 3 3
  • Page 4 4

Smeg CO301 User guide

Type
User guide
This manual is also suitable for

Ask a question and I''ll find the answer in the document

Finding information in a document is now easier with AI