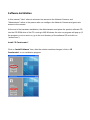
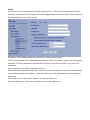
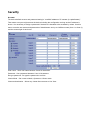
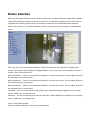
MAC Audio FCS-4300 User manual
- Category
- Security cameras
- Type
- User manual

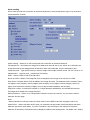
LevelOne
FCS-4000 / FCS-4100 / FCS-4200
FCS-4300 / FCS-4400 / FCS-4500
Day/Night P/T/Z IP Speed Dome Camera
User Manual
Ver:2.3.0-0812
Copyright (c) 2008 Digital Data Communications Co., Ltd. All Rights Reserved.

Before You Use This Product
The use of surveillance devices may be prohibited by law in your country. The
Network Camera is not only a high-performance web-ready camera but also
can be part of a flexible surveillance system. It is the user’s responsibility to
ensure that the operation of such devices is legal before installing this unit for
its intended use.
It is important to first verify that all contents received are complete according to
the list in the "Package Contents" chapter. Take notice of the warnings in
“Quick installation guide” before the Network Camera is installed, then
carefully read and follow the instructions in the “Installation” chapter to avoid
damages due to faulty assembly and installation. This also ensures the
product is used properly as intended.
The Network Camera is a network device and its use should be straightforward
for those who have basic network knowledge. The “Troubleshooting” chapter
in the Appendix provides remedies to the most common errors in set up and
configuration. You should consult this chapter first if you run into a system
error.
The Network Camera is designed for various applications including video
sharing, general security/surveillance, etc. The “How to Use” chapter
suggests ways to best utilize the Network Camera and ensure proper
operations.
For paragraphs preceded by the reader should use caution to understand
completely the warnings. Ignoring the warnings may result in serious hazards or
injuries.

ATTENTION
1. All operation please refer to the instruction.
2. Please don’t place the product on unstable desk or bracket.
3. Please avoid any liquid permeate inside of the machine in case damage
the product.
4. Before wiring, please follow all electronic safety standards, and using the
original attached power supply adapter.
5. The RS-485 and Video signal of the product use TVS grade lightning
protection technology can prevent effectively lightning strike under 500W.
The cable transmission of RS-485 and Video signal should keep a certain
distance with high voltage equipments or cables.
6. Do not let the camera aim at sun or other lighting objects no matter the
camera is operating or not, otherwise it might damage the CCD camera
permanently.
7. When the product is out of order, please do not try to fix it by yourself,
please refer to the trouble shooting section of this instruction to figure out
the problems in advance. If the problem is not found, please contact us or
our authorized dealers directly.
8. All the features and functions are subject to change without notice. Please
visit www.level1.com for the latest ones.

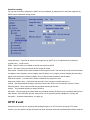
Table of Contents
Before You Use This Product....................................................................................... 2
Package Contents ....................................................................................................... 2
Functions and Operation directory............................................................................... 2
Hardware Installation ................................................................................................... 4
Installation Notice........................................................................................................4
FCS-4300/4400/4500Housing installation................................................................... 4
FCS-4000/4100/4200Housing installation................................................................... 5
Camera installation ..................................................................................................... 7
Bracket installation ......................................................................................................9
Software Installation................................................................................................... 12
Install “IP CamLocator” .............................................................................................12
Install “IP CamSecure” .............................................................................................. 13
How to Use IP CamLocator ....................................................................................... 15
Initial use IP Cam Locator ......................................................................................... 15
Configuration of Main Console..................................................................................15
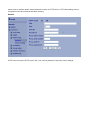
How to Access to the Network Camera ..................................................................... 38
Initial accessing the network camera ........................................................................ 38
Configuration of Main Console..................................................................................39
Basic Setting.............................................................................................................. 44
PTZ Control............................................................................................................... 62
Preset Position.......................................................................................................... 63
Patrol ........................................................................................................................65
Alarm Input................................................................................................................78
Trouble shooting sheet .............................................................................................. 83
Technical Parameters ................................................................................................ 84
Streaming Video/Audio Solution ................................................................................ 85
GNU GENERAL PUBLIC LICENSE........................................................................... 86

Package Contents
FCS-4000/FCS-4100/FCS-4200/FCS-4300/FCS-4400/FCS-4500
Power Adapter
Power & A/V Cable
LAN Cable
Alarm Cable
CD Manual/Utility
Quick Installation Guide
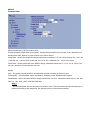
Functions and Operation directory
Followed is the brief introduction of main functions and operations of LEVELONE IP SPEED
DOME, different operation platform may have different operating methods, generally base on
the manual. Special operating demand, please contact your dealers.
Pan/Tilt/Zoom
Users can control camera up/down/left/right via software commends. In addition
users can adjust the zoom to have best view for the desire target. Auto focus and iris
adjustment while seeing the far object.
Focus/RPM auto matching technology
With focus/PRM matching technology, the step-motor will adjust the pan/tilt speed
automatically, let the operation easier while zoom the far target.
Auto flips
While tilting the camera at the vertical end, the camera will rotate 180° automatically
then turn to another side of 90° angle to see directly the back of object, realizing
vertical 180° surveillance.
Preset position set up and recall
The preset position feature can store current position of camera viewing, users can
recall those preset positions instantly via surveillance software. The intelligent IP
speed dome supports 32 preset positions. The intelligent speed dome supports 4
navigation groups, each group is capable to having 8 present positions
Lens control

Focusing control:
Users can press the zoom button to adjust the image viewing distance.
Iris control
The factory default is auto iris, ensuring to have the best image quality. In
particular circumstances, the operator can also use manual iris feature.

Hardware Installation
Installation Notice
Please be sure to follow all the steps of the instructions. Wrong installation may damage the
product.
FCS-4300/4400/4500Housing installation
Outer housing fixing as below, click down the iron slice then pull it up.
Before install inner housing, please hook the safety lock of outer housing on the fixing socket of
inner housing, in case of installation accidents.
Please fix the three screws on the side before install the camera.

Finally cover up the smoked cover to accomplish the installation. Please be sure hands are clean
while cover up, or it may dirty the cover. It’s recommended to tear off the protect membrane after
installation is finished, or wear on gloves.
FCS-4000/4100/4200Housing installation
The installed spot must be held to the product firmly, in case the image shaken while the
camera operates.
Put the cable tube into the power box, and screw it.
Using hexagon screw driver to fix the housing and bracket.

unscrew the bottom screw to install cables.
Insert the plug, and pull these cables through out from the bottom of bracket.
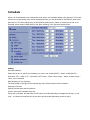
For the alarm cable
Brown Red Orange Yellow Green Blue Black White
DI 1 DI 2 DI 3 DI 4 GND NC COM NO
Hook up the safety buckle, and screw the two screws to fix the power box.
Power&A/V Cable
Alarm Cable
Microphone Cable
Speaker Cable
LAN Cable
Reset Button

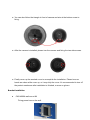
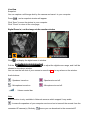
Camera installation
Before installation, please set for the communication protocol, baud rate and
camera ID address first.
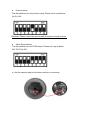
ID address setup
There are 8 dip-switchers on the PCB board. Please set it up as below:
All the dip-switchers are OFF.
*Remarks: Please reboot the camera after the camera setup is done.

Protocol setup
The dip-switchers are for protocol setup. Please set it up as below:
No.5 is ON.
*Remarks: Please reboot the camera after the protocol setup is done.
Alarm Dip-switchers
The dip-switchers are for DI/DO setup. Please set it up as below:
NO. 5/6/7/8 is ON.
Aim the camera plug to the bottom socket to connecting.

You can also follow the triangle in front of camera and aim at the bottom screw to
fixing.
After the camera is installed, please turn the camera and fixing the two side screws.
Finally cover up the smoked cover to accomplish the installation. Please be sure
hands are clean while cover up, or it may dirty the cover. It’s recommended to tear off
the protect membrane after installation is finished, or wear on gloves.
Bracket installation
CAS-4000A wall mount Kit
Fixing power box on the wall.

Hook up the safety buckle, and screw the two screws to fix the power box.
CAS-4000B ceiling mount kit
Fix the iron tube to the cover of power box and complete assembly by tightening
the 2 holes on the iron tube with included wrench.
CAS-4000C corner mount kit
Combine two brackets, and use the spanner to fix the screw.
Turn the screw to tighten the brackets and power box.

The assembly completed.
CAS-4000D pole mount kit
Fixed the bracket on the rear of power box.
The assembly will be done after the stainless ring is hooped.

Software Installation
In this manual, "User" refers to whoever has access to the Network Camera, and
"Administrator" refers to the person who can configure the Network Camera and grant user
access to the camera.
At the end of the hardware installation, the Administrator must place the product software CD
into the CD-ROM drive of the PC running in MS Windows. An auto-run program will pop up (If
the program is not on auto-run, go to the root directory of the software CD and click on
“autorun.exe”).
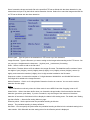
Install “IP CamLocator”
Click on “Install Software” item, after the window contains changed, click on “IP
CamLocator” to run installation program.

Upon IP CamLocator’s start up, this program searches for LevelOne’s products on the same
LAN. After searching, LevelOne Video Servers or Network cameras will be located by the IP
CamLocator. There may be several entries shown in the window. The Administrator may
differentiate the Network cameras with the model number and MAC address.
The IP addresses shown in the "IP Address" field reflect those on the local network. They
may be from the DHCP server. If there is no DHCP server, the camera will try to find a free
IP address (this takes from 15 second to 3 minutes, depending on the LAN status). The
method of finding IP address is seeking from 192.168.0.2, to 192.168.0.254. If any of the
address inside this range is free, the Network Camera will be assigned to this IP address, and
its subnet mask would be 255.255.255.0.
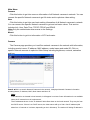
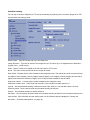
Install “IP CamSecure”
Click”Install Software”
Click”IP CamSecure” and follow the onscreen instruction or refer to the user’s manual to

complete installation.
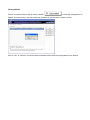
Custom Setup Type:
You may install the system to the directory of your
preference and choose which feature(s) you want to
install to the PC.
Hint: You may, for instance, install only Playback
and/or LiveView on the PC at home or other remote
site from which you do not install the camera but are
going to watch them remotely.

How to Use IP CamLocator
This chapter introduces how to monitor the image from the camera using IP CamLocator.
The LevelOne video server and Network camera can be used with Microsoft web browsers
and IP CamLocator in Windows operation systems. This document focuses on introducing IP
CamLocator.
Initial use IP Cam Locator
Click Start -> Program Files -> LevelOne -> IP Cam Locator -> IP Cam Locator.
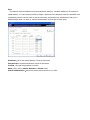
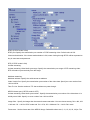
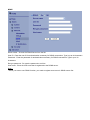
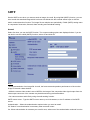
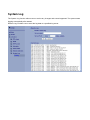
Configuration of Main Console
Main Menu

Main Menu
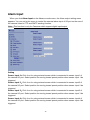
Camera
Click this button to get into common information of all Network cameras in network. You can
connect the specific Network cameras to get life video and to optimize video setting.
User
Click this button to get into user basic setting information of all Network cameras in network.
You can connect the specific Network cameras to get and set basic values. This section
includes Info, User, Date Time, TCP/IP, PPPoE and DDNS.
Note: Only the administrator has access to the Settings.
About
Click this button to get into information of IP CamLocator.
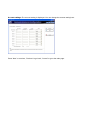
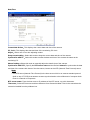
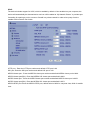
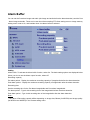
Camera
The Camera page provides you LevelOne network cameras in the network with information,
including product name, IP address, MAC address, model name and model ID. Click on
specific network cameras to optimize Video Setup including brightness, contrast, saturation
and hue.
Search:Click it to search Network Cameras in the network, it displays Network Cameras information
including Name, IP Address, MAC, Mod. Name and Mod. ID.
Note:
If the camera is not located in local network, it will appear in red text. Some information is not available
when the IP camera is not in local network.
The IP addresses shown in the "IP Address" field reflect those on the local network. They may be from
the DHCP server. If there is no DHCP server, the video server will try to find a free IP address (this
takes from 15 second to 3 minutes, depending on the LAN status). The method of finding IP address is

seeking from 192.168.0.2, to 192.168.0.254. If any of the address inside this range is free, the Network
Video server will be assigned to this IP address, and its subnet mask would be 255.255.255.0.
Link to IE:After searching Network Cameras in network, you can click to specific Network Cameras in
search area and press Link to IE to use IP cameras with Microsoft web browses.
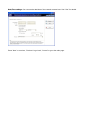
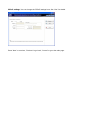
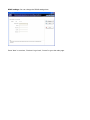
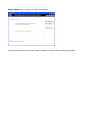
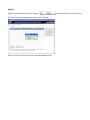
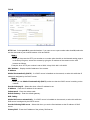
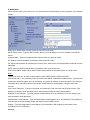
Setup
Choose a network camera, click on Setup
to change the configurations. You
have to key in the username and password of the administrator to enter the setup page.
The following screen will display:
Note:
For IP cameras not in local network area (which appears in red in the search screen), you can still use
setup to change the configurations of these cameras.
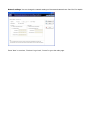
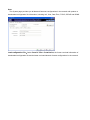
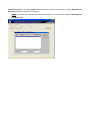
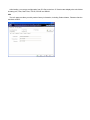
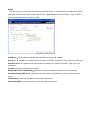
System Information: The system information is displayed.
Press “Next” to continue, “Previous” to go back, “Cancel” to go to the main page.
Page is loading ...
Page is loading ...
Page is loading ...
Page is loading ...
Page is loading ...
Page is loading ...
Page is loading ...
Page is loading ...
Page is loading ...
Page is loading ...
Page is loading ...
Page is loading ...
Page is loading ...
Page is loading ...
Page is loading ...
Page is loading ...
Page is loading ...
Page is loading ...
Page is loading ...
Page is loading ...
Page is loading ...
Page is loading ...
Page is loading ...
Page is loading ...
Page is loading ...
Page is loading ...
Page is loading ...
Page is loading ...
Page is loading ...
Page is loading ...
Page is loading ...
Page is loading ...
Page is loading ...
Page is loading ...
Page is loading ...
Page is loading ...
Page is loading ...
Page is loading ...
Page is loading ...
Page is loading ...
Page is loading ...
Page is loading ...
Page is loading ...
Page is loading ...
Page is loading ...
Page is loading ...
Page is loading ...
Page is loading ...
Page is loading ...
Page is loading ...
Page is loading ...
Page is loading ...
Page is loading ...
Page is loading ...
Page is loading ...
Page is loading ...
Page is loading ...
Page is loading ...
Page is loading ...
Page is loading ...
Page is loading ...
Page is loading ...
Page is loading ...
Page is loading ...
Page is loading ...
Page is loading ...
Page is loading ...
Page is loading ...
Page is loading ...
Page is loading ...
Page is loading ...
Page is loading ...
Page is loading ...
Page is loading ...
-
 1
1
-
 2
2
-
 3
3
-
 4
4
-
 5
5
-
 6
6
-
 7
7
-
 8
8
-
 9
9
-
 10
10
-
 11
11
-
 12
12
-
 13
13
-
 14
14
-
 15
15
-
 16
16
-
 17
17
-
 18
18
-
 19
19
-
 20
20
-
 21
21
-
 22
22
-
 23
23
-
 24
24
-
 25
25
-
 26
26
-
 27
27
-
 28
28
-
 29
29
-
 30
30
-
 31
31
-
 32
32
-
 33
33
-
 34
34
-
 35
35
-
 36
36
-
 37
37
-
 38
38
-
 39
39
-
 40
40
-
 41
41
-
 42
42
-
 43
43
-
 44
44
-
 45
45
-
 46
46
-
 47
47
-
 48
48
-
 49
49
-
 50
50
-
 51
51
-
 52
52
-
 53
53
-
 54
54
-
 55
55
-
 56
56
-
 57
57
-
 58
58
-
 59
59
-
 60
60
-
 61
61
-
 62
62
-
 63
63
-
 64
64
-
 65
65
-
 66
66
-
 67
67
-
 68
68
-
 69
69
-
 70
70
-
 71
71
-
 72
72
-
 73
73
-
 74
74
-
 75
75
-
 76
76
-
 77
77
-
 78
78
-
 79
79
-
 80
80
-
 81
81
-
 82
82
-
 83
83
-
 84
84
-
 85
85
-
 86
86
-
 87
87
-
 88
88
-
 89
89
-
 90
90
-
 91
91
-
 92
92
-
 93
93
-
 94
94


MAC Audio FCS-4300 User manual
- Category
- Security cameras
- Type
- User manual
Ask a question and I''ll find the answer in the document
Finding information in a document is now easier with AI
Other documents
-
LevelOne FCS-4100 User manual
-
LevelOne FCS-1101 User manual
-
-
-
Atlantis A02-OIPCAM1 User manual
-
Atlantis A02-IPCAM5 User manual
-
 Off The Wall SB Datasheet
-
Allnet ALL2272 Owner's manual
-
CTC Union 8309D User manual
-
LevelOne 2-Megapixel PoE Network Camera User manual
