9
WARNING
NOTE
Check with your local building authority for
recommendations on water lines and associated
materials prior to installing your new refrigerator.
Depending on your local/state building codes, Electrolux
recommends for homes with existing valves its Smart
Choice® water line kit 5305513409 (with a 6 ft.
Stainless Steel Water Line) and for homes without an
existing valve, Electrolux recommends its Smart Choice
water® line kit 5305510264 (with a 20 ft. Copper Water
Line with self-tapping saddle valve). Please refer to
www.frigidaire.com/store for more information.
IMPORTANT
Ensure that your water supply line connections comply
with all local plumbing codes.
IMPORTANT
After connecting the water supply, refer to “How to Prime
the Water Supply System” for important information about
priming an empty water supply system.
Your refrigerator’s water supply system includes several tubing
lines,awaterlter,awatervalve,andawatertank.Toensure
that your water dispenser works properly, this system must
becompletelylledwithwaterwhenyourrefrigeratorisrst
connected to the household water supply line.
• BasicTools:adjustablewrench,at-blade
screwdriver, and Phillips
TM
screwdriver
• Accesstoahouseholdcoldwaterlinewithwater
pressure between 30 and 100 psi.
• Awatersupplylinemadeof¼inch(6.4mm)OD,
copper or stainless steel tubing. To determine the
length of tubing needed, measure the distance
from the ice maker inlet valve at the back of the
refrigerator to your cold water pipe. Then add
approximately 7 feet (2.1 meters), so the refrigerator
can be moved out for cleaning (as shown).
• Ashutoffvalvetoconnectthewatersupplylineto
your household water system. DO NOT use a self-
piercing type shutoff valve.
• Acompressionnutandferrule(sleeve)forconnecting
a copper water supply line to the ice maker inlet valve.
1. Disconnect refrigerator from electric power source.
2. Place end of water supply line into sink or bucket.
TurnONwatersupplyandushsupplylineuntil
water is clear. Turn OFF water supply at shutoff valve.
3. Remove plastic cap from water valve inlet and
discard cap.
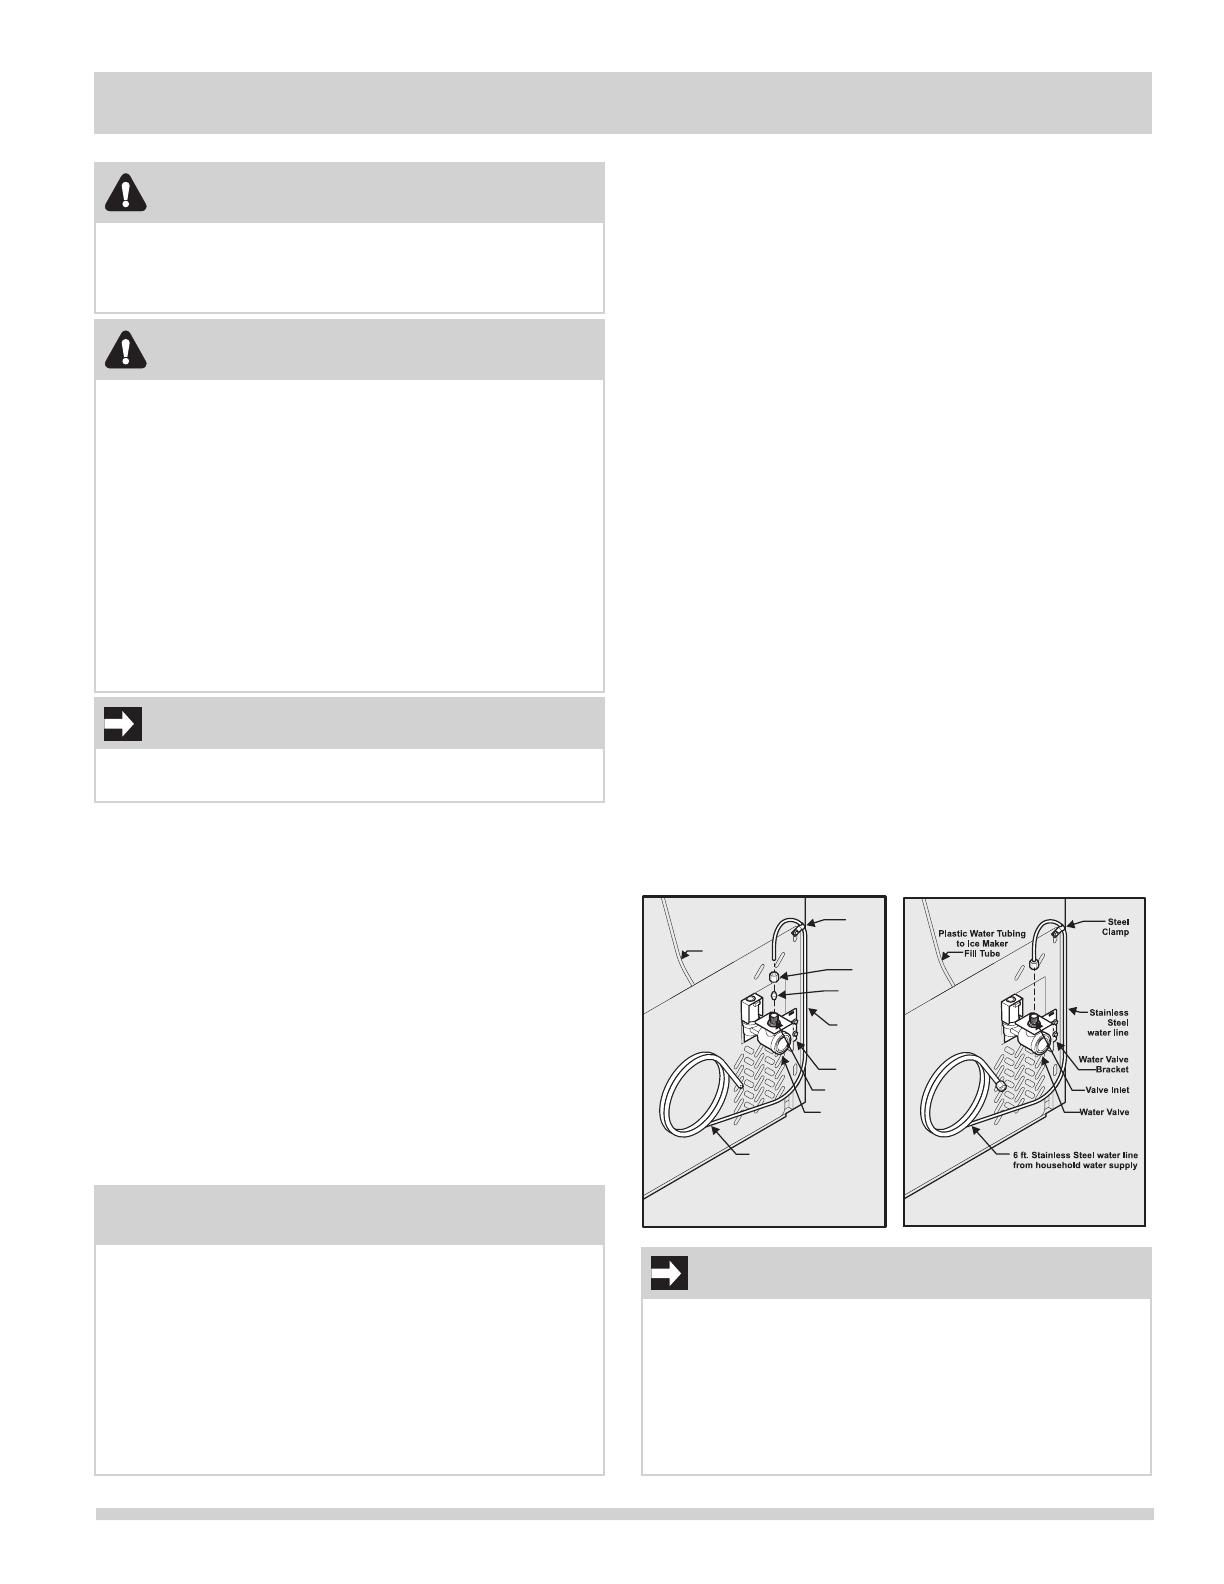
4. - Slide brass compression
nut, then ferrule (sleeve) onto water supply line. Push
water supply line into water valve inlet as far as it will
go(¼inch/6.4mm).Slideferrule(sleeve)intovalve
inletandngertightencompressionnutontovalve.
Tighten another half turn with a wrench; DO NOT
over tighten. See Figure 1.
- The nut and
ferrule are already assembled on the tubing. Slide
compressionnutontovalveinletandngertighten
compression nut onto valve. Tighten another half turn
with a wrench; DO NOT over tighten. See Figure 2.
5. With steel clamp and screw, secure water
supply line (copper tubing only) to rear panel of
refrigerator as shown.
6. Coil excess water supply line (copper tubing only),
about 2½ turns, behind refrigerator as shown and
arrange coils so they do not vibrate or wear against
any other surface.
7. Turn ON water supply at shutoff valve and tighten
any connections that leak.
8. Reconnect refrigerator to electrical power source.
9. To turn ice maker on, lower wire signal arm (side
mounted) or set the ice maker’s On/Off power
switch to the “I” position (rear mounted).
Copper water line
from household water supply
(Includeenough tubing in loop to allow
moving refrigerator out for cleaning.)
Ferrule
(Sleeve)
Copper
water line
WaterValve
Valve Inlet
Water Valve
Bracket
Steel
Clamp
Plastic Water Tubing
to Ice Maker
Fill Tube
Brass
Compression
Nut