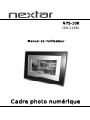
Nextar N7S-100 User manual
- Category
- Digital photo frames
- Type
- User manual
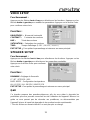
Nextar N7S-100 is a user-friendly digital photo frame that allows you to enjoy unbelievably amazing visual & audio experience. With its compatibility with various memory cards and USB, you can easily and quickly view photos, play MP3 music, or watch supported video files without the need for a computer or internet connection. The handy remote control and automatic slide show with multiple transition effects and display times make it easy to use and customize your viewing experience. You can even create a slideshow with MP3 background music, adding an extra touch of personalization.
Nextar N7S-100 is a user-friendly digital photo frame that allows you to enjoy unbelievably amazing visual & audio experience. With its compatibility with various memory cards and USB, you can easily and quickly view photos, play MP3 music, or watch supported video files without the need for a computer or internet connection. The handy remote control and automatic slide show with multiple transition effects and display times make it easy to use and customize your viewing experience. You can even create a slideshow with MP3 background music, adding an extra touch of personalization.


-
 1
1
-
 2
2
-
 3
3
-
 4
4
-
 5
5
-
 6
6
-
 7
7
-
 8
8
-
 9
9
-
 10
10
-
 11
11
-
 12
12
-
 13
13
-
 14
14
-
 15
15
-
 16
16
-
 17
17
-
 18
18
-
 19
19
-
 20
20
-
 21
21
-
 22
22
-
 23
23
-
 24
24
-
 25
25
-
 26
26
-
 27
27
-
 28
28


Nextar N7S-100 User manual
- Category
- Digital photo frames
- Type
- User manual
Nextar N7S-100 is a user-friendly digital photo frame that allows you to enjoy unbelievably amazing visual & audio experience. With its compatibility with various memory cards and USB, you can easily and quickly view photos, play MP3 music, or watch supported video files without the need for a computer or internet connection. The handy remote control and automatic slide show with multiple transition effects and display times make it easy to use and customize your viewing experience. You can even create a slideshow with MP3 background music, adding an extra touch of personalization.
Ask a question and I''ll find the answer in the document
Finding information in a document is now easier with AI
in other languages
- français: Nextar N7S-100 Manuel utilisateur
Related papers
-
Nextar Digital Photo Frame N7W-1BE User manual
-
-
-
-
-
Nextar N7-110 User manual
-
-
-
Other documents
-
Pandigital PAN80XXT User manual
-
Lenco DF-1520 Owner's manual
-
-
-
Impecca DFM1043 User guide
-
Hama 00055105 Owner's manual
-
Palsonic DPF8128 Owner's manual
-
-
-