Page is loading ...

WARNING
Read and follow all warnings and cautions printed
on the tow vehicle’s battery.
11. Reconnect the vehicle’s Negative (-) battery cable
and install the 15 amp fuse into the fuse holder
from step 10.
WARNING
All connections must be complete for the T-One
®
T-Connector to function properly. Test and verify
installation with a test light or trailer once installed.
For initial test, reset vehicle electrical system by
temporarily removing the key from the ignition.
12. Locate a flat surface in an out of the way place and
mount the T-One
®
T-Connector’s black box-module,
to prevent damage or rattling.
13. Secure the remainder of the T-One
®
T-Connector
harness with the cable ties provided, to prevent
damage or rattling and being careful to avoid any
areas that would pinch, cut or melt the wire.
14. Reinstall the plastic wing nuts, carpet and
threshold and any other items that were removed
during installation, being careful not to pinch or
cut the wires.
NOTE
Store 4-Flat in rear cargo area when not in use.
WARNING
Overloading circuit can cause fires. DO NOT exceed
lower of towing manufacturer rating or:
• Max. stop/turn light: 2 per side (4.2 amps)
• Max. tail lights: (7.5 amps)
Read vehicle’s owners manual & instruction sheet
for additional information.
ENGLISH
TOOLS REQUIRED:
Trim Panel Remover, Drill (3/32” Drill Bit),
Philips Head Screwdriver, Test-probe
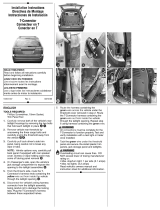
1. Open the vehicle’s rear tailgate, remove cargo nets
and cargo floor hatch to access the spare tire area.
Temporarily remove the rear threshold plate.
2. Partially remove the rear interior trim panels on both
the driver and passenger side of the vehicle. Several
trim panel fasteners will need to be removed to
remove the panels. Set aside all items removed
being careful not to damage parts
d
.
3. Carefully pull the carpet back on both sides to
expose the plastic wing nuts on each side (2 per
side). Remove the wing nuts and set aside. After
removing the wing nuts, carefully pull the taillight
away from the vehicle being careful not to damage
the alignment pins
e
.
4. On both the driver’s and passenger’s side, pull the
vehicle taillight wire harness and unseat the grommet.
On both the driver’s and passenger’s side, slit the
grommet to allow for T-One
®
T-Connector’s wiring
f
.
5.
Behind the side trim panel on the driver’s side,
route the T-One
®
T-Connector end with the yellow wire
out of the opening exposed in step 4. Route the T-One
®
T-Connector ends through the hole and into the tail
lamp pocket and reseat the grommet around the wires.
6.
On the driver’s side, insert the T-One
®
T-Connector
end, with the yellow wire, between the vehicle wiring
connectors and lock into place. Be careful not to
damage the locking tabs and be sure that connectors
are fully inserted with locking tabs in place. Reinstall
previously removed light assemblies
f
.
7. Route the T-One
®
T-Connector end with green
wire to the passenger ‘s side behind the panels
and along the threshold. Repeat steps 5 & 6 on
passenger’s side with T-One
®
T-Connector end
containing the green wire.
8. Locate a suitable grounding point near the
connector. Clean dirt and rustproofing from the
area. Drill a 3/32” hole and secure the white
wire using the eyelet and screw provided.
CAUTION
Verify what is behind any surface prior to drilling to
avoid damage to the vehicle and/or personal injury.
Do not drill into any exposed surfaces.
9. From inside the vehicle, connect the black 12 ga.
wire and the black wire from the T-One
®
T-Connector
black box with the supplied yellow butt connector.
Either route the black wire thru a grommet and along
the exterior frame or follow the existing wiring along
the thresholds into the engine compartment up to the
battery avoiding areas that may pinch or break the
wire
g
.
WARNING
If routing the wire thru a grommet and along the
exterior of the vehicle, be careful to avoid any
hot pipes, heat shields, the fuel tank or any other
points that may pinch or break the wire.
10. Disconnect the vehicle’s Negative (-) battery cable.
If not removed, remove the fuse from the yellow fuse
holder (provided).After cutting the fuse holder wire,
attach the ring terminal and secure to the vehicle’s
Positive (+) battery cable. Connect the other end of
the fuse holder to the black 12 ga. wire, using the
yellow butt connector (provided)
hi
.
Installation Instructions
Directives de Montage
Instrucciones de Instalación
T-One
®
T-Connector
T-One
®
Connecteur en T
T-One
®
Conector en T
Ford Focus Titanium Hatchback
118674-037 Rev. A 07/28/2015
READ THIS FIRST:
Read and follow all vehicle warnings and installation
instructions before beginning installation. Wear safety
glasses and use all safety precautions during installation.
LISEZ CECI EN PREMIER:
Lire et observer toutes les consignes de sécurité et les
instructions avant de commencer l’installation. Durant
l’installation, veiller à toujours porter des lunettes de
protection et respecter les mesures de sécurité.
LEA ESTO PRIMERO:
Lea y siga todas las advertencias e instrucciones de
instalación del vehículo antes de empezar la instalación.
Use gafas de seguridad y todas las precauciones de
seguridad durante la instalación.
PAGE 1 OF 3
gd
he
if

13. Asegure el resto del arnés del conector en T con
los amarres del cable que se suministran, para
evitar daños y con cuidado de evitar cualquier área
que podrían pellizcar, cortar o derretir el cable.
14. Vuelva a instalar las tuercas de mariposa,
la alfombra y el umbral y cualquier otra pieza
que se haya quitado durante la instalación,
con cuidado de no pellizcar los cables.
NOTA
Almacene el conector plano de 4 salidas en el baúl
o área posterior de carga cuando no esté en uso.
ADVERTENCIA
La sobrecarga del circuito puede ocasionar
incendios. NO exceda la calificación de remolque
más baja indicada por el fabricante o:
• Máx. luz de estacionamiento/ direccional:
2 por costado (4.2 amperios)
• Máx. luz trasera: (7.5 amperios)
Lea el manual del propietario y la hoja de instruc-
ciones del vehículo para información adicional.
ESPAÑOL
HERRAMIENTAS NECESSARIAS:
Corte el removedor de paneles, Taladro
(broca de 3/32”), Destornillador de estrella,
Terminal de prueba
1. Abra la puerta trasera del vehículo, retire las redes
de carga y la compuerta del piso de carga para
tener acceso al área de la llanta de repuesto.
Retire temporalmente la placa del umbral posterior.
2. Retire parcialmente los paneles de tapizado interior
trasero tanto en el costado del conductor como
del pasajero del vehículo. Se deberán retirar varios
tornillos del panel de tapizado para retirar los
paneles. Ponga a un lado todos los artículos
retirados con cuidado de no dañar las partes
d
.
3. Con cuidado hale la alfombra hacia atrás en
ambos lados para exponer las tuercas mariposa
plásticas en cada lado (2 por lado). Saque las
tuercas mariposa y coloque a un lado. Después
de quitar las tuercas mariposa, con cuidado hale
la luz trasera lejos del vehículo con cuidado de
no dañar los pasadores de alineación
e
.
4. Tanto en el costado del conductor como del
pasajero, hale el arnés del cableado de la luz
trasera y desmonte la arandela. Tanto en el
costado del pasajero como del conductor,
haga un corte a la arandela para pemitir el
paso del cable del T-One
®
conector en T
f
.
5. Detrás del panel de guarnición lateral en el
costado del conductor, dirija el extremo del
T-One
®
conector en T con el cable amarillo
que sale de la abertura expuesta en el paso 4.
Dirija los extremos del T-One
®
conector en T a
través del orificio y dentro del compartimiento
de la lámpara trasera y vuelva a instalar la
arandela alrededor de los cables.
6. En el costado del conductor, inserte el extremo
del T-One
®
conector en T, con el cable amarillo,
entre los conectores del cableado del vehículo y
asegure en su lugar. Tenga cuidado de no dañar
las pestañas de bloqueo y cerciórese de que los
conectores estén completamente insertados con
las pestañas de bloqueo en su lugar
f
.
7. Enrute el extremo del T-One
®
conector en T con el
cable verde hacia el costado del pasajero detrás
de los paneles y a lo largo del umbral. Repita los
pasos 5 y 6 en el costado del pasajero con el
conector en T que tiene el cable verde.
8. Localice un punto adecuado de conexión a
tierra cerca del conector. Limpie la suciedad
y el óxido del área. Perfore un orificio de 3/32”
y asegúrelo con el cable blanco usando el
ojete y tornillo provistos.
ATENCIÓN
Revise qué hay detrás de cualquier superficie
antes de perforar para evitar daños al vehículo
y/o lesiones personales. No perfore ninguna
superficie expuesta.
9. Desde el interior del vehículo, conecte el cable
negro de calibre 12 y el cable negro desde la caja
negra del T-One
®
conector en T con el conector de
culata amarilla que se suministra. Dirija el alambre
negro a través de un pasacables y a lo largo del
bastidor exterior o siga el cableado existente a lo
largo de los umbrales y dentro del compartimiento
del motor hasta la batería para evitar las áreas que
pueden pellizcar o romper el cable
g
.
© 2015 Cequent Performance Products, Inc.PAGE 3 OF 3
ADVERTENCIA
Si dirije el alambre a través de un pasacable y a
lo largo del exterior del vehículo, tenga cuidado
y evite cualquier tubería caliente, protectores de
calor, el tanque de combustible o cualquier otro
punto que pueda pellizcar o romper el cable.
10. Desconecte el cable negativo (-) de la batería
del vehículo. Si no se ha retirado, retire el fusible
del portador de fusibles amarillo (suministrado).
Después de cortar el alambre del portador de
fusibles, una el terminal de anillo y asegúrelo
al cable positivo (+) de la batería del vehículo.
Conecte el otro extremo del portador de fusibles
al alambre negro de 12 ga. usando el conector
de cabeza amarillo (suministrado)
hi
.
ADVERTENCIA
Lea y siga todas las advertencias y precauciones
impresas en la batería del vehículo de remolque.
11. Vuelva a conectar el cable negativo (-) de la batería
e instale el fusible de 15 amperios en el portador
de fusibles del paso 10.
ADVERTENCIA
Se deben completar todas las conexiones para que
el conector en T funcione correctamente. Ensaye
y verifique la instalación con una luz de prueba o
remolque una vez se instale. Para la prueba inicial,
reinicialice el sistema eléctrico del vehículo al
quitar temporalmente la llave de la ignición.
12. Localice una superficie plana e instale la caja
negramódulo del conector en T, para evitar
daños o ruido.
gd
he
if
/