Page is loading ...

HANDS-FREE 7" TOUCH SCREEN
VIDEO INTERCOM SYSTEM
OWNER
,
S MANUAL
INSTALLATION GUIDE
HFX-900R

1
1
3
4
11
12
12
16
16
17
18
19
21
23
25
1.Introduction
2.Parts Identification
2.1.Contents of the package
2.2.Main monitor function
2.3.Video door phone function
3.Expansion and accessories
3.1.EX-900H expansion monitor
3.2.EX-VIN external camera signal converter
3.3.EX-HUB home run configuration hub
Section 1: Article Operation
Section 2: Article Installation
1.System layout 1
2.System layout 2
3.Wiring and its terminals
4.Installation
5.Technical specifications
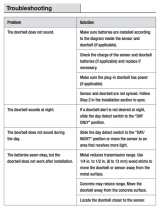
6.Trouble shooting
26
27
28
29
Section 3: Appendix
1. WARNING
2. IMPORTANT SAFETY INSTRUCTIONS
3. FCC CLASS B NOTICE
4. SERVICE AND WARRANTY
9LGHR,QWHUFRP6ROXWLRQV

Thank you for purchasing the Hands-Free 7" expandable Video intercom
system; HFX-900R.
This intercom system uses 2-wire installation and allows you to identify
and communicate with callers at the door, from the security and
convenience of any room in your home or office. Visitors activate the
system by pressing a call button on the outdoor camera, which sounds
a doorbell chime as well as turning on the inside video monitor.
A two-way intercom then lets you speak with visitors after first visually
identifying them.
It consists of a monitor station and an outdoor doorbell/camera unit.
This unit is capable of expanding up to a total of 8 indoor monitors and
4 door cameras.
For more information regarding the complete line of our products,
please visit www.comelitusa.com
1.Introduction
9LGHR,QWHUFRP6ROXWLRQV
Section 1: Article Operation
2.Parts Identification
HFX-900R Main monitor identification
1. Microphone
2. 7" Color TFT Screen
3. Speaker
4. Wiring terminals
9.06in
1.25in
6.6in
2 6
7
1
45
3
5. External chime type Jumper
6. Power button
7. SD slot (micro SD card not
included)

9LGHR,QWHUFRP6ROXWLRQV
HFX-900R Door Camera identification
5.12in
3.86in 1.42in
7
8
4
2
3
5
6
10 9 11
6XSSOHPHQWDU\/('IRUORZOLJKW
&026FDPHUD
0LFURSKRQH
6SHDNHU
&DOOEXWWRQEDFNOLW
+LGGHQVFUHZFRYHU
&DPHUDXSGRZQDGMXVWPHQWNQRE
-3$XWR/('OLJKWVXSSOLPHQWLQORZOLJKWFRQGLWLRQV
/LJKWVXSSOLPHQWHQDEOHGIDFWRU\VHWWLQJ
/LJKWVXSSOLPHQWGLVDEOHG
-3/RFNFRQWURORXWSXWW\SH
'U\FRQWDFWUHOD\IDFWRU\VHWWLQJ
&XUUHQWRXWSXWZLOOORVHYLGHRZKHQSURYLGLQJSRZHU
/RFNFRQWUROWHUPLQDOV
ZLUHVFRQQHFWWRPDLQPRQLWRU

9LGHR,QWHUFRP6ROXWLRQV
2.1.Contents of the package
Main monitor Flush mount bracket
Anchor plateSpring
Door camera
Removable wiring terminals
Power adapter
Manual
Wall mount bracket
Ma
n
ua
l
HANDS-FREE 7" TOUCH SCREEN
VIDEO INTERCOM SYSTEM
OWNER
,
S MANUAL
INSTALLATION GUIDE
HFX-900R

9LGHR,QWHUFRP6ROXWLRQV
2.2.Main monitor function
3ULYDF\ $XWRXQORFN
PRGH
6FUHHQVDYHU
VHWWLQJV
&DOOIRUZDUGLQJ
5HFRUGLQJ
3OD\EDFN
6HWWLQJV &DPHUD
0RQLWRULQJ
,QWHUFRPZ
PRQLWRUV
'D\QLJKW
PRGH
Features
Home Page
&ORFN

9LGHR,QWHUFRP6ROXWLRQV
Clock Adjust
Icon
2.2.1 Clock Adjustment
ჀFOLFNWRDGMXVWWLPH
ჀFOLFNWRDGMXVWGDWH
Privacy OFF
Privacy ON
Privacy
Ⴠ:KLWHFRORUHG%HOOLFRQPHDQV
WKDW3ULYDF\PRGHLV2))
Ⴠ3UHVVWKHSULYDF\RQEXWWRQ
WRDFWLYDWHWKHSULYDF\PRGH
RUDQJHLFRQ
2.2.2 Privacy Mode
Privacy OFFPrivacy ON
Icon

9LGHR,QWHUFRP6ROXWLRQV
( 123 ) 1234567
Delay :
Delay :
Delay :
10
Sec
Sec
Sec
Call Forwarding
OFF
Call Forwarding
ON
Call Forwarding
OFF
Call Forwarding
ON
(
XXX
)
1234567
Del
Del
Del
ay
ay
ay
:
:
:
10
10
10
Se
Se
Se
c
c
c
Call Forwarding
Ⴠ3UHVVWKHFDOOIRUZDUGLQJRII
EXWWRQWRGHDFWLYDWHFDOO
IRUZDUGLQJZKLWHLFRQ
Ⴠ3UHVVWKHFDOOIRUZDUGLQJRQ
EXWWRQWRDFWLYDWHFDOOIRUZDUGLQJ
ჀSUHVVWKHDUURZEXWWRQVWR
VHOHFWWKHSKRQHQXPEHUWR
IRUZDUGWKHFDOOWR
Ⴠ&OLFNRQWKHPLGGOHEXWWRQWR
DGGHGLWXSWRQXPEHUVWR
WKHFDOOOLVW
( 123 ) 1234567
Delay :
Delay :
Delay :
10
Sec
Sec
Sec
2.2.3 Call Forwarding Mode
Icon

9LGHR,QWHUFRP6ROXWLRQV
Night Mode
( call-all )
Day Mode
( master-only )
Night Mode
( call-all )
Day Mode
( master-only )
Day/Night Mode
3UHVVWKHQLJKWPRGHEXWWRQ
WRDFWLYDWHWKHFDOODOOPRGH
ZKLWHLFRQ
3UHVVWKHGD\PRGHEXWWRQ
WRDFWLYDWHWKHPDVWHURQO\
PRGHRUDQJHLFRQ
2.2.4 Day/Night Mode Function
Icon
DOORBELL CAM 01
NONE
DOORBELL CAM 02
Normal Mode
No Doorbell Camera
Auto-Unlock :
Auto door release upon
call
Door Station Status
NONE
2.2.5 Auto-unlock Mode
DOORBELL CAM 02
DOORBELL CAM 01
Icon
Ⴠ3UHVVWKHGRRUEHOOEXWWRQ
WRDFWLYDWHWKHDXWRXQORFN
PRGHRUDQJHLFRQ
Ⴠ3UHVVWKHGRRUEHOOEXWWRQ
DJDLQWRUHWXUQLWWRQRUPDO
PRGHZKLWHLFRQ
:$51,1*$XWRXQORFNPRGHZLOOOHDYHGRRUVXQDWWHQGHG
3OHDVHEHVXUHWRFKDQJHLWEDFNWRQRUPDOPRGHWRVHFXUHWKHGRRU

9LGHR,QWHUFRP6ROXWLRQV
$QVZHU &XWRII 7DONWLPPHU
H[WHQWLRQ
7DONWLPPHU
FRXQWGRZQ
30s
Ⴠ6WHSSUHVVLQWHUFRPEXWWRQLFRQWRLQLWLDWHWKHDOOSDJHFKLPH
Ⴠ6WHS$IWHUWKHFKLPHVRXQGVDPHVVDJHFDQEHEURDGFDVWWRDOO
PRQLWRUVRQWKHV\VWHP
Ⴠ6WHS,IDQ\RWKHUPRQLWRUSLFNVXSWKHLQWHUFRPUHTXHVWLWEHFRPHV
DSRLQWWRSRLQWFRQYHUVDWLRQEHWZHHQWKHWZRPRQLWRUV
All-Page Initiated
Intercom Conversation
Established
2.2.6 Intercom All-page with other monitors
Intercom Conversation
Established
30s
Icon

9LGHR,QWHUFRP6ROXWLRQV
Recording
90s
Camera 01
Ⴠ&OLFNWRVZLWFKEHWZHHQ
ZD\DQGZD\DXGLR
Ⴠ3UHVVDQGKROGWKHDUURZ
WRHVWDEOLVKSXVKWRWDON
DXGLRIXQFWLRQ
2.2.7 Door camera monitoring
Icon
Monitor
DOORBELL CAM 01 DOORBELL CAM 02
NONE NONE
DOORBELL CAM 01

9LGHR,QWHUFRP6ROXWLRQV
Free Space: XXXXXX MB01.01.2013
Memory Reviewing
1 / 2
10 MB
PM 10:52:23
2.2.8 Video Recording playback
Icon
Screen Saver
Ⴠ3OD\YLGHRILOHV
Ⴠ3OD\SLFWXUHILOHV
Ⴠ7KHSOD\EDFNPRGHRSHUDWHVOLNHD
W\SLFDOGLJLWDOSKRWRIUDPH
1 / 2
Screen Saver
2.2.9 Multi-media screen saver function
Icon
$XWRPDWLFDOO\WKHPRVW
UHFHQWIROGHUIRUWKHODVW
GDWHRIUHFRUGLQJLVOLVWHG
&OLFNRQWKHIROGHULFRQLQ
WKHWRSULJKWFRUQHUWR
DFFHVVRWKHUGDWHV
IROGHUVVWRUHGRQWKHFDUG
6HOHFWQFKHFNDVHVVLRQ
FDQWKHQFOLFNWUDVKFDQWR
GHOHWH

9LGHR,QWHUFRP6ROXWLRQV
DR1 : Doorbell camera
DR2 : Camera
DR3 : None
DR4 : None
1 / 4
System Settings
Interface
Operating Instructions
Ⴠ&OLFNWRHQWHUHGLWVFUHHQ
2.2.10 Settings
,QWHUDFWLYHXVHULQWHUIDFH
KHOSVWRHGLWVHWWLQJV
2.3. Video door phone function
:KHQDYLVLWRUSUHVVHVWKHGRRUEHOOEXWWRQIURPDQ\RIWKHGRRUFDPHUDVLW
DFWLYDWHVWKHGRRUEHOOFKLPHRQDOOPRQLWRUV
7KHXVHULQVLGHDQVZHUVWKHFDOOE\SUHVVLQJWKHDQVZHULFRQWRHQJDJHWKH
YLGHRDQGDXGLRFRPPXQLFDWLRQ
'HSHQGLQJRQVHWWLQJVWKHPRQLWRUVFDQEHRQSULYDF\PRGHQLJKWPRGHFDOO
IRUZDUGLQJPRGHRUQLJKWPRGH
7KHPRQLWRUZLOODXWRPDWLFDOO\UHFRUGDVHF$9ILOHWRWKHPLFUR6'FDUG
7KHXVHUIURPLQVLGHFDQRSHUDWHWKHIROORZLQJIHDWXUHVRQWKHLQWHUDFWLYHVFUHHQ
([WHQG
FRQYHUVDWLRQ
3DXVH
UHFRUGLQJ
ZD\RU
ZD\DXGLR
SXVKWRWDON
ZD\DXGLR

9LGHR,QWHUFRP6ROXWLRQV
3. Expansion and accessories
3.1. EX-900H
Features
Home Page
&ORFN
3ULYDF\ 6HWWLQJV 0RQLWRU&DPHUD ,QWHUFRP
$OOSDJH

9LGHR,QWHUFRP6ROXWLRQV
3.1.1 Clock Adjustment
Clock Adjust
Icon
Ⴠ&OLFNWRDGMXVWWLPH
Privacy OFF
Privacy ON
Privacy
Privacy OFF
Privacy ON
Icon
3.1.2 Privacy Mode
Ⴠ:KLWHFRORUHG%HOOLFRQPHDQV
WKDW3ULYDF\PRGHLV2))
Ⴠ3UHVVWKHSULYDF\RQEXWWRQ
WRDFWLYDWHWKHSULYDF\PRGH
RUDQJHLFRQ

9LGHR,QWHUFRP6ROXWLRQV
3.1.3 Intercom w/ other monitor
All-Page Initiated
Intercom Conversation
Established
Intercom Conversation
Established
30s
Icon
$QVZHU &XWRII 7DONWLPPHU
H[WHQWLRQ
7DONWLPPHU
FRXQWGRZQ
30s
Ⴠ6WHSSUHVVLQWHUFRPEXWWRQLFRQWRLQLWLDWHWKHDOOSDJHFKLPH
Ⴠ6WHS$IWHUWKHFKLPHVRXQGVDPHVVDJHFDQEHEURDGFDVWWRDOO
PRQLWRUVRQWKHV\VWHP
Ⴠ6WHS,IDQ\RWKHUPRQLWRUSLFNVXSWKHLQWHUFRPUHTXHVWLWEHFRPHV
DSRLQWWRSRLQWFRQYHUVDWLRQEHWZHHQWKHWZRPRQLWRUV

9LGHR,QWHUFRP6ROXWLRQV
3.1.4 Camera surveillance
Icon
&OLFNWRVZLWFKEHWZHHQ
ZD\DQGZD\DXGLR
3UHVVDQGKROGWKHDUURZ
WRHVWDEOLVKSXVKWRWDON
DXGLRIXQFWLRQ
&OLFNFDQVZLWFK
WRQH[WFDPHUDLQ
FLUFXODUVHTXHQFH
Recording
90s
Camera 01
DR1 : Doorbell camera
DR2 : Camera
DR3 : None
DR4 : None
1 / 4
System Settings
Operating Instructions
Ⴠ&OLFNWRHQWHUHGLWVFUHHQ
3.1.5 Settings
,QWHUDFWLYHXVHULQWHUIDFH
KHOSVWRHGLWGHVLUDEOHVHWWLQJV
Icon

9LGHR,QWHUFRP6ROXWLRQV
3.2. EX-VIN external camera signal converter
3.2.1 EX-VIN Identification
3.2.2 EX-VIN Operation
1. Power LED
2. The 2-wire terminals for
connecting to the main monitor
3. BNC connector for external
camera video input
1
3
2
A. EX-VIN converts any standard CCTV signal to the 2-wire transmission format of
the system.
B. Press the monitor button and select the camera you wish
to view with the EX-VIN installed.
C. Pressing the cut-off button to exit the monitoring mode.
* The EX-VIN does not provide power to the external CCTV Camera.
3.3. EX-HUB home run configuration hub
3.3.1 EX-HUB Identification
3.3.2 EX-HUB Function
A. Provides the ability to wire the HFX-900R and expansion monitors
in a home-run configuration, up to 5 monitors.
B. The wiring hub can amplify and distribute the 2-wire signal among the
sub monitors, effectively doubling up the distance from the master to the last
expansion.
C. The power LED is "on" during normal operation.
D. The HFX-900R series has the ability to connect 2 EX-HUB units
together to expand to a total of 8 Monitors
2. “IN” terminals for main monitor
and “POWER” terminals for
power adapter
1. Power LED
3. “OUT” terminals for expansion
monitor.
2 1
3

1.System layout 1
Maximum wiring distance
(using dry contact lock control at doorbell camera)
Maximum wiring distance
(using the 12VDC/300mA lock control at doorbell camera)
NOTE : CAT-5 is not recommended for this type of installation.
EX-720D
HFX-900R KIT
EX-900H
NOTE: This system is capable to expanding up to 4 doorbell cameras and 8
Monitors. For alternative application please consult our technical support
engineer first.
9LGHR,QWHUFRP6ROXWLRQV
Section 2: Article Installation

2.System layout 2
NOTE 1: The wiring HUB can amplify and distribute the 2-wire signal
among the main monitor and sub-monitors.
NOTE 2: the system is capable of expanding up to a total of 5 monitors
with 1 EX-HUB.
Maximum wiring distance
(using dry contact lock control at doorbell camera)
Maximum wiring distance
(using the 12VDC/300mA lock control at doorbell camera)
NOTE : CAT-5 is not recommended for this type of installation.
HFX-900R
EX-720D
EX-900H
9LGHR,QWHUFRP6ROXWLRQV
656
656
656
/