Page is loading ...

RHTOV30_IB&RB_FA_210116
2 YEAR WARRANTY
DIGITAL CONVECTION
OVEN
RHTOV30
INSTRUCTIONS & WARRANTY

2
IMPORTANT SAFEGUARDS
When using this appliance, basic safety precautions should always be followed, including the following:
Read all instructions before, and follow whilst using this appliance.
1. To protect against electrical hazards do not immerse the power cord, plug or toaster oven in water or
any other liquid.
2. Do not use in the bathroom or near any source of water.
3. Do not use outdoors.
4. Always use the appliance’s handles or use oven gloves/mitts as some parts will be hot.
5. The temperature of accessible surfaces/parts may become very hot when the appliance is operating
and may remain hot for some time after the appliance has been switched off.
6. This appliance is not intended for use by persons (including children) with reduced physical, sensory
or mental capabilities, or lack of experience and knowledge, unless they have been given
supervision or instruction concerning use of the appliance by a person responsible for their safety.
7. Keep the oven and the power cord away from the edge of table or countertops and out of reach of
children and persons with reduced physical, sensory or mental capabilities.
8. This appliance is not a toy. Children should be supervised to ensure they do not play with the
appliance.
9. Do not leave this appliance unattended when in use.
10. Always switch off and unplug from the power outlet when not in use.
11. Always switch off and unplug from the power outlet and allow the oven to cool before cleaning.
12. To disconnect, set controls to OFF. Switch off the wall power outlet, then grasp the plug and remove
from wall power socket. Never pull by the cord.
13. Do not operate this appliance with a damaged cord/plug or after the appliance has malfunctioned,
or been dropped or damaged in any manner. Contact Customer Service for replacement,
examination, repair or adjustment.
14. There are no user serviceable parts. If power cord or appliance is damaged, it must be replaced by
the manufacturer or similarly qualified person in order to avoid a hazard.
15. Do not use on an inclined plane or unstable surface.
16. Do not move the oven while it is switched on.
17. Do not cover the oven when in use.
18. Oven gloves should be used when removing food items.
19. Always take care when removing hot food items from the oven.
20. Food may burn. Always monitor when using this appliance.
21. Do not use the oven near or below any curtains or other combustible materials.
22. Do not cook food items too large for the oven.
23. Do not cook food wrapped in plastic film or polythene bags. It will cause a fire hazard.
24. Do not place on or near any heat sources.
25. Do not clean with metal scouring pads. Pieces can break off the pad and touch electrical parts,
creating a risk of electric shock.
26. Follow the instructions when cleaning this appliance.

3
2 7. Do not use appliance for anything other than its intended purpose.
28. Do not store any material, other than manufacturer’s recommended accessories, in this oven when
not in use.
29. Do not place any of the following materials in the oven: paper, cardboard, plastic, and the like.
30. Clean the oven and crumb tray regularly. Failure to do so may cause a fire hazard.
31. Do not cover crumb tray or any part of this oven with metal foil. This will cause overheating of the
oven.
32. This appliance is not intended to be operated by means of an external timer or separate remote
control system.
33. For added safety, electrical appliances should be connected to a power outlet that is protected by a
residual current device (RCD), also often referred to as a ‘Safety Switch’. Your switchboard may
already incorporate an RCD. If unsure, call an electrician for verification and fitting if necessary.
34. This appliance is intended to be used in household and similar applications such as:
- Staff kitchen areas in shops, offices and other working environments;
- Farm houses;
- By clients in hotels, motels, and other residential type environments;
- Bed & breakfast type environments.
SAVE THESE INSTRUCTIONS.

4
Spectrum Brands Australia Pty Ltd
Locked Bag 3004 Braeside
Victoria 3195 Australia
Customer Service in Australia
TollFree: 1800 623 118
Email: [email protected]
Website: www.spectrumbrands.com.au
Spectrum Brands New Zealand Ltd
PO Box 9817 Newmarket
Auckland 1149 New Zealand
Customer Service in New Zealand
TollFree: 0800 736 776
Email: [email protected]
Website: www.spectrumbrands.co.nz
Spectrum Brands Australia Pty Ltd and Spectrum Brands New Zealand Ltd
Warranty Against Defects
In this warranty:
Australian Consumer Law means the Australian consumer law set out in Schedule 2 to the
Competition and Consumer Act 2010;
CGA means the New Zealand Consumer Guarantees Act 1993;
Goods means the product or equipment which was accompanied by this warranty and
purchased in Australia or New Zealand, as the case may be;
Manufacturer, We or us means:
1. for Goods purchased in Australia, Spectrum Brands Australia Pty Ltd ABN, 78 007 070 573;
or
2. for Goods purchased in New Zealand, Spectrum Brands New Zealand Ltd, as the case
may be, contact details as set out at the end of this warranty;
Supplier means the authorised distributor or retailer of the Goods that sold you the Goods in
Australia or in New Zealand; and
You means you, the original end-user purchaser of the Goods.
1. Our goods come with guarantees that cannot be excluded under the Australian Consumer
Law, or the CGA. You are entitled to a replacement or refund for a major failure and
compensation for any other reasonably foreseeable loss or damage. You are also entitled
to have the goods repaired or replaced if the goods fail to be of acceptable quality and the
failure does not amount to a major failure.
2. The benefits provided by this Warranty are in addition to all other rights and remedies in
respect of the Goods which the consumer has under either the Australian Consumer Law
or the CGA. The original purchaser of the Goods is provided with the following Warranty
subject to the Warranty Conditions:
3. We warrant the Goods for all parts defective in workmanship or materials for a period of 2
years from the date of purchase (Warranty Period).
If the Goods prove defective within the Warranty Period by reason of improper workmanship
or material, we may, at our own discretion, repair or replace the Goods without charge.
Warranty Conditions
4. The Goods must be used in accordance with the manufacturer’s instructions. This
Warranty does not apply should the defect in or failure of the Goods be attributable
to misuse, abuse, accident or non-observance of manufacturer’s instructions on the
part of the user. As far as the law permits, the manufacturer does not accept liability
for any direct or consequential loss, damage or other expense caused by or arising
out of any failure to use the Goods in accordance with the manufacturer’s instructions.
5. Exhaustible components (such as batteries, filters and brushes) of the Goods are
included under this Warranty only where there is a defect in workmanship or materials
used.
6. The warranty granted under clause 3 is limited to repair or replacement only.
7. Any parts of the Goods replaced during repairs or any product replaced remain the
property of the manufacturer. In the event of the Goods being replaced during the
Warranty Period, the warranty on the replacement Goods will expire on the same
date as for the Warranty Period on the original Goods which are replaced.
8. In order to claim under the warranty granted under clause 3 you must:
(a) Retain this warranty with your receipt/proof of purchase; and
(b) Return the Goods to us at the relevant address or to the Supplier by prepaid
freight within the Warranty Period accompanied with (i) the legible and unmodified
original proof of purchase, which clearly indicates the name and address of the
Supplier, the date and place of purchase, the product name or other product serial
number and (ii) this warranty.
9. This warranty is immediately void if:
(a) Any serial number or appliance plate is removed or defaced;
(b) The Goods have been serviced or otherwise repaired by a person not authorised
to do so by us or where non approved replaced parts are used.
10. The Goods are designed for domestic use only. The Goods must be connected to the
electrical voltage requirements as specified in the ratings label located on the Goods.
11. This warranty does not cover the cost of claiming under the warranty or transport
of the Goods to and from the Supplier or us.
12. This warranty is only valid and enforceable in Australia against Spectrum Brands
Australia Pty Ltd and in New Zealand against Spectrum Brands New Zealand Ltd.
Contact us or the Supplier for further details.
Register your product online
If you live in Australia please visit: www.spectrumbrands.com.au/warranty
If you live in New Zealand Please visit: www.spectrumbrands.co.nz/warranty
Registration of your warranty is not compulsory, it gives us a record of your purchase
AND entitles you to receive these benefits: Product information; Hints and tips; Recipes
and news; Information on special price offers and promotions.
Any questions? Please contact Customer Service for advice.
. (Warranty Period)

5
Spectrum Brands Australia Pty Ltd
Locked Bag 3004 Braeside
Victoria 3195 Australia
Customer Service in Australia
TollFree: 1800 623 118
Email: [email protected]
Website: www.spectrumbrands.com.au
Spectrum Brands New Zealand Ltd
PO Box 9817 Newmarket
Auckland 1149 New Zealand
Customer Service in New Zealand
TollFree: 0800 736 776
Email: [email protected]
Website: www.spectrumbrands.co.nz
Spectrum Brands Australia Pty Ltd and Spectrum Brands New Zealand Ltd
Warranty Against Defects
In this warranty:
Australian Consumer Law means the Australian consumer law set out in Schedule 2 to the
Competition and Consumer Act 2010;
CGA means the New Zealand Consumer Guarantees Act 1993;
Goods means the product or equipment which was accompanied by this warranty and
purchased in Australia or New Zealand, as the case may be;
Manufacturer, We or us means:
1. for Goods purchased in Australia, Spectrum Brands Australia Pty Ltd ABN, 78 007 070 573;
or
2. for Goods purchased in New Zealand, Spectrum Brands New Zealand Ltd, as the case
may be, contact details as set out at the end of this warranty;
Supplier means the authorised distributor or retailer of the Goods that sold you the Goods in
Australia or in New Zealand; and
You means you, the original end-user purchaser of the Goods.
1. Our goods come with guarantees that cannot be excluded under the Australian Consumer
Law, or the CGA. You are entitled to a replacement or refund for a major failure and
compensation for any other reasonably foreseeable loss or damage. You are also entitled
to have the goods repaired or replaced if the goods fail to be of acceptable quality and the
failure does not amount to a major failure.
2. The benefits provided by this Warranty are in addition to all other rights and remedies in
respect of the Goods which the consumer has under either the Australian Consumer Law
or the CGA. The original purchaser of the Goods is provided with the following Warranty
subject to the Warranty Conditions:
3. We warrant the Goods for all parts defective in workmanship or materials for a period of 2
years from the date of purchase (Warranty Period).
If the Goods prove defective within the Warranty Period by reason of improper workmanship
or material, we may, at our own discretion, repair or replace the Goods without charge.
Warranty Conditions
4. The Goods must be used in accordance with the manufacturer’s instructions. This
Warranty does not apply should the defect in or failure of the Goods be attributable
to misuse, abuse, accident or non-observance of manufacturer’s instructions on the
part of the user. As far as the law permits, the manufacturer does not accept liability
for any direct or consequential loss, damage or other expense caused by or arising
out of any failure to use the Goods in accordance with the manufacturer’s instructions.
5. Exhaustible components (such as batteries, filters and brushes) of the Goods are
included under this Warranty only where there is a defect in workmanship or materials
used.
6. The warranty granted under clause 3 is limited to repair or replacement only.
7. Any parts of the Goods replaced during repairs or any product replaced remain the
property of the manufacturer. In the event of the Goods being replaced during the
Warranty Period, the warranty on the replacement Goods will expire on the same
date as for the Warranty Period on the original Goods which are replaced.
8. In order to claim under the warranty granted under clause 3 you must:
(a) Retain this warranty with your receipt/proof of purchase; and
(b) Return the Goods to us at the relevant address or to the Supplier by prepaid
freight within the Warranty Period accompanied with (i) the legible and unmodified
original proof of purchase, which clearly indicates the name and address of the
Supplier, the date and place of purchase, the product name or other product serial
number and (ii) this warranty.
9. This warranty is immediately void if:
(a) Any serial number or appliance plate is removed or defaced;
(b) The Goods have been serviced or otherwise repaired by a person not authorised
to do so by us or where non approved replaced parts are used.
10. The Goods are designed for domestic use only. The Goods must be connected to the
electrical voltage requirements as specified in the ratings label located on the Goods.
11. This warranty does not cover the cost of claiming under the warranty or transport
of the Goods to and from the Supplier or us.
12. This warranty is only valid and enforceable in Australia against Spectrum Brands
Australia Pty Ltd and in New Zealand against Spectrum Brands New Zealand Ltd.
Contact us or the Supplier for further details.
Register your product online
If you live in Australia please visit: www.spectrumbrands.com.au/warranty
If you live in New Zealand Please visit: www.spectrumbrands.co.nz/warranty
Registration of your warranty is not compulsory, it gives us a record of your purchase
AND entitles you to receive these benefits: Product information; Hints and tips; Recipes
and news; Information on special price offers and promotions.
Any questions? Please contact Customer Service for advice.

6
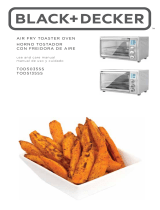
Congratulations on the purchase of your new Russell Hobbs appliance. Each unit is
manufactured to ensure safety and reliability.
Before using the appliance for the first time, please read this instruction booklet carefully
and keep it for future reference. Pass it on if you pass on the appliance.
When using this appliance, basic safety precautions should always be followed.
1. Door handle
2. Easy view glass door
3. 3 rack positions
4. Slide out crumb tray
5. Baking pan
6. Slide rack (2)
7. Digital display
8. Lights:
No Preheat, Turbo, Convection
9. Function knob
10. Temperature knob
11. Cooking light
12. Time knob and Start/Stop button
13. Function options
14. Temperature display
15. Pizza options
16. Timer display
17. Heating options
13
1
2
3
4
5 6
7
8
9
10
11
12
14
15
17
16

7
GETTING STARTED
• Remove all packing material, any stickers, and the plastic band around the power plug.
• Remove and save literature.
• Wash all removable parts as instructed in Care and Cleaning Section.
• Select a location where this unit is to be used, allowing enough space from the back of the
unit and wall to allow heat to ow without damage to cabinets and walls.
IMPORTANT INFORMATION ABOUT YOUR OVEN
1. This oven gets hot. When in use, always use oven mitts or potholders when touching any
outer or inner surface of the oven.
2. When using the oven for the rst time, you may notice smoke or a slight odor during the
rst few minutes. This is normal.
3. Be sure food or baking dish does not come within 1 1/2 inches (3.81cm) of the top heating
elements.
4. Food should not extend beyond the edges of the baking pan/drip tray to avoid drippings
from falling onto the heating elements.
5. The heating elements will cycle on and off to maintain even heat distribution.
6. After the cooking cycle is completed, the main display will stay illuminated for a short time
if not unplugged.
CHANGING TO AND FROM CELSIUS AND FAHRENHEIT
Hold down No Preheat and Turbo buttons.
ADVANCED COOKING TECHNOLOGIES FOR FAST, EASY MEALS
No Preheat
technology: Combined digital
programming and advanced infrared wave heat technology enable
the Performance Digital Convection Oven to cook without preheating
for fast, easy meals.
Turbo
Optional Turbo Function: Turbo cooking uses MAX infrared wave
power to cook faster—ideal for reheating or cooking frozen snacks.
Convection
Convection technology improves speed and evenness of cooking
using improved heat circulation.

8
OPERATING YOUR OVEN
1. Plug into outlet.
2. Display light will illuminate and all function lights will light up momentarily.
3. When turned on, the oven will either default to factory settings** or to the last setting used.
TOAST FUNCTION
1. Select TOAST function using function knob.
2. Use the TEMP knob to select desired toast shade, with 1 being the lightest and 7 being
the darkest.
3. Use the TIME knob to select the number of bread slices being toasted.
4. Place food directly on rack in the middle rack position and then press the START/STOP
button to begin toasting.
BAGEL FUNCTION
1. Select BAGEL function using function knob.
2. Use the TEMP knob to select desired toast shade, with 1 being the lightest and 7 being
the darkest.
3. Use the TIME knob to select the number of bagel slices being toasted.
4. Place food directly on rack in any rack position and then press the START/STOP button to
begin toasting.
BAKING FUNCTION
1. Place baking rack in oven in the middle rack.
2. Select BAKE function using function knob.
3. Select a heating option below:
BAKING OPTIONS
NO PREHEAT + CONVECTION
Cook WITHOUT preheating, and with convection technology in use.
1. After selecting the BAKE function, make sure NO PREHEAT and CONVECTION buttons
are lit. They should light up automatically.
2. Using the TEMP knob, adjust to needed temperature
3. Using the TIME knob, adjust time to needed cook time. DO NOT ADD IN TIME FOR
PREHEATING THE OVEN—THE OVEN DOES NOT NEED TO PREHEAT WHEN THE NO
PREHEAT OPTION IS CHOSEN. You may choose STAY ON so the oven does not stop
cooking until you press STOP.
4. Place food or pan directly on rack. Press the Start/Stop Button to begin baking.
5. A beep will sound once the baking cycle is complete. The oven will stop heating.
6. Unplug the appliance when not in use.

9
CONVECTION ONLY
Preheating will be required before cooking, but still cook using convection technology.
1. After selecting the BAKE function, press the NO PREHEAT button to deselect. The
CONVECTION button will still be lit.
2. Turning the TEMP knob, adjust temperature to desired temperature.
3. Turning the TIME knob, adjust time to set cook time.
4. Press the START/STOP knob to begin preheating.
5. The temperature display will blink while the oven is preheating.
6. Once the oven has preheated the cook time set will automatically begin counting down.
7. Place food or pan directly on rack.
8. There will be an audible beep once the baking cycle is complete and the oven will stop
heating.
9. Unplug the appliance when not in use.
TRADITIONAL BAKE (NEITHER NO PREHEAT NOR CONVECTION)
Preheating will be required before cooking, and convection technology will not be in use.
1. After selecting the BAKE function, deselect the NO PREHEAT and CONVECTION
buttons.
2. Turning the TEMP knob, adjust temperature to desired temperature.
3. Turning the TIME knob, adjust time to set cook time.
4. Press the START/STOP knob to begin preheating.
5. The temperature display will blink while the oven is preheating.
6. Once the oven has preheated the time set will automatically begin counting down.
7. Place food or pan directly on rack.
8. There will be an audible beep once the baking cycle is complete and the oven will stop
heating.
9. Unplug the appliance when not in use.

10
PIZZA FUNCTIONS
1. Select the PIZZA function using the function knob. Pause for a moment. A second menu
with four pizza options will display to the right of PIZZA. Still using the function knob,
select the type of pizza being cooked once options appear on the screen.
FRESH
1. Select the PIZZA/FRESH function. NO PREHEAT is not an option to cook FRESH pizza.
2. Turning the TEMP knob, adjust temperature to desired temperature.
3. Turning the TIME knob, adjust time to set cook time.
4. Press the START/STOP knob to begin preheating.
5. The temperature display will blink while the oven is preheating.
Note: For best results place baking pan in oven while no rack position advised
preheating, then place pizza on preheated pan to bake. Cook all pizzas in the middle
rack position.
6. Once the oven has preheated the time set will automatically begin counting down.
7. Place pizza directly on pan.
8. There will be an audible beep once the baking cycle is complete and the oven will stop
heating.
9. Unplug the appliance when not in use.
FROZEN, RISING, AND CRISPY PIZZA
1. After selecting the PIZZA function, CONVECTION button will illuminate automatically.
When using FROZEN mode and NO PREHEAT is selected, you may change to TURBO
and turn CONVECTION on and off.
2. Turning the TEMP knob, adjust temperature to desired temperature.
3. Turning the TIME knob, adjust time to set cook time. DO NOT ADD IN TIME FOR
PREHEATING THE OVEN—THE OVEN DOES NOT NEED TO PREHEAT WHEN THE NO
PREHEAT OPTION IS CHOSEN.
4. Place pizza directly on middle rack and then press the Start/Stop Button to begin baking.
5. There will be an audible beep once the baking cycle is complete and the oven will stop
heating.
6. Unplug the appliance when not in use.

11
GRILL FUNCTION
1. Select the GRILL function.The oven will default to 232°C and 10 minute cook time.
2. Turning the TEMP knob, adjust temperature to desired temperature. RECOMMENDED
GRILLING TEMPERATURE IS 232 DEGREES.
3. If needed, turn the TIME knob set cook time.
4. Place food or pan directly on rack in the top rack position.
5. Press the START/STOP knob to begin grilling.
Note: For best results when grilling meat, turn the meat over halfway through grilling.
6. There will be an audible beep once the grilling cycle is complete. The oven will stop
heating.
7. Unplug the appliance when not in use.
ROAST FUNCTION
1. Select the ROAST function using the function knob. NO PREHEAT and TURBO are not
available on the ROAST setting.
2. Turning the TEMP knob, adjust temperature to desired temperature.
3. Turning the TIME knob, adjust time to set cook time. You may choose STAY ON so the
oven does not stop cooking until you press STOP.
4. Press the START/STOP knob to begin preheating.
5. The temperature display will blink while the oven is preheating.
6. Once the oven has preheated the time set will automatically begin counting down.
7. Place food or pan directly on rack in the bottom position.
8. There will be an audible beep once the baking cycle is complete and the oven will stop
heating.
9. Unplug the appliance when not in use.
SNACKS FUNCTION
1. Select the SNACKS function using the function knob. TURBO and CONVECTION
buttons will all light up automatically. If you would like to preheat the oven or cook without
convection, please refer to TRADITIONAL BAKE instructions (page 9).
2. Turning the TEMP knob, adjust temperature to desired temperature.
3. Turning the TIME knob, adjust time to set cook time. DO NOT ADD IN TIME FOR
PREHEATING THE OVEN—THE OVEN DOES NOT NEED TO PREHEAT WHEN THE NO
PREHEAT OPTION IS CHOSEN.
4. Place food or pan directly on rack in the middle position. Press the Start/Stop Button to
begin cooking.
5. There will be an audible beep once the baking cycle is complete. The oven will stop
heating.
6. Unplug the appliance when not in use.

12
WARM FUNCTION
1. Select the WARM function using the function knob. The NO PREHEAT button will light up
automatically. You are not able to deselect NO PREHEAT. If you would like to preheat the
oven, please refer to TRADITIONAL BAKE instructions (page 10).
2. Turning the TIME knob, adjust time to set cook time. DO NOT ADD IN TIME FOR
PREHEATING THE OVEN—THE OVEN DOES NOT NEED TO PREHEAT WHEN THE NO
PREHEAT OPTION IS CHOSEN. You may choose STAY ON so the oven does not stop
cooking until you press STOP.
3. Place food or pan directly on rack. Press the Start/Stop Button to begin cooking.
4. There will be an audible beep once the baking cycle is complete. The oven will stop
heating.
5. Unplug the appliance when not in use.
REHEAT FUNCTION
1. Select the REHEAT function using the function knob. TURBO and CONVECTION buttons
will all light up automatically. You are not able to select NO PREHEAT.
2. Turning the TEMP knob, adjust temperature to desired temperature.
3. Turning the TIME knob, adjust time to set cook time. DO NOT ADD IN TIME FOR
PREHEATING THE OVEN—THE OVEN DOES NOT NEED TO PREHEAT WHEN THE NO
PREHEAT OPTION IS CHOSEN. You may choose STAY ON so the oven does not stop
cooking until you press STOP.
4. Place food or pan directly on rack. Press the Start/Stop Button to begin cooking.
5. There will be an audible beep once the baking cycle is complete and the oven will stop
heating.
6. Unplug the appliance when not in use.
STAY ON FUNCTION
Turning the TIME knob, turn until you see ON.

13
FUNCTION CHART
Default Settings** Function Ranges
FUNCTION TEMPERATURE TIME TEMPERATURE MAXIMUM TIME
RACK
POSITION
Toast Shade 4 - 1-7 Shades - Middle
Bagel Shade 4 - 1-7 Shades - Any
Convection
/ Bake*
176°C 15 mins C: 65° - 232° 120 min
Stay on Available
Middle
Pizza*
Fresh
Frozen
Rising
Crispy
232°C
204°C
204°C
218°C
15 mins
C: 65° - 232°
120 min
Middle
Grill 232°C 10 mins C: 232° 120 min Top
Roast 176°C 30 mins C: 65° - 232° 120 min
Stay on Available
Bottom
Snacks 218°C 15 mins C: 65° - 232° 120 min Middle
Warm 121°C 30 mins C: 121° 120 min
Stay on Available
Any
Reheat* 176°C 15 mins C: 65° - 232° 120 min
Stay on Available
Any
*Convection Baking is automatic on the Bake, Reheat, and Pizza Settings.
** Default settings apply only after the unit has been unplugged and plugged back in (Bake
Function is Default). Once a setting has been used, the last function, time and temperature
selections will be saved until the oven is unplugged.

14
CARE AND CLEANING
This product contains no user serviceable parts. Refer to service qualied service personnel.
CLEANING
Important: Before cleaning any part, be sure the oven is off, unplugged, and cool.
1. Clean the glass door with a sponge, soft cloth, or nylon pad and warm, soapy water. Do
not use a spray cleaner.
2. Remove racks and bake pan; wash in soapy water. To remove stubborn spots, use a
polyester or nylon pad.
3. Pull out crumb tray and dispose of crumbs. Wipe tray with a damp cloth and dry
thoroughly before placing back into the oven.
4. Wipe the outside of the oven with a damp cloth or sponge. Dry thoroughly.
5. Do not attempt to clean the heating elements. Any food that comes into contact with the
elements will burn on its own.
COOKING CONTAINERS
Metal, ovenproof glass or ceramic bakeware can be used in your oven. Follow the
manufacturer’s instructions. Be sure the top edge of the container is at least 1 1/2 inches
(3.81cm) away from the upper heating elements.

15
NOTES:

1
RHTOV30_RB_FA_210116
2 YEAR WARRANTY
DIGITAL CONVECTION
OVEN
RHTOV30
RECIPE BOOK

2
RUSSELL HOBBS and logo are Trade Marks of Spectrum Brands, Inc., or one of its subsidiaries.
©2015 Spectrum Brands, Inc.
Recipes are to be used in conjunction with the RHTOV30 Digital Convention Oven by Russell Hobbs. All rights reserved. No part of
this publication may be reproduced, stored in a retrieval system or transmitted in any form or by any means, electronic, mechanical,
photocopying, recording or otherwise, without prior permission of the copyright owner.
www.russellhobbs.com.au
www.russellhobbs.co.nz
SMOKED SALMON BAGELS
BAGEL FUNCTION
Preparation Time: 10 minutes
Cooking Time: 7 minutes
Serves: 2
Ingredients:
100g spreadable cream cheese
2 tsp nely chopped red onion
1 tsp baby capers, rinsed & roughly chopped
1 tsp lemon juice
½ tsp chopped dill (optional)
cracked black pepper, to taste
2 fresh store-bought bagels
100g smoked salmon slices
soft green lettuce leaves, to serve
Method:
1. In a bowl combine the cream cheese, onion, capers, lemon juice and dill (if using). Season
well with cracked black pepper. Stir to combine.
2. Insert a wire rack on the bottom shelf and select the BAGEL function. Set the TIME knob
to 4 (bagel slices), and the TEMP knob to your desired toast shade (between 1 and 7).
Slice the bagel diagonally in half, and place directly on the wire rack. Press START to begin
toasting.
3. Once toasted and lightly golden, spread liberally with the cream cheese mixture, top with
smoked salmon slices and lettuce leaves. Serve.

3
60g Gruyère or vintage cheddar
cheese, nely sliced
½ cup pre-made béchamel sauce
2 tbsp nely grated parmesan cheese
cracked black pepper, to serve
CROQUE MONSIEUR SANDWICH
TOAST FUNCTION
Preparation Time: 10 minutes
Cooking Time: 9 minutes
Serves: 2
Ingredients:
4 slices good-quality sourdough bread
20g salted butter, softened
2 tbsp Dijon mustard
150g good-quality thick cut ham
Method:
1. Brush each slice of bread liberally with butter and place directly onto the bottom wire rack,
butter side up. Select TOAST, set the TIME knob to 4 (bread slices), and the TEMP knob to
5. Press START and grill until golden; 3 minutes.
2. Spread the unbuttered sides of the bread with mustard. Top 2 with the ham and sliced
cheese. Place on a foil-lined tray on the bottom rack of the oven. Press START and grill
until the cheese melts.
3. Place the other bread slices on top, butter side up, then carefully cover each with
béchamel sauce and parmesan. Return the tray to the oven, this time on the top rack.
Press START and grill until the tops are bubbling and golden. Serve immediately with a
good grinding of black pepper.
** ACCOMPANYING RECIPE
BÉCHAMEL SAUCE
Preparation time: 5 minutes
Cooking time: 5 minutes
Makes: 1 cup
Ingredients:
30g salted butter
30g plain our
Melt the butter in a saucepan over medium heat. Add the our and stir 1 minute.
Add the milk all at once, reduce the heat to low, and whisk continuously until thickened.
Season with salt and pepper, to taste.
300ml full-fat milk
pinch of salt and cracked black pepper

4
GREEK SPINACH FILO PIE
NO PRE HEAT / CONVECTION FUNCTION
Preparation Time: 15 minutes
Cooking Time: 25 minutes
Serves: 6
Ingredients:
500g frozen spinach, defrosted & strained
½ bunch spring onions, white & green ends chopped
200g crumbled feta cheese
60g nely grated parmesan cheese
2 eggs, lightly beaten
¼ cup nely chopped fresh mint leaves
1 tbsp nely chopped fresh dill
freshly grated nutmeg, to taste
50g butter, melted
¼ cup extra virgin olive oil
12 sheets good-quality Greek lo pastry
Method:
1. In a large bowl combine the spinach, spring onion, cheeses, eggs, chopped herbs and
nutmeg. Mix thoroughly, and set aside.
2. Combine the butter and oil in a small bowl, and grease the inside of a 30cm diameter pie
tin. Lay a sheet of lo inside the tin and brush with the butter mixture. Lay another sheet
diagonally across the rst and brush again. Repeat, using 9 sheets of lo (reserving 3
sheets for the top of the pie).
3. Spoon in the lling mixture, Top with remaining lo sheets (brushing and layering, as with
the previous sheets). Fold in the overhanging lo to enclose the lling.
4. Brush the top with remaining butter. Insert a wire rack on the middle shelf, and select the
BAKE function (the NO PREHEAT and CONVECTION buttons should be illuminated). Set
the TEMP knob to 190°C, and the TIME knob to 25 minutes. Bake until the pastry is aky
and golden. Serve warm or at room temperature, with a side salad.
TIP: Choosing the STAY ON function means the oven will not stop cooking, until you press
STOP. You can also reheat this dish using RE-HEAT function.

5
LEMON RICOTTA CAKE WITH TOASTED ALMONDS
CONVECTION ONLY FUNCTION
Preparation Time: 10 minutes
Cooking Time: 55 minutes
Serves: 8-10
Ingredients:
400g fresh ricotta
3 eggs
Zest of 2 lemons
2 cups almond meal
3⁄4 cup caster sugar
1⁄4 cup aked almonds
1⁄2 cup lemon juice
1⁄2 cup caster sugar, extra
Natural yoghurt to serve
Method:
1. Generously grease and line a 20cm spring form cake tin.
2. Place the ricotta, eggs, zest, almond meal and sugar in a food processor and blend for 1
minute until smooth. Pour the batter into the prepared cake tin and sprinkle evenly with
aked almonds.
3. Insert a wire rack on the middle shelf, and select BAKE (deselect the NO PREHEAT
function). Set the TEMP to 148°C and TIME for 10 minutes. Once preheated, place cake on
the wire rack and set the TIME knob to bake for 55-60 minutes.
4. Meanwhile, combine lemon juice and extra sugar in a small saucepan over medium heat.
Stir until sugar dissolves and simmer for 5 minutes.
5. Allow the cake to cool for 15 minutes in the cake tin before turning out onto your serving
plate. Pour hot syrup over the cake and serve with natural yoghurt.
TIP: If the aked almonds are browning too quickly, carefully place a piece of foil over the top of
the cake until the last 5 minutes of cook time.
/