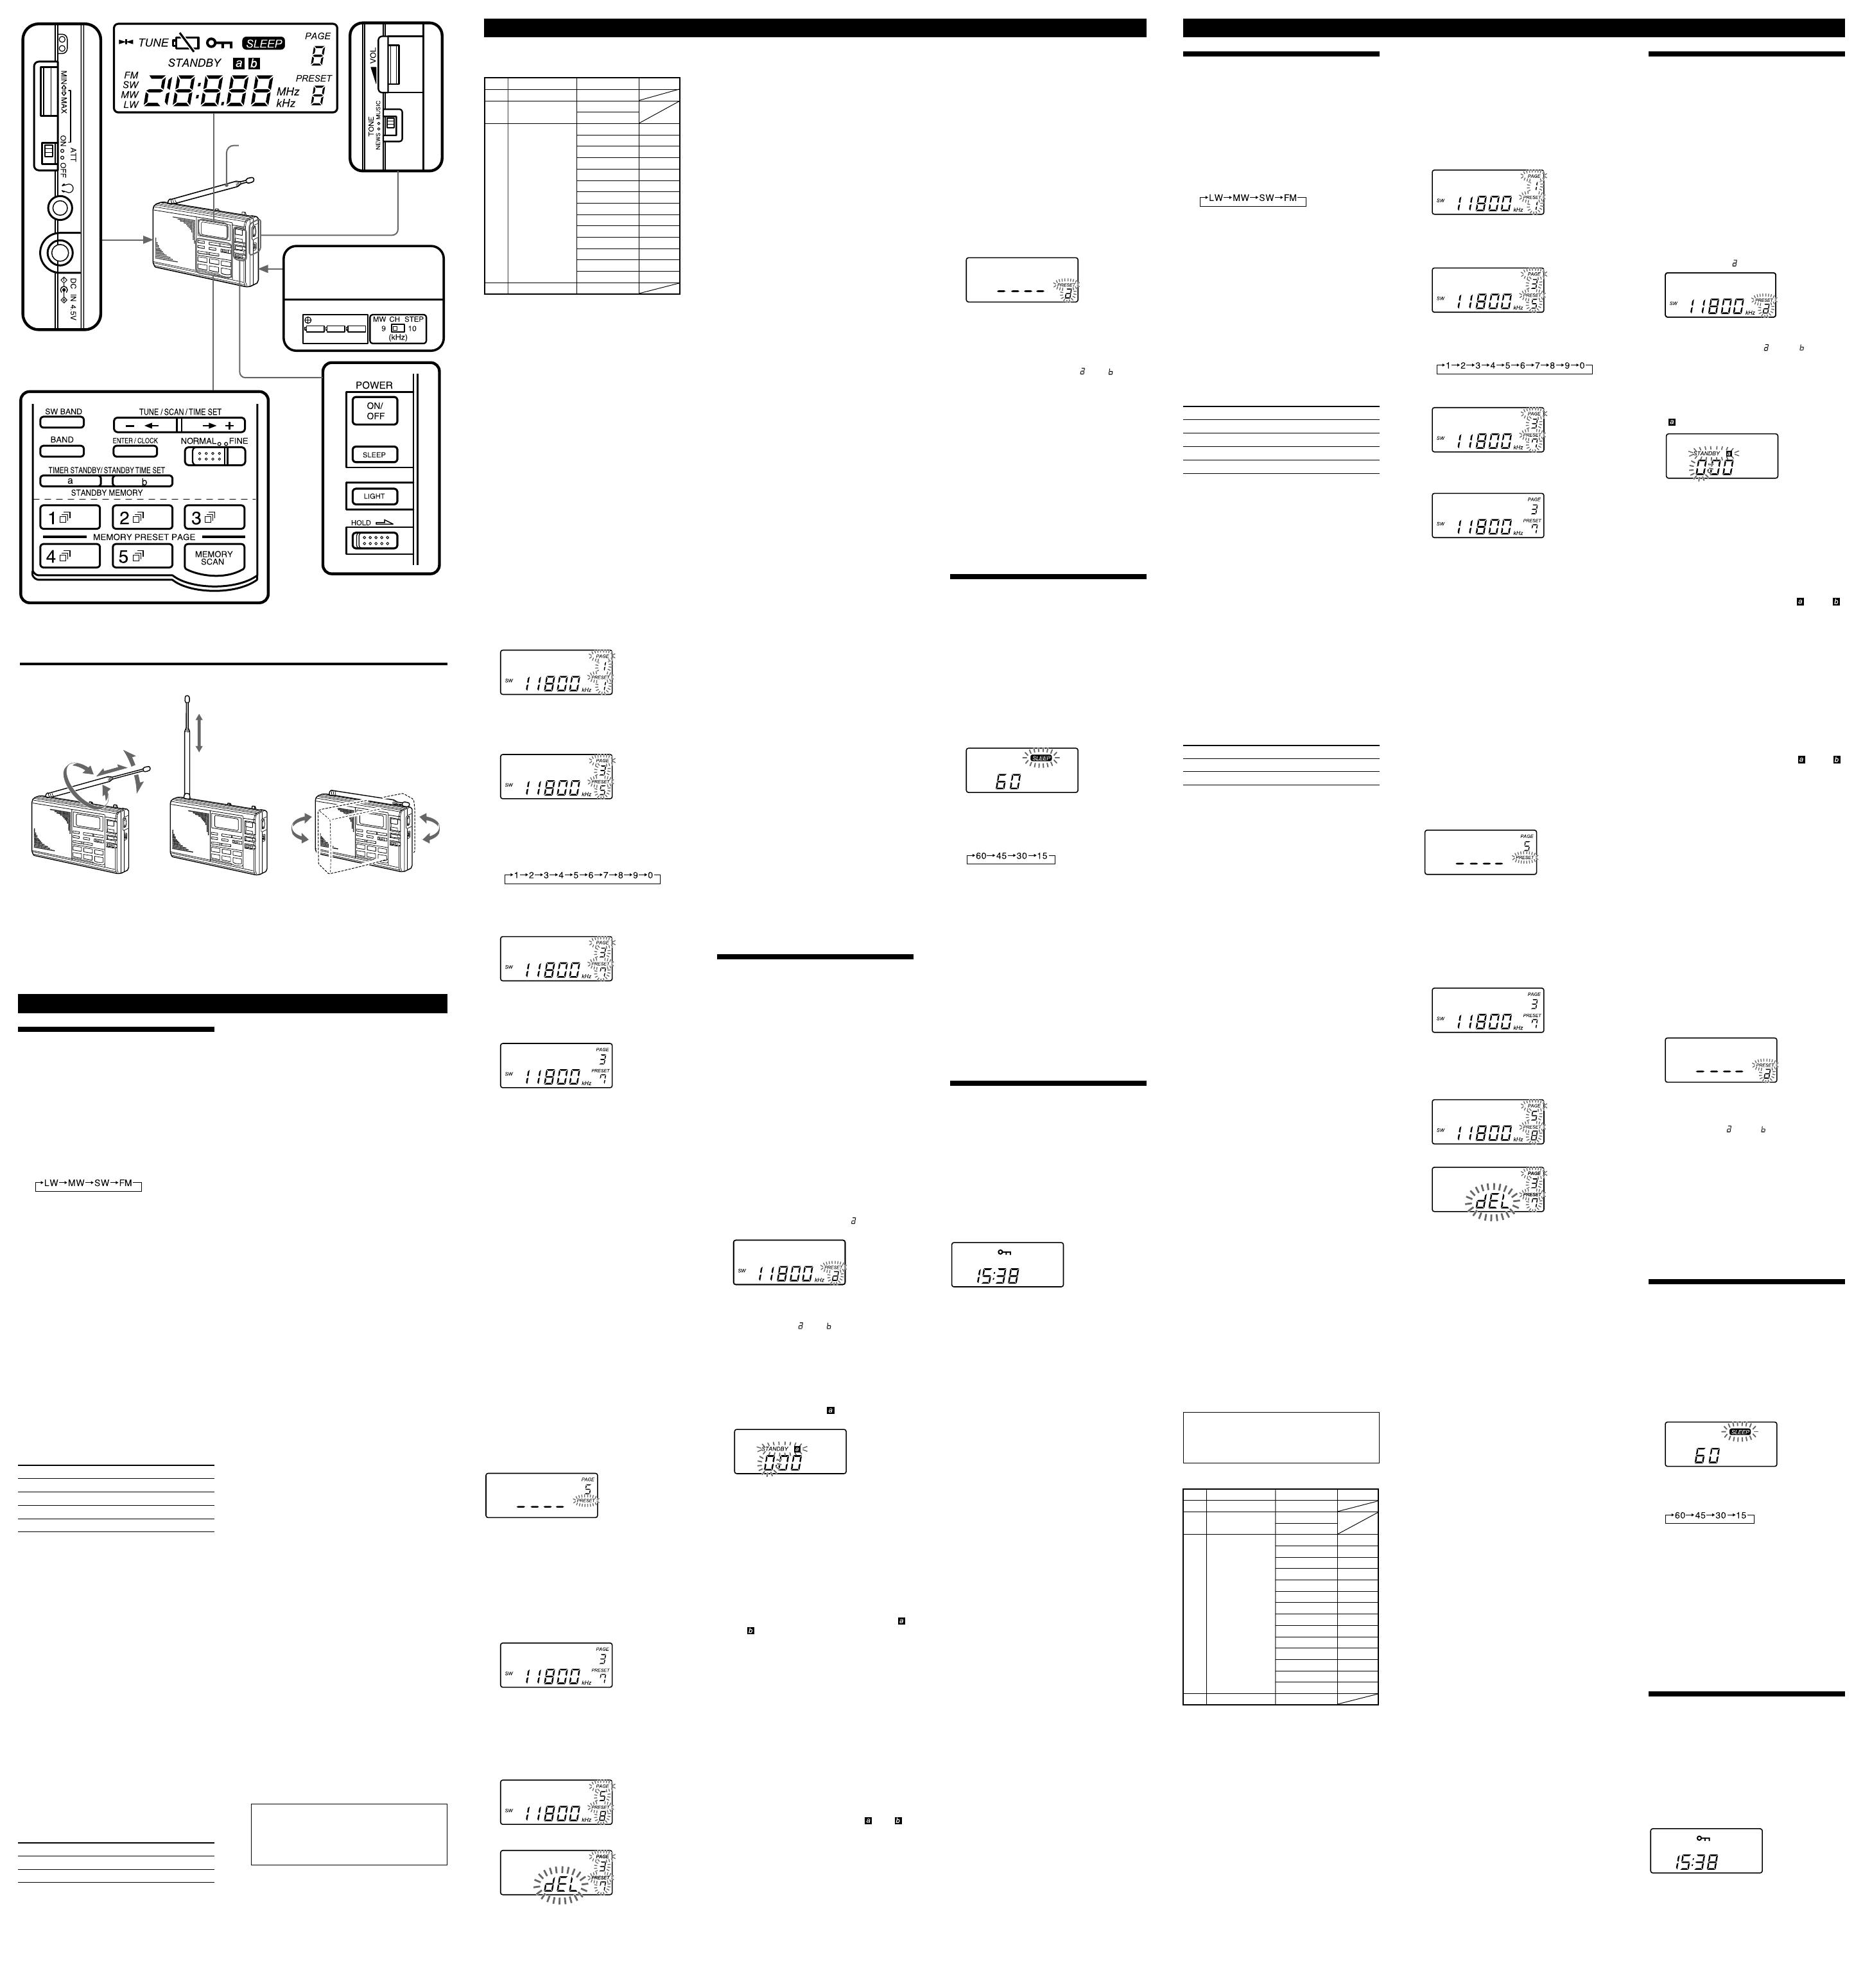
Operating the Radio
Before operating the radio, make sure of your
location. In some countries, the MW channel step
must be changed. (For details, see “Changing the
MW channel step”.)
Manual Tuning
1 Press ON/OFF to turn on the radio.
2 Press BAND to select the band. Each
press changes the display as follows:
A double-beep sounds when you select LW.
(The last frequency selected in each band
appears on the display.)
3 When you select SW: press –
TT
TT
T or
tt
tt
t +
under TUNE/SCAN/TIME SET while
pressing SW BAND to select a meter
band. See “Scan Tuning” for details on
the meter band.
When you select LW, MW and FM, follow
the step 4.
4 Tune into the desired station by
pressing –
TT
TT
T or
tt
tt
t +.
A double-beep sounds when the minimum
frequency of each band is received during
tuning. When a broadcast is received,
“p TUNE” is displayed on the display.
5 Turn the VOL (volume) to adjust the
volume.
About frequency step
The frequency step used by pressing –
TT
TT
T or
tt
tt
t
+
under TUNE/SCAN/TIME SET can be changed
with the NORMAL/FINE.
Band NORMAL FINE
LW 9 kHz 1 kHz
MW 9 kHz/10 kHz* 1 kHz
SW 5 kHz 1 kHz
FM 0.05 MHz 0.05 MHz
* See “Changing the MW channel step” for
details on the MW channel step.
• Scan tuning is started by keeping –
TT
TT
T or
tt
tt
t + hold down while NORMAL is selected.
(See “Scan tuning”.)
• The frequency changes continuously by
keeping –
TT
TT
T or
tt
tt
t + hold down while FINE
is selected. If you stop pressing –
TT
TT
T or
tt
tt
t +,
the frequency stops changing.
To turn off the radio
Press ON/OFF.
To enjoy FM stereo reception
Plug the stereo headphones (not supplied) into
the i (headphones) jack.
When listening to news
Set the TONE selector to NEWS for optimum
results. Vocal output will be sharper and clearer.
When listening to music, set the TONE selector
to MUSIC for optimum results.
Changing the MW channel step
This radio’s frequency channel step in the MW
band is set to 9 kHz/10 kHz before the radio is
shipped from the factory. The default setting
varies depending on the country where the radio
is sold. Change the MW channel step when
listening in countries in these regions.
Area channel step
North/South America 10 kHz
Other countries/Regions 9 kHz
Frequency range (LW, MW, SW: kHz,
FM: MHz)
Band
Frequency range
*
1
Scan tuning range
Meter band
LW 150-285 153-279
MW 530-1710 531-1710*
2
530-1710*
3
SW 2250-2550 120 m
3150-3450 90 m
3850-4050 75 m
4700-5100 60 m
2250-26100 5900-6250 49 m
7100-7400 41 m
9400-10000 31 m
11500-12150 25 m
13500-13900 22 m
15000-15900 19 m
17450-18000 16 m
18850-19100 15 m
21450-21950 13 m
25600-26100 11 m
FM 76.00-108.00 76.00-108.00
*
1
The LW and MW frequency ranges are the
same as the scan tuning range when
NORMAL/FINE is set to NORMAL.
*
2
9 kHz channel step
*
3
10 kHz channel step
Preset Tuning
You can preset up to 10 stations on each
MEMORY PRESET PAGE (50 stations in total.)
Once you preset a station to memory, you can
receive the broadcast merely by pressing
MEMORY PRESET PAGE.
The page number is displayed as 1-5, the preset
number is displayed as 1-0. (0 indicates 10.)
To preset stations
1 Tune into the station you want to
preset.
Refer to “Manual Tuning” or “Scan Tuning”
for more details.
2 Press and hold ENTER/CLOCK down
until you hear a beep.
Page number 1 and preset number 1 flash
when you are presetting a station for the first
time or when you have preset 50 stations. In
other cases, the number flashes as follows:
Page number: the smallest page number
among the pages that have a
free preset number
Preset number: the smallest preset number
that has not been preset in
the page displayed above.
3 Press the desired page number of
MEMORY PRESET PAGE.
For example, press page number 3. The
display changes as illustrated below.
4 Press the number under the MEMORY
PRESET PAGE you have selected
repeatedly to display the desired preset
number.
The preset number changes as follows:
A double-beep sounds when the display
returns to “1”.
For example, select preset number 7. The
display changes as illustrated below.
5 Press ENTER/CLOCK until a double-
beep sounds.
The page number and the preset number stop
flashing.
Note
If you leave the radio for 30 seconds with no
operation while the page number and preset
number are flashing, the unit returns to the
previous mode.
To change the preset station
Follow the same procedure to store a new station
to the selected preset number. The previous
preset station is overwritten by the new preset
station.
To interrupt and cancel presetting
Press ON/OFF to turn off the radio, and then
press it again to turn the unit on. The unit
returns to the previous mode.
Tuning into a preset station
1 Press ON/OFF to turn on the radio.
2 Press MEMORY PRESET PAGE
repeatedly to display the desired preset
number. Numbers that have not been
preset cannot be displayed. A double-
beep sounds if the smallest preset
number is selected.
3 Turn VOL (volume) to adjust the
volume.
Note
A double-beep sounds and the display changes
as illustrated below for about three seconds
when you select a page number that has no
preset station, and then returns to the previous
mode.
Deleting a preset station
Preset tuning works faster if you delete
unnecessary preset stations as deleted preset
stations are not selected during tuning.
1 Press ON/OFF to turn on the radio.
2 Press MEMORY PRESET PAGE
repeatedly to display the preset number
you want to delete.
3 Press and hold ENTER/CLOCK down
until “dEL” flashes.
“dEL” flashes on the display by keeping
ENTER/CLOCK held down longer while the
page number and preset number are flashing.
While these numbers are flashing, the radio
stands by for presetting the station.
m
4 Press ENTER/CLOCK again until a
double-beep sounds.
The page number and preset number
disappear from the display.
Note
If you leave the radio for 30 seconds with no
operation while the page number, preset number
and “dEL” are flashing, the unit returns to the
previous mode.
To interrupt and cancel deleting
Press ON/OFF to turn off the radio, and then
press it again to turn the unit on. The unit
returns to the previous mode.
Memory Scan Tuning
Use memory scan tuning to scan the preset
stations automatically in one page.
1 Press ON/OFF to turn on the radio.
2 Press the page number of MEMORY
PRESET PAGE you want to scan.
3 Press MEMORY SCAN.
Scanning stops when the radio receives a
preset station in the page. If you want to
select other preset stations, press MEMORY
SCAN again. The preset numbers have not
been preset will be skipped.
•Scanning works faster if you preset frequencies
in descending or ascending order in preset
number orders.
To interrupt and cancel memory
scan tuning
Press MEMORY SCAN during memory scan
tuning.
When preset stations cannot be
received by memory scan tuning
A double-beep sounds and scanning stops when
the first preset number you start scanning is
returned to.
For example: you scan page 1 that has stations
preset to preset numbers 2, 4, 6 and 8, and start
scanning from preset number 6. A double-beep
sounds when 6 is returned to.
• When scanning MW broadcasts at night when
reception is intense, or scanning under
prevailing interference, scanning will pause
frequently. If it occurs, switch the ATT switch
to ON and adjust sensitivity with the ATT
control (see “Controlling scan pauses”). Under
normal conditions, use the radio with the ATT
switch set to OFF.
Improving Reception
(See fig. B)
Adjusting the antenna
FM : Extend the telescopic antenna and adjust
the direction and angle for the best
reception.
SW : Extend the telescopic antenna to its full
length and set it vertically.
MW, LW :Rotate the unit horizontally for
optimum reception. A ferrite bar
antenna is built in the unit.
Using an external antenna
Use the wide-range antenna AN-102 or the SW
active antenna AN-LP1 (not supplied). For
details, refer to the operating instructions of the
each antenna.
Notes
• Keep the unit and antenna away from
fluorescent lights, TVs, computers, and other
equipment which may generate noise.
• Retract the telescopic antenna when using an
external antenna.
• Set up the external antenna as far away from
the street as possible.
• Note that the SW active antenna AN-LP1 may
not function as usual when it is connected to
this radio and memory scan tuning is in use.
This is because AN-LP1 selects frequencies by
the antenna controller.
Setting the Standby
Time
Standby function
You can turn on the radio and tune into your
favourite station at the desired time.
• Before you set standby, make sure that the
radio’s clock setting is correct.
• Two standby times can be stored to STANDBY
MEMORY a and b.
• Before you set the standby time, adjust VOL
(volume) to set the volume when the radio is
turned on.
1 Receive the desired broadcast station.
2 Press ENTER/CLOCK until you hear a
beep.
The page number and preset number start
flashing.
3 Press STANDBY MEMORY a or b.
For example, when you press STANDBY
MEMORY a, “PRESET” and “
” start
flashing.
4 Press ENTER/CLOCK until you hear a
double-beep.
“PRESET” and “ ” or “ ” light.
5 Press ON/OFF to turn off the radio.
6 Press STANDBY MEMORY a or b until
you hear a beep.
For example, when you press STANDBY
MEMORY a:
The display returns to the clock setting
display, “STANDBY”, “
” and the hour
indication start flashing.
7 Press –
TT
TT
T or
tt
tt
t + under TUNE/
SCAN/TIME SET to set the hour.
8 Press STANDBY MEMORY a or b you
selected in step 6 until you hear a beep.
The hour is set, and the minute starts
flashing.
9 Press –
TT
TT
T or
tt
tt
t + to set the minute.
10
Press STANDBY MEMORY a or b you
selected in step 6 until you hear a
double-beep.
The minute is set, and “STANDBY” and “ ”
or “
” light.
When the standby time is reached
The radio turns on and “SLEEP” is displayed.
The unit will turn off automatically after about
60 minutes.
When you have set STANDBY
MEMORY a and b
If the second preset standby time is reached
while the first standby time is operating, the
most recent standby time will have priority over
the other and the radio will tune into the
appropriate station. If you have set STANDBY
MEMORY a and b to the same time, STANDBY
MEMORY a will have priority.
To cancel the standby function
Press STANDBY MEMORY a or b with the radio
turned off so that “STANDBY” and “
” or “ ”
are cleared from the display.
Be sure to release the button within one second.
If the button is pressed continuously, the radio
enters the standby setting mode.
To cancel temporarily the standby
function
Slide HOLD in the direction of the arrow with
the radio turned off to make “-” appear. When
the hold is canceled and “-” disappears, the
standby function is operational. (see “Using
Other Functions”)
Notes
• Once a standby time is set, the radio turns on at
the preset standby time everyday unless the
standby setting is canceled.
• The standby function activates even while you
are listening to other stations.
Activating the Alarm
To activate the alarm instead of the radio at the
desired time, delete the station assigned to either
STANDBY MEMORY a or b as necessary.
1 Press ON/OFF to turn on the radio.
2 Press STANDBY MEMORY a or b.
The radio receives the preset station. If there
is no preset station, a double-beep sounds
and the display changes as illustrated below.
In this case, perform the step 5.
3 Press and hold ENTER/CLOCK down
until “dEL” flashes.
4 Press ENTER/CLOCK again until a
double-beep sounds.
The display “PRESET” and “ ” or “ ” will
disappear. (See “Preset tuning-Deleting a
preset station”.)
5 Perform steps 5 to 10 of the procedure
described in “Setting the Standby
Time”.
When the standby time is reached and the
standby is activated, the alarm sounds. The
unit then turns off automatically after 60
minutes.
To stop the alarm
Press any button except LIGHT.
Notes
• The alarm volume is not adjustable.
• When the standby time is reached while you
are listening to the radio, the radio turns off
and the alarm sounds.
Setting the Sleep
Timer
Sleep Timer Function
Enjoy falling asleep to the radio using sleep
timer. The radio turns off automatically after the
sleep timer setting (60, 45, 30 or 15 minutes) is
reached.
1 Press SLEEP.
The sleep timer setting of “60” minutes is
displayed and “SLEEP” flashes.
The radio turns on if it was turned off.
2 Press SLEEP repeatedly to select the
desired sleep timer setting while
“SLEEP” is flashing.
Each press changes the display as follows:
A double-beep sounds when the display
returns to “60”. “SLEEP” lights three seconds
after you select the sleep timer setting while
“SLEEP” is flashing. After the sleep timer
indication disappears and the frequency
indication appears, the sleep timer activates.
3 Tune into the desired station, and
adjust the VOL (volume).
The radio will turn off automatically after the
sleep timer setting is reached.
To turn off the radio before the
sleep timer setting is reached
Press ON/OFF.
To reset or extend the sleep timer
setting
Press SLEEP again and select the desired sleep
timer setting.
Using Other Functions
Hold Function
When the hold function is used, the buttons are
not operational. Use the hold function to prevent
accidental operation.
The hold function can also be used to tempo-
rarily cancel the standby function.
To use the hold function
Slide HOLD in the direction of the arrow.
“-” appears on the display and all buttons are
no longer operational.
To cancel the hold function
Slide HOLD in the opposite direction of the
arrow. “-” disappears from the display.
Light Function
Press LIGHT to turn on the light for about 20 to
30 seconds to view the display in the dark.
B
SW MW/LW
1 Press ON/OFF to turn off the radio.
2 Remove the batteries from the unit.
3 Change the position of the MW CH
STEP in the battery compartment to the
desired channel step.
4 Install the batteries and press ON/OFF.
Notes
• Completely perform steps 2 to 4 within 60
seconds. If you do not perform the operations
in 60 seconds, the clock setting will be erased.
•Reception of around 10250 kHz and 20500 kHz
may be difficult because of spurious internal
signals generated by the built-in oscillators.
Scan Tuning
Use scan tuning to automatically scan the
stations in the frequency range of a broadcast
band.
1 Press ON/OFF to turn on the radio.
2 Press BAND to select the band.
If you select SW, select the meter band too.
3 Set NORMAL/FINE to NORMAL.
4 Press and hold –
TT
TT
T or
tt
tt
t + under
TUNE/SCAN/TIME SET. Release the
button when the frequency indication
starts changing.
Scan tuning will begin within the frequency
range table in the “Frequency range”, and
pause automatically for about three seconds
when a station is received.
5 When the radio tunes into the desired
station, press –
TT
TT
T or
tt
tt
t + again to stop
scanning.
Until you press –
TT
TT
T or
tt
tt
t +, scan tuning will
continue. If necessary, tune the station more
precisely by pressing either –
TT
TT
T and
tt
tt
t +.
• The unit scans the frequencies in descending
order when you hold down –
TT
TT
T for two
seconds or more, and in ascending order when
you hold down
tt
tt
t + for two seconds or more.
•To change the scanning direction, hold down
either –
TT
TT
T or
tt
tt
t + opposite to the current
direction for two seconds or more. This is
convenient when, for example, you want to
return to the previous reception after the unit
has resumed scanning.
• When scanning MW broadcasts at night when
reception is intense, or when scanning under
prevailing interference, the scanning will pause
frequently. If it occurs, switch the ATT switch
to ON and adjust sensitivity with the ATT
control (see “Controlling scan pauses”, below).
Under normal conditions, set the ATT switch
to OFF.
Controlling scan pauses–using the
ATT switch and the ATT control
Use the ATT (attenuator) switch and the ATT
control to control reception sensitivity when the
scanning pauses frequently or scanning under
prevailing interference. Under normal
conditions, set the ATT switch to OFF (i.e., with
maximum sensitivity).
The ATT control is activated when the ATT
switch is switched to ON. Turn the ATT control
toward MAX to reduce sensitivity. The radio will
skip weak signals and stop at only strong ones.
Note
If the ATT control is turned too for toward
MAX, the radio will not stop at any weak
signals at all. Set the ATT switch to OFF if
you do not need to use the attenuator.
Inside of the battery compartment
English
Telescopic antenna
1
2
3
4
5
1
2
3
1
2
3
m
4
1
2
3
•
•
B
•
•
•
•
•
•
•
1
2
3
4
5
6
7
–
TT
TT
T
tt
tt
t +
8
9 –
TT
TT
T
tt
tt
t +
10
- -
•
•
1
2
3
4
5
•
•
1
2
3
-
-
1
2
3
4
•
•
1
2
3
4
–
TT
TT
T
tt
tt
t +
5
–
TT
TT
T
tt
tt
t +
–
TT
TT
T
tt
tt
t +
–
TT
TT
T
tt
tt
t +
• –
TT
TT
T
tt
tt
t +
• –
TT
TT
T
tt
tt
t +
•
1
2
3
–
TT
TT
T
tt
tt
t +
4 –
TT
TT
T
tt
tt
t +
p
5
–
TT
TT
T
tt
tt
t +
*
*
• –
TT
TT
T
tt
tt
t +
• –
TT
TT
T
tt
tt
t +
–
TT
TT
T
tt
tt
t +
i
*
*
*
*
*
English
FM


