Page is loading ...

CEILING MOUNTING BRACKET
C-BC20U
Thank you for purchasing TOA’s Ceiling Mounting Bracket. Please carefully follow the
instructions in this manual in order to ensure long, trouble-free use of your mounting bracket.
Over 10 mm
Mounting bracket
INSTRUCTION MANUAL
SAFETY PRECAUTIONS
• Before installation or use, be sure to carefully read all the instructions in this section in order
to ensure long, trouble-free operation.
• Be sure to follow all the precautionary instructions in this section, which contain important
warnings regarding safety.
• After reading, keep this manual handy for future reference.
Indicates a potentially hazardous situation which could result in death
or serious personal injury if ignored or mishandled.
WARNING
Indicates a potentially hazardous situation which could result in
moderate or minor personal injury, and/or property damage if ignored
or mishandled.
CAUTION
Install the unit only in a location that can structurally support the weight of the unit and the
camera. Doing otherwise may result in the unit falling and causing personal injury.
• Leave the unit’s installation to the dealer from where the unit was purchased because the
installation requires expert knowledge. Inadequate installation may cause the unit to fall,
possibly resulting in personal injury.
• Do not hang from the camera, as it may fall, possibly resulting in personal injury.
GENERAL DESCRIPTION
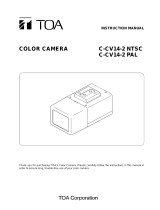
The C-BC20U Bracket permits TOA’s Dome Camera to be installed in a ceiling with only part
of the Dome Camera exposed.
INSTALLATION
1. Cut a 145 mm diameter hole in the ceiling and run a length of coaxial cable to it, feeding it
through the hole.
Note: Check to be sure that the ceiling panel is less than 30 mm in thickness, and that a
space of at least 180 mm in diameter and 50 mm in height is available behind the
panel.
2. Loosely install the camera mounting screws
supplied with the bracket so that their
heads project 10 mm or more from the
ceiling surface.
Decorative panel ............................ 1
M4 x 15 camera fixing screw .......... 2
Instruction manual .......................... 1
Installed bracket
Dome camera
(optional)
Decorative panel
(C-BC20U)
Ceiling
Accessories
Coaxial cable
Ø
145mm
Mounting bracket
Notched
section
Ceiling clamping
plate
Bracket fixing
screw
Camera
Ø
180mm
50mm
Under 30 mm
Camera lens
orientation
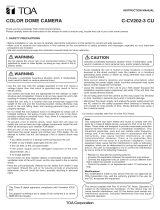
Decorative panel
Attach
Tab
Slot
Detach
Mounting bracket
(1)
(2)
mark
Slotted hole
3. Install the bracket in the mounting hole.
• When inserting the bracket into the
mounting hole, align the bracket’s notched
section with the camera’s intended
orientation.
• After installing the bracket, tighten the
bracket mounting screws (3 places) with
an electric screwdriver. The ceiling
clamping plate is pulled down to grip the
ceiling.
Note: Check to be sure that the bracket is
securely mounted in the ceiling.
4. Connect the coaxial cable hanging through
the ceiling hole to the camera.
5. Align the mark on the camera’s base
with the orientation of the notch in the
bracket. This allows slotted holes in the
camera base to fit over the two camera
mounting screws left projecting in Step 2.
Rotate the camera clockwise until the
screws are set in place as shown in the
figure below, then tighten the screws.
Note: Ensure that the screws are securely
tightened in the slotted holes.
6. Attach the dome cover to the camera.*
7. Attach the supplied decorative panel to the
bracket.
(1) Set the panel as shown below so that
the panel’s tab is offset slightly from the
slot in the bracket.
(2) Rotate the panel clockwise until the
panel’s tab aligns with the bracket slot,
indicating that the panel is attached.
*For more information on the mounting
bracket, refer to the instruction manual for
the Dome Camera.
Printed in Japan
133-05-363-6A
/