Excalibur RS-260-EDPB Owner's manual
- Category
- Remote starters
- Type
- Owner's manual
This manual is also suitable for

RS-260-EDPB
Deluxe 1-Button Keyless Entry & Remote Start
w/ BLADE Technology
April 23, 2015
Operation Guide
v.2.0
Temporary cover. Color cover is in a separate le.
1

Table Of Contents
Transmitter Overview ................................................................................................... 2
Transmitter Functions ................................................................................................... 3
Other Remote Start Features ....................................................................................... 4
Low Battery/Low Temp Automatic Starting ............................................................... 4
Turbo Timer Feature ................................................................................................. 4
Pit-Stop Feature ....................................................................................................... 4
Manual Transmission Starting .................................................................................. 4
Security System Features (OPTIONAL) ....................................................................... 4
Last Door Arming ...................................................................................................... 4
Automatic Rearming ................................................................................................. 5
Pre-Warn Detection .................................................................................................. 5
When The System Triggers ...................................................................................... 5
Using The Valet Switch ................................................................................................. 5
Emergency Override ................................................................................................ 5
Valet Mode ................................................................................................................ 5
The Status Light ........................................................................................................... 6
Anti-Carjacking Protection ............................................................................................ 6
Programming Transmitters ........................................................................................... 7
Programming Features ................................................................................................. 7
User Programmable Features ...................................................................................... 8
Installer Programmable Features ................................................................................11
Transmitter Overview
“start”
button
Transmitter part number:
117-03
Call your dealer or visit
www.caralarm.com to order
replacement transmitters.
Battery replacement:
Remove the small screw from the
lower back case, and separate the
transmitter halves. Replace the
CR2032 battery (or with 2 CR2016
batteries) and reassemble the
transmitter case.
This system is ECHO compatible, which means you can upgrade at anytime to
have 2-way capability and greater range (up to 1-mile!). It’s a simple upgrade
that only takes minutes, so talk to your dealer about upgrading with ECHO
TECHNOLOGY today!!
2

LOCK / ARM: While the system is unlocked / disarmed, Press
and hold the “START” button for 1 second.
• THE SIREN / HORN WILL CHIRP & THE PARKING
LIGHTS WILL FLASH ONCE.
Transmitter Functions
UNLOCK / DISARM: While the system is locked / armed, Press
and hold the “START” button for 1 second.
• THE SIREN / HORN WILL CHIRP TWICE & THE PARK-
ING LIGHTS WILL FLASH TWICE, THEN ILLUMINATE FOR
30 SECONDS.
REMOTE START: Press and release the “START” button twice
within 5 seconds. (see user feature #8 for additional options)
• THE PARKING LIGHTS WILL FLASH ONCE AND THE
STATUS LIGHT WILL FLASH RAPIDLY.
• THE SYSTEM WILL TURN ON THE IGNITIONS AND
PROCEED TO START THE ENGINE.
• ONCE THE ENGINE IS RUNNING, THE PARKING
LIGHTS WILL TURN ON AND STAY ON AND THE STATUS
LIGHTS WILL FLASH SLOWLY.
• If the engine stalls, the system will make up to 3 more attempts.
• Each time you park, set the climate controls as desired when you use the remote start. The
engine will run for the preset run time (see user feature #1).
• Run Time Extender: Press the “START” button one time during remote start to restart the
engine run timer.
NOTE: This can only be used once per remote start cycle.
• If you decide not to drive your vehicle, you can turn off the remote start using the same method
to turn it on (Default = press “START” twice in 5 seconds)
NOTE: If remote start activation is programmed for 1 press, the 1st press activates Run
Time Extender so an additional press is required to turn off remote start.
• Upon entering the vehicle during remote start mode, turn the ignition key to the “ON/RUN” posi-
tion (NOT START!!). When you press the brake pedal, the remote start will turn off allowing the
ignition key to take over.
x2
3

LOW BATTERY/LOW TEMP AUTOMATIC STARTING
Other Remote Start Features
This feature will automatically start the engine if the vehicle battery drops below 11 volts or the
interior temperature drops to 15 (or 32) degrees fahrenheit. You must activate these features each
time you park your car to use them. They can be activated one of two ways:
• Turn the ignition switch “on”, then “off” (engine not running), and within 7 seconds press the
valet switch twice. If there is a 2 second delay without additional valet button presses, the horn
will honk 3 times activating low voltage start mode.
• To activate low temp starting, enter low voltage start mode as described above but, immediate-
ly after the horn honks, press the valet switch 1 time (15 degrees) or 2 times (32 degrees) within 5
seconds. The horn will honk to conrm your selection.
NOTE: When low temp start mode is activated, low voltage start is also activated. These
features will operate once every two hours until the ignition key is turned “ON”.
TURBO TIMER FEATURE
PIT-STOP FEATURE
This feature allows you to leave your engine running for making quick errands. To use this
feature, have the engine running normally from the ignition switch and your foot off the brake
pedal. Press the Valet Switch twice; the parking lights will ash to conrm. Turn the key off and
the engine will remain running for the programmed run time.
MANUAL TRANSMISSION STARTING
Remote starting with a manual transmission requires a different installation method and
installer feature #11 must be turned on. Also, a setup procedure that ensures the transmission
was left in neutral must be performed each time you leave your vehicle and intend to use remote
start later. Make sure the system is in an “UNLOCKED” state then perform these steps:
1) With the car running, hold the brake pedal, apply the parking brake, release the brake pedal.
2) Use the transmitter as if you were activating remote start (default: press START twice). The
status light will start to ash slow.
3) Turn off the ignition key and exit the vehicle.
4) LOCK the vehicle with the remote. The engine will shut down (unless turbo timer is on) and the
status light will ash every 2 seconds to indicate it is ready to be remote started.
NOTE: Manual transmission setup will cancel if you enter the vehicle.
This is recommended for vehicles equipped with a turbocharger. It allows the engine to idle
after driving to cool the turbo. When this Installer Programmable Feature (#10) is enabled, the
system will automatically keep the engine running as follows:
• With the engine running, hold the brake pedal and engage the parking brake.
When the brake pedal is released, the system will keep the engine running for the programmed
time (1, 2, or 3 minutes), and then automatically turn it off.
• The system may be locked while the engine is running. Turbo Timer can be prevented from
engaging, or “bypassed” if desired, by turning the engine off before engaging the parking brake.
Security System Features (OPTIONAL)
LAST DOOR ARMING
This system can be congured to arm automatically when all the vehicle’s doors are closed
(see user feature #9). When enabled, the siren/horn will chirp once when all of the doors are
closed. It will start a 30 second countdown (indicated by a fast ashing status light) after which the
system will lock and/or arm. The 30 second arming delay will pause while a point of entry is open.
Turning ON the ignition key will cancel the arming sequence until the key is turned off and the
doors are all closed once again.
NOTE: Installer feature #13 must be on and the system must be wired for security
functions.
NOTE: Security features are optional for the RS-260-EDPB. Talk to your dealer to learn
more about upgrading.
4

AUTOMATIC REARMING
This automatically rearms the alarm if the system is disarmed from the remote. (see user
feature #10). When disarmed by remote, the system will start a 90 second countdown (fast ash-
ing status light) to arm the system. This is useful if the controller accidentally disarms the system
when it’s kept in a purse or pocket where other items could potentially press the buttons.
NOTE: Installer feature #13 must be on and the system must be wired for security functions
WHEN THE SYSTEM TRIGGERS
If the system were to be compromised while armed, it will trigger, sounding the siren/horn and
ashing the parking lights for 30 seconds (programmable). When disarming the system after a
trigger event, the siren/horn will chirp 4 times and the parking lights will ash 4 times instead of the
standard 2 times.
LOCK ON TRIGGER: If a door is opened when the system is triggered, it will wait until the door is
closed again, then lock the doors. This patented feature is useful to further deny a thief access to
the vehicle.
STORM SAFE MODE: When the system is triggered, disarming the system will stop the alarm
from sounding but will leave the doors locked. This function is useful if you have a false triggering
situation due to violent weather.
ZONE VIOLATION RECALL: The system is capable of telling you which zones were triggered
last. The system’s status light will ash to indicate which zone was triggered. This occurs during
the alarm cycle AND after disarming. The system will store the last triggered zone until the ve-
hicle’s ignition key is turned on. See “The Status Light” section oon page 6 for further explanation
of this feature.
NUISANCE PREVENTION: If the system prewarns 5 times within 15 minutes, it will bypass the
zone for the remainder of the 15 minutes before rearming the pre-warn zone. Additionally, if a full
trigger zone is left open, the system will trigger a total of 3 times before bypassing the zone. Once
the zone is closed, it will re-arm that zone.
Security System Features (cont’d)
PRE-WARN DETECTION
EXTERNAL SENSORS ARE OPTIONAL UPGRADES. TALK TO YOUR DEALER. The optional
impact sensor is designed, in addition to detecting a full impact, to warn away potential violators
when it detects a light impact to the vehicle. The system will respond by chirping the siren/horn 3
times and locking the doors. This is very useful when an intruder attempts to unlock the door.
EMERGENCY OVERRIDE
If your controller isn’t usable and your alarm is armed, you’ll need to perform an emergency
override to disarm the system and use your vehicle. To do so, use the following steps:
STEP 1 - Enter the vehicle (the alarm should sound).
STEP 2 - Turn the ignition key to the “ON” position.
STEP 3 - Press the valet switch (located on the window-mount antenna) once.
STEP 4 - Turn the ignition “OFF”.
VALET MODE
Valet mode disables all security & remote start functions. To enter Valet Mode:
STEP 1 - Disarm the system by remote or by performing an emergency override.
STEP 2 - Press and hold the valet switch for 2 seconds. The system will chirp once
and the status light will turn on.
EXITING VALET MODE - Press and release the valet switch once. The status light will turn off.
Using The Valet Switch
5

Anti-Carjacking Protection
The system is equipped with two separate Anti-Carjacking protection features
(ignition, open door, or both) that are selectable via user feature #12. Once activated,
the user has 60 seconds to cancel the Anti-Carjacking protection process (described
below). If Anti-Carjacking is not cancelled, 53 seconds after being activated the siren
will begin to chirp for 7 seconds to alert the user that the system is about to enter into
an alarm condition. The Valet Switch may still be pressed once during this period to
cancel the Anti-Carjacking process.
If the Anti-Carjacking process is not cancelled before the 60 second countdown
expires, the system will enter an alarm condition, sounding the siren and ashing the
parking lights. 30 seconds after this occurs, or should the ignition be turned off in the
meantime, the starter interrupt will engage. Once the system enters the alarm
The Status Light
The status lights, located in the window-mount antenna, provide a visual indication
of the system’s status.
SECURITY SYSTEM STATUS (must be enabled by installer)
OFF: The alarm is disarmed and not performing any automatic functions.
ON: The alarm is in valet mode.
FLASHING SLOW: The alarm is armed and monitoring all entry points.
FLASHING FAST: One of the automatic arming features is in progress.
AUTOMATIC TRANSMITTER VERIFICATION
Every time you turn on the ignition key, the status light will ash a number of times
equal to the number of transmitters programmed to the system. This unique security
feature combats potential thieves (valet attendant, mechanic, etc.) from adding their
own transmitter without your knowledge and accessing your vehicle at a later time.
ALARM ZONE VIOLATION RECALL
If the security system is triggered, upon disarming, the status lights will ash
a number of times to indicate exactly which zones, have been violated. It will
store the last 2 violated circuits and continually repeat the ash pattern until the
vehicle’s ignition key is turned ON.
2 FLASHES: Hood trigger
3 FLASHES: Door trigger
4 FLASHES: Sensor port trigger
REMOTE START STATUS
FLASHING SLOW: The engine was remote started successfully and is running.
FLASHING FAST: The remote start sequence has begun.
2 FLASHES, PAUSE: The engine is running while the alarm is armed.
REMOTE START DIAGNOSTICS
The remote start system can also indicate which zone caused the last remote start
cycle to end. To see this indicator, place the system into valet mode. Immediately after
the chirp, the status light will ash to indicate which zone violation occured.
1 FLASH: Run time expired.
2 FLASHES: Brake pedal was pressed.
3 FLASHES: Engine stalled or a bad tach signal.
4 FLASHES: Received transmitter command to stop.
5 FLASHES: The neutral safety circuit was triggered.
6 FLASHES: The alarm was triggered or low battery voltage.
7 FLASHES: The hood was opened.
6

Standard Programming: Use this method to program additional or replacement
transmitters. Before you begin, have all transmitters at hand.
Step 1 Then, turn the ignition “on” (do not crank the engine).
Step 2 Within 5 seconds of Step 1, press the Valet Switch 5 times. The siren/horn
will briey sound & the status light will turn on, conrming that the system is ready to
learn a transmitter code.
Step 3 Press the “start” button on each transmitter one at a time. The system will
chirp the siren/horn once & the status light will turn off briey to conrm that each was
learned. If a code is not received within 10 seconds of Step 2, the learning process
will automatically exit.
Step 4 Then, turn the ignition “off” or wait 10 seconds to exit programming mode.
Programming Transmitters
Programming Features
A matrix of all programmable features and their options are on the last page of this
guide. For detailed information on each feature, please refer to the next section. Use
the procedure below to make any necessary changes.
TO MANUALLY CHANGE FEATURES:
Step 1 Turn the ignition key “ON”, then “OFF”.
Step 2 Within 5 seconds of step 1, press the valet switch 5 times to access user
features (Press 10 times to access installer features).
~ The siren/horn will sound and the status light will turn on.
Step 3 Within 10 seconds of step 2, press the valet switch the number of times cor-
responding with the desired feature’s number.
~ The siren/horn will chirp equal to the selected feature.
Step 4 Change the feature by pressing the transmitter button OR brake pedal the
same number of times that corresponds with the desired setting (make all presses
before hearing any chirps). NOTE: some cars require the ignition to be on for the
brake circuit to operate. In this case, turn on the ignition before this step.
~ The siren/horn will chirp equal to the selected setting.
Step 5 If you wish to change more features, repeat steps 3 & 4 at this time.
Step 6 To exit programming, turn the ignition key “ON” then “OFF”. Or, it will
exit automatically after 10 seconds of no activity.
condition, it will not respond to the transmitter, nor will the system reset automatically
after 60 seconds, and it can only be disengaged by:
Step 1 Turning the vehicle’s ignition off.
Step 2 Turning the ignition back on.
Step 3 Within 5 seconds, perform an Emergency Override using the Valet Switch.
TYPES OF ANTI-CARJACKING PROTECTION
Ignition Activated Anti-Carjacking activates every time the vehicle’s ignition is
turned on. The Valet Switch must be pressed within 60 seconds of activating to can-
cel Anti-Carjacking.
Door Anti-Carjacking activates when a door is opened after the vehicle is started
and the engine is running. The Valet Switch must be pressed within 60 seconds after
activation to cancel Anti-Carjacking.
Anti-Carjacking Protection (cont’d)
7

User Programmable Features
Feature #6 - Open Door Bypass of Ignition Locking
On (press “start” 1 time to program) - DEFAULT
Off (press “start” 2 times to program)
This feature cancels the automatic locking or unlocking of the vehicle’s doors if one of
the doors is open when the ignition switch is turned on or off.
Feature #5 - Ignition Controlled Lock/Unlock
Off (press “start” 1 time to program) - DEFAULT
Lock w/ Ignition On (press “start” 2 times to program)
Unlock w/ Ignition Off (press “start” 3 times to program)
Lock And Unlock w/ Ignition (press “start” 4 times to program)
This feature controls the lock/unlock operations when the ignition key is turned on/off.
Feature #1 - Remote Start Run Time
10 Minutes (press “start” 1 time to program) - DEFAULT
5 Minutes (press “start” 2 times to program)
15 Minutes (press “start” 3 times to program)
20 Minutes (press “start” 4 times to program)
This sets the maximum amount of time that the remote start will keep the engine
running if it is not shut down by other methods.
Feature #3 - Conrmation Chirp Volume
Low (softest) (press “start” 1 time to program)
Medium Low (press “start” 2 times to program)
Medium High (press “start” 3 times to program) - DEFAULT
High (loudest) (press “start” 4 times to program)
This feature allows the choice of different chirp volume levels, and when programming
it, each selection will be conrmed in the chosen volume making it easy to choose the
most suitable setting.
Feature #4 - BROWN Wire Audible Output
Pulsed Horn Low (press “start” 1 time to program) - DEFAULT
Pulsed Horn Medium (press “start” 2 times to program)
Pulsed Horn High (press “start” 3 times to program)
Steady Siren (press “start” 4 times to program)
This changes the BROWN wire’s audible output when the alarm is triggered. Steady
siren must be selected when using a siren (other horn outputs stay at the Medium
setting). The horn honk options will affect all horn honk outputs used as well as
change the BROWN wire’s function.
Feature #2 - Flashing Light Conrmations
Unlock: ON, RS: ON (press “start” 1 time to program)
Unlock: ON, RS: Flash (press “start” 2 times to program)
Unlock: Flash, RS: ON (press “start” 3 times to program)
Unlock: Flash, RS: Flash (press “start” 4 times to program) - DEFAULT
This feature affects the parking light conrmations for system unlock & remote start
functions. With the above options, you can select any combination of:
Unlock: Flash - Flashes twice after unlock
Unlock: ON - Flashes twice then stays on for 30 seconds after unlock
RS: ON - Stays on during remote start mode
RS: Flash - Flashes once every 1.5 seconds during remote start mode
8

Feature #9 - Last Door Arming
Off (press “start” 1 time to program) - DEFAULT
On w/o doors locking (press “start” 2 times to program)
On w/ doors locking (press “start” 3 times to program)
“Last Door Arming” has the system automatically arm itself every time you exit the
vehicle (the complete operation is described on page 4).
Feature #10 - Automatic Rearming
Off (press “start” 1 time to program) - DEFAULT
On w/o doors locking (press “start” 2 times to program)
On w/ doors locking (press “start” 3 times to program)
Enhanced auto rearm (press “start” 4 times to program)
“Automatic Rearming”, described on page 5, rearms the alarm if accidentally dis-
armed. Options are to have Automatic Rearming operate with or without also locking
the doors when the system does rearm. Enhanced auto rearm allows you to cancel
the rearming sequence by pressing unlock a 2nd time after disarming.
User Programmable Features (cont’d)
Feature #7 - Unlock w/ Trunk Release
On (press “start” 1 time to program) - DEFAULT
Off (press “start” 2 times to program)
“2nd channel” is most commonly used for trunk release, in which case the alarm
should also disarm. This feature, when on, congures the system to unlock/disarm
when the 2nd channel is activated. This feature is only available when using CarLink.
Feature #8 - Remote Start Activation From The Remote
Press “start” button 1 time (press “start” 1 time to program)
Press “start” button 2 times (press “start” 2 times to program) - DEFAULT
Press “start” button 3 times (press “start” 3 times to program)
Press “start” button 4 times (press “start” 4 times to program)
This feature changes how the remote start feature is activated from the remote.
Feature #11 - Conrmation Chirps
Siren + Horn (press “start” 1 time to program)
Siren Only (press “start” 2 times to program) - DEFAULT
On Demand (siren+horn) (press “start” 3 times to program)
Off (press “start” 4 times to program)
When using the horn & a siren, this feature selects whether the siren and/or horn
give conrmation chirps. Both outputs will always sound when the alarm system is
triggered or in panic mode.
Feature #12 - Anti-Carjacking
Ignition Only (press “start” 1 time to program)
Door Only (press “start” 2 times to program)
Ignition + Door (press “start” 3 times to program)
Off (press “start” 4 times to program) - DEFAULT
This selects between the 2 forms of anti-carjacking protection. Details on using anti-
carjacking protection are described on page 6.
9

User Programmable Features (cont’d)
Feature #15 - Alarm Duration
30 Seconds (press “start” 1 time to program) - DEFAULT
60 Seconds (press “start” 2 times to program)
90 Seconds (press “start” 3 times to program)
120 Seconds (press “start” 4 times to program)
This feature selects the period of time for which the system sounds the siren (and/or
horn) and ashes the lights when triggered. Caution: Before lengthening the Alarm
Duration you should always check and determine if there are any local anti-
noise or nuisance ordinances in your area.
Feature #16 - Arming Delay
3 Seconds (press “start” 1 time to program) - DEFAULT
15 Seconds (press “start” 2 times to program)
30 Seconds (press “start” 3 times to program)
45 Seconds (press “start” 4 times to program)
This selects how long the alarm waits to monitor trigger zones after arming.
Feature #17 - Open Door Warning Upon Arming
On (press “start” 1 time to program)
Off (press “start” 2 times to program) - DEFAULT
When this feature is turned on, if one of the vehicle’s doors is open at the time that
the system is armed via the controller or transmitter, the siren will chirp 3 times and
the parking lights will ash 3 times instead of once.
Feature #14 - Ignition Activated Override
On (press “start” 1 time to program)
Off (press “start” 2 times to program) - DEFAULT
This feature allows an activated system to be overridden and disarmed by simply
turning the ignition switch on within 10 seconds of the system’s activation. After 10
seconds, the Emergency Override must be performed.
Feature #13 - NOT USED
10

Installer Programmable Features
This group of Installer Programmable Features are all accessed as a group in the second level of
features’ programming. These features have a direct affect upon the system’s operations related
to the installation and vehicle type AND SHOULD ONLY BE CHANGED BY THE INSTALLER!!!
Feature #1 - Remote Start Activation From The WHITE/BLUE Wire
1 pulse (press “start” 1 time to program) - DEFAULT
2 pulses (press “start” 2 times to program)
3 pulses (press “start” 3 times to program)
4 pulses (press “start” 4 times to programm)
This feature changes how the remote start feature is activated from the (-) activation input wire.
Feature #2 - PINK/WHITE (IGN #2)Wire Function
Ignition (press “start” 1 time to program) - DEFAULT
Accessory (press “start” 2 times to program)
Starter (press “start” 3 times to program)
This feature changes the operation of the unit’s large PINK/WHITE output wire. This feature
should only be programmed by the installer.
Feature #3 - Engine Detection Method
Tachless Hi (press “start” 1 time to program) - DEFAULT
Tachless Lo (press “start” 2 times to program)
Tach Wire (press “start” 3 times to program)
Data Tach (press “start” 4 times to program)
Crank Only (press “start” 5 times to program)
This feature selects the method in which the remote start monitors the engine’s running condition
in remote start mode.
“Tachless Hi” sensitivity mode uses a preset crank time (see installer feature #7) and monitors
the vehicle’s voltage level to determine if the engine is running. This setting looks for a voltage
increase of 0.3v after cranking.
“Tachless Lo” sensitivity mode operates like the “Tachless Hi” setting but looks for a voltage
increase of 0.5v after cranking.
“Tach Wire” Before this setting is programmed, refer to the “Violet/White wire” section of the
installation manual for proper wiring connection and the Tach Learn Procedure. It will crank the
engine for up to 3 seconds or until a tach signal is detected.
“Data Tach” mode operates just like the “Tach Wire” setting except it takes its reading from the
D2D data port instead of using the Violet/White wire. Before using, make sure this function is sup-
ported by the Databus Interface module.
“Crank Only” AKA “blind start” is similar to the “Tachless” settings however, it only makes one
start attempt and does not monitor engine running conditions. This is useful for many “push-to-
start” vehicles.
Feature #4 - Gasoline Or Diesel Engine
Gasoline (press “start” 1 time to program) - DEFAULT
Diesel 15 Sec. Delay (press “start” 2 times to program)
Diesel 20 Sec. Delay (press “start” 3 times to program)
Diesel 30 Sec. Delay (press “start” 4 times to program)
This feature changes the system’s timing of the ignition and starter output sequence for gas or
diesel engines. Gasoline: the starter output will occur 3 seconds after the ignitions turn on. When
in “Tachless” mode, the engine running status is determined 10 seconds after starting. Diesel:
the starter output will occur 15, 20, or 30 seconds after the ignitions turn on (allows for glow plug
warming). When in “Tachless” mode, the engine running status will be determined 40 seconds
after cranking.
11

Installer Programmable Features (cont’d)
Feature #5 - Light Relay Function
Dome Light Output (press “start” 1 time to program) - DEFAULT
Start (press “start” 2 times to program)
Ignition Output (press “start” 3 times to program)
Accessory Output (press “start” 4 times to program)
Status (press “start” 5 times to program)
The system has two built-in relays, which can be programmed to perform several different func-
tions. The primary function of this relay, is to operate the vehicle’s dome, or interior lighting as
part of the system’s operations. Optionally, if desired or needed, this relay can be programmed for
the other functions listed above.
Feature #7 - Starter Cranking Time
0.75 Second (press “start” 1 time to program) - DEFAULT
1.00 Second (press “start” 2 times to program)
1.5 Seconds (press “start” 3 times to program)
2.25 Seconds (press “start” 4 times to program)
This feature determines the crank time of the 1st start attempt when in “Tachless” mode. If the
engine doesn’t start on the rst attempt, it will retry up to 3 more times extending the crank time by
an additional 0.2 second with each attempt.
Feature #8 - Door Lock/Unlock Outputs
0.8 Second Outputs (press “start” 1 time to program) - DEFAULT
3 Second Outputs (press “start” 2 times to program)
Double Pulse Unlock Output (press “start” 3 times to program)
Total Closure Lock Output (press “start” 4 times to program)
This changes the system’s doorlocking outputs to suite different vehicle requirements. The total
closure setting provides a 28 second lock pulse (press LOCK or UNLOCK is during the pulse to
stop it) and a 0.8 second unlock pulse.
Feature #9 Remote Start Lock Control
Off (press “start” 1 time to program) - DEFAULT
Lock After Start (press “start” 2 times to program)
Unlock before start (press “start” 3 times to program)
Unlock Before RS & Lock After RS (press “start” 4 times to program)
This feature allows for OEM alarm/lock control in relation to remote start operations thus eliminat-
ing extra wiring for OEM alarm control.
Feature #6 Blue Satellite Port, Blue Wire Function
Ignition (press “start” 1 time to program)
Status / GWR (press “start” 2 times to program) - DEFAULT
Defrost Pulse (press “start” 3 times to program)
Pulse After Engine Off (press “start” 4 times to program)
Horn (press “start” 5 times to program)
This determines the function of the Blue wire on the Blue satellite relay port.
The Status setting turns on briey before the Ignition output and stays on during remote start
mode. The other pulse settings give a 0.8 second pulse under the selected condition. Defrost
Pulse will send a pulse after start only when the cabin temperature is below freezing (32 degrees
F / 0 degrees C).
12

Installer Programmable Features (cont’d)
Feature #11 - Manual Transmission Mode
On (press “start” 1 time to program)
Off (press “start” 2 times to program) - DEFAULT
This feature changes the parameters of the system’s remote start operation to be suitable for
manual transmission-equipped vehicles via a “setup” procedure which must be followed upon exit-
ing the vehicle to ensure the transmission is in neutral.
Feature #10 - Turbo Timer
Off (press “start” 1 time to program) - DEFAULT
Run 1 Minute (press “start” 2 times to program)
Run 2 Minutes (press “start” 3 times to program)
Run 3 Minutes (press “start” 4 times to program)
This feature, the operation of which is described on page 4, when turned on
congures the system to automatically keep the engine running briey after the key is turned off.
This operation is designed specically for vehicles with turbocharged engines. NOTE: This feature
is dependent on the proper wiring of the neutral safety circuit.
Feature #14 - Pulse Ignition On Disarm
On (press “start” 1 time to program)
Off (press “start” 2 times to program) - DEFAULT
This feature will pulse the ignition and activate any attached immobilizer bypass module for
vehicles that require the ignition to be turned on to disarm the OEM alarm.
Feature #15 Lock On Prewarn
On (press “start” 1 time to program) - DEFAULT
Off (press “start” 2 times to program)
This feature will automatically lock the doors to combat unauthorized entry from lock picking when
the prewarn zone is triggered.
Feature #13 - Virtual Alarm
On (press “lock” button to program)
Off (press “unlock” button to program) - DEFAULT
Off / 1-Button Unlock Only (press “trunk” button to program)
This feature converts the system into a Security/Remote Start System by enabling antitheft
alarm-oriented operations and features. OPTIONAL MODULES MAY BE REQUIRED. The “Off /
1-Button Unlock Only” setting disables the LOCK function from 1-button remotes.
Feature #12 Data Port Protocol
Green: DBI, Black: DBI (press “lock” button to program)
Green: iData, Black: iData (press “unlock” button to program)
Green: DBI, Black: iData (press “trunk” button to program)
Green: iData, Black: DBI (press “start” button to program)
Auto-Detect: (press “lock” & “unlock” buttons to program) - DEFAULT
This feature determines which data protocol is used on each data port. By default, this feature
shouldn’t need to be changed. With everything installed and connected to the data ports, upon the
rst remote start attempt, each port will auto-detect the type of device connected and choose the
proper protocol. This can also be congured manually. NOTE: When a BLADE is inserted, the
black data port automatically switches to iData protocol.
13

Installer Programmable Features (cont’d)
Feature #17 Low Temp Crank Extender
0ms (Off) (press “start” 1 time to program)
200ms (press “start” 2 times to program) - DEFAULT
300ms (press “start” 3 times to program)
400ms (press “start” 4 times to program)
When the vehicle’s interior temperature is below freezing, this feature adds extra crank time to the
base timing (see installer feature #7). It applies to tachless modes only (installer feature #3)
Feature #18 - Arm, Disarm or Additional Channels
Arm / Disarm (press “start” 1 time to program) - DEFAULT
Arm / Channel 5 (press “start” 2 times to program)
Channel 4 / Disarm (press “start” 3 times to program)
Channel 4 / Channel 5 (press “start” 4 times to program)
The system has outputs designed for arming and/or disarming a factory-equipped security system.
These wires may be used instead to provide further system outputs, which are remotely operated
by the controller or transmitter. These outputs are in addition to the 2nd channel and 3rd channel
outputs. As shown in the programming assignment, the arm, disarm, channel 4 and channel 5 are
programmable as various combinations. For example, if the disarm output is needed, but not the
arm output, then channel 4 may be made available for use.
Feature #19 - Horn Relay Functions
Horn Output (press “start” 1 time to program) - DEFAULT
Ignition (press “start” 2 times to program)
Trunk Release (press “start” 3 times to program)
Pulse After Start (press “start” 4 times to program)
The primary function of this second relay, is to operate the vehicle’s existing horn; either in
conjunction with the electronic siren, or in place of the siren. Using both the siren and the horn
creates an extremely effective security system. Optionally, if desired or needed, this relay can be
programmed for the other functions listed above.
This device complies with FCC Rules part 15. Operation is subject to the following two conditions, (1) This
device may not cause harmful interference and, (2) This device must accept any interference that may be
received, including interference that may cause undesired operation.
The manufacturer is not responsible for any radio or TV interference caused by unauthorized modications to
this equipment. Such modications could void the user’s authority to operate the equipment.
Feature #16 - Starter Interrupt Functions
Alarm Only (press “start” 1 time to program)
Anti-Grind Only (press “start” 2 times to program) - DEFAULT
Alarm & Anti-Grind (press “start” 3 times to program)
Automatic (press “start” 4 times to program)
Alarm Only - The Starter Interrupt is operable whenever the alarm is armed.
Anti-Grind Only - The Starter Interrupt is operable whenever remote start is on.
Alarm & Anti-Grind - This setting combines the two settings above.
Automatic - This will cause the Starter Interrupt output to automatically engage 90 seconds after
the ignition switch is turned “off”, and after disarming the system.
14

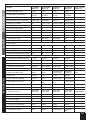
CONVENIENCESECURITYINSTALLER ONLY
User Feature Programming: Ignition on, off, press valet 5 times
# Feature Lock Button
(Brake x 1)
Unlock button
(Brake x 2)
Trunk button
(Brake x 3)
Start button
(Brake x 4)
Lock + Unlock
(Brake x 5)
1 Remote Start Run Time 10 min 5 min 15 min 20 min
2 Flashing Light Conrmations Unlock: ON
RS: ON
Unlock: ON
RS: Flash
Unlock: Flash
RS: ON
Unlock: Flash
RS: Flash
3 Conrmation Chirp Volume Low Med-Low Med-High High
4 BROWN Wire: Siren / Pulsed Horn Pulse LOW Pulse MED Pulse HI Steady Siren
5 Ignition Lock / Unlock Off Ign On = Lock Ign. Off = Unlock Lock + Unlock
6 Door Open Bypass for Feat. #5 On Off
7 Unlock w/ Trunk Release On Off
8 RS Activation (Remote) Start x 1 Start x 2 Start x 3 Start x 4
9 Last Door Arming Off On w/o Lock On w/ Lock
10 Automatic Rearming Off On w/o Lock On w/ Lock Enhanced
11 Conrmation Chirps Siren + Horn Siren Only On Demand Off
12 Anti-Carjacking Ignition Door Ignition + Door Off
13 NOT USED
14 Ignition Override On Off
15 Alarm Trigger Duration 30 sec 60 sec 90 sec 120 sec
16 Arming Delay 3 sec 15 sec 30 sec 45 sec
17 Open Door Warning Upon Arming On Off
Installer Feature Programming: Ignition on, off, press valet 10 times
1 RS Activation (WHITE/BLUE wire) 1 Pulse 2 pulses 3 pulses 4 pulses
2 PINK/WHITE Wire Ignition Accessory Starter
3 Engine Detection Tachless Hi Tachless Lo Tach Wire Data-tach Crank Only
4 Gasoline or Diesel Engine Gasoline 15 sec Diesel 20 sec Diesel 30 sec Diesel
5 Light Relay Function Dome Light Start Ignition Accessory Status
6 Blue Sat Port BLUE Wire Ignition Status Pulse After Start
below freezing
Pulse After
Engine Off Horn
7 Crank Time 0.75 sec 1 sec 1.5 sec 2.25 sec
8 Door Lock/Unlock Outputs 0.8 sec 3 sec Double Unlock Total Closure
9 Remote Start Lock Control Off Lock after
Start
Unlock before
Start Lock + Unlock
10 Turbo Timer Off 1 min 2 min 3 min
11 Manual Transmission On Off
12 Data Port Protocol Green: DBI
Black: DBI
Green: iData
Black: iData
Green: DBI
Black: iData
Green: iData
Black: DBI Auto-detect
13 Alarm Functions On Off
14 Pulse Ign. on Disarm On Off
15 Lock On Prewarn On Off
16 Starter Interrupt Alarm Only Anti-grind Only Alarm/Anti-Grind Automatic
17 Low Temp Crank Extender 0 ms 200 ms 300 ms 400 ms
18 Arm/Disarm or CH. 4/5 Arm/Disarm Arm/CH. 5 CH. 4/Disarm CH. 4/CH.5
19 Horn Relay Function Horn Ignition Trunk Release Pulse After
Start
15

Back Cover
Color cover is in a
separate le.
16
-
 1
1
-
 2
2
-
 3
3
-
 4
4
-
 5
5
-
 6
6
-
 7
7
-
 8
8
-
 9
9
-
 10
10
-
 11
11
-
 12
12
-
 13
13
-
 14
14
-
 15
15
-
 16
16


Excalibur RS-260-EDPB Owner's manual
- Category
- Remote starters
- Type
- Owner's manual
- This manual is also suitable for
Ask a question and I''ll find the answer in the document
Finding information in a document is now easier with AI
Related papers
-
Omega RS-360-EDP+ Owner's manual
-
Omega RS-340-EDP Owner's manual
-
-
-
-
-
-
-
Excalibur AL-XX70 User manual
Other documents
-
-
 Scytek electronic Precision 200 series User manual
-
 Scytek electronic 5000RS User manual
-
Scytek Electronics Two-way Led Automatic Transmission Remote Starter Owner's manual
-
 Crime Guard 850i4e User manual
-
-
Pyle PWD250 Operating instructions
-
-
 Scytek electronic Galaxy 3000Plus Series User manual
-


