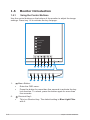
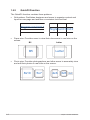
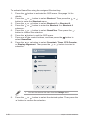
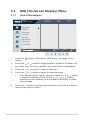
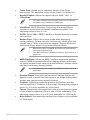
Asus VY249HE is a cutting-edge monitor designed to elevate your computing experience with its exceptional features. With its user-friendly control buttons, you can effortlessly navigate the intuitive on-screen display (OSD) menu to customize your viewing preferences. The QuickFit function provides real-time alignment grids for accurate document layout and editing. Protect your eyes with the EyeCheck function, which helps prevent eye strain and fatigue during prolonged use. Enhance your gaming prowess with the GamePlus function, offering a crosshair overlay and timer for immersive gameplay.
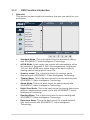
Asus VY249HE is a cutting-edge monitor designed to elevate your computing experience with its exceptional features. With its user-friendly control buttons, you can effortlessly navigate the intuitive on-screen display (OSD) menu to customize your viewing preferences. The QuickFit function provides real-time alignment grids for accurate document layout and editing. Protect your eyes with the EyeCheck function, which helps prevent eye strain and fatigue during prolonged use. Enhance your gaming prowess with the GamePlus function, offering a crosshair overlay and timer for immersive gameplay.


-
 1
1
-
 2
2
-
 3
3
-
 4
4
-
 5
5
-
 6
6
-
 7
7
-
 8
8
-
 9
9
-
 10
10
-
 11
11
-
 12
12
-
 13
13
-
 14
14
-
 15
15
-
 16
16
-
 17
17
-
 18
18
-
 19
19
-
 20
20
-
 21
21
-
 22
22
-
 23
23
-
 24
24
-
 25
25
-
 26
26
-
 27
27
-
 28
28
-
 29
29
-
 30
30
-
 31
31
-
 32
32
-
 33
33
-
 34
34
-
 35
35
-
 36
36
-
 37
37
-
 38
38
-
 39
39
-
 40
40
-
 41
41


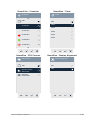
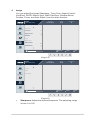
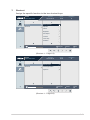
Asus VY249HE is a cutting-edge monitor designed to elevate your computing experience with its exceptional features. With its user-friendly control buttons, you can effortlessly navigate the intuitive on-screen display (OSD) menu to customize your viewing preferences. The QuickFit function provides real-time alignment grids for accurate document layout and editing. Protect your eyes with the EyeCheck function, which helps prevent eye strain and fatigue during prolonged use. Enhance your gaming prowess with the GamePlus function, offering a crosshair overlay and timer for immersive gameplay.
Ask a question and I''ll find the answer in the document
Finding information in a document is now easier with AI