Page is loading ...

WLAN mini PCI Card
H3C DNMA-83 User Manual
Version: 1.0
Nov 2007

1
Copyright Statement
No part of this publication may be reproduced, stored in a retrieval system, or
transmitted in any form or by any means, whether electronic, mechanical,
photocopying, recording or otherwise without the prior writing of the publisher.
Windows
™
98SE/2000/ME/XP are trademarks of Microsoft
®
Corp.
Pentium is trademark of Intel.
All copyright reserved.

2
FCC Statement
Warning: Changes or modifications to this unit not expressly approved by the party
responsible for compliance could void the user authority to operate the equipment.
This equipment has been tested and found to comply with the limits for a Class B
digital device, pursuant to Part 15 of the FCC Rules. These limits are designed to
provide reasonable protection against harmful interference in a residential installation.
This equipment generates, uses and can radiate radio frequency energy and, if not
installed and used in accordance with the instructions, may cause harmful interference
to radio communications.
However, there is no guarantee that interference will not occur in a particular
installation. If this equipment does cause harmful interference to radio or television
reception, which can be determined by turning the equipment off and on, the user is
encouraged to try to correct the interference by one of the following measures:
- Reorient or relocate the receiving antenna.
- Increase the separation between the equipment and receiver.
- Connect the equipment into an outlet on a circuit different from that to which the
receiver is connected.
- Consult the dealer or an experienced radio/TV technician for help.
This device complies with Part 15 of the FCC Rules. Operation is subject to the
following two conditions:
(1) This device may not cause harmful interference, and
(2) this device must accept any interference received, including interference that may
cause undesired operation.
FCC Caution: Any changes or modifications not expressly approved by the party
responsible for compliance could void the user's authority to operate this equipment.
IEEE 802.11a operation of this product in the U.S.A.
High power radars are allocated as primary users of the 5.25 to 5.35GHz and 5.47 to
5.725GHz bands, do not use these bands.
To comply with FCC RF exposure compliance requirements, a separation distance of
at least 20 cm must be maintained between the antenna of this device and all persons.
This Transmitter must not be co-located or operating in conjunction with any other

3
antenna or transmitter This device is intended only for OEM integrators under the
following conditions:
The antenna must be installed such that 20 cm is maintained between the antenna and
users. For laptop installations, the antenna must be installed to ensure that the proper
spacing is maintained in the event the users places the device in their lap during use
(i.e. positioning of antennas must be placed in the upper portion of the LCD panel
only to ensure 20 cm will be maintained if the user places the device in their lap for
use) and The transmitter module may not be co-located with any other transmitter or
antenna. As long as the 2 conditions above are met, further transmitter testing will not
be required.
However, the OEM integrator is still responsible for testing their end-product for any
additional compliance requirements required with this module installed (for example,
digital device emissions, PC peripheral requirements, etc.).
NOTE: In the event that these conditions can not be met (for example certain laptop
configurations or co-location with another transmitter), then the FCC authorization is
no longer considered valid and the FCC ID can not be used on the final product.
In these circumstances, the OEM integrator will be responsible for re-evaluating the
end product (including the transmitter) and obtaining a separate FCC authorization.
End Product Labeling
This transmitter module is authorized only for use in devices where the antenna may
be installed such that 20 cm may be maintained between the antenna and users (for
example access points, routers, wireless ASDL modems, certain laptop configurations,
and similar equipment). The final end product must be labeled in a visible area with
the following: "Contains
TX FCC ID: O9C-DNMA83 ".
RF Exposure Manual Information That Must be Included
The users manual for end users must include the following information in a prominent
location
NOTE: To comply with FCC RF exposure compliance requirements, the antenna used
for this transmitter must be installed to provide a separation distance of at least 20 cm

4
from all persons and must not be co-located or operating in conjunction with any
other antenna or transmitter."
Additional Information That Must be Provided to OEM Integrators
The end user should NOT be provided any instructions on how to remove or install the device.
Service Center in U.S.A
Company Name : 3Com Corporation
Company Address: 350 Campus Drive, Marlborough, MA 01752-3064. U.S.A.
Service Center in Canada
Company Name : 3Com Canada
Company Address: 466 Speers Road 3rd Floor Oakville, ON, L6K 3W9

5
Table of Contents
1. INTRODUCTION 6
2. DRIVER/UTILITY INSTALLATION / UNINSTALLATION 7
2.1 INSTALLATION..........................................................................................................7
2.2 ADDITIONAL SETUP PROCESSES............................................................................10
2.3 UNINSTALLATION...................................................................................................11
3. CONNECTING TO AN EXISTING NETWORK 12
4. CREATING AN AD HOC NEW NETWORK 17
5. MODIFYING A WIRELESS NETWORK 21
5.1 INFRASTRUCTURE MODE AND AD HOC MODE.....................................................21
5.2 MODIFYING A WIRELESS NETWORK.....................................................................22
5.3 DEFAULT SETTINGS WINDOWS XP ZERO-CONFIGURATION................................29
5.4 SUPER A/G SETTING........................................................... !
APPENDIX A: FAQ ABOUT WLAN 30
APPENDIX B: SPECIFICATION 32

6
1. Introduction
Thank you for purchasing the WLAN a/b/g/n mini-PCI Module that provides the
easiest way to wireless networking. This User Manual contains detailed instructions in
the operation of this product. Please keep this manual for future reference.
System Requirements
z A laptop PC contains:
- 32 MB memory or greater
- 300 MHz processor or higher
z Microsoft
®
Win
™
2000/ME/98 Second Edition/XP

7
2. Driver/Utility Installation / Uninstallation
2.1 Installation
Note! The Installation Section in this User Manual describes the first-time installation
for Windows. To re-install the driver, please first uninstall the previously
installed driver. See Chapter 2.3 “Uninstallation” in this User Manual.
Follow the steps below to complete the driver/utility installation:
1. Insert the Installation Software CD into the CD-Rom Drive.
2. Click “Next”.
3. Read the License Agreement and click “Yes”.

8
4. Click “Next” to continue or click “Browse” to choose a destination folder.
5. Click “Next”.
6. Click “Yes” to create a shortcut icon on your desktop.

9
7. Click “Finish”.
8. You should now see a shortcut icon on your desktop.

10
2.2 Additional Setup Processes
During software installation procedure, each operating system may prompt different
specific options:
1. Windows 98SE: The system will request the original Windows CD during the
installation process. When the installation is finished, you’ll have to restart your
computer.
2. Windows Me: Please restart your computer when the installation is finished.
3. Windows 2000/XP: Select “Install the software automatically” when the window
with this option appears, and then click “Next” to continue installation.

11
2.3 Uninstallation
Note! Before uninstallation, please close all running programs.
1. Click Start>Programs>WLAN a+b+g mini-PCI Module >UnInstall WLAN a+b+g
mini-PCI Module.
2. Choose “Remove”. Click “Next”.
3. Click “OK” to start Uninstall.
4. Click “Finish”. Uninstall is now completed.

12
3. Connecting to an Existing Network
1. Double click the shortcut icon of WLAN a+b+g mini-PCI Module on the desktop,
and the Configuration window appears.
2. Click on the Refresh button to list all available networks.

13
Note! To automatically connect to the network with the strongest signal, select
Enable Smart Selection. Any displays in Profile List.
3. From the list of “Available Networks”, choose one network by double clicking the
Network Name. One of the following dialog boxes appears. Click “Yes” to
continue.
4. If the chosen network has security enabled, the Security tab displays. Select the
security option used by the network. Contact the network administrator for the
correct settings.

14
5.
If selecting WPA or 802.1X, select the EAP type, then click on the Configure
button to select the certificate.
6. If selecting WPA-PSK, click on the Configure button to enter the PassPhrase.

15
7.
If selecting Pre-Shared Key, click on the Configure button to enter the correct
Encryption Keys.
Key entry method:
a.10hex digits: User must enter 10 hexadecimal digits.
The hexadecimal define is "0-9" and "A-F".
ex: 123456abc
b.5 chars: User must enter 5 characters. ex: ab3#@
c.13 chars: User must enter 13 characters.
ex: ab3#@kf08&kdk
d.16 chars: User must enter 16 characters.
ex: ab3#@kf08&kdk456
For WEP key, please contact with MIS administrator.
8. Click on OK (or Apply if using the other tabs) when done to save the settings.
9. Once connected (the icon or in front of the name of the Connected
Network), you can check the signal strength from the icon in the Windows
System Tray.

16
Additional Note for Windows XP
In Windows XP, it is recommended that you use the WLAN a+b+g mini-PCI Module
Configuration Utility. Before using the Utility, please follow the steps below to
disable the Windows XP Zero Configuration:
Option 1:
1. Double click the shortcut icon to open the Utility.
2. From the Windows System Tray, you should see the signal icon. Right-click it
and select “Disable Zero-Configuration”.
Option 2:
1. Go to “Control Panel” and double click “Network Connections”.
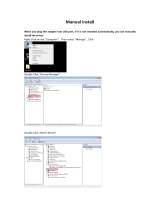
2. Right-click “Wireless Network Connection” of “WLAN a+b+g mini-PCI Module”,
and select “Properties”.
3. Select “Wireless Networks” tab, and uncheck the check box of “Use Windows to
configure my wireless network settings”, and then click “OK”.

17
4. Creating an Ad Hoc New Network
NOTE! Ad-hoc mode is available only for 802.11b/g. It is not available for 802.11a.
This is a client product and do not have radar detection function specified by FCC.
The software will not let you to use ad-hoc under 802.11a.
1. In the Configuration window, click New .
2. Select the “Profile Editor” tab.

18
3. Choose the check box of Enable Advanced Setting to edit all settings.
4. If joining or creating an Ad-Hoc network, choose Ad Hoc.
5. Click OK (or Apply if using the other tabs) to save the settings.
For details of each setting, refer to Modifying a Wireless Network on page 20.
6. Click the Security tab. If not using security, select None.

19
7. If security is used, select Pre-Shared Key and click on the Configure button.
/