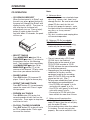
Pyle PLCD69 is a mobile audio system that combines a PLL Synthesizer Stereo Radio and a Digital Compact Disc Player with features such as Automatically Memory Storing, Hiding Panel, Preset Equalization, Auxiliary Input Function, and Remote Control. It offers a wide range of capabilities, making it a versatile and convenient choice for your mobile audio needs. With its ability to play CDs, receive radio broadcasts, and connect to external audio sources, the Pyle PLCD69 provides a comprehensive audio experience on the go.
Pyle PLCD69 is a mobile audio system that combines a PLL Synthesizer Stereo Radio and a Digital Compact Disc Player with features such as Automatically Memory Storing, Hiding Panel, Preset Equalization, Auxiliary Input Function, and Remote Control. It offers a wide range of capabilities, making it a versatile and convenient choice for your mobile audio needs. With its ability to play CDs, receive radio broadcasts, and connect to external audio sources, the Pyle PLCD69 provides a comprehensive audio experience on the go.


-
 1
1
-
 2
2
-
 3
3
-
 4
4
-
 5
5
-
 6
6
-
 7
7
-
 8
8
-
 9
9
-
 10
10
-
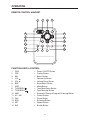 11
11
-
 12
12
-
 13
13
-
 14
14
-
 15
15
-
 16
16


Pyle PLCD69 is a mobile audio system that combines a PLL Synthesizer Stereo Radio and a Digital Compact Disc Player with features such as Automatically Memory Storing, Hiding Panel, Preset Equalization, Auxiliary Input Function, and Remote Control. It offers a wide range of capabilities, making it a versatile and convenient choice for your mobile audio needs. With its ability to play CDs, receive radio broadcasts, and connect to external audio sources, the Pyle PLCD69 provides a comprehensive audio experience on the go.
Ask a question and I''ll find the answer in the document
Finding information in a document is now easier with AI
Related papers
-
 PYLE Audio PLCD69MP Owner's manual
-
Pyle PLCD87 Owner's manual
-
-
 PYLE Audio PLCD21 User manual
-
Radio Shack PLCD32 User manual
-
 PYLE Audio PLDVD199XM User manual
-
PYLE Audio PLCD3MR User manual
-
PYLE Audio PLCD67 User manual
-
-
Pyle PYLE Hydra Series PLCD13MR Owner's manual


Other documents
-
 PYLE Audio PLCD69MP User manual
-
Sanyo T1443 - ECD Radio / CD Owner's manual
-
-
Lenco CS173DAB Owner's manual
-
West Marine 2641272 Owner's manual
-
Koss MS2015 User manual
-
Insignia IN-CS102 User manual
-
-
-
