Page is loading ...


ii CX1000 Color Label Press
Notices: The information in this document is subject to change without notice. NO WARRANTY OF ANY KIND IS MADE WITH REGARD
TO THIS MATERIAL, INCLUDING, BUT NOT LIMITED TO, THE IMPLIED WARRANTIES OF MERCHANTABILITY AND FITNESS FOR A
PARTICULAR PURPOSE. No liability is assumed for errors contained herein or for incidental or consequential damages in connection with the
furnishing, performance, or use of this material. This document contains proprietary information that is protected by copyright. All rights are
reserved. No part of this document may be photocopied, reproduced, or translated into another language without prior written consent.
Trademark Acknowledgments: Windows is a registered trademark of Microsoft Corporation. All other trademarks are the property of their
respective owners.
Printing History
Edition 2.0, #110514 Copyright 2011, All rights reserved.
FCC Compliance Statement: This device complies with part 15 of the FCC rules. Operation is subject to the following two conditions: (1) this
device may not cause harmful interference, and (2) this device must accept any interference received, including interference that may cause unde-
sired operation.
For Users in the United States: This product is intended to be supplied by a UL listed Direct Plug-In Power Supply marked "Class 2"or a UL
listed ITE Power Supply marked "LPS" with output rated 12VDC, 4.5A or higher. This equipment has been tested and found to comply with the
limits for a Class A digital device, pursuant to Part 15 of the FCC Rules. In a domestic environment this product may cause radio interference,
in which case the user may be required to take adequate measures. This equipment generates, uses, and can radiate radio frequency energy and,
if not installed and used in accordance with the instructions, may cause harmful interference to radio communications. However, there is no
guarantee that interference will not occur in a particular installation. If this equipment does cause harmful interference to radio or television
reception, which can be determined by turning the equipment off and on, the user is encouraged to try to correct the interference by one or
more of the following measures:
• Re-orient or relocate the receiving antenna.
• Increase the separation between the equipment and receiver.
• Connect the equipment into an outlet on a circuit different from that to which the receiver is connected.
• Consult the dealer or an experienced radio/TV technician for help.
Use of shielded cables is required to comply with the Class A limits of Part 15 of the FCC Rules. You are cautioned that any changes or
modifications not expressly approved in this manual could void your authority to operate and/or obtain warranty service for this equipment.
For Users in Canada: This digital apparatus does not exceed the Class A limits for radio noise for digital apparatus set out on the Radio
Interference Regulations of the Canadian Department of Communications. Le present appareil numerique n'emet pas de bruits radioelectriques
depassant les limites applicables aux appareils numeriques de la class A prescrites dans le Reglement sur le brouillage radioelectrique edicte par
le ministere des Communications du Canada.
General Safety Information.
Note: Notes are used to notify of installation, operation, or maintenance information that is important but not safety related.
Caution: Caution is used to indicate the presence of a hazard, which if ignored may result in damage to the unit.
Warning: Warning means that a potential safety hazard exists and indicates procedures that must be followed exactly to avoid serious personal injury.
Caution
You must use only 8.5 inch wide label stock in the CX1000. Failure to use specified label stock will result in damage to your printer and
excessive build up of toner inside the printer.
WARNING!
TO PREVENT FIRE OR SHOCK HAZARD, DO NOT EXPOSE THE UNIT TO RAIN OR MOISTURE. TO REDUCE THE RISK OF
ELECTRIC SHOCK, DO NOT REMOVE EXTERIOR PANELS. NO USER-SERVICEABLE PARTS INSIDE. REFER SERVICING TO
QUALIFIED SERVICE PERSONNEL. OPERATE THE UNIT WITH ONLY THE PROPER ELECTRICAL SPECIFICATIONS AS
LABELED ON THE PRINTER AND AC ADAPTER.
WARNING!
DO NOT WEAR LOOSE FITTING CLOTHING SUCH AS NECK TIES OR LOOSE LONG SLEEVES WHEN OPERATING THE
CX1000. THE REWINDER MOTOR IS VERY POWERFUL AND THE ROLLER COULD CATCH THE CLOTHING WHILE THE ROLL
IS BEING REWOUND.
WARNING!
ALL LABEL STOCK MUST BE QUALIFIED FOR LASER PRINTING. PLASTIC BASED STOCKS SUCH AS POLYPROPYLENE OR
POLYESTER CAN MELT OR CATCH FIRE FROM THE EXTREME HEAT OF THE FUSER
!
!
!

CX1000 Color Label Printer iii
Section 1. Introduction ................................................. 1
Section 2. Unpack and Assemble .........................................2
Section 3. Install Software...............................................14
Section 4. Load Label Stock (Includes attaching stock to rewinder) ...........15
Section 5. Printing .....................................................20
5.1 Measure Your Label Stock .....................................20
5.2 Array Images with PTPrint Wizard .............................20
5.3 Adjusting Print Offsets ........................................24
5.4 Manually Array Images using PTPrint ..........................26
5.5 Using Barcodes...............................................28
5.6 Recommended Image Format for Imported Graphics..............29
Section 6. Toner Monitoring and Supply Management......................30
6.1 Estimating Cost Per Label (Quote Tool) ..........................30
6.2 Printing a Proof Print .........................................31
6.3 Managing Used Toner Cartridges...............................32
6.4 Enter Supply Roll Length......................................33
6.5 Low Supplies Warning ........................................33
6.6 Other Functions of the Status Monitor...........................34
Section 7. Media Recommendations......................................35
Section 8. Replace Toner Cartridges ......................................37
Section 9. Maintenance and Troubleshooting ..............................38
9.1 Color Matching ..............................................38
9.2 Color/Alignment Calibration ..................................40
9.3 Print Head Alignment.........................................40
9.4 Cut Alignment/Stretch Factor..................................42
9.5 Stop/Cut Button .............................................44
9.6 Error Messages...............................................44
9.7 Replacing the Fuser ...........................................45
9.8 Replacing an Image Transfer Unit...............................46
Section 10. Specifications ................................................49
Index . . . . . . . . . . . . . . . . . . . . . . . . . . . . . . . . . . . . . . . . . . . . . . . . . . . . . . . . . . . . . . . . . . 51
Table of Contents

iv CX1000 Color Label Press

Introduction 1
Thank you for purchasing the CX1000 Color Label Printer. The CX1000 Color Label Printer may
also be labeled as the CX1000 Color Label Press or as the Color Label Press in PTPrint software, the
status monitor software or the printer driver. Hereafter in the manual the CX1000 Color Label
Printer will be referred to as the "CX1000". The laser printer portion will be referred to as the
"printer". The unwinder and rewinder unit will be referred to as the "base". Toner and label stock
will be referred to as "media".
This manual is one of many sources of information for this product. If you have problems or
questions please consult one of these resources:
• Tech Support Phone: 763-475-6979
• Tech Support Email: www.primera.com/contactsupport
• Online Knowledgebase: www.primera.com/kb
Important Note on Label Press Operating Environment! It is strongly recommended that the
CX1000 Color Label Press is operated in an air-conditioned, humidity controlled, smoke free, pet free
environment.
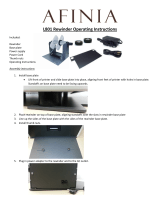
Section 1: Introduction
Rewinder
Label Guide
Rewinder
Dancer
Arm
Cut/Stop Button
Cutter
Label Guide Discs
Unwinder
Printer
Control Panel
Feeder Door
Tension Knob
Figure 1-1.
Unwinder
Dancer
Arm
Eyemark Sensor
TOC
INDEX

2 Unpack and Assemble
1. You will receive three boxes. The printer portion of the CX1000 will be packaged inside a
separate box on top of a pallet. Set aside the printer box for now. Open the two remaining
boxes. The following items will be included:
Section 2: Unpack and Assemble
Figure 2-1.
LO CT IT E
© 2011 All rights reserved
Operator’s Guide
1noitcudortnI
Unpack and Assemble 2
31erawtfoS llatsnI
41kcotS lebaL daoL
91gnitnirP
Toner Monitoring & Supply Management 30
Media Recommendations 35
Maintenance and Troubleshooting 38
94snoitacificepS
Power Supplies
Sample Stock
Core
Label Guide Discs
6-Pin Cables
Install Disc
Documentation
Allen Wrench
Ethernet (Gray)
Loctite
Rewinder
(Right Side)
Ethernet (Yellow)
Unwinder
(Left Side)
Note: Save all packing materials!
Grounding Straps
Unwinder Chuck
(Left Side)
Rewinder Chuck
(Right Side)
Rewinder Stand
Unwinder Stand
Printer Stand
Screws
TOC
INDEX

Unpack and Assemble 3
2. Remove all packing tape from the components. There is one piece securing the dancer on the
unwinder and rewinder.
3. Locate the left/unwinder chuck, the 3mm allen wrench, the Loctite and the unwinder.
See Figure 2-2.
• The unwinder has a shorter dancer arm, dancer stops and two 6-pin ports on the back.
• The unwinder chuck has a small stop disc attached to the back side of the chuck. The
rewinder chuck does not have this disc attached.
4. Assemble the Unwinder. See Figure 2.3.
A. Partially remove the two set screws on
each chuck so that approximately ½
inch (1 cm) is exposed.
B. Crack the top off the Loctite container
and place two drops on each set screw.
C. Reset each screw until it is flush with
the outside of the chuck.
D. Attach the chuck to the unwinder (left
side) drive shafts. Line up the holes in
the chuck with the flat edges on the
drive shaft. The holes must correspond
with the flats or the set screws will not
hold the chuck in place.
E. Tighten the set screws using the 3mm
allen wrench. Once they are tight,
attempt to rotate the chuck forward
backward while watching the drive
shaft. The drive shaft should move
with the chuck. If it does not move
with the chuck, loosen the set screws
slightly and turn the chuck until the
set screws are even with the flats. The
Loctite will dry in 24 hours.
Figure 2-2.
LOC T IT E
LOC T IT E
A
B
C
DE
LOC TIT E
Figure 2-3.
Unwinder
Shorter Dancer Arm
Dancer Stops
Loctite
Allen Wrench
Unwinder Chuck
(Left Side)
Stop Disc
TOC
INDEX

4 Unpack and Assemble
5. Locate the rewinder (right side) chuck, the label guide disc with the three interior holes, the
rewinder, the loctite and the 3mm allen wrench. The rewinder has a longer dancer arm and no
6-pin ports on the back.
6. Assemble the Rewinder. See Figure 2.5.
A. Partially remove the two set screws on the
chuck so that approximately ½ inch (1 cm)
is exposed.
B. Place two drops of loctite on each set
screw.
C. Reset each screw until it is flush with the
outside of the chuck.
D. Peel off the protective wrap from the label
guide disc. Attach the label guide disc to
the rewinder (right side) chuck using two
flat head bolts provided.
E. Attach the chuck to the unwinder (left
side) drive shafts. Line up the holes in the
chuck with the flat edges on the drive
shaft. The holes must correspond with the
flats or the set screws will not hold the
chuck in place.
F. Tighten the set screws using the 3mm
allen wrench. Once they are tight, attempt
to rotate the chuck forward backward
while watching the drive shaft. The drive
shaft should move with the chuck. If it
does not move with the chuck, loosen the
set screws slightly and turn the chuck
until the set screws are even with the flats.
The Loctite will dry in 24 hours.
Figure 2-4.
LOC TIT E
Rewinder
Three Interior Holes
Label Guide Disc
Allen Wrench
Loctite
Rewinder
(Right Side)
LOC T IT E
LOC T IT E
A
B
C
DE
Figure 2-5.
TOC
INDEX

Unpack and Assemble 5
7. Locate the unwinder stand and printer stand. Orient the printer stand so that the CX1000 logo
faces forward. Attach the unwinder stand to the left side of the printer stand. Align the hooks
on the unwinder stand to the slots on the printer stand.
8. Locate the unwinder. It has the shorter dancer arm and two 6-pin ports on the back. Attach it
to the stand using the #2 Phillips screws and the washers found in the hardware bag. Use the
locator pegs on the stand and align them with the holes on the bottom of the unwinder.
Locator Pegs
Figure 2-6.
Figure 2-7.
TOC
INDEX

6 Unpack and Assemble
9. Locate the rewinder stand. Attach it to the right side of the printer base. Align the hooks on the
rewinder stand to the slots on the printer stand.
10. Locate the rewinder. The rewinder has a longer dancer arm and no 6-pin ports on the back.
Attach it to the stand using the #2 Phillips screws and the washers found in the hardware bag.
Use the locator pegs on the stand and align them with the holes on the bottom of the rewinder.
Figure 2-9.
Locator Pegs
Figure 2-8.
TOC
INDEX

Unpack and Assemble 7
11. Locate the printer box. Remove the boxing material as shown in Figure 2.10 below. The power
cord for the printer will be found in this packaging material.
12. Place the printer on the printer base. Primera recommends three people to lift the printer on top
of the base. Two people are required to lift the printer and one person to guide the printer onto
the mounting pegs. Align the pegs on the base with the holes in the bottom of the printer. Use
the locating label to align the right front edge of the printer with indicated mark on the label.
The right front edge of the printer will be 1.5 inches (38 mm) from the front of the base.
!!
48 Kg.
105 lbs.
!
65.5 Kg.
140 lbs.
Figure 2-10.
Figure 2-11.
1.5 inch (38 mm)
!!
48 Kg.
105 lbs.
TOC
INDEX

8 Unpack and Assemble
13. Now that the printer is in place, all of the packing tape, clips and shipping protection devices
must be removed. First remove the tape securing the front cover.
14. Open the front cover. Remove the red toner cartridge stabilization clips. Remove all the print
cartridges.
a. Pull up slightly on the cartridge handhold.
b. Pull the cartridge straight out and use the handle to lift it off the guides.
c. Place the cartridges on a clean, flat surface out of direct light.
Figure 2-12.
Note: The CX1000 comes
with 4 starter cartridges.
These cartridges can only
be used with this printer!
Figure 2-13.
TOC
INDEX

Unpack and Assemble 9
15. Remove the Image Transfer Unit (ITU) protection sheet. Pull up on the plastic piece on
the right side of the ITU to remove the sheet. The protection sheet is attached to the
plastic piece.
Important Note: Do not touch the exposed ITU.
16. Before replacing the toner cartridges remove the red plastic protection plate from the
bottom of each toner cartridge. Put cartridges back in to the printer. On each cartridge
there are pegs that correspond to slide rails inside the printer.
Note: Before replacing each cartridge, shake it side to side and front to back to redistribute
the toner evenly.
Figure 2-14.
Figure 2-15.
TOC
INDEX

10 Unpack and Assemble
17. Close the front cover by first lifting the door to its maximum height, then disengaging the cover
prop latch, and then finally close the door until you hear a click from both sides of the door.
18. Pull down to open the feeder door on the left side of the printer. When the door is ¼ open pull
both latches toward the unwinder to release the latches on both side of the door to open it all
the way.
19. Now connect one of the 6-pin round cables to the connector on the door.
Figure 2-19.
Figure 2-17.
Figure 2-18.
2
1
3
TOC
INDEX

Unpack and Assemble 11
20. Connect the other end of this cable to the connector port on the right side or farthest away from
the printer.
21. Connect the remaining 6-pin round cable to the back of the cutter mechanism and to the
remaining port on the unwinder closest to the printer.
Figure 2-20.
Cable
Figure 2-21.
TOC
INDEX

12 Unpack and Assemble
22. Locate the power converters and the printer power cord. Connect power to the printer and
switch on the power. Connect the power to the back of the rewinder and unwinder. Switch on
the power.
Figure 2-22.
ON
OFF
Unwinder
Rewinder
Printer
TOC
INDEX

Unpack and Assemble 13
23. Attach five grounding straps in the locations shown below. Screws and grounding straps are
found in the supply back. To attach the grounding straps you will need to remove and replace
the screws where indicated in the diagram below on the unwinder, rewinder and printer. The
grounding straps are not all the same. Refer to the diagram below to determine the correct
location of the straps.
Congratulations! Your CX1000 is setup!
Figure 2-23.
Important Note:
Match the location of your 6-pin
round cables to what is shown
in this diagram. Notice how the
cables are crossed.
To test for proper configuration
press the Stop/Cut button. If
you hear it cut, everything is
setup properly.
Note: Remove and
replace these screws
to attach grounding
straps.
TOC
INDEX

14 Install Software
Three pieces of software will need to be installed in order to print to the CX1000:
• The CX1000 Printer Driver. This software allows a networked or local computer to
communicate with the CX1000 via the included Ethernet cable or Ethernet crossover cable.
• PTPrint. This software allows you to import an existing file and arrange it across a page (step
and repeat). This software is a full-featured layout software that supports embedding or linking
many different files types. It is not a design software. Only one copy of the print software can
be used with each CX1000. This ensures proper supply level tracking.
• Status Monitor. This installs automatically along with PTPrint. This allows you to estimate ink
costs for a particular label and accurately track toner and label stock supplies.
1. To install the software place the CD in your CD-Rom Drive. The Installer application should
automatically launch in a few moments. If it does not automatically launch, follow these steps:
• Double-click the My Computer Icon, then double-click the icon of the appropriate CD drive
containing the Software Installer disc.
• Double-click setup.exe
2. Follow the prompts in the software installer to complete the installation of the software.
Note: If you connect your PC to the CX1000 using a yellow crossover cable it may be necessary to
disable or modify the settings of your antivirus/firewall program.
Section 3: Install Software
TOC
INDEX

Load Label Stock 15
This section details the general process for installing label stock on the unwinder, and attaching the
label stock to the rewinder.
1. Switch on the unwinder, printer and rewinder.
2. Place the label stock roll (max 8" OD) on the unwinder chuck. Push the stock all the way back
until it touches the stop disc.
Note: You must use only 8.5 inch wide label stock in the CX1000. Failure to use specified label stock will
result in damage to your printer and excessive build up of toner and adhesive inside the printer.
Caution! You must use Primera approved label stock to avoid damage to your printer. Damage due to use of
unapproved material will not be covered by the warranty.
Section 4: Load Label Stock
Figure 4-1.
Stop Disc
Figure 4-2.
ON
OFF
Unwinder
Rewinder
Printer
TOC
INDEX

16 Load Label Stock
3. The loose stock should fall on the right side of the roll. Turn the tension knob clockwise to
secure the roll to the chuck. Turn the knob as as tight as you can! Feed the stock under the
dancer arm and through the cutter.
4. Feed the stock under the dancer arm.
Dancer Arm
Eyemark
facing up!
Figure 4-3.
Dancer Arm
Tension Knob
Note: To track supply roll
usage, remember to enter the
length of the roll using the
instructions in Section 6.4.
MP Feeder Door on Printer
Figure 4-4.
TOC
INDEX
/