Page is loading ...

Parrilla con Quemadores a gas
Guía del usuario
US CA
(ES)
Gas cooktop
User guide
US CA
(EN)
Table de cuisson au gaz
Manuel d’utilisation
US CA
(FR)
GC912, GC913 models

Do not store or use gasoline or other flammable
vapors and liquids in the vicinity of this or any other
appliance.
NEVER use this appliance as a space heater to heat or
warm the room. Doing so may result in carbon monoxide
poisoning and overheating of the cooktop.
WHAT TO DO IF YOU SMELL GAS
Do not try to light any appliance.
Do not touch any electrical switch.
Do not use any phone in your building.
Immediately call your gas supplier from a neighbor’s
phone. Follow the gas supplier’s instructions.
If you cannot reach your gas supplier, call the fire
department.
Installation and service must be performed by a
qualified installer, service agency or the gas supplier.
WARNING!
If the information in this manual is not followed
exactly, a fire or explosion may result causing
property damage, personal injury or death.

Contents
Introducing your cooktop 3
Cooktop safety 4
Using your cooktop 6
Cookware 8
Care and cleaning 10
Frequently asked questions 13
Trouble shooting 14
Limited warranty 15
Contenido
Familiarizándose con su parrilla 19
Seguridad de la parrilla 20
Cómo utilizar su parrilla 22
Ollas y sartenes 24
Cuidado y limpieza 26
Preguntas frecuentes 29
Solución de problemas 30
Garantía limitada 31
Table des matières
Présentation de votre table de cuisson 35
Utilisation sécuritaire de la table de cuisson 36
Utilisation de votre table de cuisson 38
Batterie de cuisine 40
Entretien et nettoyage 42
Foire aux questions 45
Dépannage 46
Garantie limitée 47
EN
ES
FR
1

2

Introducing your cooktop
Now that your new cooktop is installed and ready to use, you will want to know everything
about it to be sure of excellent results right from the start.
This booklet will introduce you to the features and special talents of your cooktop/hob. We
recommend you read the whole book before you start using your cooktop, for the sake of safety
as well as success.
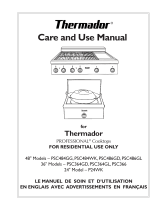
Location of features
1. Semi-rapid burner
2. Rapid burner
3. Wok burner
4. Auxiliary burner
5. Cooktop controls
1
4
3
2
2
5
Important!
SAVE THESE INSTRUCTIONS
The models shown in this user guide may not be available in all markets and are subject to change at any
time. For current details about model and specification availability in your country, please go to our website
www.fisherpaykel.com or contact your local Fisher & Paykel dealer.
EN
3

Cooktop safety
Your safety is important to us
This guide contains safety statements under warning symbols. Please pay special attention to
these symbols and follow instructions.
Important safety instructions
General
Have your cooktop installed and properly grounded by a qualified installer in accordance with
the installation instructions.
Be sure to have the installer show you how to turn off the gas and electrical supply.
Use this appliance for its intended purpose as described in this user guide.
To avoid risk of burns and/or fire keep loose clothing, pot holders or any other flammable
materials well clear of the burner flame.
Always use a pot holder when removing cookware from the cooktop. Do not use wet or damp
pot holders as these can cause steam burns. Do not use towels or similar cloths for removing
cookware.
When deep frying fat, be sure the pan is large enough not to cause an overflow from bubbling
of the fat. Do not deep fry foods with a high moisture content or food covered with frost.
Turn the pot handles to the side or the back of the cooktop away from the reach of children.
Handles should not be positioned over adjacent burners.
Always check that the control knobs are in the ‘off’ position when you have finished cooking.
While using the cooktop, surfaces can become hot enough to cause burns.
Do not leave children alone or unattended near the cooktop. Never allow children to stand, sit
or play near, on or with the cooktop.
Do not leave the cooktop unattended when in use.
Do not use the cooktop to heat unopened food containers, such as cans. This will cause the
container to burst and could result in injury.
This symbol alerts you to hazards such as fire, electrical shock, or
other injuries.
4

Operational
Do not use water on grease fires. A violent steam explosion may result.
Do not store or use flammable materials, gasoline or other flammable vapors and liquids in the
vicinity of the cooktop, or any other appliance.
Do not operate the burner without all burner parts in place.
Always keep flammable wall coverings, curtains or drapes a safe distance from your cooktop.
For safety reasons the burner flame size should be adjusted so it does not extend
beyond the edge of the cookware.
Use cookware of the appropriate size and construction for the type of cooking. Cookware must
be matched to the size of the cast iron grate.
Do not spray aerosols in the vicinity of this appliance while it is in operation.
NEVER use this appliance as a space heater to heat or warm the room. Doing so may result in
carbon monoxide poisoning and overheating of the cooktop.
Do not stand on this gas cooktop.
Be careful when reaching for items stored in cabinets over the cooktop. Flammable materials
could be ignited if brought in contact with flame or hot surfaces and may cause severe burns.
For safety reasons, do not store items of interest to children above or at the back of the cooktop.
Maintenance
Do not let cooking grease or other flammable materials accumulate near the cooktop.
Do not repair or replace any part of the appliance unless specifically recommended in
this manual. All other servicing should be referred to a qualified technician.
Unplug the cooktop from the electrical supply and turn off the gas supply at the shut-off valve
before servicing this appliance.
This appliance is equipped with a three-prong grounding plug for your protection against shock
hazard and should be plugged directly into a properly grounded receptacle. DO not cut or
remove the grounding prong from this plug.
Do not obstruct the flow of combustion and ventilation air to the cooktop.
Environmental hazards
The California Safe Drinking Water and Toxic Enforcement Act requires the Governor of California
to publish a list of substances known to the state to cause cancer, birth defects or other
reproductive harm, and requires businesses to warn customers of potential exposure to such
substances.
Gas appliances can cause minor exposure to four of these substances, namely benzene, carbon
monoxide, formaldehyde and soot, caused primarily by the incomplete combustion of natural
gas or LP fuels.
Properly adjusted burners, indicated by a bluish rather than a yellow flame, will minimize
incomplete combustion. Exposure to these substances can be minimized further by venting with
an open window or using the ventilation fan.
EN
5

Using your cooktop
This section tells you how to successfully operate your cooktop
Choose the control knob for the burner you want to use. Press down and turn the knob counter
clockwise to the HI symbol (see below). All the igniters will spark until the gas ignites on the
selected burner.
Adjusting the flame
The flame adjusts anywhere between the HI and LO symbols. Do not regulate the flame between
HI and OFF.
Temperature control
Your cooktop offers a wide range of temperature settings from delicate slow cooking to the
intense high temperatures needed for boiling and searing.
For general cooking purposes turn the control knob to the HI setting to begin cooking or bring
food to the boil and adjust as necessary. Once your pan is hot, reduce the temperature to
maintain a steady heat to cook your food through. This will reduce cooking times.
Results will vary depending on the type of pans used and the quantities being cooked. You
will need to experiment with the temperature settings to match your desired cooking result.
Different types of cooking utensils will vary in efficiency.
GC912
-0
-0
-0
)*
)*
)*
0''
0''
0''
Burner
indicator
GC913
-0
-0
-0
)*
)*)*
0''
0''
0''
Burner
indicator
6

Auto re-ignition
Auto re-ignition is for your convenience and safety. The auto re-ignition feature causes the
igniters to spark automatically and the burner to re-light if a flame blows out or if the flame is
severely distorted by a draft or a cooktop ventilation system.
Constant sparking
The igniters must be kept clean and dry to
work correctly. Dirty or wet igniters could
cause constant sparking, even if a flame
is present. (See Troubleshooting guide).
If the burner has an inconsistent flame or does not light
If the gas does not light within four seconds, turn the knob to OFF. Allow at least two minutes
for the gas to disperse before trying again.
Check that the power to the product is switched on.
Check that the burner parts are assembled correctly as below:
Power failure
In the event of a power failure, turn all burner control knobs to OFF. The burners can be lit by
holding a lighted match close to the side of the burner and turning the control knob to HI. Wait
until the flame is burning all the way around the burner cap before adjusting.
EN
Correct assembly Incorrect assembly

Cookware
Using a wok
Use your wok only on the middle burner.
Do not use a wok larger than 18” (45 cm).
When using any wok, make sure it does not
push other pots and pans aside. This
could make them unstable, or deflect heat
onto nearby walls or the countertop.
Wok ring (some models only)
Make sure the wok ring fits tightly on the four
fingers of the grate. Always use the wok ring
with your wok.
Using the SimmerMat (some models only)
The SimmerMat helps you control the
temperature of your cooking surface to allow
the long slow simmering that is needed for
successfully cooking delicate foods. Use at low
heat only.
To use the SimmerMat
1
First cook the food, or bring to the boil, over high heat.
2
Turn the burner off and carefully place the
SimmerMat on the grate with the points facing
upward. Re-ignite the burner, turn to LO and place
your saucepan on top of the SimmerMat.
Do not use an asbestos mat or decorative covers
between the flame and the saucepan as this may
cause serious damage to your cooktop.

EN
Using saucepans
Do not let large saucepans or frying pans overlap the countertop as this can deflect heat and
damage the countertop surface.
Hold the handle of the saucepan to prevent movement of cookware when stirring.
Saucepans should have a thick flat base. Food in a saucepan with an uneven base will take
longer to cook.
Extremely heavy saucepans may bend the grate or deflect the flame.
Match the bottom of your saucepans with the cooking zone and be sure that they are stable.
This will give you the most efficient cooking.
Griddle
Using the griddle (some models only)
A griddle is ideal for cooking a variety of foods. Cook steak, tender cuts of meat, panini and char-
grilled vegetables on the ribbed side and griddle scones, pancakes, pikelets, polenta and eggs on
the flat side.
The surfaces of a cast-iron griddle will become more and more non-stick as cooking oils become
baked in. This ‘seasoning’ process can be started by coating both surfaces of the griddle with
cooking oil and baking in the oven at 300
O
F (150
O
C) for about an hour.
Cooking with a griddle
Only use the griddle over the two left-hand burners.
Heat the griddle for a few minutes before using.
Brush the food, not the griddle, with oil, to reduce splatter and smoking,
Cook steak and vegetables at high temperatures on the ribbed side of the griddle. Turn the steak
only once, about half way through the cooking time and test by pressing the surface of the
steak. The softer the meat is, the ‘rarer’ or less well done it will be.
Griddle scones, pancakes, pikelets, polenta and eggs are best cooked slowly at medium to low
temperatures on the flat side of the griddle.
Important!
Prolonged cooking with the griddle at high temperatures may damage the cooktop.
Cleaning a cast-iron griddle
Leave the griddle to cool before cleaning. Scrape away any food residue and wash in warm
soapy water.
Do not scour to the bare metal when cleaning or you will remove the non-stick coating that has
built up during cooking.
Dry the griddle thoroughly and wipe with a thin coating of cooking oil to prevent rust forming,
especially when the griddle is new.
9

Care and cleaning
Use soapy water and a soft sponge or cloth to clean the cooktop, rinse with clean water and
dry thoroughly. Clean the cooktop regularly, before spills become burnt on. Soaking stubborn
stains under the soapy cloth for a few minutes will help make them easier to remove. Grates are
dishwasher safe. If stubborn soil remains follow the recommended cleaning methods outlined
below.
Always use the mildest cleaner that will do the job. Use clean, soft cloths, sponges or paper
towels.
Clean brushed stainless steel finishes in the direction of the grain.
Dry thoroughly to avoid water marks.
Do not clean cooktop parts in any self cleaning oven.
After cleaning, replace all cooktop parts in their proper position before using the cooktop.
Rinse and wipe away all cleaner residue as when heated the cleaners can permanently stain the
cooktop.
Important!
The cleaners recommended on the following page indicate cleaner types and do not
constitute an endorsement of a particular brand. Use all products according to directions
on the package.
Cleaning procedures listed opposite are only applicable for the ‘F&P Gas cooktops’ and are
not applicable for other appliances with stainless steel finish.
WARNING!
Hot Surface Hazard
Before cleaning, be
certain the burners are
turned off and the whole
cooktop is cool.
Failure to do so could
result in burns and scalds.
10

EN
Care and cleaning
Cooktop cleaning chart
Cooktop part Cleaning Important
Grates, burner caps &
SimmerMat,
porcelain enamel finish
Burner parts
Control knobs
Stainless steel exterior
Ignition electrodes
Hot soapy water and nylon scourer
Soaking in a solution of biological
clothes washing detergent eg Surf®
Mild abrasive cleansers eg Bon Ami®
Fume Free oven cleaner eg Easy
Off®
Heavy Duty oven cleaner eg Easy
Off®
Always allow cooktop parts to cool
completely before cleaning them.
Remove spills as soon as the burner
caps are cool to avoid the soil
becoming burnt on.
Hot soapy water
To clear the holes use a stiff nylon
brush or wire eg straight ended
paper clip
Mild abrasive cleansers eg Bon Ami®
Reassemble the burner parts correctly.
Hot soapy water and a soft cloth
Mild abrasive cleansers eg Bon Ami®
Always apply minimal pressure with
abrasive cleaners.
Soak soil under a hot soapy cloth,
rinse and dry thouroughly
Hard water spots can be removed
with household white vinegar
Non abrasive stainless steel cleaner
eg 3M Stainless Steel Cleaner &
Polish. Regular use of a stainless
steel polish will reduce fingerprints
and other marks
Heavy soiling can be removed with
oven cleaner eg Easy Off® Fume Free
or Easy Off® Heavy Duty
Never use harsh/abrasive cleaning
agents as they will damage the
stainless steel finish.
Chlorine or chlorine compounds
in some cleaners are corrosive to
stainless steel and may damage the
appereance of your cooktop. Check
the label on the cleaner before using.
Toothbrush and rubbing alcohol
A dirty or wet electrode will prevent
the burner from lighting efficiently.
11

Replacing the grates
The wok grate goes in the center over the wok burner. The other two grates are interchangeable.
Care and cleaning
Re-assembling the brass wok burner (some models only)
Each part of the brass burner has locating pins to help you to assemble it correctly after cleaning.
Incorrect assembly can cause dangerous irregular flames and ignition problems. Refer to this
diagram for the correct order of assembly. Note: The brass parts of your wok burner will change
color with use. This will have no effect on the performance.
Rotate vent ring to align locater
pin with hole in burner base.
Inner cap
Outer cap (small holes)
Trim ring
Vent ring with locater pins
(large holes)
Align and insert pin
Side view

Frequently asked questions
Q
What is the best way to clean stainless steel?
A
See ‘Care and cleaning’ instructions.
Q
How do I clean the grates and burners?
A
Grates can be washed in the dishwasher or alternatively with a cream cleaner and a nylon
scourer. Burners are best washed in warm water (see ‘Care and cleaning’ instructions).
Q
All the burners spark at once when I go to light one, is this ok?
A
Yes, they are designed to do this.
Q
Why doesn’t my cooktop light?
A
Firstly, check it is plugged in and the gas is turned on. Alternatively, the gas igniters may be dirty.
These are easily cleaned with a toothbrush and rubbing alcohol. (Also check ‘Troubleshooting’).
Q
Will the graphics on my cooktop come off?
A
No, these are etched by laser.
Q
My burner flames are yellow / slow to start, is something wrong?
A
Yes, there are a number of factors which could be causing this
1. If you use bottled gas this may indicate you are getting near the end of the bottle.
2. Your cooktop may not be suited to the gas you are using, check with your service
person/installer.
3. The gas pressure may not be correct, check with your service person/installer.
4. See ‘Troubleshooting’.
Q
One of my burners has an uneven flame, what can I do?
A
Check the burner parts are assembled correctly.
Q
What size pots should I use?
A
Generally larger pots are more energy efficient (see ‘Cookware’).
Q
Do I need special pans for a gas cooktop?
A
Regular pans are fine. We recommend thick-based pans for efficient, even heat.
EN
13

Troubleshooting
Problem Possible solutions
My cooktop does not
light
Check it is plugged in and there is power to the wall socket.
The gas igniters may be dirty. These can be easily cleaned
with a toothbrush and rubbing alcohol.
The burner parts may not be located properly. Check the
assembly and make sure the burner cap is sitting flat.
Check the gas supply valve is turned on and the supply to
the house is working. Gas should be heard when you turn a
burner on.
My burner flames are
yellow/slow to start
The burner parts may not be located properly. Check the
assembly and make sure the burner cap is sitting flat.
If you use bottled gas this may indicate you are getting near
the end of the bottle.
Check that the burner parts are not blocked with water.
The gas pressure may not be correct, check with your service
person/installer.
One of my burners has
an uneven flame
Check the burner parts are assembled correctly and that the
burner cap is sitting flat on the burner.
My cooktop is sparking
Your cooktop thinks that the flame has gone out. This could
be caused by drafts disturbing the flame eg using a down
draft.
Check that the igniter is clean and dry.
Your power supply may not be properly grounded or, in an
older house, the correct wiring polarity may not have been
observed.
The flame goes out at
low settings
Gas supply pressure may be low, check with service person/
installer.
Low setting may be incorrect, check with your service person/
installer.
14

Limited warranty
When you purchase any new Fisher & Paykel whiteware Product for personal or consumer use
you automatically receive a two year Limited Warranty covering parts and labor for servicing
within the 48 mainland United States, Hawaii, Washington D.C and Canada. In Alaska the Limited
Warranty is the same except that you must pay to ship the Product to the service shop or the
service technician’s travel to your home. Products for use in Canada must be purchased through
the Canadian distribution channel to ensure regulatory compliance.
If the Product is installed in a motor vehicle, boat or similar mobile facility, you receive the same
two year Limited Warranty, but you must bring the vehicle, boat or mobile facility containing the
Product to the service shop at your expense or pay the service technician’s travel to the location
of the Product.
Fisher & Paykel undertakes to:
Repair without cost to the owner either for material or labor any part of the Product, the serial
number of which appears on the Product, which is found to be defective. In Alaska, you must
pay to ship the Product to the service shop or for the service technician’s travel to your home.
If the Product is installed in a motor vehicle, boat or similar mobile facility, you must bring it to
the service shop at your expense or pay for the service technician’s travel to the location of the
Product. If we are unable to repair a defective part of the Product after a reasonable number of
attempts, at our option we may replace the part or the Product, or we may provide you a full
refund of the purchase price of the Product (not including installation or other charges).
This warranty extends to the original purchaser and any succeeding owner of the Product for
products purchased for ordinary single-family home use.
All service under this Limited Warranty shall be provided by Fisher & Paykel or its Authorized
Service Agent during normal business hours.
How long does this Limited Warranty last?
Our liability under this Limited Warranty expires TWO YEARS from the date of purchase of the
Product by the first consumer.
Our liability under any implied warranties, including the implied warranty of merchantability
(an unwritten warranty that the Product is fit for ordinary use) also expires ONE YEAR (or such
longer period as required by applicable law) from the date of purchase of the Product by the first
consumer. Some states do not allow limitations on how long an implied warranty lasts, so this
limit on implied warranties may not apply to you.
EN
15

This warranty does not cover:
A
Service calls that are not related to any defect in the Product. The cost of a service call will be
charged if the problem is not found to be a defect of the Product. For example:
1. Correcting faulty installation of the Product.
2. Instructing you how to use the Product.
3. Replacing house fuses, reset circuit breakers, correct house wiring or plumbing, or replace
light bulbs.
4. Correcting fault(s) caused by the user.
5. Changing the set-up of the Product.
6. Unauthorized modifications of the Product.
7. Noise or vibration that is considered normal, for example, drain/fan sounds, regeneration
noises or user warning beeps.
8. Correcting damage caused by pests, for example, rats, cockroaches etc.
B
Defects caused by factors other than:
1. Normal domestic use or
2. Use in accordance with the Product’s User Guide.
C
Defects to the Product caused by accident, neglect, misuse, fire, flood or Act of God.
D
The cost of repairs carried out by non-authorized repairers or the cost of correcting such
unauthorized repairs.
E
Travel Fees and associated charges incurred when the product is installed in a location with
limited or restricted access (eg airplane flights, ferry charges, isolated geographic areas).
F
Normal recommended maintenance as set forth in the Product’s User Guide.
If you have an installation problem contact your dealer or installer. You are responsible for
providing adequate electrical, exhausting and other connection facilities.
We are not responsible for consequential or incidental damages (the cost of repairing or
replacing other property damaged if the Product is defective or any of your expenses caused if
the Product is defective). Some states do not allow the exclusion or limitation of incidental or
consequential damages, so the above limitation or exclusion may not apply to you.
How to get service
Please read your User Guide. If you then have any questions about operating the Product,
need the name of your local Fisher & Paykel Authorized Service Agent, or believe the Product is
defective and wish service under this Limited Warranty, please contact your dealer or call us at:
TOLL FREE 1-888-9-FNP-USA (1-888-9-367-872)
or contact us through our web site: www.usa.fisherpaykel.com
You may be required to provide reasonable proof of the date of purchase of the Product before
the Product will be serviced under this Limited Warranty.
16

Commercial use
If you are using the Product in a commercial setting (any use other than a single family dwelling),
we agree to repair or replace, without cost to you for parts only, any defective parts, the serial
number of which appears on the Product. Our liability for these repairs expires ONE YEAR from
the date of original purchase.
At our option we may replace the part or the Product, or we may provide you a full refund of
the purchase price of the Product (not including installation or other charges). All service under
this Limited Warranty shall be provided by Fisher & Paykel or its Authorized Service Agent during
normal business hours.
No other warranties
This Limited Warranty is the complete and exclusive agreement between you and Fisher & Paykel
regarding any defect in the Product. None of our employees (or our Authorized Service Agents)
are authorized to make any addition or modification to this Limited Warranty.
Warrantor: Fisher & Paykel Appliances, Inc.
If you need further help concerning this Limited Warranty, please call us at the above number, or
write to:
Fisher & Paykel Appliances, Inc.
5900 Skylab Road
Huntington Beach, CA 92647
This Limited Warranty gives you specific legal rights, and you may also have other rights which
vary from state to state.
EN
17

No almacene o utilice gasolina u otros líquidos o
vapores inflamables cerca de este o cualquier otro
aparato eléctrico.
NUNCA utilice este electrodoméstico como calefactor
ambiental, ya que puede ocasionar envenenamiento
por monóxido de carbono y sobrecalentamiento de la
parrilla.
QUÉ HACER SI HUELE A GAS
No intente encender ningún aparato eléctrico.
No toque ningún interruptor eléctrico.
No utilice el teléfono dentro de su casa.
Llame inmediatamente a su proveedor de gas desde
el teléfono de un vecino. Siga las instrucciones del
proveedor de gas.
Si no puede comunicarse con su proveedor de gas,
llame a los Bomberos.
Tanto los trabajos de instalación como de
mantenimiento, los deberá llevar a cabo personal
calificado, el proveedor o su compañía de gas.
ATENCION!
El no seguir la información de este manual al pie
de la letra, puede ocasionar explosión o incendio,
provocando daños a su propiedad, personales o
incluso la muerte.
18
/