Stanley FL5W10 User manual

Category
Battery chargers
Type
User manual

Stanley FL5W10 is a waterproof 5W LED spotlight designed to provide bright, energy-efficient lighting for various indoor and outdoor applications. It features a durable construction, multiple brightness settings, and a long battery life, making it suitable for camping, fishing, hiking, home repairs, and more.

Stanley FL5W10 is a waterproof 5W LED spotlight designed to provide bright, energy-efficient lighting for various indoor and outdoor applications. It features a durable construction, multiple brightness settings, and a long battery life, making it suitable for camping, fishing, hiking, home repairs, and more.

2 3
GENERAL SAFETY WARNINGS AND INSTRUCTIONS
READ ALL INSTRUCTIONS
WARNING: Read all instructions before operating spotlight. Failure to follow all instructions listed below may result in electric
shock, fire and/or serious injury.
SAFETY GUIDELINES / DEFINITIONS
DANGER: Indicates an imminently hazardous situation which, if not avoided, will result in death or serious injury.
WARNING: Indicates a potentially hazardous situation which, if not avoided, could result in death or serious injury.
CAUTION: Indicates a potentially hazardous situation which, if not avoided, may result in minor or moderate injury.
CAUTION: Used without the safety alert symbol indicates potentially hazardous situation which, if not avoided, may result in property damage.
RISK OF UNSAFE OPERATION. When using tools or equipment, basic safety precautions should always be followed to reduce the risk of personal
injury. Improper operation, maintenance or modification of tools or equipment could result in serious injury and property damage. There are
certain applications for which tools and equipment are designed. Manufacturer strongly recommends that this product NOT be modified and/or
used for any application other than for which it was designed. Read and understand all warnings and operating instructions before using any tool
or equipment.
IMPORTANT SAFETY INSTRUCTIONS
WARNING: This product or its power cord contains lead, a chemical known to the State of California to cause cancer and birth defect or other
reproductive harm. Wash hands after handling.
INSTRUCTIONS PERTAINING TO RISK OF FIRE, ELECTRIC SHOCK, OR INJURY TO PERSONS
WARNING – WHEN USING ELECTRICAL APPLIANCES, BASIC PRECAUTIONS SHOULD ALWAYS BE FOLLOWED, INCLUDING THE
FOLLOWING:
To reduce the risk of injury, close supervision is necessary when the spotlight is used near children.
Use only attachments recommended or sold by the manufacturer.
WARNING: TO REDUCE THE RISK OF ELECTRIC SHOCK:
Charge indoors only. Do not expose chargers to water or any other liquid.
Use only the charger supplied by the manufacturer to recharge.
When an extension cord is used:
The marked rating of the detachable power supply cord or extension cord should be at least as great as the electrical rating of this appliance.
The cord should be arranged so that it will not drape over the countertop or tabletop where it can be tripped over, snagged, or pulled on
unintentionally (especially by children).
The extension cord should be kept dry and off the ground.
WARNING: FIRE HAZARD: Keep spotlight lamp away from materials that may burn.
CAUTION: TO REDUCE THE RISK OF INJURY OR PROPERTY DAMAGE:
5W LED gets hot quickly. Do not touch hot lens, guard or enclosure.
Never look directly into the light or shine the light into another persons eyes.
Keep sharp objects away from lens — it can crack or break.
Do not expose this unit to extremely high temperatures.
Do not drop or throw spotlight. It contains a nickel metal hydride rechargeable battery pack.
This device complies with part 15 of the FCC rules. Operation is subject to the following two conditions: (1) this device may not cause harmful
interference, and (2) this device must accept any interference received, including interference that may cause undesired operation.
This equipment has been tested and found to comply with the limits for a Class B digital device, pursuant to part 15 of the FCC Rules. These limits are
designed to provide reasonable protection against harmful interference in a residential installation. This equipment generates, uses and can radiate
radio frequency energy and, if not installed and used in accordance with the instructions, may cause harmful interference to radio communications.
However, there is no guarantee that interference will not occur in a particular installation. If equipment does cause harmful interference to radio or
television reception, which can be determined by turning the equipment off and on, the user is encouraged to try to correct the interference by one or
more of the following measures:
• Reorient or relocate the receiving antenna.
• Increase the separation between equipment and receiver.
• Connect the equipment into an outlet on a circuit different from that to which the receiver is connected.
• Consult the dealer or an experienced radio/TV technician for help.
Changes or modifications not approved by the party responsible for compliance could void user’s authority to operate the equipment.
7
9
8
6
FEATURES
CARACTERÍSTICAS
FEATURES
1. Rubber “O”ring
2. Translucent waterproof end cap (see detailed view on page 4)
3. 12 volt DC charging port (for use with 120 volt AC charger and
12 volt DC charger)
4. Battery/charge status LED indicator
5. Rubber bezel
6. 5 watt LED bulb
7. Dimmer selector knob
8. On/off power knob
9. Grip handle
10. 120 volt AC charger
11. 12 volt DC charger (optional accessory)
CARACTERÍSTICAS
1. Junta tórica de goma
2. Casquillo de extremo impermeable translúcido (véase la ilustración
detallada en la página 9)
3. Puerto de recarga de la CC de 12 voltios (para usar con cargador de
la CA de 120 voltios y cargador de la CC de 12 voltios)
4. Indicador LED del estado de la batería/carga
5. Bisel de goma
6. Bulbo de 5 vatios LED
7. Una perilla más dévil
8. Perilla con./desc. de la energía
9. Agarre mango
10. Cargador de la CA de 120 voltios
11. Cargador de la CC de 12 voltios (accesorio opcional)
3
10
11
4
1
2
5
FL5W10_ManualENSP_060810.qxp 6/8/2010 12:07 PM Page 2
5
CHARGING/RECHARGING THE SPOTLIGHT
This unit is shipped in a partially charged state. Charge unit BEFORE first use using either the 120 volt AC charger or the optional 12 volt DC charger
for approximately 3-5 hours. Charge after each use until the battery/charge status LED indicator lights green.
CAUTION: TO REDUCE THE RISK OF PROPERTY DAMAGE:
Make sure the unit is thoroughly dry before charging or recharging. If the unit has been submerged, wipe it dry with a soft cloth before opening
the end cap. If water leaks into the charging port, the unit can sustain permanent damage.
Charging/recharging using the 120 volt AC charger
• Make sure the spotlight is turned off by rotating the on/off power knob to the furthest position clockwise.
Unscrew (counterclockwise) the waterproof end cap on the back of the unit and remove it.
• Insert the barrel connector of the AC charger into the 12 volt DC charging port on the back of the unit. Insert the plug end into a (powered)
standard North American 120 volt 60Hz outlet.
• Charge until the battery/charge status LED indicator lights green (approximately 3-5 hours).
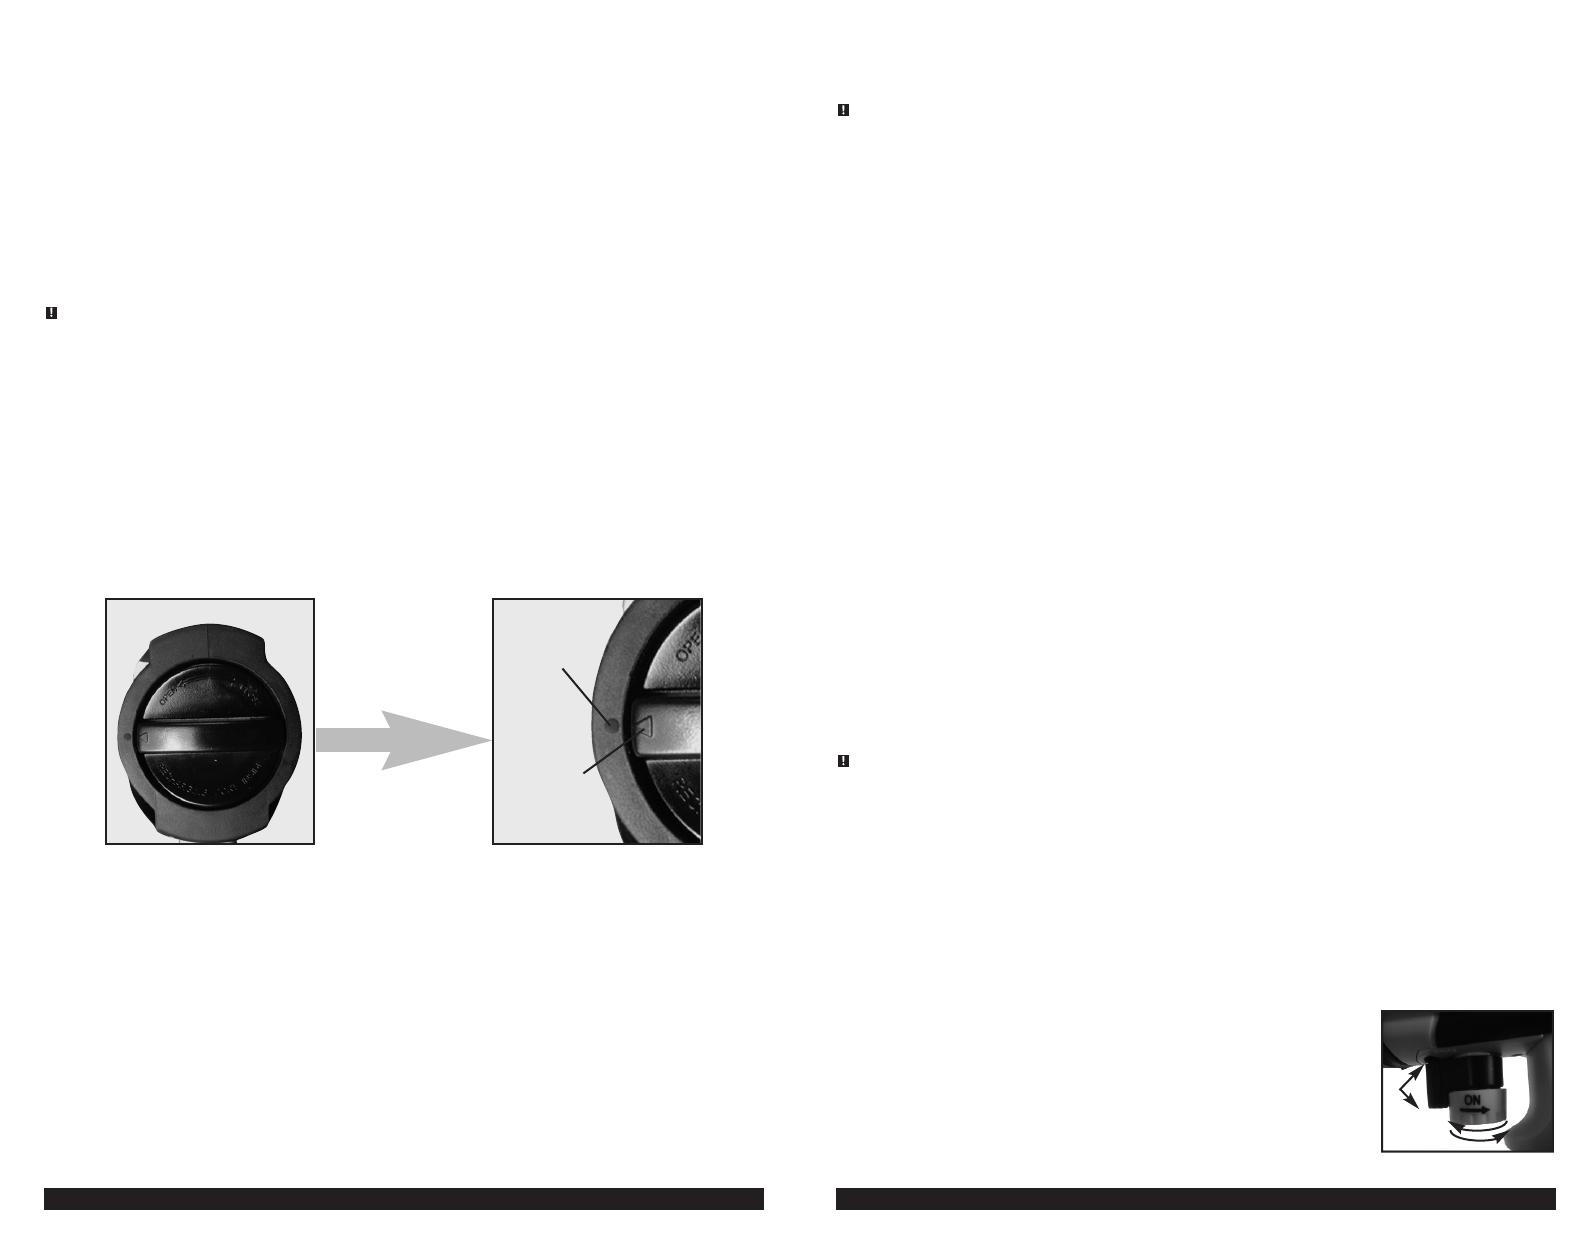
Replace the end cap on the unit, screwing clockwise until the triangular arrow on the end cap is pointing to the dot icon on the rear of unit.
Make sure it fits securely, but do NOT overtighten.
Charging/recharging using the 12 volt DC charger (optional accessory)
• Make sure the spotlight is turned off by rotating the on/off power knob to the furthest position clockwise.
Unscrew (counterclockwise) the waterproof end cap on the back of the unit and remove it.
Plug the barrel tip of the supplied 12 volt DC charger into the 12 volt DC charging port.
Insert the 12 volt DC plug end into the accessory outlet of your vehicle or other 12 volt DC power source.
Charge until the green battery status LED lights (approximately 3-5 hours). DO NOT CHARGE FOR LONGER THAN 5 HOURS USING THIS METHOD.
Replace the end cap on the unit, screwing clockwise until the triangular arrow on the end cap is pointing to the dot icon on the rear of unit.
Make sure it fits securely, but do NOT overtighten.
Note:
When using a vehicles 12 volt DC accessory outlet as a charging source, be aware that some vehicles require you to turn on the ignition to power the
accessory outlet.
IMPORTANT NOTES:
If either of the chargers is plugged into the spotlight while it is operating, the unit will not charge. The unit will begin charging once the
spotlight is turned off.
If either of the chargers is plugged into the spotlight while the built-in low voltage protection is activated, the unit will automatically turn off
and begin charging.
If the on/off power knob is turned on when charging, the spotlight may not operate until the charger is disconnected and the spotlight is turned
off, then on again.
Once the unit begins charging, the spotlight will not operate until the charger is disconnected.
When the battery/charge status LED indicator lights green, a “beep”will sound to indicate the charging process is completed.
OPERATING INSTRUCTIONS
Important note: When either charger is plugged into the 12 volt DC port, the unit is in charging mode. The spotlight will not run with either of
the chargers plugged in.
CAUTION: TO REDUCE THE RISK OF PROPERTY DAMAGE:
Never operate this spotlight unless the rubber “O”ring, rubber bezel and lens are intact and properly seated; and the waterproof end cap is
securely in place.
Never operate the spotlight in areas with high strength magnetic fields, such as in the vicinity of AC power generator, etc.
Never operate this spotlight at depths greater than 6 feet.
Never operate this spotlight in water temperatures other than between 41ºF and104ºF (5ºC and 40ºC).
This spotlight is designed to operate for up to one hour under water.
Operating the spotlight
1. Disconnect from charger.
2. The on/off power knob is located in the front of the handle of the spotlight and underneath the dimmer selector knob.
3. To turn on the spotlight, rotate the on/off power knob to the furthest position counterclockwise.
4. To turn off the spotlight, rotate the on/off power knob to the furthest position clockwise.
Note:
The battery/charge status LED indicator will light in one of three colors (as described in the “Reading the Battery/Charge Status LED”section) to indicate the
battery status. It is visible through the translucent waterproof end cap.
Using the dimmer selector
The dimmer selector knob that adjusts the light intensity is located above the on/off power knob. Push and
turn it to the left, then hold for 2 seconds to select a brighter setting. Push and turn it to the right, then
hold for 2 seconds to select a dimmer setting.* A “beepwill sound twice when the spotlight has been
adjusted to its minimum (dimmest) and maximum (brightest) settings.
* The battery/charge status LED indicator will flash red to indicate the light is adjusting to a brighter setting or flash green to
indicate the light is adjusting to a dimmer setting.
OFF
ON
DIM
BRIGHT
4
• Use only with AC or DC charging adapters that are provided with unit. Plug in the charging adapter at the spotlight first, then plug into the
charging source.
• Do not overcharge: Recharge up to 5 hours maximum.
• After charging/recharging, disconnect charging adapter or extension cord and wait 5 minutes before use.
• Do not crush, cut, pull or expose charging adapter cords to extreme heat.
• Position charging adapter cords so they do not become entangled or become a safety hazard. Keep charging adapter cords away from sharp edges.
• Do not open body casing. There are no user-serviceable parts inside.
• Do not operate the spotlight without the lens in place.
To reduce risk of damage to electric plug and cord, pull by plug rather than cord when disconnecting.
• Do not attempt to charge the unit if the charger is damaged – return the charger to manufacturer for repair or replacement.
INSTRUCTIONS PERTAINING TO WATERPROOF SPOTLIGHTS
The rubber “O”ring acts to preserve the waterproof qualities of the spotlight. The “O”ring contacts the end cap to prevent water from entering the
gap. An undamaged rubber “O”ring, rubber bezel and lens, and proper sealing of the end cap before use are very important.
CAUTION: TO REDUCE THE RISK OF PROPERTY DAMAGE:
Attempting to remove the rubber O”ring; use of the unit with a damaged “O”ring, rubber bezel or lens; improper sealing of the waterproof end
cap; and/or submerging this unit in depths greater than 6 feet may cause the unit to no longer be waterproof. Do not submerge the unit if these
conditions exist or the unit could sustain permanent damage.
Submerging this unit in depths greater than 6 feet and/or operating it in water temperature other than between 41ºF and 104ºF (5ºC and 40ºC)
could result in leakage, warping or malfunction, causing permanent damage to the spotlight.
SAVE THESE INSTRUCTIONS
INTRODUCTION
Congratulations on purchasing your new spotlight. Read this Instruction Manual and follow the instructions carefully before using your
new spotlight.
READING THE BATTERY/CHARGE STATUS LED INDICATOR
The battery and charging status LED indicator is located directly above the 12 volt DC charging port under the waterproof end cap on the back of
the unit.
It lights or flashes in three colors to indicate the following:
When charging:
Green & Red (flashing alternately): Battery is overheated due to extensive use or recharging. The charging process will stop at this stage and will
automatically resume after a cool down period of several minutes.
Green: Battery is in a fully charged state.
Orange: Battery is in a partially charged state.
Red: Battery needs to be recharged.
When operating:
Green: Battery is operating at full voltage.
Orange: Battery is operating at partial voltage.
Red: Battery is operating at low voltage, and should be recharged.
Red (flashing): Battery is operating at extremely low voltage. The built-in low voltage protection has activated and the unit will automatically shut
down (after sounding several “beeps”). The unit must be recharged immediately.
When using the dimmer selector:
Green (flashing): The light is adjusting to dimmer setting.
Red (flashing): The light is adjusting to brighter setting.
END CAP DETAIL
DOT ICON (FOR
ALIGNMENT TO THE
TRIANGULAR ICON ON
THE END CAP)
TRIANGULAR
ARROW ICON (FOR
ALIGNMENT TO THE
DOT ICON ON THE
REAR OF UNIT)
FL5W10_ManualENSP_060810.qxp 6/8/2010 12:07 PM Page 4
7
ONE-YEAR LIMITED WARRANTY
Manufacturer warrants this product for one year against any defects in material or workmanship. The defective product will be replaced or
repaired at no charge in either of two ways.
The first, which will result in exchanges only, is to return the product to the retailer from whom it was purchased (provided that the store is a
participating retailer). Returns should be made within the time period of the retailer’s policy for exchanges (usually 30 to 90 days after the sale).
Proof of purchase may be required. Please check with the retailer for their specific return policy regarding returns that are beyond the time set for
exchanges. The second option is to return the product (prepaid) to the manufacturer for repair or replacement at our option. Proof of purchase
may be required.
This warranty does not apply to accessories. This warranty gives you specific legal rights and you may have other rights which vary from state to
state or province to province. This product is not intended for commercial use.
SPECIFICATIONS
Spotlight
Bulb: 5 watt LED bulb
Battery: Maintenance-free, NiMH, 7.2 volt, 700 mAh
120 volt AC charger
Charger: UL Listed Class 2, 12 volts DC (500mA)
Optional 12 volt DC charger
Voltage: 12 volts DC
Fuse: 5 A/250 V
Imported by Baccus Global, 399 NW 2nd Avenue, Suite 150, Boca Raton, FL 33432 • (877) 571-2391
RD060810
6
On a single charge, the spotlight will provide steady illumination for approximately 10 hours on its minimum (dimmest) setting; approximately 50
minutes on its maximum (brightest) setting.
IMPORTANT: To avoid sustaining damage, this spotlight should not be used under water for any longer than one hour.
CARE AND MAINTENANCE
Make sure the unit is thoroughly dry before storage. If the unit has been submerged, wipe it dry with a soft cloth.
If the unit gets dirty, gently clean the outer surfaces of the spotlight unit with a soft cloth moistened with a mild solution of water and detergent.
There are no user-replaceable parts. Periodically inspect the condition of adapters, connectors and wires. Contact manufacturer to replace any
components that have become worn or broken.
All batteries lose energy from self-discharge over time and more rapidly at higher temperatures. When the unit is not in use, we recommend that
the battery is charged at least every 60 days.
Battery replacement/disposal
BATTERY REPLACEMENT
The battery should last the service life of the unit. Contact manufacturer for any information you may need.
SAFE BATTERY DISPOSAL
This unit contains a nickel metal hydride rechargeable battery pack, which must be disposed of properly when
it will no longer retain a charge. For information on recycling this battery, call toll-free (800) 822-8837.
To locate a free recycling program collection center near you, go to www.call2recycle.org.
WARNINGS:
• Do not dispose of the battery in fire as this may result in an explosion.
• Before disposing of the battery, protect exposed terminals with heavy-duty electrical tape to prevent shorting (shorting can result in injury or fire).
• Do not expose battery to fire or intense heat as it may explode.
12 volt DC charger plug fuse replacement
The fuse in the plug end of the 12 volt DC charger protects the adapter’s charging circuit. If the 120 volt AC charger operates, but the DC charging adapter
does not, then this fuse may be opened (blown).
To replace the fuse:
1. Unscrew the end cap of the DC plug (counterclockwise).
2. Remove spring center contact and fuse.
3. Check fuse with a continuity checker.
4. If blown, locate a replacement 5 amp/250 volt fuse.
5. Replace the fuse, spring, contact and end cap.
6. Screw end cap clockwise until it is finger tight – DO NOT OVER-TIGHTEN.
7. Test for proper operation of the 12 Volt DC Charging Adapter.
TROUBLESHOOTING
The battery/charge status indicator LED does not light when charging
1. The battery is in overheat protection after extensive use. Allow the spotlight to cool down for several minutes before recharging.
2. The spotlight will not charge when operating. Make sure the spotlight is turned off.
3. Check connection to the 12 volt DC charging port.
4. Check connection to AC or DC power source.
5. Confirm there is a functioning AC or DC current.
Unit will not operate
1. The battery is in overheat protection after fully charging or recharging. Allow the spotlight to cool down for several minutes before operating.
2. The spotlight will not operate when charging. Be sure all adapters are disconnected before spotlight use.
3. The battery may be completely discharged. Charge the unit following the directions.
4. If the spotlight does not operate after recharging as directed, contact manufacturer at (877) 571-2391.
ACCESSORIES
Recommended accessories for use with your tool are available from your local dealer or authorized service center. If you need assistance regarding
accessories, please contact manufacturer at (877) 571-2391.
WARNING: The use of any accessory not recommended for use with this tool could be hazardous.
SERVICE INFORMATION
Whether you need technical advice, repair, or genuine factory replacement parts, contact the manufacturer at (877) 571-2391.
FL5W10_ManualENSP_060810.qxp 6/8/2010 12:07 PM Page 6
  • Page 1 1
  • Page 2 2
  • Page 3 3
  • Page 4 4
  • Page 5 5
  • Page 6 6

Stanley FL5W10 User manual

Category
Battery chargers
Type
User manual

Stanley FL5W10 is a waterproof 5W LED spotlight designed to provide bright, energy-efficient lighting for various indoor and outdoor applications. It features a durable construction, multiple brightness settings, and a long battery life, making it suitable for camping, fishing, hiking, home repairs, and more.

Ask a question and I''ll find the answer in the document

Finding information in a document is now easier with AI

in other languages