
WL 90
ENGLISH
Wake-up Light
Instructions for use ................................................................................... 2
ESPAÑOL
Luz para despertar
Manual de instrucciones .................................................................................10
FRANÇAIS
Lampe de réveil
Mode d‘emploi .................................................................................................19
Distributed by/Distribuido por/
Distribué par:
Beurer North America LP
900 N Federal Highway, Suite 300
Hallandale Beach, FL 33009
www.beurer.com
READ THIS MANUAL COMPLETELY AND CAREFULLY BEFORE USING THIS PRODUCT
Keep this manual in a safe location for future reference
LEA TODO ESTE MANUAL CON ATENCIÓN ANTES DE USAR ESTE PRODUCTO
Conserve este manual en un lugar seguro para consultarlo en el futuro
LISEZ CE MODE D’EMPLOI COMPLÈTEMENT ET ATTENTIVEMENT AVANT
D’UTILISER CE PRODUIT
Conservez ce manuel en lieu sûr pour y faire référence ultérieurement
Questions or comments?
Call toll free 1-800-536-0366 or contact info@beurer.com
¿Preguntas o comentarios? Llame gratis al
1-800-536-0366 o póngase en contacto info@beurer.com
Questions ou commentaires? Appeler gratuitement
1-800-536-0366 ou communiquez avec info@beurer.com

2
CONTENT
SAVE THESE INSTRUCTIONS FOR FUTURE REFERENCE
If the instruction manual is damaged or if you no longer have the instruction manual
in your possession, please contact Beurer customer service. Please see warranty for
service contact.
Dear Customer,
Thank you for choosing one of our products. Our name stands for high-quality, thoroughly tested products
for applications in the areas of heating, weight management, blood pressure, body temperature, pulse, gen-
tle therapy, massage, and beauty.
Please read these instructions for use carefully and keep them for later use. Make them accessible to other
users and observe the information they contain.
With Kind Regards,
Your Beurer team
1. IMPORTANT SAFETY INSTRUCTIONS
Signs and symbols
The following signs appear in the Safety Section (page 2) and in this manual on page 2, 3 and 5.
READ AND UNDERSTAND THIS ENTIRE MANUAL INCLUDING THE SAFETY SECTION
AND ALL INSTRUCTIONS AND WARNINGS COMPLETELY AND CAREFULLY BEFORE
USING THIS PRODUCT. FOLLOW ALL SAFETY INSTRUCTIONS AND WARNINGS TO
AVOID HAZARDOUS SITUATIONS AND TO MAKE CORRECT USE OF THIS PRODUCT.
This is the safety alert symbol. It alerts you to potential personal injury haz-
ards. Obey all safety messages that follow this symbol to avoid possible injury
or death.
WARNING WARNING indicates a hazardous situation which, if not avoided, could result
in death or serious injury.
NOTICE NOTICE addresses practices not related to personal injury, such as product
and/or property damage.
WARNING – To reduce the risk of fire, electric shock, or serious personal injury:
•
Before use, ensure all packaging materials are removed and that there is no visible damage to the
unit or accessories. When in doubt, do not use the unit and contact customer service.
•
Always place the unit on a flat, level, stable, hard surface.
ENGLISH
1. IMPORTANT SAFETY INSTRUCTIONS ...................... 2
2. Introduction ................................................................ 3
3. Contents ..................................................................... 3
4. Parts and Controls ...................................................... 3
5. To Set Up .................................................................... 4
6. To Use ......................................................................... 5
7. Troubleshooting ........................................................ 7
8. Care and Maintenance ............................................. 7
9. Specifications ........................................................... 7
10. FCC ........................................................................... 8
11. Warranty ................................................................... 8

3
•
Only operate the device with the power adapter provided and with the voltage specified on the
adapter.
•
The connector socket must be near the installation location of the WL90 and be easily accessible.
•
Do not immerse the unit into water and do not use it in wet rooms such as a bathroom, laundry
room, or pool area.
•
Keep children away from packaging materials (risk of suffocation).
•
Do not cover or store the unit while it is warm.
•
Always unplug the power adapter and allow the unit to cool down before touching it.
•
Do not touch the unit with wet hands while it is plugged in; do not allow any water to be sprayed
onto the unit. Operate only when the unit is completely dry.
•
Ensure that you only insert and remove the power adapter with dry hands and that you only press
the buttons with dry hands.
•
Keep the power cord away from heated objects and flames.
•
Protect the unit from strong impacts.
•
Do not disconnect the power adapter from the electrical outlet by pulling on the cord.
•
This product has no user-serviceable parts; return the product to customer service for any repair
or replacement.
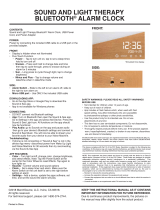
2. Introduction
The Beurer WL90 Wake-up Light wakes you up in gentle and natural manner. The LED light gradually
becomes brighter like a rising sun, allowing you to slowly adjust to the light conditions and your body to
prepare itself for waking up. You can also set an alarm that follows the simulated sunrise. For the alarm tone,
you can choose between the radio and various sounds. You can also control all device functions from your
smartphone using the “Beurer LightUp” app.
Functions:
• C
ontrol of the device functions via smartphone with the “Beurer LightUp” app
• S
imulated Sunrise (Wake-up Light slowly dims over a period of time)
• L
ight function (white light/reading lamp)
• M
ood light with individual color setting (choice of 10 different settings)
• C
lock
• B
luetooth® speaker
• F
M radio
• A
larm via radio or sounds
• S
leep function (light shuts off after a preset time)
3. Contents
• W
L90 Wake-Up Light
• I
nstruction Manual
• Q
uick Start Guide
• A
C Adapter
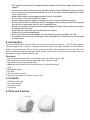
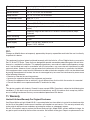
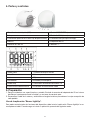
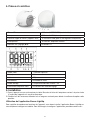
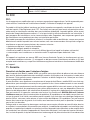
4. Parts and Controls
1
2
3
4

4
1 LCD Display 6 MODE/ENTER button
2 Lamp 7 ALARM button
3 Snooze function (device vibrates) 8 USB connection (charging only)
4 Speaker 9 AC Adapter Socket
5 SET buttons ▲ / ▼
10 +/- buttons
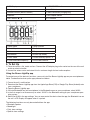
1 Radio mode 7 Sleep function
2 Month/Day 8 Radio Alarm
3 Volume 9 Beep
4 Bluetooth® 10 Wake-up melody
5 Clock mode 11 Alarm memory space 1-3
6 Time/Date/Radio frequency 12 Set mode indicator
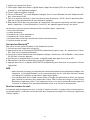
5. To Set Up
1
. Place the unit on a flat, stable surface. Connect the AC Adapter plug to the socket on the rear of the unit
and to an electrical outlet.
2
. Unravel the antenna wire and extend it to its maximum length for best radio reception.
Using the Beurer LightUp app
To control many of the device’s functions, you must install the Beurer LightUp app on your smartphone or
tablet. To download and set up the app, proceed as follows:
1
. Ensure the unit is switched on.
2
. Download the Beurer LightUp app from the Apple App Store (iOS) or Google Play Store (Android) onto
your smartphone.
3
. Open the Beurer LightUp app.
4
. Activate Bluetooth® on your smartphone. In the Bluetooth menu on your smartphone, select WL90.
5
. In the first usage it can be necessary to select “WL90” in the Bluetooth setting on your smartphone oper-
ating system.
6
. Select the WL90 in the app settings. You can now control the device from the app; the Bluetooth icon on
the unit’s LCD Display will appear when it is paired.
T
he following functions can only be controlled from the app:
• B
luetooth speaker
• M
ood light
• D
aily alarm settings
• S
pecial alarm settings

5
• S
witching button tones on/off
• S
unset function
Bluetooth® Speaker
To activate the Bluetooth speaker, it must be paired first:
1
. Make sure app is not open.
2
. Press the MODE/ENTER Button twice until “bt” appears on the LCD Display. This begins the Bluetooth
search.
3
. In the Bluetooth settings on your smartphone, select “WL 90 Speaker” from the device list.
4
. Once the Wake-up Light is paired, the blue Bluetooth logo will appear on the LCD Display.
5
. Select the music function in the menu of the app.
6
. Press the MODE/ENTER Button twice to deactivate the speaker. Close the app.
NOTICE
•
After pairing for the first time, Bluetooth connection parameters for your smartphone will be saved.
Bluetooth pairing will occur automatically during subsequent usage when you start the music func-
tion in the LightUp app.
•
Bluetooth Smart (low energy) is generally used; for example to control the light and alarm functions.
For music playback, Classic Bluetooth is also used. It is only here that the Bluetooth symbol appears
in the display of the Wake-up Light (Bluetooth connection is active or searching for connection).
Sunset function
The Wake-up Light can also be used to simulate a sunset, whereby the lamp slowly dims over a set period
of time. The sunset function can only be adjusted via the menu in the “Beurer LightUp” app.
6. To Use
The following basic functions can also be controlled directly without the app using the buttons on the
device, but only if the app on your smartphone is closed. For full functionality, control this device with the
“Beurer LightUp” app.
Setting the date and time
NOTICE
•
When using the “Beurer LightUp” app, the time and date automatically synchronize with your
smartphone each time you use it; no manual time and date setting is needed.
1
. Press and hold the MODE / ENTER button for three seconds.
2
. “12” flashes in the LCD Display. Set the time display mode (12 or 24 hour) using the ▲ / ▼ buttons.
Confirm with the MODE / ENTER button.
3
. The hour field flashes in the LCD Display. Set the hour using the ▲ / ▼ buttons. Confirm with the MODE
/ ENTER button.
4
. The minute field flashes in the LCD Display. Set the minutes using the ▲ / ▼ buttons. Confirm with the
MODE / ENTER button.
5
. The year field flashes in the LCD Display. Set the year using the ▲ / ▼ buttons. Confirm with the MODE
/ ENTER button.
6
. The month field flashes in the LCD Display. Set the month using the ▲ / ▼ buttons. Confirm with the
MODE / ENTER button.
7
. The day field flashes in the LCD Display. Set the day using the ▲ / ▼ buttons. Confirm with the MODE
/ ENTER button. The set time will display.

6
Activating/deactivating an alarm
Before setting an alarm, first select the alarm number; this device contains three alarms that can be con-
figured separately. You can also choose one of ten wakeup sounds, a beeping alarm, or the radio.
To select an alarm memory space, proceed as follows:
1
. Select the desired alarm number pressing the ALARM button. The corresponding alarm icon will appear
in the LCD Display (multiple alarm memory spaces may be selected at the same time).
2
. To deactivate an alarm, keep press the ALARM button again until the corresponding alarm icon disap-
pears from the LCD Display.
Setting an alarm time
1
. Press and hold the ALARM button for two seconds.
2
. The alarm hour field flashes in the LCD Display. Set the alarm hour using the ▲ / ▼ buttons. Confirm
with the ALARM button.
3
. The alarm minute field flashes in the LCD Display. Set the alarm minute using the ▲ / ▼ buttons. Con-
firm with the ALARM button.
4
. The alarm mode field flashes in the LCD Display. Set the desired alarm tone using the ▲ / ▼ buttons
(wakeup sound 1-10, beep, or radio). Confirm with the ALARM button.
5
. The alarm volume field flashes in the LCD Display. Set the alarm volume using the ▲ / ▼ buttons. Con-
firm with the ALARM button.
6
. The snooze time flashes in the LCD Display. Set the snooze time (1, 2, 5, 10, 20, or 30 minutes) using
the ▲ / ▼ buttons. Confirm with the ALARM button.
To activate an alarm time using the app, the smartphone simply needs to be paired with the Wake-up
Light while setting the alarm. Once you have set the alarm time and alarm mode, you can deactivate
Bluetooth on your smartphone or shut your smartphone off altogether. A continuous overnight Bluetooth
connection is not necessary.
Switching off the sunrise function
You can switch off the sunrise function by pressing any button; the alarm will not sound. The light is slightly
dimmed for two minutes. If you press any button again, the light will shut off.
Snooze function
When the alarm sounds, tap on the lamp dome to activate the snooze function; the alarm will sound again
when the set snooze duration elapses.
Shutting the alarm off
When the alarm sounds, press any button except Snooze. The alarm will shut off until the next day at the
set alarm time. The light stays on for two minutes after the alarm is shut off. To switch the light on again
after it shuts off, see the “lamp function” section.
Setting the display brightness
This device has four LCD brightness settings (0, 1, 2, 3, A). Brightness setting “A” (automatic) automat-
ically adjusts the display brightness to the surrounding light conditions. To set the display brightness,
proceed as follows:
1
. Press both +/- buttons at the same time; “BL:” appears in the display. Set the desired display bright-
ness using the MODE button.
2
. To confirm the display brightness, press both +/- buttons at the same time.

7
Radio mode
To turn on the radio, proceed as follows:
1
. Press the MODE / ENTER button repeatedly until RADIO appears in the LCD Display.
2
. Set the radio volume using the +/- buttons.
3
. Select a memory preset using the ▲ / ▼ buttons.
4
. To search for a station, press and hold the ▲ or ▼ button for three seconds. Briefly press the SET but-
tons ▲ / ▼ to adjust the radio frequency manually in 0.2 MHz increments.
5
. To save a radio station to a preset, press the MODE/ENTER button. The corresponding preset number
(e.g. P1) appears in the LCD Display.
Sleep timer
When using the radio or the Bluetooth speaker, you can also enable a sleep timer, which sets the number
of minutes after which the radio or Bluetooth speaker will shut off.
1
. In radio mode or Bluetooth speaker mode, press the ▲ / ▼ buttons at the same time.
2
. The sleep timer flashes in the LCD Display. Select a desired timer duration using the ALARM button (2,
5, 10, 15, 30, 45, or 60 minutes).
3
. To confirm, press the ▲ / ▼ buttons at the same time.
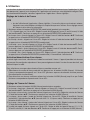
Lamp function
1
. Using your hand, tap on the side of the Wake-up Light to make it vibrate lightly. The illuminated display
becomes brighter.
2
. Tap on the side of the Wake-up Light again within three seconds. The reading lamp will illuminate.
Mood light function
1
. Using your hand, tap on the side of the Wake-up Light to make it vibrate lightly. The illuminated display
becomes brighter.
2
. Tap on the side of the Wake-up Light again within three seconds. The white light of the reading lamp
will come on.
3
. To activate the mood light with change of color, tap again on the light area.
4
. To have colored light permanently display during the color change, tap again on the light area.
5
. To deactivate the mood light function, tap again on the light area.
7. Troubleshooting
You can find further information and a list of frequently asked questions (FAQs) about this product at
www.beurer.com.
8. Care and Maintenance
• C
lean the device with a dry cloth.
• D
o not use any abrasive cleaning products.
• E
nsure that no water enters the device; otherwise, do not reuse the device until it has fully dried out.
• N
ever immerse the device or power cord in water or other liquids.
•
P
rotect the device from knocks, damp, dust, chemicals, large temperature fluctuations, and nearby sources
of heat (ovens, heaters).
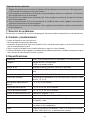
9. Specifications
Illumination Max. approx. 2500 lux (at distance of 6 inches/15 cm)
Lamp LED service life: ~50.000 hours
LED non-replaceable
Light levels Continuously adjustable via app
Mood light Automatic RGB color change; option to set individual color
Wake-up Light function Off, 2, 5, 10, 15, 20, 30, 45, 60 minutes prior to alarm

8
Sunrise function Increasing light intensity up to alarm: Light level 5, 10, 15, 20
Snooze time 1, 2, 5, 10, 20, 30 minutes
Sunset function 2, 5, 10, 15, 20, 30, 45, 60 minutes
Sleep function 2, 5, 10, 15, 20, 30, 45, 60 minutes
LCD backlight levels Auto, Off, 1, 2, 3
Time 12/24 hour display modes
Alarm 3 alarms (Off, On, Day) alarm tone, 10 sounds, radio
USB USB charging function for smartphone with 5V/500 mA (tablets are not sup-
ported)
Radio Frequency range FM 88.1MHz to 107.9 MHz in 0.2MHz (200kHz) steps,
10 presets
Music streaming Bluetooth®
Loudspeaker 2 x 3W
Power supply Input: 110-240 VAC, 50/60 Hz, 0.5 A
Output: 5 VDC, 3000mA
10. FCC
FCC:
Changes or Modifications not expressly approved by the party responsible could void the user’s authority
to operate this device.
This equipment has been tested and found to comply with the limits for a Class B digital device, pursuant to
Part 15 of the FCC Rules. These limits are designed to provide reasonable protection against harmful inter-
ference in a residential installation. This equipment generates, uses and can radiate radio frequency energy
and, if not installed and used in accordance with the instructions, may cause harmful interference to radio
communications. However, there is no guarantee that interference will not occur in a particular installation.
If this equipment does cause harmful interference to radio or television reception, which can be determined
by turning the equipment off and on, the user is encouraged to try to correct the interference by one or more
of the following measures:
• R
eorient or relocate the receiving antenna.
• I
ncrease the separation between the equipment and receiver.
• C
onnect the equipment into an outlet on a circuit different from that to which the receiver is connected.
• C
onsult the dealer or an experienced radio/TV technician for help.
IC:
This device complies with Industry Canada Licence-exempt RSSs. Operation is subject to the following two
conditions: (1) this device may not cause harmful interference, and (2) this device must accept any interfer-
ence, including interference that may cause undesired operation of the device.
11. Warranty
Limited Lifetime Warranty For Original Purchaser
Your Beurer Wake-up Light, Model WL90, is warranted to be free from defects in materials and workmanship
for the life of the product under normal conditions of intended use and service. This warranty extends only
to the original retail purchaser and does not extend to retailers or subsequent owners.
We will, at our option, repair or replace the Beurer Wake-up Light, Model WL90, without additional charge, for
any part or parts covered by these written warranties. No refunds will be given. Repair or replacement is our

9
Subject to error and change
only responsibility and your only remedy under this written warranty. If replacement parts for defective mate-
rials are not available, Beurer reserves the right to make product substitutions in lieu of repair or replacement.
For warranty service contact our customer service department at 1-800-536-0366 or at info@beurer.com to
provide a description of the problem. If the problem is deemed to be within the scope of the limited lifetime
warranty, you will be asked to mail the product at your costs in its original package with proof of purchase,
your name, address and phone number. If the problem is not deemed to be within the scope of the limited
lifetime warranty, we will provide a quotation for repair respectively replacement and return shipping fee.
This warranty does not cover damage caused by misuse or abuse; accident; the attachment of unautho-
rized accessory; alteration to the product; improper installation; misapplication; lack of reasonable care with
respect to the product; unauthorized repairs or modifications; improper use of electrical/power supply; nor-
mal wear; loss of power; dropped product; malfunction or damage of an operating part as a result of failure
to comply with instructions for use or to provide manufacturer’s recommended maintenance; transit dam-
age; theft; neglect; vandalism; or environmental conditions; loss of use during the period the product is at a
repair facility or otherwise awaiting parts or repair; or any other conditions whatsoever that are beyond the
control of Beurer. This warranty is void if the product is ever used in a commercial or business environment.
The maximum liability of Beurer under this warranty is limited to the purchase price actually paid by the cus-
tomer for the product covered by the warranty, as confirmed by proof of purchase, regardless of the amount
of any other direct or indirect damage suffered by the customer.
This warranty is effective only if the product is purchased and operated in the country in which the product
is purchased. A product that requires modifications or adaptation to enable it to operate in any other country
than the country for which it was designed, manufactured, approved and/or authorized, or repair of products
damaged by these modifications is not covered under this warranty.
THE WARRANTY PROVIDED HEREIN SHALL BE THE SOLE AND EXCLUSIVE WARRANTY. ANY IMPLIED
WARRANTIES, OBLIGATIONS, OR LIABILITES, INCLUDING BUT NOT LIMITED TO THE IMPLIED WAR-
RANTY OF MERCHANTABILITY AND FITNESS FOR A PARTICULAR PURPOSE, ARE LIMITED IN DURA-
TION TO THE DURATION OF THIS APPLICABLE WRITTEN WARRANTY. Some states do not allow
limitations on how long an implied warranty lasts, so the above limitations may not apply to you.
IN NO EVENT SHALL BEURER BE LIABLE FOR ANY SPECIAL, INCIDENTAL, INDIRECT OR CONSE-
QUENTIAL DAMAGES FOR BREACH OF THIS OR ANY OTHER WARRANTY, EXPRESS, IMPLIED OR
ANY OTHER THEORY OF LIABILITY, WHATSOEVER. Some states do not allow the exclusion or limitation
of special, incidental, or consequential damages, so the above limitation may not apply to you.
Beurer does not authorize anyone, including, but not limited to, retailers, the subsequent consumer pur-
chaser of the product from a retailer or remote purchaser, to obligate Beurer in any way beyond the terms
set forth herein.
This warranty does not extend to the purchase of opened, used, repaired, repackaged and/or resealed prod-
ucts, including but not limited to sale of such products on Internet auction sites and/or products by surplus
or bulk resellers. Any and all warranties or guarantees shall immediately cease and terminate in connection
with any products or parts thereof which are repaired, replaced, altered, or modified, without the prior explic-
itly written consent of Beurer.
This warranty gives you specific legal rights, and you may also have other rights which may vary from state
to state.
Distributed by:
Beurer North America LP,
900 N Federal Hwy Ste 300
Hallandale Beach, FL 33009 USA
Made in China
Page is loading ...
Page is loading ...
Page is loading ...
Page is loading ...
Page is loading ...
Page is loading ...
Page is loading ...
Page is loading ...
Page is loading ...
Page is loading ...
Page is loading ...
Page is loading ...
Page is loading ...
Page is loading ...
Page is loading ...
Page is loading ...
Page is loading ...
Page is loading ...
Page is loading ...
Page is loading ...
Page is loading ...
-
 1
1
-
 2
2
-
 3
3
-
 4
4
-
 5
5
-
 6
6
-
 7
7
-
 8
8
-
 9
9
-
 10
10
-
 11
11
-
 12
12
-
 13
13
-
 14
14
-
 15
15
-
 16
16
-
 17
17
-
 18
18
-
 19
19
-
 20
20
-
 21
21
-
 22
22
-
 23
23
-
 24
24
-
 25
25
-
 26
26
-
 27
27
-
 28
28
-
 29
29
-
 30
30


Ask a question and I''ll find the answer in the document
Finding information in a document is now easier with AI
in other languages
- français: Beurer N9ZWL90 Manuel utilisateur
- español: Beurer N9ZWL90 Manual de usuario
Related papers
-
Beurer WL 75 Owner's manual
-
Beurer WL 90 Owner's manual
-
Ewig Industries Macao Commercial Offshore N9ZTL100 User manual
-
Beurer WL 32 Owner's manual
-
-
-
Beurer BS 49 Owner's manual
-
-
Beurer IL 50 Owner's manual
-
Other documents
-
 MerchSource Sound and See – Sound/Light Therapy Bluetooth Alarm Clock User manual
-
Pyle PILCR34BT Owner's manual
-
-
iLuv SmartShaker Quick start guide
-
 Sunrise 208287 User guide
-
Lenoxx BCR663 Instructions Manual
-
THESOURCE Sunrise Alarm Clock Owner's manual
-
Denver CRL-340 User manual
-
RCA RP5605 User manual
-
SCOTT CMX 118 Lyte User manual

