Page is loading ...

Instructions for Converting Range to Operate on Liquefied Petroleum Gas
INSTALLATION AND SERVICES MUST BE PERFORMED BY A QUALIFIED INSTALLER
IMPORTANT: SAVE INSTRUCTION MANUAL FOR THE LOCAL INSPECTOR’S USE.
READ AND SAVE THESE INSTRUCTIONS FOR FUTURE REFERENCE
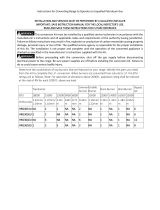
Determine the combination of top burners that are featured on your range. Identify the parts you need
from this kit to complete the L.P. conversion. When burners are converted from natural to L.P. the BTU
ratings are as follows: Note: For operation at elevations above 2000ft., appliance rating shall be reduced
at the rate of 4% for each 1000 ft. above sea level.
IMPORTANT: After replacing the natural gas to LP orifices, be sure to keep the original factory installed
natural gas orifices for future range conversion back to natural gas.
Top Burner
Simmer
burner
Griddle
Burner
Oven Burner
Broil Burner
Bypass
Jet
BTU
18000
15000
12000
9000
6000
15000
22000
14000
16500
13000
Orifice Size
1.22mm/
1.24mm
1.07mm/
1.10mm
1.0m
m
0.8m
m
0.72m
m
0.34m
m
1.16mm/
1.22mm
1.32m
m
1.10m
m
1.18m
m
1.05m
m
HRG3078U
NA
1
2
1
NA
1
NA
1
NA
NA
1
5
HRG3080U
1
1
2
NA
NA
1
NA
1
NA
NA
1
5
This conversion kit must be installed by a qualified service technician in accordance with the
manufacturer's instructions and all applicable codes and requirements of the authority having jurisdiction.
Failure to follow instructions may result in fire, explosion or production of carbon monoxide causing property
damage, personal injury or loss of life. The qualified service agency is responsible for the proper installation
of this kit. The installation is not proper and complete until the operation of the converted appliance is
checked as specified in the manufacturer's instructions supplied with this kit.
Before proceeding with the conversion, shut off the gas supply before disconnecting
electrical power to the range. Be sure power supplies are off before installing the conversion kit. Failure to
do so could cause serious bodily injury.

Instructions for Converting Range to Operate on Liquefied Petroleum Gas
1. Convert the Pressure Regulator
Gas Pressure (water column)
NG
LP
Gas line to Regulator
7 inches
11 inches
Regulator to Burners
4 – 6 inches
9 – 11 inches
Your Thor Kitchen Range needs to have the regulator cap conversed, providing a different regulator
pressure for LP gas.
For 30-inch with 13,000BTU Broiler (HRG3080U) and all 48-inch gas range. The regulator cap couldn’t be
conversed from the back of the unit. In order to get access to regulator cap, follow the below steps:
a. Take out the oven door. Fully open the door and locate the hinges. Use a flat screw driver to lift the
lock clip all the way back to the hinges.

Instructions for Converting Range to Operate on Liquefied Petroleum Gas
b. With the hinge clips raises, position the door shown in the picture (with a 20-30 degrees), hold both
sides of the door and lift the door. Below is how the door hinge clips should look when you remove the
door. When you are going to put the door back, make sure the clips are still in this position. Carry the
door back in the same way it was eased out, when both hooks are in, try to open the door flat. If the door
doesn’t open flat its most likely that the door was not properly inserted. Raise the door back up and try to
reposition until the door can lay fully open. Once accomplished, lock the hinge clips and close.
c. Take out the oven rack and the oven floor cover. Use Philips screw driver to take out the oven side
panel next to the bake burner (U-shape burner), then take out the cover at the bottom right, to get
access to regulator.

Instructions for Converting Range to Operate on Liquefied Petroleum Gas
**IMPORTANT** Pay attention that the NG and LP are in different direction. All the gas ranges are
initially designed with NG position, please have it changed in to LP position.
2.Convert Top Burner for LP/ Propane Gas
Save the natural gas orifices removed from the appliance for possible future conversions to natural gas.
You should refer to the following process also to covert unit back to Nature gas. Take extra care when
handling steel parts.
a. Remove top grates, burner caps and inner burner rings.
b. Lift off outer burner heads and burner bases.
c. Remove the factory installed natural gas orifices from the center of the orifice holders using a 7mm nut
driver (See Fig. 2c)
Remember to keep the original natural gas orifices for future conversions back to natural gas.
“IMPORTANT” to identify their markings.
c.1. Replace the main orifice for dual burner 15000BTU with orifice size 1.07mm/1.10mm (they are both
working fine with the LP 15000BTU burner main orifice).
c.2. Replace the 18000BTU burner orifice in each with orifice size 1.22/1.24mm (they are both working
fine with the LP 18000BTU burner).
c.3 Replace the 12000BTU burner orifice in each with orifice size 1.0mm. Please remember not to over
tighten the orifice and keep the orifice clean.
d. Use a 6mm nut driver to replace the simmer (yellow screw driver), the simmer orifice size is 0.34mm.
** A small folded piece of scotch tape (sticky side out) inserted in to the socket will help hold the orifice in
place**.
Put the outer burner heads back to the main burner bases. Put back the inner burner rings, burner caps
and grates.

Instructions for Converting Range to Operate on Liquefied Petroleum Gas
3. Convert Oven Burner Orifice for LP/Propane Gas
a. Remove the (2) screws on the bottom of the toe kick panel. Hold the bottom edge of toe kick panel at
the middle section and slightly lift towards the front. Hold the toe kick panel on both ends and slowly pull
away towards the front.
b. Remove the toe kick panel.
c. Remove the (2) screws holding the orifice bracket and locate the orifice. Remove orifice using an
adjustable wrench. Replace with oven burner orifice, size 1.32mm (for 48-in gas range’s small oven,
please replace with orifice 1.10mm) and tighten it. Replace the orifice bracket, aligning the new orifices
into the air shutter of the oven burner.
4. Convert Broil Burner Orifice for LP/Propane Gas for 30-inch range with 13,000BTU tube broil
(HRG3080U), please follow the next several steps:
1.Remove the oven door and oven rack;
2.Unscrew the oven baffle. There are 1 pc screw on the middle front and 1 pc screws on each corner. Use
the screw driver with magnetic to screw them out, carefully hold the tube burner with baffle to avoid it
from falling down.

Instructions for Converting Range to Operate on Liquefied Petroleum Gas
3. Carefully take out the tube broiler burner from the original broiler orifice (NG) and replace with LP
oven burner orifice (size 1.05mm) and tighten it.
.
5. Convert Burner Valves for LP/Propane Gas
a. Remove control knobs, bezel and control panel
b. Using a flat screwdriver, replace gas valve bypass jets with bypass jets for LP
c. Save the main bypass jets, in the plastic bag labeled main jets and simmer bypass jets in the bag for
simmer jets.

Instructions for Converting Range to Operate on Liquefied Petroleum Gas
When you are using your top burners, if the flame needs to be adjusted accordingly to fit your need, please
adjust the bypass orifices on the burner valve.
[How to adjust the bypass orifices on HRG gas range models]
- Screw out NG bypass orifices;
- Screw in LP bypass orifices. All LP bypass orifices are the same. Don’t screw in LP bypass to bottom
(tightest), make sure it’s one cycle before the bottom. Put the knob back and open the burner to
simmer function and adjust the position of bypass orifice one more time to get the best flame.
NG bypass orifice has a number on the side; LP bypass has nothing on the side.
Put back the knob on and adjust the flame by rotating the bypass via a small flat screw driver. Check the
flame’s condition to get the best performance.
For single valve, it has one bypass orifice; For Dual valve, it has two bypass orifices: left bottom one for
simmer adjustment and right front one for main burner adjustment.

Instructions for Converting Range to Operate on Liquefied Petroleum Gas
*** You DON’T need to exchange the bypass under below certain serial numbers:
[from HRG3080U1804492 to HRG3080U1804541]
Please follow below procedures if your
unit is within above serial numbers:
A. Check the condition of the bypass jets
on all the burner valves. Dual (simmer)
burner valve is having 2 bypass jets (the
top one controls the main flame, and the
bottom one controls the simmer flame)
B. Use flat screw driver to screw all the
bypass jets to the end (clockwise);
C. Put back the burner knob, open the
burner and check the flame in different
positions (Bypass will help to control the size of the low flame, and simmer flame will help to control the
size of the simmer flame). Adjust the position of the bypass jets to get the best burner flame for cooking.
6. Reconnect Gas and Electrical Supply to Range.
Leak testing of the appliance shall be conducted according to the installation instructions provided with
the range.
Checking for Manifold Gas Pressure
If it is necessary to check the manifold gas pressure, remove the burner cap, inner ring, outer burner head
and burner base of the right front top burner and connect a manometer (water gauge) or another
pressure test device to the burner orifice. Use a rubber hose with inside diameter of approximately ¼”
and hold the end of the tube tight over the orifice. Turn the gas valve on. For a more accurate pressure
check, have at least two other top burners burning. Be sure that the gas supply (inlet) pressure is at least
one inch above the specified manifold pressure. The gas supply pressure should never be over 14” water
column. When properly adjusted the manifold water column pressure is 10” for LP/Propane gas or 5” for
Natural Gas.
7. Air Shutter Oven Burner
The air shutter for the oven burner may need adjustment, especially if the unit has been converted for
use with LP/Propane gas.
The approximate flame length of the oven burner is one inch (distinct inner blue flame).
To Determine if the oven burner flame is proper:

Instructions for Converting Range to Operate on Liquefied Petroleum Gas
a. With the toe tick removed, set the oven to bake at 350°F and observe the flame. If the flame is yellow
in color, increase the air shutter opening size. If the flame is blue lifting away from the burner, reduce the
air shutter opening size.
b. Turn off oven and allow it to cool before adjusting the air shutter. To adjust, loosen the lock screw,
reposition the air shutter and tighten the lock screw. Retest the burner by repeating the steps above.
When the burner flame is a distinct blue color burning steadily, the air shutter is adjusted correctly.
9. Installation of New LP / Propane Rating / Serial Plate
Record the model and serial number on the LP / Propane Rating serial plate provided in this kit. The
information can be obtained from the existing Rating / Serial plate. Place the new plate as close as
possible to the existing Rating / Serial plate on the range.
Do not use a flame to check for gas leaks
a. Disconnect the range and its individual shut-off valve from the gas supply piping system during any
pressure of that system at test pressures greater than 14” of water column pressure (approximately ½”
psig) b. The appliance must be isolated from the gas supply piping system by closing its individual manual
hut-off valve during any pressure testing of the supply system at test pressure equal to or less than 14”
water column pressure (approximately ½” psig)
/