American Standard 7052230.295 User manual
- Category
- Wall & ceiling mounts accessories
- Type
- User manual

- 1 -
Product names listed herein are trademarks of AS America, Inc.
© AS America, Inc. 2018
Thank you for selecting American Standard...
the benchmark of ne quality for over 140 years.
To ensure that your installation proceeds smoothly-please
read these instructions carefully before you begin.
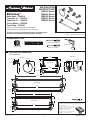
RECOMMENDED TOOLS
1
M965988 (10/18)
Delancey
®
Robe Hook – 7052210
Towel Bar 18" – 7052018
Towel Bar 24" – 7052024
Tissue Holder – 7052230
Towel Ring – 7052190
INSTALLATION
INSTRUCTIONS
7052018 Series
7052024 Series
7052190 Series
7052210 Series
7052230 Series
Certied to comply with ANSI A112.18.1M
Phillips Screwdriver
10'
Tape Measure
Electric Drill
Level
Flat Head Screwdriver
ROUGHING-IN DIMENSIONS:
• For reference
18"
(457 mm)
20"
(512 mm)
Ø 2-3/16"
(55 mm)
3-7/16"
(87 mm)
3-7/8"
(98 mm)
26"
(660 mm)
24"
(610 mm)
Ø 2-3/16"
(55 mm)
3-7/16"
(87 mm)
3-7/8"
(98 mm)
Towel Ring
Ø 2-3/16"
(55 mm)
Ø 2-3/16"
(55 mm)
8-1/4"
(209 mm)
7"
(182 mm)
2-7/8" (73 mm)
2-3/16" (56 mm)
7-1/8"
(181 mm)
9-5/16"
(236 mm)
Ø 2-3/16"
(55 mm)
3-7/16"
(87 mm)
3-7/8"
(98 mm)
Robe Hook
4"
(102 mm)
4"
(102 mm)
2-3/16"
(55 mm)
Tissue Holder
24" Towel Bar
18" Towel Bar
HOT LINE FOR HELP
For toll-free information and answers to your questions, call:
1 (800) 442-1902
Mon. - Fri. 8:00 a.m. to 8:00 p.m. EST
Saturday 10:00 a.m. to 4:00 p.m. EST
IN CANADA 1-800-387-0369
(TORONTO 1-905-306-1093)
Weekdays 8:00 a.m. to 7:00 p.m. EST
IN MEXICO 01-800-839-1200

- 2 -
M965988 (10/18)
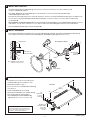
2
3
4
INSTALL WALL BRACKET
INSTALL ACCESSORY
INSTALL TOWEL BAR
• The WALL MOUNTED ACCESSORIES (1) works best if secured to a wall stud or cross brace within the wall,
using the SCREWS (2) supplied.
• If the WALL MOUNTED ACCESSORIES (1) are to be installed on a tile or plaster wall the ANCHORS (4)
and SCREWS (2) should be used.
• Determine desired height and location (optional) and mark a center line. Using the MOUNTING PLATE (3) as a template mark
the two spots for the ANCHORS (4). If MOUNTING PLATE (3) is secured to a stud or cross brace drill small pilot holes
for SCREWS (2).
• For installations on drywall or tiled walls: Use ANCHORS (4) and SCREWS (2) for securing MOUNTING PLATE (3) to nished
wall. Drill two 1/4" dia. holes a minimum of 1-3/4" deep. Insert the two ANCHORS (4) ush with face of the nished wall.
• Secure MOUNTING PLATE (3) to wall with SCREWS (2).
• Install WALL MOUNTED ACCESSORY (1) onto installed MOUNTING PLATE (3). Push WALL MOUNTED ACCESSORY (1)
ush against nished wall and tighten SET SCREW (5) with HEX WRENCH (6) supplied with accessory.
• See detail for the center to center dimension
of TOWEL BARS (1). For installation of the
MOUNTING PLATE see step 1.
• Note: The center line of MOUNTING PLATES (3)
must be level.
• Install TOWEL BAR (1) onto installed
MOUNTING PLATES (3). Push TOWEL BAR (1)
ush against nished wall and tighten
SET SCREWS (5) with HEX WRENCH (6)
supplied with accessory to secure to wall.
*FROM CENTER TO CENTER OF WALL BRACKETS
* NOTE: MEASURMENT IS APPROXIMATE ONLY,
PLEASE USE BAR AS TEMPLATE FOR ACTUAL
CENTER TO CENTER MEASUREMENTS.
Towel Ring
Robe Hook
Pivoting Tissue Holder
Note: Installation is typical for all
wall mounted accessories.
OPTIONAL TO
FINISHED FLOOR
C/L
3
4
2
FINISHED WALL
5
6
USE MOUNTING
PLATE AS
TEMPLATE
2
3
4
1
Towel Bar
*23-5/8"
(600mm)
USE
MOUNTING
PLATE AS
TEMPLATE
OPTIONAL TO
FINISHED FLOOR
(50" TO 60")
(1270mm TO
1524mm)
LEVEL
C/L
2
1
3
4
C/L
5
6
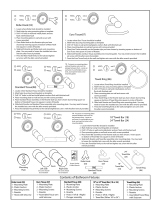
-
 1
1
-
 2
2


American Standard 7052230.295 User manual
- Category
- Wall & ceiling mounts accessories
- Type
- User manual
Ask a question and I''ll find the answer in the document
Finding information in a document is now easier with AI
Related papers
-
American Standard 7353230.013 Installation guide
-
American Standard 7353224.002 Installation guide
-
-
-
-
-
-
-
-
Other documents
-
CMI 182-6610 Installation guide
-
-
-
Dyconn BAHOOK-ORB User guide
-
Dyconn BA4SET24 Installation guide
-
WaterWorks CNTB18 Installation guide
-
Kohler K-16146-PB Installation guide
-
 Residential Essentials 2286VB Installation guide
-
Kohler K-12153-CP Installation guide
-
GINGER 4711/PC Installation guide
