Toro HoverPro 450 Machine User manual
- Category
- Lawnmowers
- Type
- User manual
This manual is also suitable for

FormNo.3414-501RevB
HoverPro
®
450and550Machines
ModelNo.02610—SerialNo.400000000andUp
ModelNo.02611—SerialNo.400000000andUp
Operator'sManual
Introduction
WARNING
CALIFORNIA
Proposition65Warning
Thisproductcontainsachemical
orchemicalsknowntotheStateof
Californiatocausecancer,birthdefects,
orreproductiveharm.
Theengineexhaustfromthisproduct
containschemicalsknowntotheStateof
Californiatocausecancer,birthdefects,
orotherreproductiveharm.
ItisaviolationofCaliforniaPublicResourceCode
Section4442or4443touseoroperatetheengineon
anyforest-covered,brush-covered,orgrass-covered
landunlesstheengineisequippedwithaspark
arrester,asdenedinSection4442,maintainedin
effectiveworkingorderortheengineisconstructed,
equipped,andmaintainedforthepreventionofre.
Thismachinedoesnotcomeequippedwitha
sparkarresterstandard.Youmustinstallthe
sparkarresterkitbeforeoperatingthismachinein
California.
TheenclosedEngineOwner'sManualis
suppliedforinformationregardingtheUS
EnvironmentalProtectionAgency(EPA)and
theCaliforniaEmissionControlRegulationof
emissionsystems,maintenance,andwarranty.
Replacementsmaybeorderedthroughtheengine
manufacturer.
Readthisinformationcarefullytolearnhowtooperate
andmaintainyourproductproperlyandtoavoid
injuryandproductdamage.Youareresponsiblefor
operatingtheproductproperlyandsafely.Keepfor
futurereference.
YoumaycontactTorodirectlyatwww.T oro.comfor
productandaccessoryinformation,helpndinga
dealer,ortoregisteryourproduct.
Wheneveryouneedservice,genuineToroparts,or
additionalinformation,contactanAuthorizedService
DealerorT oroCustomerServiceandhavethemodel
andserialnumbersofyourproductready.Figure1
identiesthelocationofthemodelandserialnumbers
ontheproduct.
g017365
1
g017365
Figure1
1.Modelandserialnumberplate
Writetheproductmodelandserialnumbersinthe
spacebelow:
ModelNo.
SerialNo.
Thismanualidentiespotentialhazardsandhas
safetymessagesidentiedbythesafety-alertsymbol
(Figure2),whichsignalsahazardthatmaycause
seriousinjuryordeathifyoudonotfollowthe
recommendedprecautions.
g000502
Figure2
1.Safety-alertsymbol
©2017—TheToro®Company
8111LyndaleAvenueSouth
Bloomington,MN55420
Registeratwww.Toro.com.
OriginalInstructions(EN)
PrintedintheUK
AllRightsReserved
*3414-501*B

Thismanualuses2wordstohighlightinformation.
Importantcallsattentiontospecialmechanical
informationandNoteemphasizesgeneralinformation
worthyofspecialattention.
Formodelswithstatedenginehorsepower,thegross
horsepoweroftheenginewaslaboratoryratedbythe
enginemanufacturerinaccordancewithSAEJ1349.
Asconguredtomeetsafety,emission,andoperating
requirements,theactualenginehorsepoweronthis
classmachinewillbesignicantlylower.
Contents
Introduction...............................................................1
Safety.......................................................................2
GeneralSafety...................................................2
BeforeOperationSafety.....................................2
DuringOperatingSafety.....................................3
AfterOperatingSafety........................................4
MaintenanceSafety............................................4
SafetyandInstructionalDecals..........................5
Setup........................................................................7
1AssemblingtheHandle....................................7
2InstallingtheFootstop......................................7
3FillingtheEnginewithOil.................................8
ProductOverview.....................................................9
Specications..................................................10
Operation................................................................10
FillingtheFuelTank..........................................10
CheckingtheEngine-OilLevel...........................11
AdjustingtheCuttingHeight..............................11
StartingtheEngine...........................................12
AdjustingtheChoke..........................................13
ShuttingOfftheEngine.....................................13
Hauling.............................................................13
OperatingTips.................................................14
Maintenance...........................................................15
RecommendedMaintenanceSchedule(s)...........15
PreparingforMaintenance...............................15
ReplacingtheAirCleaner.................................16
ChangingtheEngineOil...................................16
ServicingtheSparkPlug...................................17
ReplacingtheBlade..........................................17
CleaningtheMachine.......................................18
Storage...................................................................18
PreparingtheMachineforStorage...................18
Troubleshooting......................................................19
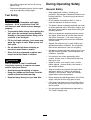
Safety
Thismachinehasbeendesignedinaccordancewith
ANSIB71.4-2012.
GeneralSafety
Thisproductiscapableofamputatinghandsand
feetandofthrowingobjects.Alwaysfollowallsafety
instructionstoavoidseriouspersonalinjury.
Usingthisproductforpurposesotherthanitsintended
usecouldprovedangeroustoyouandbystanders.
•Readandunderstandthecontentsofthis
Operator’sManualbeforestartingtheengine.
•Donotputyourhandsorfeetnearmoving
componentsofthemachine.
•Donotoperatethemachinewithoutallguards
andothersafetyprotectivedevicesinplaceand
workingonthemachine.
•Keepclearofanydischargeopening.Keep
bystandersasafedistanceawayfromthe
machine.
•Keepchildrenoutoftheoperatingarea.Never
allowchildrentooperatethemachine.
•Stopthemachineandshutofftheenginebefore
servicing,fueling,oruncloggingthemachine.
Improperlyusingormaintainingthismachinecan
resultininjury.Toreducethepotentialforinjury,
complywiththesesafetyinstructionsandalwayspay
attentiontothesafety-alertsymbol,whichmeans
Caution,Warning,orDanger—personalsafety
instruction.Failuretocomplywiththeseinstructions
mayresultinpersonalinjuryordeath.
Youcanndadditionalitemsofsafetyinformationin
theirrespectivesectionsthroughoutthismanual.
BeforeOperationSafety
GeneralSafety
•Alwaysinspectthemachinetoensurethatthe
blades,bladebolts,andcuttingassemblyarenot
wornordamaged.
•Inspecttheareawhereyouwillusethemachine
andremoveallobjectsthatthemachinecould
throw.
•Becomefamiliarwiththesafeoperationofthe
equipment,operatorcontrols,andsafetysigns.
•Checkthatallguardsandsafetydevicesarein
placeandworkingproperly.
•Adjustingthecuttingheightmaybringyouinto
contactwiththemovingblade,causingserious
injury.
2

–Shutofftheengineandwaitforallmoving
partstostop.
–Disconnectthespark-plugwirefromthespark
plugwhenadjustingcuttingheight.
FuelSafety
DANGER
Fuelisextremelyammableandhighly
explosive.Areorexplosionfromfuel
canburnyouandothersandcandamage
property.
•Topreventastaticchargefromignitingthe
fuel,placethecontainerand/ormachine
directlyonthegroundbeforelling,notin
avehicleoronanobject.
•Fillthefueltankoutdoors,inanopenarea,
whentheengineiscold.Wipeupanyfuel
thatspills.
•Donothandlefuelwhensmokingor
aroundanopenameorsparks.
•Storefuelinanapprovedcontainerand
keepitoutofthereachofchildren.
WARNING
Fuelisharmfulorfatalifswallowed.
Long-termexposuretovaporscancause
seriousinjuryandillness.
•Avoidprolongedbreathingofvapors.
•Keepyourhandsandfaceawayfromthe
nozzleandthefuel-tankopening.
•Keepfuelawayfromyoureyesandskin.
DuringOperatingSafety
GeneralSafety
•Wearappropriateclothing,includingeye
protection;slip-resistant,substantialfootwear;and
hearingprotection.Tiebacklonghairanddonot
wearjewelry.
•Donotoperatethemachinewhileill,tired,or
undertheinuenceofalcoholordrugs.
•Thebladeissharp;contactingthebladecanresult
inseriouspersonalinjury.Shutofftheengine,and
waitforallmovingpartstostopbeforeleavingthe
operatingposition.
•Whenyoureleasetheoperator-presencecontrol,
theengineshouldshutoffandthebladeshould
stopwithin3seconds.Ifnot,stopusingyour
machineimmediatelyandcontactanAuthorized
ServiceDealer.
•Operatethemachineonlyingoodvisibilityand
appropriateweatherconditions.Donotoperate
themachinewhenthereistheriskoflighting.
•Wetgrassorleavescancauseseriousinjuryifyou
slipandcontacttheblade.Avoidmowinginwet
conditions,ifpossible.
•Useextremecarewhenapproachingblind
corners,shrubs,trees,orotherobjectsthatmay
blockyourview.
•Watchforholes,ruts,bumps,rocks,orother
hiddenobjects.Uneventerraincouldcausea
slip-and-fallaccident.
•Stopthemachineandinspectthebladesafter
strikinganobjectorifthereisanabnormal
vibrationinthemachine.Makeallnecessary
repairsbeforeresumingoperation.
•Beforeleavingtheoperatingposition,shutoffthe
engine,andwaitforallmovingpartstostop.
•Iftheenginehasbeenrunningthemuferwillbe
hotandcanseverelyburnyou.Keepawayfrom
thehotmufer.
•Useaccessoriesandattachmentsapprovedby
TheT oro®Companyonly.
3

SlopeSafety
WARNING
Runningtheengineonslopesofmorethan45
degreeswillcausesevereenginedamagedue
toalackoflubrication.Someofthepotential
damagecouldincludestuckvalves,scored
pistons,orburnedcrankbearings.
•Beforeoperatingonanyslope,asite
surveyshouldbecompletedtodetermine
theactualslopewheretheunitwillbe
operating.
•Donotrunthe4cycleHondaengineinthis
productonslopesofmorethan45degrees.
•Avoidmowingwetgrass.Poorfootingcouldcause
aslip-and-fallaccident.
•Mowwithcautionneardrop-offs,ditches,or
embankments.
•Whenusingthemachine,alwayskeepbothhands
onthehandlebar.
•Whencuttingfromthetopofasteepslopeand
youneedlongerreach,useanapprovedextended
handlebarifyouneedalongerreach.
AfterOperatingSafety
GeneralSafety
•Cleangrassanddebrisfromthemachinetohelp
preventres.Cleanupoilorfuelspills.
•Allowtheenginetocoolbeforestoringthemachine
inanyenclosure.
•Neverstorethemachineorfuelcontainerwhere
thereisanopename,spark,orpilotlight,such
asonawaterheateroronotherappliances.
HaulingSafety
•Usecarewhenloadingorunloadingthemachine.
•Securethemachine.
•Theengineisnottobeusedtoliftthemachine,as
sharpedgescouldcauseinjury.
MaintenanceSafety
•Disconnectthespark-plugwirefromthesparkplug
beforeperforminganymaintenanceprocedure.
•Wearglovesandeyeprotectionwhenservicing
themachine.
•Thebladeissharp;contactingthebladecanresult
inseriouspersonalinjury.Weargloveswhen
servicingtheblade.
•Nevertamperwithsafetydevices.Checktheir
properoperationregularly.
•Tippingthemachinemaycausethefueltoleak.
Fuelisammableandexplosive,andcancause
personalinjury.Runtheenginedrytoremovethe
fuelwithahandpump;neversiphonthefuel.
4

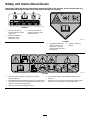
SafetyandInstructionalDecals
Important:Safetydecalsandinstructionsareeasilyvisibletotheoperatorandarelocatednearany
areaofpotentialdanger.Replaceanydecalthatisdamagedormissing.
decal130-8322
130-8322
1.Useonlyfuelwithan
alcoholcontentbyvolume
under10%.
3.Donotusefuelwithan
alcoholcontentbyvolume
greaterthan10%.
2.ReadtheOperator's
Manualformore
informationonfuel.
decal111-9826
111–9826
1.Cutting/dismemberment
hazardofhandorfoot,
cuttingunit—keepyour
handsandfeetawayfrom
movingparts.
2.ReadtheOperator’s
Manual.
decal111-5393
111-5393
1.Warning—Receivetrainingontheproduct;readthe
Operator’sManual.
4.Thrownobjecthazard;keepbystandersawayfromthe
machine.
2.Cutting/dismembermenthazardofhandorfoot,mowerblade;
disconnectthewirefromthesparkplugbeforeworkingonthe
machine;nevertmetalcuttingparts.
5.Warning—donottouchhotsurfaces;keepguardsinplace;
Stayawayfrommovingparts;keepguardsinplace.
3.Warning—weareyeandhearingprotection.
5

decal94-8072
94-8072
1.Warning—cutting/dismembermenthazardofhandorfoot,
cuttingmechanism.
g017410
g017410
H295159
1.Enginestop(shutoff)
6

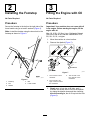
Setup
1
AssemblingtheHandle
NoPartsRequired
Procedure
1.Slide2bushingsintotheframe.
g017333
1
2
3
4
5
6
g017333
Figure3
1.Lowerhandle4.Frame
2.Bushings5.Bolt
3.Nut6.Washers
2.Placethelowerhandlebetweenthebushings
andsecureitwith1handlebarbolt,2washers,
and1nut.
Note:Placethelowerhandlebetweenthe
bushingswiththekickstopassemblyattheright
side.
3.Repeatfortheoppositeside.
4.Aligntheholesontheupperhandlewiththe
lowerhandle.
g209291
Figure4
1.Upperhandle4.U-bolt
2.Handwheel5.Lowerhandle
3.Washer
5.FittheU-boltthroughtheupperandlower
handleandsecureitwithawasherandahand
wheel.
6.Attachthethrottleassemblytotheoutsideofthe
handlebarandsecureitwithanutandapan
screw.
g209280
Figure5
1.Nut2.Panscrew
7

2
InstallingtheFootstop
NoPartsRequired
Procedure
Securethefootstoptotheboltontherightsideofthe
lowerhandleusinganutand2washers(Figure6).
Note:Installthefootstopusingthelowerholeinthe
footstopasshowninFigure6.
g027774
Figure6
1.Footstop4.Bolt
2.Nut5.Lowerhandle
3.Washer
3
FillingtheEnginewithOil
NoPartsRequired
Procedure
Important:Yourmachinedoesnotcomewithoil
intheengine.Beforestartingtheengine,llthe
enginewithoil.
Max.ll:0.59L(20oz),type:MultigradeMineral
10W-30oilwithanAPIserviceclassicationofSF,
SG,SH,SJ,SL,orhigher.
1.Movethemachinetoalevelsurface.
2.Removethedipstick(Figure7).
1
2
3
g017332
g017332
Figure7
1.Theoillevelisatits
maximum.
3.Theoillevelistoo
low—addoiltothe
crankcase.
2.Theoillevelistoo
high—removeoilfrom
thecrankcase.
3.Slowlypouroilintotheoil-llhole,wait3
minutes,andchecktheoillevelonthedipstick
bywipingthedipstickcleanandtheninserting,
butnotscrewingin,theoil-llcapintothehole
(Figure8).
8

g017338
g017338
Figure8
Note:Filltheenginecrankcasewithoiluntil
thedipstickindicatesthattheengine-oillevel
iscorrectasshowninFigure7.Ifyouoverll
theenginewithoil,removetheexcessoilas
directedinChangingtheEngineOil(page16).
4.Installthedipstickandhandtightenitsecurely.
Important:Changetheengineoilafterthe
rst5operatinghours;changeityearly
thereafter.RefertoChangingtheEngineOil
(page16).
ProductOverview
g017341
1
2
3
4
5
6
7
8
9
g017341
Figure9
1.Fuelcap6.Handlebarsecuringknob
2.Enginestart7.Enginecover
3.Throttlecontrol8.Exhaustguard
4.Operator-presencecontrol
9.Dipstick
5.Handlebar
1
2
3
7
8
9
g017335
4
5
6
g017335
Figure10
1.Sparkplug
6.Fuelcap
2.Exhaustguard7.Fingerguard
3.Exhaust8.Aircleaner
4.Dipstick
9.Carburetor
5.Startergrip
9

Specications
Model
Cuttingwidth
Productwidth
02610
46.5cm(18-1/2
inches)
57.5cm(22-1/2
inches)
02611
53.5cm(21inches)63.5cm(25inches)
Operation
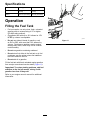
FillingtheFuelTank
•Forbestresults,useonlyclean,fresh,unleaded
gasolinewithanoctaneratingof87orhigher
((R+M)/2ratingmethod).
•Oxygenatedfuelwithupto10%ethanolor15%
MTBEbyvolumeisacceptable.
•Donotuseethanolblendsofgasoline,such
asE15orE85,withmorethan10%ethanolby
volume.Performanceproblemsand/orengine
damagemayresult,whichmaynotbecovered
underwarranty.
•Donotusegasolinecontainingmethanol.
•Donotstorefueleitherinthefueltankorinfuel
containersoverthewinterunlessfuelstabilizer
hasbeenaddedtothefuel.
•Donotaddoiltogasoline.
Fillthefueltankwithfreshunleadedregulargasoline
fromamajorname-brandservicestation(Figure11).
Important:Toreducestartingproblems,addfuel
stabilizertothefuelallseason,mixingitwith
gasolinelessthan30daysold.
Refertoyourengineowner’smanualforadditional
information.
g017340
g017340
Figure11
10

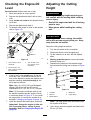
CheckingtheEngine-Oil
Level
ServiceInterval:Beforeeachuseordaily
1.Movethemachinetoalevelsurface.
2.Removethedipstickandwipeitwithaclean
cloth.
3.Insert,butdonotscrewin,thedipstickintothe
oil-llhole.
4.Removethedipstickandcheckit.
5.Todeterminetheproperoillevelonthedipstick,
refertoFigure12).
1
2
3
g017332
g017332
Figure12
1.Theoillevelisatits
maximum.
3.Theoillevelistoo
low—addoiltothe
crankcase.
2.Theoillevelistoo
high—removeoilfrom
thecrankcase.
6.Iftheoillevelislow,slowlypouroilintothe
oil-llhole,wait3minutes,andchecktheoil
levelonthedipstickbywipingthedipstickclean
andtheninserting,butnotscrewingin,the
oil-llcapintothehole.
Note:Max.ll:0.59L(20oz)Multigrade
Mineral10W-30oilwithanAPIservice
classicationofSF ,SG,SH,SJ,SL,orhigher.
Note:Filltheenginecrankcasewithoiluntil
thedipstickindicatesthattheengine-oillevel
iscorrectasshowninFigure12.Ifyouoverll
theenginewithoil,removetheexcessoilas
directedinChangingtheEngineOil(page16).
7.Installthedipstickandhandtightenitsecurely.
Important:Changetheengineoilafterthe
rst5operatinghours;changeityearly
thereafter.RefertoChangingtheEngineOil
(page16).
AdjustingtheCutting
Height
WARNING
Adjustingthecuttingheightmaybringyou
intocontactwiththemovingblade,causing
seriousinjury.
•Shutofftheengineandwaitforallmoving
partstostop.
•Weargloveswhilehandlingthecutting
unit.
CAUTION
Iftheenginehasbeenrunning,themufer
willbehotandcanseverelyburnyou.Keep
awayfromthehotmufer.
Adjustthecuttingheightasdesired.
1.TurnthefuelswitchtotheOFFposition.
2.Disconnectthewirefromthesparkplug.
3.Tipthemachineonitsside,withthedipstick
down.
4.Wearingprotectivegloves,removetheblade
boltandcuttingunit.
5.Repositionthespacerstothedesiredheight,
thenreinstallthecuttingunitasshowninFigure
13.
g017336
Figure13
1.Cutterbar
4.Bladebolt
2.Spacers
5.Largespacer
3.Bladeretainer
Note:Thelargespacermustbedirectlybelow
theimpelleratalltimes.
6.Useatorquewrenchtotightenthebladeboltto
25N-m(18ft-lb).
11

StartingtheEngine
1.Placethethrottlecontroltothechokeposition,
ensurethatthefuelswitchisintheONposition.
OFF
ON
g017346
g017346
Figure14
2.Holdtheoperator-presencecontrolagainstthe
handle.
g017334
1
2
g017334
Figure15
1.Handle
2.Operator-presencecontrol
3.Placeyourfootonthedeckandtiltthemachine
towardyou(Figure16).
g017329
g017329
Figure16
4.Pulltherecoil-starthandle.
Note:Ifthemachinedoesnotstartafterseveral
attempts,contactanAuthorizedServiceDealer.
12

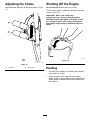
AdjustingtheChoke
Usethethrottleassemblytoadjustthechoke(Figure
17).
g017367
1
2
g017367
Figure17
1.Chokeon2.Chokeoff
ShuttingOfftheEngine
ServiceInterval:Beforeeachuseordaily
Toshutofftheengine,releasetheoperator-presence
control(Figure18).
Important:Whenyoureleasethe
operator-presencecontrol,boththeengine
andbladeshouldstopwithin3seconds.Ifthey
donotstopproperly,stopusingyourmachine
immediatelyandcontactanAuthorizedService
Dealer.
g017366
g017366
Figure18
Hauling
•Usecarewhenloadingorunloadingthemachine
intoatraileroratruck.
•Tiethemachinedownsecurelyusingstraps,
chains,cable,orropes.Boththefrontandtherear
strapsshouldbedirecteddownandoutwardfrom
themachine.
13

OperatingTips
GeneralMowingTips
•Inspecttheareawhereyouwillusethemachine
andremoveallobjectsthatthemachinecould
throw.
•Avoidstrikingsolidobjectswiththeblade.Never
deliberatelymowoveranyobject.
•Ifthemachinestrikesanobjectorstartstovibrate,
immediatelyshutofftheengine,disconnect
thewirefromthesparkplug,andexaminethe
machinefordamage.
•Forbestperformance,installanewbladebefore
thecuttingseasonbegins.
•ReplacethebladewhennecessarywithaToro
replacementblade.
CuttingGrass
•Cutonlyaboutathirdofthegrassbladeatatime.
Donotcutbelowthehighestsetting(34mmor1.3
inchesforModel02610or32mmor1.25inches
forModel02611)unlessthegrassissparseoritis
latefallwhengrassgrowthbeginstoslowdown.
RefertoAdjustingtheCuttingHeight(page11).
•Mowinggrassover15cm(6inches)inlengthis
notrecommended.Ifthegrassistoolong,the
machinemayplugandcausetheenginetostall.
•Wetgrassandleavestendtoclumpontheyard
andcancausethemachinetoplugortheengine
tostall.Mowonlyindryconditions,ifpossible.
WARNING
Wetgrassorleavescancauseserious
injuryifyouslipandcontacttheblade.
Mowonlyindryconditions,ifpossible.
•Beawareofapotentialrehazardinverydry
conditions,followalllocalrewarnings,andkeep
themachinefreeofdrygrassandleafdebris.
•Ifthenishedlawnappearanceisunsatisfactory,
try1ormoreofthefollowing:
–Replacethebladeorhaveitsharpened.
–Walkataslowerpacewhilemowing.
–Raisethecuttingheightonyourmachine.
–Cutthegrassmorefrequently.
–Overlapcuttingswathsinsteadofcuttingafull
swathwitheachpass.
CuttingLeaves
•Aftercuttingthelawn,ensurethathalfofthelawn
showsthroughthecutleafcover.Youmayneed
tomakemorethanasinglepassovertheleaves.
•Mowinggrassover15cm(6inches)inlengthis
notrecommended.Iftheleafcoveristoothick,the
machinemayplugandcausetheenginetostall.
•Slowdownyourmowingspeedifthemachine
doesnotcuttheleavesnelyenough.
14

Maintenance
Note:Determinetheleftandrightsidesofthemachinefromthenormaloperatingposition.
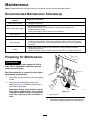
RecommendedMaintenanceSchedule(s)
MaintenanceService
Interval
MaintenanceProcedure
Aftertherst5hours
•Changetheengineoil.
Beforeeachuseordaily
•Checktheengine-oillevel.
•Ensurethattheengineshutsoffwithin3secondsafterreleasingthe
operator-presencecontrol.
•Cleangrassclippingsanddirtfromtheentiremachine.
Aftereachuse
•Cleangrassclippingsanddirtfromtheentiremachine.
Every100hours
•Checkthesparkplugandreplaceitifnecessary.
Beforestorage
•Emptythefueltankbeforerepairsasdirectedandbeforeannualstorage.
•Cleanthecoolingsystem;removegrassclippings,debris,ordirtfromtheengine
aircoolingnsandstarter.Cleanthesystemmorefrequentlyindirtyorhigh-chaff
conditions.
Yearly
•Replacetheairlter;replaceitmorefrequentlyindustyoperatingconditions.
•Changetheengineoil.
•Replacethebladeorhaveitsharpened(morefrequentlyiftheedgedullsquickly).
PreparingforMaintenance
WARNING
Tippingthemachinemaycausethefuelto
leak.Fuelisammable,explosiveandcan
causepersonalinjury.
Runtheenginedryorremovethefuelwitha
handpump;neversiphon.
1.Shutofftheengineandwaitforallmovingparts
tostop.
2.Disconnectthespark-plugwirefromthe
sparkplug(Figure19)beforeperformingany
maintenanceprocedure.
Important:Alwaystipthemachineontoits
side,withthedipstickdown.Ifthemachine
istippedinanotherdirection,oilmayllthe
valvetrain,requiringatleast30minutesto
drain.
g017342
g017342
Figure19
1.Spark-plugwire
3.Afterperformingthemaintenanceprocedure(s),
connectthespark-plugwiretothesparkplug.
15

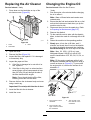
ReplacingtheAirCleaner
ServiceInterval:Yearly
1.Pressdownonthelatchtabsontopofthe
air-cleanercover(Figure20).
1
2
3
g017339
g017339
Figure20
1.Cover
3.Filter
2.Latchtabs
2.Openthecover.
3.Removethelter(Figure20).
4.Inspectthelter,andreplaceitifitisdamaged
orexcessivelydirty.
5.Inspectthepaperairlter.
A.Ifthelterisdamagedoriswetwithoilor
fuel,replaceit.
B.Ifthelterisdirty,tapitonahardsurface
severaltimesorblowcompressedairless
than207kPa(30psi)throughthesideof
thelterthatfacestheengine.
Note:Donotbrushthedirtoffthelter;
brushingforcesdirtintothebers.
6.Removedirtfromtheair-cleanerbodyandcover
usingamoistrag.
Important:Donotwipedirtintotheairduct.
7.Insertthelterintotheaircleaner.
8.Installthecover.
ChangingtheEngineOil
ServiceInterval:Aftertherst5hours
Yearly
1.Runtheengineafewminutesbeforechanging
theoiltowarmit.
Note:Warmoilowsbetterandcarriesmore
contaminants.
2.Ensurethatthefueltankcontainslittleornofuel
sothatthefueldoesnotleakwhenyoutipthe
machineontoitsside.
3.Disconnectthewirefromthesparkplug.Refer
toPreparingforMaintenance(page15).
4.Removethedipstick.
5.Tipthemachineontoitsside,withthedipstick
down,todraintheusedoiloutthroughtheoil-ll
tube.
6.Returnthemachinetotheoperatingposition.
7.Slowlypouroilintotheoil-llhole,wait3
minutes,andchecktheoillevelonthedipstick
bywipingthedipstickcleanandtheninserting,
butnotscrewingin,theoil-llcapintothehole.
Note:Max.ll:0.59L(20oz),type:
MultigradeMineral10W-30oilwithanAPI
serviceclassicationofSF,SG,SH,SJ,SL,or
higher.
Note:Filltheenginecrankcasewithoiluntil
thedipstickindicatesthattheengine-oillevelis
correctasshownin(Figure21).Ifyouoverll
theenginewithoil,removetheexcessoilas
directedin5.
1
2
3
g017332
g017332
Figure21
1.Theoillevelisatits
maximum.
3.Theoillevelistoo
low—addoiltothe
crankcase.
2.Theoillevelistoo
high—removeoilfrom
thecrankcase.
16

8.Installthedipstickandhandtightenitsecurely.
9.Disposeoftheusedoilproperlyatalocal
recyclingcenter.
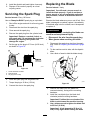
ServicingtheSparkPlug
ServiceInterval:Every100hours
UseanChampionRN9YCsparkplugorequivalent.
1.Shutofftheengineandwaitforallmovingparts
tostop.
2.Disconnectthewirefromthesparkplug.
3.Cleanaroundthesparkplug.
4.Removethesparkplugfromthecylinderhead.
Important:Replaceacracked,fouled,or
dirtysparkplug.Donotcleantheelectrodes
becausegritenteringthecylindercan
damagetheengine.
5.Setthegapontheplugto0.76mm(0.030inch)
asshowninFigure22.
g000533
Figure22
1.Center-electrodeinsulator
2.Sideelectrode
3.Airgap(nottoscale)
6.Installthesparkplugandthegasketseal.
7.Torquetheplugto20N-m(15ft-lb).
8.Connectthewiretothesparkplug.
ReplacingtheBlade
ServiceInterval:Yearly
Important:Youwillneedatorquewrenchto
installthebladeproperly.Ifyoudonothavea
torquewrenchorareuncomfortableperforming
thisprocedure,contactanAuthorizedService
Dealer.
Examinethebladewheneveryourunoutoffuel.Ifthe
bladeisdamagedorcracked,replaceitimmediately.
Ifthebladeedgeisdullornicked,haveitsharpened
orreplaceit.
WARNING
Thebladeissharp;contactingthebladecan
resultinseriouspersonalinjury.
•Disconnectthewirefromthesparkplug.
•Weargloveswhenservicingtheblade.
1.Disconnectthespark-plugwirefromthespark
plug.RefertoPreparingforMaintenance(page
15).
2.Tipthemachineontoitsside,withthedipstick
down.
3.Useablockofwoodtoholdthebladesteady.
g209201
Figure23
4.Removetheblade(turnthebladebolt
counterclockwise),savingallthemounting
hardware.
5.Installthenewblade(turnthebladebolt
clockwise)andallmountinghardware.
Important:Positionthecurvedendsofthe
bladetopointtowardthemachinehousing.
6.Useatorquewrenchtotightenthebladebolt
to25N-m(18ft-lb).
Important:Abolttorquedto25N-m(18
ft-lb)isverytight.Whileholdingtheblade
17

withablockofwood,putyourweight
behindtheratchetorwrenchandtightenthe
boltsecurely.Thisboltisverydifcultto
overtighten.
CleaningtheMachine
ServiceInterval:Beforeeachuseordaily
Aftereachuse
WARNING
Themachinemaydislodgematerialfrom
underthemachinehousing.
•Weareyeprotection.
•Stayintheoperatingposition(behindthe
handle).
•Donotallowbystandersinthearea.
1.Tipthemachineonitssidewiththedipstick
down.
2.Useabrushorcompressedairtoremovegrass
anddebrisfromtheexhaustguard,thetopcowl,
andthesurroundingdeckareas.
Storage
Storethemachineinacool,clean,dryplace.
PreparingtheMachinefor
Storage
WARNING
Fuelvaporscanexplode.
•Donotstorefuelmorethan30days.
•Donotstorethemachineinanenclosure
nearanopename.
•Allowtheenginetocoolbeforestoringit.
1.Onthelastrefuelingoftheyear,addfuel
stabilizertothefuelasdirectedbytheengine
manufacturer.
2.Runthemachineuntiltheengineshutsofffrom
runningoutoffuel.
3.Primetheengineandstartitagain.
4.Allowtheenginetorununtilitshutsoff.
Whenyoucannolongerstarttheengine,itis
sufcientlydry.
5.Disconnectthewirefromthesparkplug.
6.Removethesparkplug,add30ml(1oz)of
oilthroughthesparkplughole,andpullthe
starterropeslowlyseveraltimestodistribute
oilthroughoutthecylindertopreventcylinder
corrosionduringtheoff-season.
7.Installthesparkplugandtightenitwithatorque
wrenchto20N-m(15ft-lb).
8.Tightenallnuts,bolts,andscrews.
18

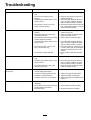
Troubleshooting
Problem
PossibleCauseCorrectiveAction
1.Thewireisnotconnectedtothespark
plug.
1.Connectthewiretothesparkplug.
2.Theholeinthefuel-capventis
plugged.
2.Cleantheholeinthefuel-capventor
replacethefuelcap.
3.Thesparkplugispitted,fouled,orthe
gapisincorrect.
3.Checkthesparkplugandadjustthe
gapifnecessary.Replacethespark
plugifitispitted,fouled,orcracked.
Theenginedoesnotstart.
4.Thefueltankisemptyorthefuel
systemcontainsstalefuel.
4.Drainand/orllthefueltankwithfresh
fuel.Iftheproblempersists,contactan
AuthorizedServiceDealer.
1.Theholeinthefuel-capventis
plugged.
1.Cleantheholeinthefuel-capventor
replacethefuelcap.
2.Theairlterelementisdirtyandis
restrictingtheairow.
2.Cleantheairlterpre-cleanerand/or
replacethepaperairlter.
3.Theundersideofthemachinehousing
containsclippingsanddebris.
3.Cleanunderthemachinehousing.
4.Thesparkplugispitted,fouled,orthe
gapisincorrect.
4.Checkthesparkplugandadjustthe
gapifnecessary.Replacethespark
plugifitispitted,fouled,orcracked.
5.Theengineoil-levelistoolow,too
high,orexcessivelydirty.
5.Checktheengineoil.Changetheoilif
itisdirty;addordraintheoiltoadjust
theoilleveltotheFullmarkonthe
dipstick.
Theenginestartshardorlosespower.
6.Thefueltankcontainsstalefuel.6.Drainandllthefueltankwithfresh
fuel.
1.Thewireisnotconnectedtothespark
plug.
1.Connectthewiretothesparkplug.
2.Thesparkplugispitted,fouled,orthe
gapisincorrect.
2.Checkthesparkplugandadjustthe
gapifnecessary.Replacethespark
plugifitispitted,fouled,orcracked.
Theenginerunsrough.
3.Theairlterelementisdirtyandis
restrictingtheairow.
3.Cleantheairlterpre-cleanerand/or
replacethepaperairlter.
1.Theundersideofthemachinehousing
containsclippingsanddebris.
1.Cleanunderthemachinehousing.
2.Theenginemountingboltsareloose.2.Tightentheenginemountingbolts.
3.Theblademountingboltloose.3.Tightentheblademountingbolt.
Themachineorenginevibrates
excessively.
4.Thebladeisbentorisoutofbalance.4.Balancetheblade.Ifthebladeisbent,
replaceit.
1.Youaremowinginthesamepattern
repeatedly.
1.Changethemowingpattern.
2.Theundersideofthemachinehousing
containsclippingsanddebris.
2.Cleanunderthemachinehousing.
Thereisanunevencuttingpattern.
3.Thebladeisdull.
3.Sharpenandbalancetheblade.
19

Notes:
Page is loading ...
Page is loading ...
Page is loading ...
Page is loading ...
-
 1
1
-
 2
2
-
 3
3
-
 4
4
-
 5
5
-
 6
6
-
 7
7
-
 8
8
-
 9
9
-
 10
10
-
 11
11
-
 12
12
-
 13
13
-
 14
14
-
 15
15
-
 16
16
-
 17
17
-
 18
18
-
 19
19
-
 20
20
-
 21
21
-
 22
22
-
 23
23
-
 24
24


Toro HoverPro 450 Machine User manual
- Category
- Lawnmowers
- Type
- User manual
- This manual is also suitable for
Ask a question and I''ll find the answer in the document
Finding information in a document is now easier with AI
Related papers
-
Toro HoverPro Series – 40 to 53 cm Cutting Width User manual
-
Toro HoverPro 550 Machine User manual
-
-
-
-
-
-
Toro HoverPro 400 Machine User manual
-
-
Toro HoverPro 450 Machine User manual