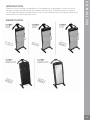
Corby 4400
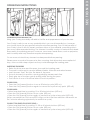
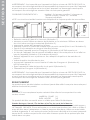
The Corby 4400 is a high-quality trouser press designed to keep your clothes looking sharp and wrinkle-free. With its powerful heating element and adjustable timer, the Corby 4400 can quickly and easily press your trousers, leaving them looking their best.
The Corby 4400 is also incredibly easy to use. Simply hang your trousers on the hanger, set the timer, and press the start button. The Corby 4400 will then automatically press your trousers, ensuring that they are wrinkle-free and ready to wear.
In addition to its powerful heating element and adjustable timer, the Corby 4400 also features a number of other convenient features, including:
Corby 4400
The Corby 4400 is a high-quality trouser press designed to keep your clothes looking sharp and wrinkle-free. With its powerful heating element and adjustable timer, the Corby 4400 can quickly and easily press your trousers, leaving them looking their best.
The Corby 4400 is also incredibly easy to use. Simply hang your trousers on the hanger, set the timer, and press the start button. The Corby 4400 will then automatically press your trousers, ensuring that they are wrinkle-free and ready to wear.
In addition to its powerful heating element and adjustable timer, the Corby 4400 also features a number of other convenient features, including:


-
 1
1
-
 2
2
-
 3
3
-
 4
4
-
 5
5
-
 6
6
-
 7
7
-
 8
8
-
 9
9
-
 10
10
-
 11
11
-
 12
12
-
 13
13
-
 14
14
-
 15
15
-
 16
16
-
 17
17
-
 18
18
-
 19
19
-
 20
20
-
 21
21
-
 22
22
-
 23
23
-
 24
24


Corby 4400 User manual
- Type
- User manual
Corby 4400
The Corby 4400 is a high-quality trouser press designed to keep your clothes looking sharp and wrinkle-free. With its powerful heating element and adjustable timer, the Corby 4400 can quickly and easily press your trousers, leaving them looking their best.
The Corby 4400 is also incredibly easy to use. Simply hang your trousers on the hanger, set the timer, and press the start button. The Corby 4400 will then automatically press your trousers, ensuring that they are wrinkle-free and ready to wear.
In addition to its powerful heating element and adjustable timer, the Corby 4400 also features a number of other convenient features, including:
Ask a question and I''ll find the answer in the document
Finding information in a document is now easier with AI
in other languages
- français: Corby 4400 Manuel utilisateur
Related papers

Other documents
-
 SRIWATANA Letter Mail Holder Wall Mount, Rustic Bill Mail Organizer Hanging Key Holder Installation guide
-
Samsung B3313 Corby Mate User manual
-
Oceanic Graff Incanto Wall Mounted Shower Column Operating instructions
-
MyBinding Foster Keencut Javelin User manual
-
RS PRO IM-502 User manual
-
Peavey HISYS 1MXT Owner's manual
-
Integra LZ3587 User manual
-
-
-
