
NASS- UND TROCKENSAUGER PNTS 1400 B1
NASS- UND TROCKENSAUGER
Originalbetriebsanleitung
WET & DRY VACUUM CLEANER
Translation of original operation manual
NAT- EN DROOGZUIGER
Vertaling van de originele gebruiksaanwijzing
IAN 74286
74286_par_Nass_Trockensauger_cover_LB1_DE_NL.indd 2 08.05.12 15:46
Page is loading ...
Page is loading ...
Page is loading ...
Page is loading ...
Page is loading ...
Page is loading ...
Page is loading ...
Page is loading ...
Page is loading ...
Page is loading ...
Page is loading ...
Page is loading ...
Page is loading ...
Page is loading ...
Page is loading ...
Page is loading ...
Page is loading ...
Page is loading ...
Page is loading ...
Page is loading ...
Page is loading ...
Page is loading ...

24
GB
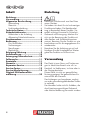
Contents
Introduction ...............................24
Application ................................24
General description ....................25
Delivery Contents ............................ 25
Overview ....................................... 25
Description of operation ................... 25
Technical data ............................26
Safety information .....................26
Symbols used in the instructions ........ 26
General notes on safety .................. 26
Assembly ................................ 27
Operation .................................. 28
Switching on/off ............................. 28
Dry vacuuming ............................... 28
Wet vacuuming .............................. 28
Blow Function ................................. 29
Cleaning/Maintenance ...............29
Storage ...................................... 29
Disposal/Environmental
protection ..................................29
Trouble shooting ........................30
Replacement parts ..................... 30
Guarantee .................................31
Repair Service ............................ 32
Service-Center ............................ 32
Service Branch ........................... 32
Translation of the original EC
declaration of conformity ...........33
Introduction
Congratulations on the purchase of your
new device. With it, you have chosen a
high quality product.
The operating instructions constitute part of
this product. They contain important infor-
mation on safety, use and disposal.
Before using the product, familiarise your-
self with all of the operating and safety
instructions. Use the product only as de-
scribedandfortheapplicationsspecied.
Keep this manual safely and in the event
that the product is passed on, hand over
all documents to the third party.
Application
The appliance is intended for domestic wet
and dry vacuuming in, for example, the
house, work room, car or garage.
This equipment is not suitable for commer-
cial use.
Commercial use will invalidate the guar-
antee.
Vacuumingofammableorexplosive
materials or those which endanger health
is prohibited. The manufacturer will not be
heldresponsibleforinjuriesresultingfrom
use which does not comply with the direc-
tions, or from incorrect use.

25
GB
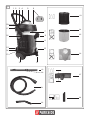
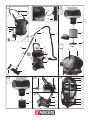
General description
The illustration of the principal
functioning parts can be found
on the front and back foldout
pages.
Delivery Contents
Unpack the equipment and check that it is
complete.
The equipment is supplied with the motor
head on (see
3).
To take off the motor head and remove the
accessories, release the locking lever (
16) and fold down the bow handle
tie bars (
2) towards the suction nozzle
(
8).
-
Motor housing
-
Stainless steel container
-
Bow handle
-
Cable holder
- Front steering castor
- 4 attachment ports with rear steering
castor
-
2 wheels with hubcaps
-
Telescopic suction pipe
- Suction hose
- Handle with air regulation
- Foamlter
- Flutedlter+ltercover(already
mounted)
- Paperlterbag
- Switchable household nozzle
- Crevice nozzle
- 10 cross-head screws
- 2 plastic washers
Dispose of the packaging material in a
proper manner.
Overview
Housing
1 Bow handle
2 Bow handle tie bars
3 Motor housing
4 Cable holder
5 Mains power cable
6 On/off switch
7 Vent holes
8 Suction connection
9 Stainless steel container
10 Drainage outlet
11 Front steering castor
12 2 wheels with hubcaps
13 Anti-static chain (not visible)
14 Rear steering castor
15 4 attachment ports for acces
-
sories
16 Locking lever
17 Blow connection
18 2 attachment ports
19 Telescopic suction pipe
Accessories
20 Vacuum tube holder
21 Suction hose
22 Handle with air regulation
Filter
23 Foamlterforwetvacuuming
24 F
ilter cover
25 Flutedlterfordryvacuuming
26 Paperlterbagfornedust
Nozzles
27 Switchable household nozzle
for vacuuming carpets
for vacuuming smooth surfaces
28 Crevice nozzle
Description of operation
Theequipmentisttedwithastable
stainless steel container to hold liquid
and dust. The wheels and swivel castors
give the equipment great mobility. For

26
GB
wetvacuuming,thesuctionairowis
switchedoffbyaoatwhenthestainless
steel container is full. The equipment also
has a blow function.
To prevent electrostatic charging during
vacuuming,ananti-staticchainistted
on the bottom of the equipment.
The following describes the function of
the operating parts.
Technical data
Rated power input (of the vacuum) ...1400 W
Rated voltage .............230-240V~, 50 Hz
Safety class ......................................
II
Protection category.......................... IP24
Suction force ............16 kPA, 2.2 m
3
/min
Cable length.................................... 4 m
Stainless steel container
capacity (brutto) .........................22.7 l
useful volume ................................15 l
Weight (incl. all accessories) ......... 7.7 kg
Technicalandvisualmodicationsmay
be carried out due to further development
without prior notice. All dimensions, infor-
mation and statements provided in these
OperatingInstructionsarethereforesubject
to amendment. Legal claims which are
based on the Operating Instructions can
therefore not be recognised.
Safety information
Symbols used in the
instructions
Hazard symbols with in-
formation on prevention of
personal injury and property
damage.
Precaution symbol with information
on prevention of harm / damage.
Notice symbol with information on
how to handle the device properly.
General notes on safety
Caution! When using electrical ma-
chines, observe the following basic
safety measures for the prevention
of electric shocks and the risk of
injuryandre:
To avoid accidents and injuries:
• Childrenshouldbesupervisedtoen-
sure that they do not play with the ap-
pliance.
• Childrenshouldonlybeallowedtouse
the appliance under supervision.
• Thisapplianceisnotintendedforuse
by persons (including children) with
reduced physical, sensory or mental
capabilities, or lack of experience and
knowledge, unless they have been giv-
en supervision or instruction concern-
ing use of the appliance by a person
responsible for their safety.
• Neverleaveamachinewhichisready
for operation unattended at the work-
place.
• Peopleandanimalsmustnotbevacu-
umed with the machine.
• Donotvacuumanyhot,incandescent,
ammable,explosivematerials,or
those which endanger health. This in-
cludes hot ashes, petrol, solvents, acids
orcausticsolutions.Personalinjury
could occur.
• Nozzlesandsuctiontubesmustnot
reach head level whilst in use. Personal
injurycouldoccur.
To avoid accidents and injuries
from electric shocks:
• Ensurethatthemainscableisnot
damaged by being pulled over sharp

27
GB
edges,byjamming,orbypullingon
the cable.
• Beforeeachuse,checkthepowersup-
ply lead and the extension cable for
damage and ageing. Do not use the
equipment if the cable is damaged or
worn. Danger of electric shock hazard.
• Ifthepowercableforthisequipmentis
damaged, it must be replaced by the
manufacturer, a customer service agent
ofthesameorasimilarlyqualiedper-
son in order to prevent hazards.
• Switchthemachineoffandpullthe
plug under the following circumstances:
- when you are not using the device,
- transporting it or leaving it unat-
tended;
- when you are checking the device,
cleaning it or removing blockages;
- when you are carrying out cleaning
or maintenance work or replacing
accessories;
- when the power or extension cable
is damaged; after contact with for-
eign bodies or in case of abnormal
vibration.
• Onlyusereplacementpartsandacces-
sories delivered and recommended by
our Service Centre (see page 32). The
use of parts by other manufacturers im-
mediately renders the guarantee void.
• Donotusethecabletopulltheplug
out of the socket. Protect the cable from
heat, oil, and sharp edges.
• Makesurethatthemainsvoltagecor-
responds with the information on the
rating plate.
• Onlyplugtheapplianceintoasocket
whichissafeguardedbyatleast16A.
• Thedevicemustonlybeconnectedto
a mains socket via a residual-current
circuit breaker (RCD) with a rated leak-
agecurrentofnotmorethan30mA.
The following states how damage
to the appliance and possible in-
jury to people can be avoided:
• Ensurethatthemachineiscorrectly
assembledandtheltersareinthecor-
rect position.
• Donotusewithoutthelter.Thiscould
damage the machine.
• Onlyhaverepairscarriedoutatour
authorised customer service points.
• Observetheinstructionsforcleaning
and maintenance of the machine.
• Storetheapplianceinadryplaceand
out of reach of children.
Assembly
Pull out the mains plug.
Danger of electric shock.
1. Plug the front steering castor (11) into
the slot on the front of the stainless
steel container (9). Fix the steering cas-
tor with 2 crosshead screws.
2. Plug the attachment ports (15) with the
rear steering castor (14) into the slot
on the rear of the stainless steel con-
tainer (9). Screw these in place with 2
crosshead screws.
3. Fit both wheels (12) and plastic wash-
ers(atsurfacetowardstheequip-
ment). Fix each wheel with 1 cross-
head screw. Fit the hubcaps.
4. Fit the bow handle (1) onto the two
bow handle tie bars (2) and screw it in
place with 2 crosshead screws.
5. Fold down the bow handle (1) towards
the suction nozzle (8). Place the mo-
tor head (3) on the stainless steel
container (9). Close the stainless steel
container by folding up the bow han-
dleandxingitwiththelockinglevers
(thetensioncanbeadjusted
withthelockingleveradjustingscrew).

28
GB
Several positions are possible for the
bow handle.
Never vacuum without a lter!
6. Fit the power cable holder (4) onto the
motor head (3) and screw it in place
with 2 crosshead screws.
7. Fit the accessories:
- Connect the suction hose (21).
- Fit the handle (22)
- Fit the telescopic suction pipe (19).
(Press the knob on the telescopic
suction pipe in the
direction and
separate to the desired length).
- Fit the desired nozzle (27/28).
To store the suction set during breaks,
push together the telescopic suc-
tion hose and plug the suction pipe
holder into the socket on the motor
housing (see picture
below).
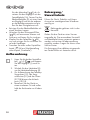
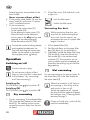
Operation
Switching on/off
Connect the mains plug.
Donotvacuumwithoutalter!
(Howtoinsertthelterisdescribed
in the chapters “dry vacuuming“
and “wet vacuuming“).
Switching On:
On/Off Switch (see
6) In position “I“
Switching Off:
On/Off Switch (see
6) In position “0”
Dry vacuuming
1. Fordryvacuuming,tthepleatedlter
(25)ontothelterbasketonthemotor
head (3). The sealing lip that curves
upward must point away from the mo-
tor head.
2. Fittheltercover(24)andlockitwith
a light turn:
Locktheltercover
Unlocktheltercover
Vacuuming ne dust:
Whilevacuumingnedust,you
maynddirtaccumulatingfaster
than usual. For this reason, we
recommendtheuseofapaperlter
bagfornedust.
1. Fitthepleatedlter(25).
2. Foldthesideapsonthepaperlter
bag (26) down on the perforation.
3. Completelyunfoldthepaperlterbag
(26) and pull it over the internal suc-
tion nozzle (8) in the stainless steel
container (9). The connector on the
suction nozzle must be completely en-
closedbythesealingringonthelter
bag opening.
Wet vacuuming
Forwetvacuumingortovacuumwater,t
thefoamlter(23)tothelterbasketon
the motor head (3).
When the container is full, the suc-
tionopeningisshutoffbyaoat,
and suction is then cut off.
Switch the appliance off, remove
the plug from the socket and empty
the container (see “Cleaning/Main-
tenance/Storage”).
If foam or liquid exits, switch off the
machine immediately.

29
GB
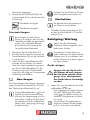
Blow Function
Operationwithouttheuseofalter
is recommended.
• Connectthesuctionhose(21)tothe
connecting blower (17) on the motor
head (3).
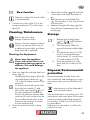
Cleaning/Maintenance
Pull out the mains plug.
Danger of electric shock.
Always check the appliance before
use for any obvious faults such as
a defective mains cable, and have
these repaired or replaced.
Cleaning the Equipment:
Never hose the appliance
down with water. Never use
aggressive cleaning agents or
solvents. This could damage
the appliance.
• Afteruse,emptythe
stainless steel con-
tainer
( 9):
- Opening the drain plug to allow the
vacuumed liquid to drain out (
10). A liquid residue remains in the
container.
To remove all residual liquids, fold
down the bow handle (1) and
take off the motor head (
3):x
the bow handle with the locking
levers (16), hold the stainless steel
container (9) with one hand on the
bow handle and the other on the
bottom of the container and pour
out the residual liquid.
• Cleanthewastetankwithadamp
cloth.
• Washthefoamlter(
23) with luke-
warm water and soap, and allow to
dry.
• Beatthedustoutoftheutedlter
(
25) and clean it with a paint brush
or hand brush.
• Replacethepaperlterbag(
26)
when full (see “replacement parts” for
reordering)
Storage
1. Release both locking levers
(
16) and fold down
the bow handle (1).
2. Wind the power cable (5)
around the power cable holder
(4).
3. The attachment ports (15/18)
serve to store the telescopic
suction hose (19), suction hose
(21) and nozzles (27/28).
4. Store the appliance in a dry
place and out of reach of chil-
dren.
Disposal/Environmental
protection
Be environmentally friendly. Return the
tool, accessories and packaging to a recy-
clingcentrewhenyouhavenishedwith
them.
Machines must not be disposed of
with household refuse.
Take the machine to a recycling point. The
waste plastic and metal parts can be sepa-
rated, accurately graded and passed on
for recycling. Contact our Service Centre
for more details.
Defective units returned to us will be dis-
posed of for free.

30
GB
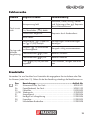
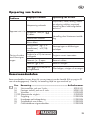
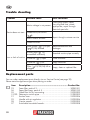
Trouble shooting
Problem Possible cause Fault correction
Device does not start
Mains voltage is not present
Check plug socket, cable,
line, plug and fuse, where
appropriate, repair through
electrical specialist
Defective on/off switch
(
6)
Repair through customer service
Worn carbon brushes
Defective motor
Low or lack of suction
Hose system (
21) orjets
(
27/28) blocked
Remove obstructions and
blockages
Suction pipe (
19)
assembled incorrectly
Assemble suction pipe correctly
Container (
9) open Close container
Container (
9) full Empty container
Filter (
23/25/26) full or
clogged
Empty,cleanorreplacelter
Replacement parts
YoucanorderreplacementpartsdirectlyviaourServiceCentre(seepage32).
Please state the appliance type when placing an order.
Item Description ........................................................ Product No.
23 Foamlter,packof3 ........................................................ 30250101
26 Paperlterbags,packof5 ............................................... 30250133
25 Flutedlterfordryvacuuming ............................................ 91099009
19/20
Telescopic suction pipe
.................................................... 91099003
21 Suction hose ....................................................................91099004
22 Handle with air regulation ................................................. 91099006
28 Crevice nozzle ................................................................. 91099005
27 Switchable household nozzle.............................................91099008

31
GB
Guarantee
Dear Customer,
This equipment is provided with a 3-year
guarantee from the date of purchase.
In case of defects, you have statutory rights
against the seller of the product. These
statutory rights are not restricted by our
guarantee presented below.
Terms of Guarantee
The term of the guarantee begins on the
date of purchase. Please retain the original
receipt. This document is required as proof
of purchase.
If a material or manufacturing defect
occurs within three years of the date of
purchase of this product, we will repair or
replace – at our choice – the product for
you free of charge. This guarantee requires
the defective equipment and proof of pur-
chase to be presented within the three-year
period with a brief written description of
what constitutes the defect and when it oc-
curred.
If the defect is covered by our guarantee,
you will receive either the repaired product
or a new product. No new guarantee pe-
riod begins on repair or replacement of the
product.
Guarantee Period and Statutory
Claims for Defects
The guarantee period is not extended by
the guarantee service. This also applies for
replaced or repaired parts. Any damages
and defects already present at the time of
purchase must be reported immediately af-
ter unpacking. Repairs arising after expiry
of the guarantee period are chargeable.
Guarantee Cover
The equipment has been carefully pro-
duced in accordance with strict quality
guidelines and conscientiously checked
prior to delivery.
The guarantee applies for all material and
manufacturing defects. This guarantee
does not extend to cover product parts that
aresubjecttonormalwearandmaythere-
fore be considered as wearing parts (e.g.
ltersorattachments)ortocoverdamage
to breakable parts (e.g. switches, batteries,
or parts made of glass).
This guarantee shall be invalid if the prod-
uct has been damaged, used incorrectly or
not maintained. Precise adherence to all of
theinstructionsspeciedintheoperating
manual is required for proper use of the
product. Intended uses and actions against
which the operating manual advises or
warns must be categorically avoided.
The product is designed only for private
and not commercial use. The guarantee
will be invalidated in case of misuse or
improper handling, use of force, or inter-
ventions not undertaken by our authorised
service branch.
Processing in Case of Guarantee
To ensure quick handling of you issue,
please follow the following directions:
• Pleasehavethereceiptanditemnum-
ber (e.g. IAN 12345) ready as proof
of purchase for all enquiries.
• Pleasendtheitemnumberonthe
rating plate, an engraved plate on the
front page of your manual (bottom left)
or as a sticker on the back or bottom.
• Shouldfunctionalerrorsorotherde-
fects occur, please initially contact the
servicedepartmentspeciedbelowby
telephone or by e-mail. You will then
receive further information on the pro-
cessing of your complaint.

32
GB
• Afterconsultationwithourcustomer
service, a product recorded as defec-
tive can be sent postage paid to the
service address communicated to you,
with the proof of purchase (receipt)
andspecicationofwhatconstitutes
the defect and when it occurred. In or-
der to avoid acceptance problems and
additional costs, please be sure to use
only the address communicated to you.
Ensure that the consignment is not sent
carriage forward or by bulky goods,
express or other special freight. Please
send the equipment inc. all accessories
supplied at the time of purchase and
ensure adequate, safe transport pack-
aging.
Repair Service
For a charge, repairs not covered by the
guarantee can be carried out by our ser-
vice branch, which will be happy to issue
a cost estimate for you.
We can handle only equipment that has
been sent with adequate packaging and
postage.
Attention: Please send your equipment to
our service branch in clean condition and
with an indication of the defect.
Equipment sent carriage forward or by
bulky goods, express or other special
freight will not be accepted.
We will dispose of your defective devices
free of charge when you send them to us.
Service-Center
Service Great Britain
Tel.: 0871 5000 720
(£ 0.10/Min.)
E-Mail: [email protected]
IAN 74286
Service Branch
Please note that the following address is
not a service address. Please initially con-
tacttheservicecentrespeciedabove.
DES UK Ltd.
Unit B7
Oxford Street Industrial Park
Vulcan Road
Bilston, West Midlands WV14 7LF

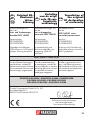
33
Original EG-
Konformi-
tätser-
klärung
Vertaling
van de origi-
nele CE-con-
formiteits-
verklaringg
Translation of
the original
EC declaration
of conformity
Hiermit bestätigen wir,
dass der
Nass- und Trockensauger
Baureihe PNTS 1400 B1
Seriennummer
201206000501-
201206047609
Hiermedebevestigenwij
dat de
nat- en droogzuiger
bouwserie PNTS 1400 B1
Serienummer
201206000501-
201206047609
Weherebyconrm
that the
PNTS 1400 B1 series
wet and dry vacuum cleaner
Serial no.
201206000501-
201206047609
folgenden einschlägigen
EU-Richtlinieninihrerjeweils
gültigen Fassung entspricht:
is overeenkomstig met
de hierna volgende, van
toepassingzndeEU-
richtlnen:
conforms with the following
applicable relevant version of
the EU guidelines:
2004/108/EC • 2006/95/EC
Um die Übereinstimmung zu
gewährleisten, wurden fol-
gende harmonisierte Normen
sowie nationale Normen und
Bestimmungen angewendet:
Om de overeenstemming
te waarborgen, werden de
hierna volgende, in overeen-
stemming gebrachte normen
en nationale normen en
bepalingen toegepast:
In order to guarantee consis-
tency, the following harmoni-
sed standards as well as natio-
nal standards and stipulations
have been applied:
EN 60335-1/A14:2010 • EN 60335-2-2:2006 • EN 62233:2008
EN 55014-1/A1:2009 • EN 55014-2/A2:2008
EN 61000-3-2/A2:2009 • EN 61000-3-3:2008
Grizzly Gartengeräte GmbH & Co. KG
Am Gewerbepark 2
64823 Groß-Umstadt 28.8.2012
DE
AT NL GB
CH
Oliver Christ
(Dokumentationsbevollmächtigter,
documentatiegelastigde,
Documentation Representative)
2012-06-20_rev02_gs
Page is loading ...
Page is loading ...

GRIZZLY GARTENGERÄTE GMBH & CO. KG
Am Gewerbepark 2
D-64823 Groß-Umstadt
Stand der Informationen · Stand van de informatie
Last Information Update: 05 / 2012
Ident.-No.: 72080336052012-DE / NL
IAN 74286
74286_par_Nass_Trockensauger_cover_LB1_DE_NL.indd 1 08.05.12 15:46
-
 1
1
-
 2
2
-
 3
3
-
 4
4
-
 5
5
-
 6
6
-
 7
7
-
 8
8
-
 9
9
-
 10
10
-
 11
11
-
 12
12
-
 13
13
-
 14
14
-
 15
15
-
 16
16
-
 17
17
-
 18
18
-
 19
19
-
 20
20
-
 21
21
-
 22
22
-
 23
23
-
 24
24
-
 25
25
-
 26
26
-
 27
27
-
 28
28
-
 29
29
-
 30
30
-
 31
31
-
 32
32
-
 33
33
-
 34
34
-
 35
35
-
 36
36


Parkside PNTS 1400 B1 Owner's manual
- Type
- Owner's manual
- This manual is also suitable for
Ask a question and I''ll find the answer in the document
Finding information in a document is now easier with AI
in other languages
- Deutsch: Parkside PNTS 1400 B1 Bedienungsanleitung
- Nederlands: Parkside PNTS 1400 B1 de handleiding
Related papers
-
Parkside PNTS 1300 Operation and Safety Notes
-
Parkside PNTS 1400 F2 Translation Of The Original Instructions
-
Parkside PNTS 1400 B1 Original Operation Manual
-
-
Parkside PNTS 1300 A1 User manual
-
-
Parkside PNTS 1400 A1 Operating instructions
-
Parkside PNTS 1400 E2 Original Instructions Manual
-
Parkside PAS 1200 C2 Translation Of The Original Instructions
-
Other documents
-
CIATRONIC BS 1292 User manual
-
EINHELL Expert TE-VC 1820 Operating instructions
-
BOMANN BS 9000 CB Owner's manual
-
Clatronic BS 1285 Wet and dry Owner's manual
-
Clatronic BS 1235 Owner's manual
-
 AquaVac EXCELL 20S User manual
-
EINHELL GC-DP 1020 N Product Sheet
-
Kärcher wd 3200 Owner's manual
-
ProfiCare PC-BS 3041 User manual
-
