Page is loading ...
Page is loading ...
Page is loading ...
Page is loading ...
Page is loading ...
Page is loading ...
Page is loading ...
Page is loading ...
Page is loading ...
Page is loading ...
Page is loading ...
Page is loading ...

13
Deutsch (Übersetzung der originalen Anleitungen)
DE
FR EN ES IT PT NL SV DA NO FI HU CS RU RO PL SL HR ET LT LV SK BG
13
English (Original instructions)
EN
FR DE ES IT PT NL SV DA NO FI HU CS RU RO PL SL HR ET LT LV SK BG
Your product has been engineered and manufactured to
Ryobi’s high standard for dependability, ease of operation,
and operator safety. When properly cared for, it will give
you years of rugged, trouble-free performance.
Thank you for buying a Ryobi product.
Save this manual for future reference
INTENDED USE
This product is intended for domestic lawn mowing. The
cutting blade should rotate approximately parallel to the
ground over which it is being wheeled. All four wheels
should touch the ground while mowing. It is a pedestrian
controlled walk behind mower.
NOTE: The mower should never be operated with the
wheels off the ground, it should not be pulled or ridden on.
It should not be used to cut anything other than domestic
grass lawns.
GENERAL SAFETY RULES
WARNING
To reduce the risk of injury, the user must read and
understand the operator's manual.
WARNING
Do not attempt to operate this mower until you have read
thoroughly and understood completely all instructions,
safety rules, etc. contained in this manual. Failure to
comply may result in accidents involving electric shock,
fi re, and/or serious personal injury.
WARNING
The machine should be operated with the battery pack.
When using battery operated machine basic safety
precaution should always be followed to reduce the risk
of fi re, leaking batteries and personal injury.
PERSONAL SAFETY
■ This lawn mower is capable of amputating hands and
feet, and throwing objects. Failure to observe all safety
instructions could result in serious injury or death.
■ Never allow children or people unfamiliar with the
instructions to use the machine. Local regulations may
restrict the age of the operator.
■ Stay alert, watch what you are doing, and use common
sense when operating the lawn mower. Do not operate
the mower while tired or under the influence of drugs,
alcohol, or medication. A lapse in concentration while
operating the machine may result in serious personal
injury.
■ Wear heavy, long trousers, long sleeves, boots,
and gloves. Do not wear loose fitting clothing, short
trousers, sandals, or go barefoot.
■ Always wear safety glasses with side shields. Use
face mask if operation is dusty.
■ Always be sure of your footing. Keep firm footing and
balance. Do not overreach. Overreaching can result in
loss of balance.
■ Walk, never run.
■ Mow across the face of slopes, never up and down.
Exercise extreme caution when changing direction on
slopes.
■ Do not mow near drop-offs, ditches, excessively steep
slopes, or embankments. Poor footing could cause a
slip and fall accident.
■ Plan your mowing pattern to avoid discharge of
material toward roads, public pavements, bystanders
and the like. Also, avoid discharging material against
a wall or obstruction, which may cause the material to
ricochet back toward the operator.
WORK AREA SAFETY
■ Never mow while people, especially children, or pets
are nearby.
■ Always mow in the daylight or in good artificial light.
■ Do not operate the machine in explosive atmospheres,
such as in the presence of flammable liquids, gases
or dust. The tool create sparks which may ignite the
dust or fumes.
■ Objects struck by the lawn mower blade can cause
severe injuries to persons. Thoroughly inspect the
area where the machine is to be used and remove all
rocks, sticks, metal, wire, bones, toys, or other foreign
objects.
■ Do not operate the machine in wet grass or in the rain.
■ Keep in mind that the operator or user is responsible
for accidents or hazards occurring to other people or
their property.
■ Tragic accidents can occur if the operator is not alert to
the presence of children. Children are often attracted
to the machine and the mowing activity. Never assume
that children will remain where you last saw them.
■ Keep children out of the mowing area and under the
watchful care of a responsible adult other than the
operator.
■ Be alert and turn mower off if a child enters the area.
■ Never allow children or people unfamiliar with the
instructions to use the machine.
■ Use extra care when approaching blind comers,
shrubs, trees, or other objects that may block your

14
Deutsch (Übersetzung der originalen Anleitungen)
DE
FR EN ES IT PT NL SV DA NO FI HU CS RU RO PL SL HR ET LT LV SK BG
14
English (Original instructions)
EN
FR DE ES IT PT NL SV DA NO FI HU CS RU RO PL SL HR ET LT LV SK BG
view.
■ Keep work area clean.
■ Keep work area well lit.
■ Cluttered or dark areas invite accidents.
GARDEN TOOLS USE AND CARE
■ Before using, always visually inspect to ensure blades,
blade bolts, and cutter assembly are not worn or
damaged.
■ Replace worn or damaged blades and bolts in sets to
preserve balance.
■ Check all nuts, bolts, and screws at frequent intervals
for proper tightness to be sure the equipment is in safe
working condition.
■ Check the grassbox frequently for wear or
deterioration.
■ Replace worn or damaged parts.
■ Do not force the machine. It will do the job better and
safer at the speed for which it was designed.
■ Do not overload your mower. Mowing long thick grass
may cause the motor speed to drop, or the power to
cut out. When mowing in long thick grass a first cut
with the cutting height set higher will help reduce the
load. See adjusting the blade height.
■ Please note that cutting long grass will drain the
battery quicker than cutting shorter grass.
■ Stop the blade when crossing gravel surfaces.
■ Do not pull the mower backward unless absolutely
necessary. If you must back the machine away from a
wall or obstruction, first look down and behind to avoid
tripping or pulling the machine over your feet.
■ Stop the blade(s) if the machine has to be tilted for
transportation when crossing surfaces other than
grass, and when transporting the machine to and from
the area to be mowed.
■ Never operate the machine with defective guards
or shields, or without safety devices, for example,
deflectors and/or grassboxes, in place.
■ Switch on the motor according to instructions and
keep hands and feet away from cutting area. Keep
clear of the discharge opening at all times.
■ Never pick up or carry a lawnmower while the engine
is running.
■ Remove isolator key for the below cases:
● whenever you leave the machine
● before cleaning a blockage
● before checking, cleaning or working on the
machine
● after striking a foreign object; inspect the appliance
for damage and make repairs as necessary
● before clearing the grassbox
● if the machine starts to vibrate abnormally (check
immediately)
● when not in use and storing the machine
● when recharging and removing/inserting battery
pack
■ Avoid holes, ruts, bumps, rocks, property stakes, or
other hidden objects. Uneven terrain could cause a
slip and fall accident.
■ If the machine should start to vibrate abnormally,
stop the motor and check immediately for the cause.
Replace the blade if it is unevenly worn or damaged in
any way. Vibration is generally a warning of trouble.
■ If the machine strikes a foreign object, follow these
steps:
● Stop the machine by releasing the power lever,
wait until the blade comes to a complete stop, and
then remove isolator key.
● Thoroughly inspect the machine for any damage.
● Replace the blade if it is damaged in any way.
Repair any damage before restarting and
continuing to operate the mower.
● Use the right appliance. Do not use the machine
for any job except that for which it is intended.
■ When not in use, mower should be stored in a well-
ventilated, dry, locked up place-out of the reach of
children. The isolator key should also be removed.
■ Follow manufacturer's instructions for proper operation
and installation of accessories. Only use accessories
approved by the manufacturer.
SERVICE
■ Service on the product must be performed by qualified
repair personnel only. Service or maintenance
performed by unqualified personnel could result in a
risk of injury to the user, or damage to the machine.
■ Use only identical replacement parts when servicing
the product. Use of unauthorised parts may create
a risk of serious injury to the user, or damage to the
product.
NOTE: Only perform the tasks listed in this manual. For
other service or repair, it should be done by a qualifi ed
person.
BATTERY RULES FOR SAFETY
■ Battery operated units do not have to be plugged
into an electrical outlet; therefore, they are always in
operating condition. Be aware of possible hazards
even when unit is not operating.
■ Remove the battery pack before making any
adjustments, cleaning, or removing material from the
unit.
■ Ensure the isolator key is removed before inserting

15
Deutsch (Übersetzung der originalen Anleitungen)
DE
FR EN ES IT PT NL SV DA NO FI HU CS RU RO PL SL HR ET LT LV SK BG
15
English (Original instructions)
EN
FR DE ES IT PT NL SV DA NO FI HU CS RU RO PL SL HR ET LT LV SK BG
battery pack.
■ A battery pack must be recharged only with the charger
specified by the manufacturer. Using a charger with
an incompatible battery pack may create a risk of fire.
Use battery pack only with charger listed.
■ Use only battery pack intended specifically for the
machine. Use of any other battery packs may result in
a risk of fire, electric shock, or injury to persons.
■ When battery pack is not in use, keep it away from
other metal objects like, paper clips, coins, keys, nails,
screws, or other small metal objects, that can make
a connection from one terminal to another. Shorting
the battery pack terminals together may cause sparks,
burns, or a fire.
■ Do not place battery products or their batteries near
fire or heat. This will reduce the risk of explosion and
possibly injury.
■ Do not open or mutilate the battery pack. Released
electrolyte is corrosive and may cause damage to the
eyes or skin. It may be toxic if swallowed.
■ Do not short-circuit the battery pack. There is danger
of explosion.
■ Protect the battery pack against moisture and water.
Do not charge unit in a damp or wet location. Following
this rule will reduce the risk of electric shock.
■ If electrolyte contacts the skin, wash it off immediately
with water.
■ If electrolyte contacts the eyes, flush thoroughly and
immediately with water. Seek medical attention.
■ In case of damage and improper use of the battery,
vapour may be emitted. Provide for fresh air and seek
medical help in case of complaints. The vapour can
irritate the respiratory system.
■ Do not leave the battery pack in the car in the summer.
■ Do not incinerate the battery.
SAFETY RULES FOR CHARGER
■ Use of an attachment not recommended by the
manufacturer may result in a risk of fire, electric shock,
or injury to persons. Following this rule will reduce the
risk of electric shock, fire, or serious personal injury.
■ Do not clean machine with isolator key or charger
installed.
■ Do not use the charger when the ambient temperature
is above 40ºC or below 0ºC.
■ Do not operate charger with a damaged cable or plug,
which could cause shorting and electric shock. Return
to authorised service centre for repair or replacement.
■ Do not operate charger if it has received a sharp blow,
been dropped, or otherwise damaged in any way.
Take it to an authorised service center for electrical
check to determine if the charger is in good working
order.
■ Do not disassemble charger, take it to an authorised
service station if repair is required. Incorrect
reassemble may result in a risk of electric shock or fire.
■ Unplug charger from outlet before attempting any
cleaning to reduce the risk of electric shock.
■ Disconnect charger from the power supply when not in
use to prevent damage to the charger during a power
surge.
■ Do not expose machine to rain or wet conditions.
Water entering charger will increase the risk of electric
shock.
■ Make sure cable is located so that it will not be stepped
on, tripped over, come in contact with sharp edges or
moving parts or otherwise subjected to damage or
stress. This will reduce the risk of accidental wash,
which could cause injury, and damage to the cable,
which could result in electric shock.
■ Keep cable and charger away from heat to prevent
damage to housing or internal parts.
■ Do not let gasoline/petrol, oils, petroleum-based
products, etc. come in contact with plastic parts.
They contain chemicals that can damage, weaken or
destroy plastic.
■ An extension cable should not be used for the
charger unless absolutely necessary. Use of improper
extension cable could result in a risk of fire and electric
shock. If extension cable must be used, make sure:
● That pins on plug of extension cable are the
same number, size and shape as those of plug on
charger.
● That extension cable is properly wired and in good
electrical condition.
WARNING
If any parts are missing, do not operate unit until the
missing parts are replaced. Failure to do so could result
in possible serious personal injury.
Save these instructions. Refer to them frequently and use
them to instruct others who may use this product. If you
lend someone this unit, lend them these instructions also.
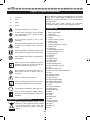
SYMBOL
Some of the following symbols may be used on this
product. Please study them and learn their meaning.
Proper interpretation of these symbols will allow you to
operate the product better and safer.
V Volts

16
Deutsch (Übersetzung der originalen Anleitungen)
DE
FR EN ES IT PT NL SV DA NO FI HU CS RU RO PL SL HR ET LT LV SK BG
16
English (Original instructions)
EN
FR DE ES IT PT NL SV DA NO FI HU CS RU RO PL SL HR ET LT LV SK BG
A Amperes
Hz Hertz
W Watts
Hrs Hours
Precautions that involve your safety.
To reduce the risk of injury, user must read
and understand user’s manual before
using this product.
Do not expose machine to rain or wet
conditions.
Pay attention that bystanders are not injured
through foreign objects thrown from the
mower.
Keep all bystanders (especially children and
pets) at least 15 m away from the work area.
Keep hands and feet away from blade and
cutting area.
Switch off and remove isolator key before
adjusting, cleaning and before leaving the
product unattended for any period.
Do not operate on inclines greater than 15˚
Mow across the face of slopes, never up
and down.
Beware of electric shock hazard.
Wait for all components of machine to have
completely stopped before touching them.
The charger is intended for indoor use only.
Tool in which protection against electric
shock rely on double insulation or reinforced
insulation.
ENVIRONMENTAL PROTECTION
Waste electrical products should not be
disposed of with household waste. Please
recycle where facilities exist. Check with
your local authority or retailer for recycling
advice.
Do not dispose of battery packs/batteries into household
waste, fi re or water. Battery packs/batteries should be
collected, recycled or disposed of in an environmental-
friendly manner.
Consult your local waste authority for information
regarding available recycling and/or disposal options.
DESCRIPTION
1. Motor control cable
2. Start button
3. Power lever (grey)
4. Handle
5. Self propel lever (green)
6. Battery meter
7. Key cover/slot
8. Side discharge door opening
9. Battery pack
10. Isolator key
11. Side discharge defl ector
12. Height adjustment lever
13. Mulching plug
14. Grassbox
15. Charger
16. Upper handle
17. Lower handle
18. Hand knobs
19. Rear discharge door
20. Rear discharge opening
21. Pins
22. Side discharge door
23. Hooks of side discharge defl ector
24. Slots
25. Grassbox handle
26. Grassbox hooks
27. Rear door rod
28. Highest blade setting
29. Lowest blade setting
30. Charge receptacle 2
31. LED
32. Charge receptacle 1
33. Motor shroud
34. Resettable fuse
35. Blade
36. Wrench
37. Wood
38. Blade posts
39. Shaft
40. Fan assembly
41. Blade insulator
42. Spacer
43. Blade nut
44. Nut

17
Deutsch (Übersetzung der originalen Anleitungen)
DE
FR EN ES IT PT NL SV DA NO FI HU CS RU RO PL SL HR ET LT LV SK BG
17
English (Original instructions)
EN
FR DE ES IT PT NL SV DA NO FI HU CS RU RO PL SL HR ET LT LV SK BG
HEIGHT ADJUSTMENT LEVER
The height adjustment lever provides cutting height
adjustments.
MOTOR CONTROL CABLE
The motor control cable, located on the upper handle of
the mower, engages and disengages the motor and blade.
ISOLATOR KEY
The isolator key must be inserted before the mower can
be started.
MULCHING PLUG
Your mower is equipped with a mulching plug that covers
the rear discharge opening, which allows the mower blade
to cut and recut for fi ner clippings.
SELF-PROPELLED FEATURE
Pulling the self propel lever (green) upward to meet the
handle turns on the self-propelled feature of your mower.
SIDE DISCHARGE DEFLECTOR
Use the side discharge defl ector on your mower when
the grass is too high to mulch or when side discharging
is preferred. The grass clippings produced when using
the side discharge defl ector are noticeably larger than
those produced when using the mulching plug and side
mulching plate.
SIDE DISCHARGE DOOR
Your mower is equipped with a door that covers the side
discharge opening, which allows the mower blade to cut
and recut the grass for fi ner clippings if the mulching plug
is engaged, or otherwise sends the grass clippings to the
collection bag.
ASSEMBLY
UNPACKING
This product requires assembly.
■ Carefully remove the product and any accessories
from the box. Make sure that all items listed in the
packing list are included.
WARNING
Do not use this product if any parts on the packing list are
already assembled to your product when you unpack it.
Parts on this list are not assembled to the product by
the manufacturer and require customer installation. Use
of a product that may have been improperly assembled
could result in serious personal injury.
■ Inspect the product carefully to make sure no breakage
or damage occurred during shipping.
45. Rear wheels
46. Dust cover
47. E-ring
48. Washer
49. Pins
50. Wheel gear
51. Front wheels
52. Wheel axle
SPECIFICATIONS
Lawn mower RLM4852L
Width of cut 50.2 cm
Height of cut 19 mm - 76 mm
No-load speed 3000 rpm
Self-propelled speed 0.8~1.0 m/s
Grassbox capacity 55 L
Mower weight 43.1±2 kg
Serial number See product rating label
Battery Lead-acid
Battery number 31108469
Rated voltage 48 V
Charging time 8-10 Hours
Weight 14.6 ± 0.7 kg
Battery charger QL-91435A-4801300F
Input 220-240 V, 50-60 Hz, AC only
Output 48 V DC, 1.3 A
Allowable charging
temperature range
0-40 ˚C
KNOW YOUR LAWN MOWER
See fi gure 1.
The safe use of the product requires an understanding of
the information on the tool and in this operator’s manual
as well as a knowledge of the project you are attempting.
Before use of this product, familiarize yourself with all
operating features and safety rules.
BATTERY METER
The battery meter measures the amount of charge
remaining in the battery.
GRASSBOX
The grassbox collects grass clippings and prevents them
from being discharged across your lawn as you mow.

18
Deutsch (Übersetzung der originalen Anleitungen)
DE
FR EN ES IT PT NL SV DA NO FI HU CS RU RO PL SL HR ET LT LV SK BG
18
English (Original instructions)
EN
FR DE ES IT PT NL SV DA NO FI HU CS RU RO PL SL HR ET LT LV SK BG
■ Do not discard the packing material until you have
carefully inspected and satisfactorily operated the
product.
■ If any parts are damaged or missing, please call your
Ryobi service centre for assistance.
PACKING LIST
■ Lawn mower
■ Isolator key
■ Grassbox
■ Charger
■ Mulching plug
■ Side discharge deflector
■ Operator’s manual
WARNING
If any parts are damaged or missing do not operate this
product until the parts are replaced. Using a product
with damaged or missing parts could result in serious
personal injury.
WARNING
Do not attempt to modify this product or create
accessories not recommended for use with this product.
Any such alteration or modifi cation is misuse and could
result in a hazardous condition leading to possible
serious personal injury.
WARNING
Do not insert isolator key until assembly is complete and
you are ready to mow. Failure to comply could result in
accidental starting and possible serious personal injury.
WARNING
To prevent accidental starting that could cause serious
personal injury, always remove the battery pack from
the product when assembling parts.
WARNING
Never operate the mower without the proper safety
devices in place and working. Never operate the mower
with damaged safety devices. Operation of this product
with damaged or missing parts could result in serious
personal injury.
UNFOLDING AND ADJUSTING HANDLE
See fi gure 2.
1. Fully loosen the handle knobs on both sides of the
handle by rotating counterclockwise.
2. Pull up and back on the upper handle to raise the
handle into operating position. Make certain the
handles snap into place securely.
3. Tighten the handle knobs on both sides of the handle
to secure by rotating clockwise.
Avoid pinching or trapping any cables.
INSTALLING THE MULCHING PLUG (FOR MULCHING
OPERATION)
See fi gure 3.
NOTE: When using the mulching plug, do not install either
the side discharge defl ector or the grassbox.
1. Lift and hold up the rear discharge door.
2. Grasp the mulching plug by its handle and insert it at a
slight angle, as shown.
3. Push the mulching plug securely into place.
4. Ensure side discharge door is down.
5. Lower the rear discharge door.
INSTALLING SIDE DISCHARGE DEFLECTOR (FOR
SIDE DISCHARGE OPERATION)
See fi gure 4.
NOTE: When using the side discharge defl ector, do not
install the grassbox. The mulching plug should remain
installed.
1. Lift the side discharge door.
2. Align the hooks on the defl ector with the hinge rod on
the underside of the door.
3. Lower the defl ector until the hooks are secured on the
mulch door hinge rod.
4. Release the defl ector and side discharge door.
INSTALLING THE GRASSBOX (FOR REAR BAGGING
OPERATION)
See fi gure 5.
NOTE: When using the grassbox, do not install either
the side discharge defl ector or the mulching plug. Also,
ensure side discharge door is closed securely.
1. Lift the rear discharge door.
2. Lift the grassbox by its handle and place under the
rear door, so that the hooks on the grassbox frame are
seated into the slots in the handle bracket.
3. Release the rear door. When installed correctly, the
hooks on the grassbox will rest securely in the slots on
the handle brackets.
SETTING BLADE HEIGHT
See fi gure 6.
When shipped, the wheels on the mower are set to a low-

19
Deutsch (Übersetzung der originalen Anleitungen)
DE
FR EN ES IT PT NL SV DA NO FI HU CS RU RO PL SL HR ET LT LV SK BG
19
English (Original instructions)
EN
FR DE ES IT PT NL SV DA NO FI HU CS RU RO PL SL HR ET LT LV SK BG
If your LED lights illuminate, the battery is 100% charged
and ready for use. Three lights indicate a 50-80% charge.
Two lights indicate a 30-50% charge.
If one light illuminates, the battery will soon require
charging. It is recommended that the battery be charged
at this point. The battery is at 5-30% charge when one
light illuminates.
If no light illuminates, the battery must be charged
immediately before use. There is less than 5% of battery
charge remaining if none of the lights are on.
NOTE: When none of the lights are on, you must stop
the mower and charge the battery immediately, or it will
reduce the life of the battery.
CHARGING THE BATTERY PACK
See fi gure 7-8.
WARNING
Always remove the isolator key and store it in a separate
location out of the reach of children when the mower is
charging or not in use. Failure to remove the isolator
key may result in accidental starting or unauthorised
use and cause serious personal injury.
The lawn mower comes with a maintenance-free, spill-
free, sealed 48 volt battery pack.
■ The battery charger is only for use indoors, it must not
be used in wet or damp environments. Do not operate
the charger near petrol/gasoline or other explosive
gasses or vapours.
■ The battery should be charged in a cool, dry place. The
battery charger should be operated in temperatures
between 0 ºC and 40 ºC.
■ Charge the battery pack only with the charger
provided.
■ The battery pack may be charged while it is connected
to the mower, or while it is disconnected from the
mower.
■ Allow at least 8-10 hours of charge time before initial
use of the mower.
■ For optimal performance, recharge the battery every
2 months even when it is not in use and prior to each
usage.
■ The charger may remain connected to the battery
pack any time the mower is not in use.
■ To improve battery life, store battery indoors in a
controlled climate.
■ The battery does not have to be fully discharged
before recharging.
■ Two to three initial charging/discharging cycles may
be required to achieve maximum run time/capacity.
cutting position. Before using the mower for the fi rst time,
adjust the cutting position to the height best suited for your
lawn. The average lawn should be between 38 mm and 51
mm during cool months and between 51 mm and 70 mm
during hot months.
To adjust the blade height
■ Stop the mower, allow the blade to stop rotating and
remove the isolator key before making adjustment.
■ The mower can be set to 7 cutting heights between 19
mm and 73 mm.
■ Using the cut height between 19 and 36 mm will
shorten the battery duration.
■ To raise the blade height, grasp the height adjustment
lever and move it toward the back of the mower.
■ To lower the blade height, grasp the height adjustment
lever and move it toward the front of the mower.
OPERATION
WARNING
Do not allow familiarity with products to make you
careless. Remember that a careless fraction of a
second is suffi cient to infl ict serious injury.
WARNING
Always wear eye protection. Failure to do so could
result in objects being thrown into your eyes resulting
in possible serious injury.
WARNING
Do not use any attachments or accessories not
recommended by the manufacturer of this product. The
use of attachments or accessories not recommended
can result in serious personal injury.
WARNING
Always inspect mower for missing or damaged parts
and blade for damage, uneven, or excessive wear prior
to use. Using a product with damaged or missing parts
could result in serious personal injury.
BATTERY METER
See fi gure 7.
Since the mower battery is shipped in a low charge
condition, the battery must be charged before use. The
battery has four LED lights to indicate battery capacity.
These lights will illuminate when the button is pressed.

20
Deutsch (Übersetzung der originalen Anleitungen)
DE
FR EN ES IT PT NL SV DA NO FI HU CS RU RO PL SL HR ET LT LV SK BG
20
English (Original instructions)
EN
FR DE ES IT PT NL SV DA NO FI HU CS RU RO PL SL HR ET LT LV SK BG
thrown by the mower in any direction and cause
serious personal injury to the operator and others.
■ For a healthy lawn, always cut off one-third or less of
the total length of the grass.
■ Do not cut wet grass, it will stick to the underside of
the deck and prevent proper bagging or mulching of
grass clippings.
■ New or thick grass may require a higher cutting height.
■ Clean the underside of the mower deck after each use
to remove grass clippings, leaves, dirt, and any other
accumulated debris.
NOTE: Always stop mower, allow blades to completely
stop, and remove the isolator key before cleaning
underneath the mower.
SLOPE OPERATION
WARNING
Slopes are a major factor related to slip and fall
accidents that can result in severe injury. Operation on
slopes requires extra caution. If you feel uneasy on a
slope, do not mow it. For your safety, do not attempt to
mow slopes greater than 15 degrees.
■ Mow across the face of slopes, never up and down.
Exercise extreme caution when changing direction on
slopes.
■ Watch for holes, ruts, rocks, hidden objects, or bumps
which can cause you to slip or trip. Tall grass can hide
obstacles. Remove all objects such as rocks, tree
limbs, etc., which could be tripped over or thrown by
the blade.
■ Always be sure of your footing. A slip and fall can
cause serious personal injury. If you feel you are losing
your balance, release the power lever immediately.
■ Do not mow near drop-offs, ditches, or embankments;
you could lose your footing or balance.
EMPTYING THE GRASSBOX
See fi gure 12.
1. Stop mower, allow blades to completely stop, and
remove isolator key.
2. Lift the rear door.
3. Lift the grassbox by its handle to remove from mower.
4. Empty grass clippings.
5. Lift the rear door and reinstall the grassbox as
described earlier in this manual.
■ When fully charged, the battery can be safely stored in
environment of 25 ˚C for a period of up to two months,
before it requires charging.
To charge:
■ Make sure the power supply is normal household
voltage, 220-240 V, 50-60 Hz, AC only.
■ Remove the isolator key and store in separate location
out of reach of children.
■ Method 1: Remove the isolator key, then plug the
charger connector into the slot on the right vent when
the battery is on the mower. See figure 8.
■ Method 2: After parting the battery from the mower,
plug the charger connector into the receptacle on the
battery. See figure 7-18.
■ Insert the plug of the charger into the wall receptacle.
■ The red light on the charger should come on, indicating
you have power and the battery is being charged. The
red light should go off when charging is complete. A
fully discharged mower will charge in approximately
8-10 hours.
■ When charging is complete, disconnect the charger
from the battery, or the slot from the right vent.
STARTING/STOPPING THE MOWER
See fi gure 9-10.
1. Insert the isolator key into the slot on the motor/shroud
assembly.
2. Press and hold the start button. Pull the power lever
toward the handle and release the button to start the
mower.
To stop the mower, release the power lever.
■ For starting in thick grass conditions maybe necessary
to press down on the handlebars and slightly raise the
front wheels until the motor reaches full speed.
■ Never lift the rear wheels as this can cause debris to
be thrown towards you and increase risk of injury.
SELF-PROPELLED MOWING
See fi gure 9-10.
■ Once the mower has been started, the self-propelled
feature is engaged by pulling the self propel lever
upward to meet the handle.
■ To disengage the self-propelled feature, release the
self propel lever.
MOWING TIPS
See fi gure 11.
■ Make sure the lawn is clear of stones, sticks, wires,
and other objects that could damage the lawn mower
blades or motor. Do not mow over property stakes or
other metal posts. Such objects could be accidentally

21
Deutsch (Übersetzung der originalen Anleitungen)
DE
FR EN ES IT PT NL SV DA NO FI HU CS RU RO PL SL HR ET LT LV SK BG
21
English (Original instructions)
EN
FR DE ES IT PT NL SV DA NO FI HU CS RU RO PL SL HR ET LT LV SK BG
WARNING
Always protect hands by wearing heavy gloves and/or
wrapping the cutting edges of the blade with rags and
other material when performing blade maintenance.
Contact with the blade could result in serious personal
injury.
WARNING
Do not lubricate any of the wheel components.
Lubrication may cause the wheel components to fail
during use, which could result in serious personal injury
to the operator and/or mower or property damage.
RESETTING THE FUSE
See fi gure 13.
If the motor stops while you are cutting grass, you may
need to reset the fuse. Press the reset button on the fuse
and try restarting the motor.
REPLACING THE CUTTING BLADE
See fi gure 14-15.
NOTE: Only use authorised replacement blades. Replace
worn or damaged blades and bolts in sets to preserve
balance.
1. Stop the motor and remove the isolator key. Allow
blade to come to a complete stop.
2. Remove the battery pack.
3. Turn the mower on its side.
4. Wedge a block of wood (not provided) between the
blade and mower deck to prevent the blade from
turning.
5. Loosen the blade nut by turning it counterclockwise
(as viewed from bottom of mower) using a 15 mm
wrench or socket (not provided).
6. Remove the blade nut, spacer, blade insulator, and
blade.
7. Make certain the fan assembly is pushed completely
against the motor shaft.
8. Place the new blade on the shaft. Ensure blade
is properly seated with shaft going through center
blade hole and the two blade posts inserted into their
respective holes on the blade. Make sure it is installed
with the curved ends pointing up toward the mower
deck and not down toward the ground. When seated
properly, the blade should be fl at against the fan
assembly.
9. Replace the blade insulator and spacer, then thread
the blade nut on the shaft and fi nger tighten.
NOTE: Make certain all parts are replaced in the exact
order in which they were removed.
MAINTENANCE
WARNING
Before performing any maintenance, make sure the
mower battery and isolator key are removed to avoid
accidental starting and possible serious personal injury.
WARNING
When servicing, use only authorised replacement parts.
Use of any other parts may create a hazard or cause
product damage.
WARNING
Keep the motor and battery compartments free from
grass, leaves or excessive grease. This will help reduce
the risk of fi re.
GENERAL MAINTENANCE
Before each use, inspect the entire product for damaged,
missing, or loose parts such as screws, nuts, bolts, caps,
etc.
Tighten securely all fasteners and caps and do not
operate this product until all missing or damaged parts
are replaced. Please call Ryobi customer service for
assistance. Avoid using solvents when cleaning plastic
parts. Most plastics are susceptible to damage from
various types of commercial solvents and may be
damaged by their use. Use clean cloths to remove dirt,
dust, oil, grease, etc.
WARNING
Do not at any time let brake fl uids, gasoline, petroleum-
based products, penetrating oils, etc., come in contact
with plastic parts. Chemicals can damage, weaken, or
destroy plastic which may result in serious personal
injury.
Periodically check all nuts and bolts for proper tightness to
ensure safe operation of the mower.
Wipe the mower clean with a dry cloth occasionally. Do
not use water.
LUBRICATION
All of the bearings in this product are lubricated with a
suffi cient amount of high grade lubricant for the life of
the unit under normal operating conditions. Therefore, no
further bearing lubrication is required.

22
Deutsch (Übersetzung der originalen Anleitungen)
DE
FR EN ES IT PT NL SV DA NO FI HU CS RU RO PL SL HR ET LT LV SK BG
22
English (Original instructions)
EN
FR DE ES IT PT NL SV DA NO FI HU CS RU RO PL SL HR ET LT LV SK BG
■ Store mower indoors in a clean, dry place out of the
reach of children.
■ Do not store near corrosive materials such as fertilizer
or rock salt.
To lower the handle before storing:
1. Fully loosen the handle knobs on the sides of the
handle and fold the upper handle down.
2. Push inward on each side of the lower handle, and
lift the sides of the lower handle past the edges of the
handle mounting brackets. Avoid pinching or trapping
any cables.
REPLACING THE BATTERY
See fi gure 18.
The mower battery is designed for maximum life; however,
like all batteries, it will eventually need to be replaced.
Charge the new battery pack before use. See charging
the battery pack in the operation section of this manual.
To install a new battery:
1. Remove the isolator key.
2. Carefully lift the old battery by the handle.
3. Install the new battery pack.
4. Take the old battery pack to a recycling center that
accepts lead acid/lithium ion batteries. Never dispose
of battery in fi re or regular household trash.
10. Torque the blade nut down clockwise using a torque
wrench (not provided) to ensure the bolt is properly
tightened. The recommended torque for the blade nut
is 62.5~71.5 kgfcm (350-400 in.-lb.).
To reduce the fi re hazard, keep the motor and battery
compartment free of grass, leaves, or excessive grease.
DRIVE GEAR MAINTENANCE
See fi gure 16.
To ensure smooth operation of wheels, the wheel
assembly should be cleaned before storage.
1. Remove the nut by turning counter clockwise. Remove
wheel and set aside.
2. Remove dust cover, e-ring, washer, pins, and wheel
gear. Clean any dirt from these items and the end of
the drive shaft by wiping with a dry cloth. If necessary,
rubbing alcohol may be used to remove any stubborn
dirt.
3. Reinstall wheel gear with the arrows facing the front
of the mower. Reinstall pins, washer, e-rings, and dust
cover.
4. Reinstall wheel and nut. Tighten nut clockwise to
secure.
REPLACING FRONT WHEELS
See fi gure 17.
1. Using a hex wrench (not provided), remove the hex
nut by turning counterclockwise.
2. Remove the wheel and replace with new wheel.
3. Replace the hex nut and tighten securely by turning
clockwise.
STORING THE MOWER
See fi gure 2.
■ Remove the isolator key and store in separate location
out of reach of children.
■ Removal of the battery is not required for storage.
■ When the battery pack is not in use, store it in an
environment of 25 ˚C and recharge it every 2 months.
■ Before storage, wipe any dirt or debris from the battery
area.
■ Turn mower on its side and clean grass clippings that
have accumulated on the underside of the mower
deck.
■ Wipe the mower clean with a dry cloth occasionally.
Do not use water.
■ Check all nuts, bolts, knobs, screws, fasteners, etc.,
for tightness.
■ Inspect moving parts for damage, breakage, and
wear. Have repairs made on any damaged or missing
parts. Check blade for damage, uneven, or excessive
wear and replace blade if these conditions exist.

23
Deutsch (Übersetzung der originalen Anleitungen)
DE
FR EN ES IT PT NL SV DA NO FI HU CS RU RO PL SL HR ET LT LV SK BG
23
English (Original instructions)
EN
FR DE ES IT PT NL SV DA NO FI HU CS RU RO PL SL HR ET LT LV SK BG
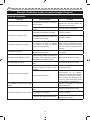
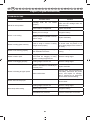
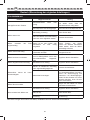
TROUBLESHOOTING
Problem Possible cause Solution
Handle is not in position.
Carriage bolts are not seated
properly.
Adjust the height of the handle and
make sure the carriage bolts are
seated properly.
Cam handle is not tightened. Tighten cam handle.
Mower is not starting.
Battery is low in charge. Charge the battery.
Battery is either inoperable or will not
take a charge.
Replace the battery.
Mower is cutting grass unevenly.
Lawn is rough or uneven or cutting
height not set properly.
Move the wheels to a higher position.
All wheels must be placed in the
same cutting height for the mower to
cut evenly.
Mower is not mulching properly.
Wet grass clippings are sticking to
the underside of the deck.
Wait until the grass dries before
mowing.
Mower is hard to push.
High grass, rear of mower housing
and blade are dragging in heavy
grass, or cutting height too low.
Raise the cutting height.
Mower is not bagging properly. Cutting height is set too low. Raise the cutting height.
Mower is vibrating at higher speed.
Blade is unbalanced, excessively or
unevenly worn.
Replace the blade.
Motor shaft is bent.
Stop the motor, remove isolator key
and battery, disconnect the power
source, and inspect for damage.
Have it repaired by an authorised
service center before restarting.
Mower does not self-propel.
Take the mower to an authorised
service center.
Motor stops while cutting.
Cutting height is set too low. Raise the cutting height.
Battery has no power. Charge the battery.
Resettable fuse protected. Press the reset button on the fuse.
If these solutions do not solve the problem contact your authorised service dealer.
Page is loading ...
Page is loading ...
Page is loading ...
Page is loading ...
Page is loading ...
Page is loading ...
Page is loading ...
Page is loading ...
Page is loading ...
Page is loading ...
Page is loading ...
Page is loading ...
Page is loading ...
Page is loading ...
Page is loading ...
Page is loading ...
Page is loading ...
Page is loading ...
Page is loading ...
Page is loading ...
Page is loading ...
Page is loading ...
Page is loading ...
Page is loading ...
Page is loading ...
Page is loading ...
Page is loading ...
-
 1
1
-
 2
2
-
 3
3
-
 4
4
-
 5
5
-
 6
6
-
 7
7
-
 8
8
-
 9
9
-
 10
10
-
 11
11
-
 12
12
-
 13
13
-
 14
14
-
 15
15
-
 16
16
-
 17
17
-
 18
18
-
 19
19
-
 20
20
-
 21
21
-
 22
22
-
 23
23
-
 24
24
-
 25
25
-
 26
26
-
 27
27
-
 28
28
-
 29
29
-
 30
30
-
 31
31
-
 32
32
-
 33
33
-
 34
34
-
 35
35
-
 36
36
-
 37
37
-
 38
38
-
 39
39
-
 40
40
-
 41
41
-
 42
42
-
 43
43
-
 44
44
-
 45
45
-
 46
46
-
 47
47
-
 48
48
-
 49
49
-
 50
50


Ask a question and I''ll find the answer in the document
Finding information in a document is now easier with AI
in other languages
- français: Ryobi RLM4852L Le manuel du propriétaire
- español: Ryobi RLM4852L El manual del propietario
- Deutsch: Ryobi RLM4852L Bedienungsanleitung
Related papers
-
Ryobi RLM3640LI-1 Owner's manual
-
-
-
-
-
-
-
-
-
Other documents
-
EINHELL GC-PM 46/2 S HW-E Original Operating Instructions
-
AL-KO Easy Flex 34.8 Li Lawnmower Kit User manual
-
Hitachi ML 36DAL User manual
-
-
-
Hyundai LM3301E Original Operation Instructions
-
-
Einhell Blue BG-PM 46 S HW Owner's manual
-
Hurricane HB 51 R HW E Original Operating Instructions
-
Einhell Classic GC-PM 46/2 S HW-E User manual