Page is loading ...

GTS-1500-E
WOOD CHIPPER SHREDDER.
OWNER’S MANUAL.

CONTENTS.
1. GENERAL……………………………………………………………………3
Limitations of use…………………………………………………………3
Specification of use………………………………………………………3
Description of the machine…………………………………………..3
Symbols………………………………………………………………………..5
2. MACHINE COMPONENT DEFINITION………………………….6
3. UNPACKING……………………………………………………………...7
4. ASSEMBLY INSTRUCTIONS………………………………………….8
5. IMPORTANT INSTRUCTIONS FOR SETUP………………….12
6. WORKING WITH THE SHREDDER………………………………14
Safety and technical remarks……………………………………..14
Before operating the machine……………………………………15
Starting and operating the machine…………………………..15
Transportation……………………………………………………………16
7. MAINTANENCE AND CHECKS………………………………………17
8. PROBLEMS AND SOLUTION…………………………………………18
9. TECHINCAL SPECIFICATIONS……………………………………….19
10. PARTS DRAWING………………………………………………..18
11. PARTS LIST………………………………………………………….21

1. GENERAL
Intended use
The shredder is designed solely for shredding/chipping all
kind of newly cut tree branches of diameter up to 8.5 cm.
Restrictions
You should not use the shredder for shredding/chipping metal, stones, and
plastics. If you are going to shred tree roots check that the diameter is less
than 8.5 cm and remove all earth, sand stones.
Before using the machine for the first time, check the maximum engine speed
by screwing in/out the screw which controls the position of the throttle lever
so that it is positioned as in the diagram. (fig.3) after the first hour’s use check
that the bolts of the blades and counter blade are firmly fixed and that the gap
between blades and counter blade is 0.5mm (half a millimetre). Adjust in the
slots necessary and fix the bolts. (fig.2a,ab)
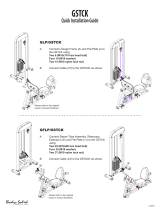
Description of the machine
The shredder is a machine for shredding/chipping newly cut wood. The rotor
has 2 blades each with a 30 cm width and is powered by a gasoline engine.
Transmission is through two parallel drive belts. The shredded wood or chips
are discharged through the output tube by the centrifugal force of the rotor.
Because of the angle of the blades and the positioning of the counter blade
branches are pulled inside the machine automatically and feeder belt is
required. (fig.1)
8.5
cm

FIG.1
Output pipe
Input pipe
Protection
Rotor axe
Rotor
Engine
Handle
Emergency Stop
FIG.2B
FIG.2A
FIG.3

SYMBOLS.
N.B.: Before use, make sure that the manual has carefully read. Because
familiar with the controls so as to use the machine correctly. Obey all safety
instructions!

2. MACHINE COMPONENT DEFINTION.
1. Shredder Hopper
2. Wheel
3. Inlet Hopper Assembly
4. Outlet Hopper Assembly
5. Tow Bar
6. Wheel Axle
7. Handle
8. Connecting Shaft
1PC
2PCS
1PC
1PC
1PC
1PC
1PC
2PCS

3. UNPACKING.
When unpacking, check to make sure all the parts shown on the below
diagram are included.

4. ASSEMBLY INSTRUCTION.
Step 1: Put wheel (#30), flat washer Ø20 (#31), wheel bushing (#32) and wheel
axle (#29) to the base (#22) using hex bolt M8x25(#53),lock washer Ø8(#54)
and tire gasket(#21). Tighten the wheel axle (#29) using hex bolt M6x16
(#35) and hex nut M6 (#84).
Attention: Locking the Wheel Axle (#29) at this position by using a 12"
Adjustable spanner when fixing the hex bolt M8X (#53) to the wheel.

STEP 2:
1.Secure the inlet hopper assembly (#4) to the roller cover plate assembly (#3)
using hex bolt M8x20 (#75), lock washer Ø8 (#54), big flat washer Ø8
(#40).
2. Secure the Outlet Hopper Assembly (#2) to the roller cover plate assembly
(#3) using hex bolt M8x16(#39),lock washer Ø8(#54), big flat washer Ø8(#40).

STEP 3.
1. Attach the connecting shaft (#86) to the base (#22) using hex bolt M10x50
(#87), flat washer Ø10 (#49) and nylon lock nut M10 (50).
2. Lock handle (#28) and base (#22) using hex bolt M10x45 (#85), flat washer
Ø10 (#49) and nylon lock nut M10 (50). Then insert lock pin (#26) to the rear
hole.
3. Attach the tow bar (#20) to the square tube of base (#22), then secure hitch
pin (#63) using R pin (#64), the other side secure hitch pin(#33) using R pin
(#64).

STEP 4.
1. Please pull out the lock pin (#26) and turn up handle (#28), then insert
the lock pin (#26) to the rear hole again when it’s working.

IMPORTANT INSTRUCTIONS FOR SET UP.
Important instructions for setting up the device! You must read these before
1
st
use!
1. Adjust the distance between the blade and axel blade. The correct distance is
approx. 2 mm +/- 0.5 mm. Check if the distance between the blade and the axel
blade is consistent for both rotor blades by turning them manually.
2. Check that all of the screw joints on the device are secure; this applies especially
to the bolts for both blades and the axel blades. Tighten all of the screws. Repeat
this process after the first operational hour after setup!
Attention: the bolts for all blades are secured with Loctite screw lock! If you
want to loosen the bolts (e.g. for changing the blades) please heat up the bolts
first, otherwise they will shear. When again fastening the bolts also please use
a bit of Loctite screw lock.
3. Check that the driving belt and belt pulley are aligned and straight. If they are
slanted, this can be repaired by adjusting the engine. Both belts should be
tightened. The belts should sag a maximum of 10 mm in the centre at the correct
tension level.

4. Check and tighten the screws of both driving belt pulleys.
5. Connect the batteries: The red positive cable coming from the battery
should be connected to the magnet switch of the starter
STRAIGHT
Under 1.5 kg of pressure, the belts can sag approx. 10
mm.
Connect the red positive cable
here!

5. Fill up the lead free super petrol (95 octane) and engine oil (multigrade oil
10W40 or 15W40).
Always fill the engine oil up to the maximum mark on the dipstick.
6. When starting the engine, please ensure that the emergency off switch is
not pushed in, otherwise the engine will not start. To start the engine, use the
cold start button / choke, open the petrol tap and start in half choke.
If you have questions about setup, feel free to contact us at any time
on 01843491642.

6. WORKING WITH THE SHREDDER.
1. Safety and technical remarks
1.1. The user should be 18 years old or more.
1.2. The machine should be positioned on a horizontal. Firm surface.
1.3. User must wear safety gloves (not provided with this unit), ear-
Protection and safety goggles. (fig.4)
1.3. When working in a confined space, always make sure there is sufficient
ventilation and lighting, in order to reduce the risk of suffocation and
injury.
1.5. Only one person at a time should operate the machine.
1.6. Pieces jamming the input tube can only be removed safely when the engine is
stopped and blocked. If necessary, unbolt and tip the input and output
tubes to facilitate access to the rotor. Use a wooden pole to remove pieces
stuck in the rotor. Never use your hands. (Fig.6-8)
1.7. Never leave the machine running unattended.

FIG.5
FIG.6
FIG.7
1.8. Changing the blades of the rotor or the counter blade and checking blade bolts
should only be done when the engine and rotor are stopped, the spark plug cap is
removed and the rotor is blocked.
1.9. After one hour of use always check that all bolts and nuts are still tightened
properly. If not, tighten them again or bring the machine back to your
dealer/service-point.
1.10. Use only original parts for maintaining your shredder, otherwise the warranty
will be void.
1.11. The shredder can only be repaired by a skilled dealer/service-point.
1.12. The shredder exceeds 90 dBA during operation. Therefore all users and
onlookers must wear ear-protection.
1.13. Before use, make secure that the bolts on the fixed blade are firmly fixed.
Check after one hour that the bolts still are firmly fixed (just first time).

2. Before operating the machine
Make sure the machine stands firmly on the ground and does not tilt in any
way. The danger zone on the output of the machine must be respected, in
order to avoid serious injury by chips thrown out of the output tube. Chips can
be thrown a distance of 12 meters, so onlooker must remain behind the
direction of throw or at least 12 meters away from the output tube.
Before using the machine for the first time, check the maximum engine speed
by screwing in/out the screw which controls the position of the throttle lever
so that it is positioned as in the diagram.
After the first hour’s check that the bolts of the blades and counter blade are
firmly fixed and that the gap between blades and counter blade is 0.5mm (half
a millimetre). Adjust in the slots if necessary and fix the bolts.
3. Starting and operating the machine
Start the engine at half throttle and let it warm up for about 3 minutes. (For
proper use of the engine on should also read the attached manual). Then put
the engine on full throttle. (fig.9, 10) Put the branches in the input tube and
when you feel they are pulled in by the rotating blades, let the branch go. Do
not hang on to the branch, the branch will be pulled in by the machine by
itself. Side branches with a diameter exceeding 3 cm should be sawn or cut off
and shredded separately.

WARNING!
In case of emergency or any doubt, immediately activate the safety switch (red
knob) to be found by the engine. (fig.11)
Before starting the engine check that the bolts holding the input and output
tubes are fully tightened. (fig.12, 13)
FIG.9
FIG.10
FIG.11
FIG.12
FIG.13

MAINTANENCE AND CHECKS.
All technical check-ups and maintenance should be done with the engine shut
off and the spark plug cap removed from the spark plug.
While cleaning the shredder, never spray the bearing with a high pressure
washer! It could cause water to enter the bearings which will cause damage
to the machine; (this is not covered by warranty). The two grease nipples on
the rotor require lubricating once a year or every 500 hours.
Before putting the shredder into storage grease or oil the bearings, blades and
rotor to protect against corrosion.
1. Points to be checked
2. Cleaning the machine
For engine maintenance refer to the engine manufacturer’s
engine manual. Note that the first engine oil change is after 5
hours use.
IMPORTANT: ALL screwed joints on the device must be checked every
10 operational hours to ensure they are securely attached!

PROBLEMS AND SOLUTIONS.
Problem
Cause
Solution
The shredder does not
perform properly: the wood
is not pulled in by the
machine itself. The chips do
not have the same size.
-the blades are worn too much
-the diameter of
the branches inserted
into the machine is too large
-there is too big a gap between
the fixed blade and the counter
blade: correct gap is 0.5 mm
(half a millimetre)
-change or sharpen the blades and counter-blade.
Note that the blades are sharpened on both edges so
they can be reversed.
-shut the engine off and remove the branch that is
too thick
-adjust the gap between the blade and the counter-
blade in the slots
The engine does not start/
the engine shuts
off by itself
-electrical problem whit the
engine
-no fuel
-no or not enough oil in the
engine (the oil should be level
with the threads of
The fill hole.)
Check that
-the input tube is correctly fitted and the bolts are
tight
-put the start-switch of the engine “on” -de-activate
the emergency switch (turn the knob)
-check oil and fuel levels
-contact your dealer
Important: screw back the blade bolts.
The rotor jams
The engine will not start/
turn because the rotor is
jammed.
-the diameter of
the
branch is too big
-there are unacceptable
materials such as stones or
metal in the input tube
-a length of branch remains in
the rotor remains in the rotor
after the engine was last
stopped.
-shut off the engine, remove the spark plug cap and
turn the rotor counter-clock-wise. Use a wooden
stick to turn the rotor and to remove the material
from the rotor and input tube.
If necessary, remove the cap of the bearing housing
and rotate the rotor axle with a spanner.
If necessary, remove the input or output tube to
facilitate access to the rotor.
Check the sharpness of the blades and counter blade
and replace them if necessary.
Important: screw back the blade bolts.
/