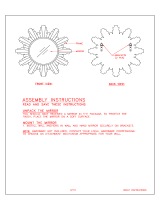
- FRAME LINEA CABINET INSTALL GUIDE -
(2018-05-07)
14/14
CLEANING GUIDE
WETSTYLE FRAME LINEA FURNITURE is made from Oak or Walnut.
WETSTYLE Furniture is ultra-easy to clean: after use, simply wipe with a soft cloth to remove
any surface dirt. For standard cleaning, we recommend using warm water with mild soap.
Do not use abrasive products or cream cleaners. Never use petroleum-based products
when cleaning the wood, i.e. paint thinners or other solvents, as they may damage the
wood surface. Glass surfaces may be cleaned using standard glass cleaning products.
WARRANTY
The warranty on WETSTYLE products covers all defects in materials and manufacturing for a
period of one year from the date on which the owner originally purchased the product
directly from WETSTYLE or from an authorized retailer. This warranty is valid for the original
owner only. This warranty does not apply to cases in which a product was incorrectly
installed, or to damage due to negligence, misuse, cigarettes, flames, natural disasters or
other accidents.
WETSTYLE is not responsible for any fees or recovery charges that may have been
generated by the purchase of a product that is not adequate for an existing building
structure.
At the discretion of the manufacturer, the guarantee is limited to the repair or replacement
(of a product of equal or greater value) at the condition that the claim is made during the
guarantee period to an authorized dealer or directly to WETSTYLE. The handling fees and all
other charges related to the product replacement are not covered by the guarantee.
Printed in Canada
www.WETSTYLE.CA – Montreal – Canada
Tel. 450.536.9000 – 1.888.536.9001 – Fax. 450.536.0202