
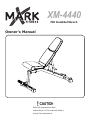
Owner’s Manual
XM-4440
Read all precautions and
instructions in this manual before
using this equipment.
FID Dumbbell BHQFK

2
Table of Contents
Before You Begin 3
Important Safety Information
4
Assembly
5-7
8
9
W
Exploded View
Parts List

MODEL: XM-4440
XM-4440
This manual will guide you through the assembly process. If at any time you
are having trouble with the assembly or use of this product, then please contact
When calling please have the following product information available:
Model Name :
Date Mfg.:
Serial #
Model Name Decal Location
Before You Start
QUESTIONS?
CALL 1-800-719-4605
Monday-Friday
8:30 a.m.-5:00 p.m.
(Central Standard Time)
MAILING ADDRESS
XMark Fitness, LLC
2791 Valley View Drive
Shreveport, LA 71108
3
THANK YOU for making this unit a part of your exercise
program.
XMARK Fitness
assures the very best in value,
appearance, durability and biomechanics.
XMARK FITNESS SERIES
us at our
XMARK Fitness help line. We have trained service technicians on site to
take care of you, our valued customer.

NOTE: Hand tighten bolts and nylon nuts until machine is fully
assembled.
SAFETY PRECAUTIONS
SAFETY INFORMATION WARNING!
Prior to assembly, remove components from the box and verify that all the listed parts
were supplied.
Before using this unit or starting any exercise program, consult your physician.
This is especially important for persons over the age of 35 and/or persons with pre-
existing health problems. XMARK Fitness assumes no responsibility for personal
injury or property damage sustained by or through the use of this product.
It is the owner’s responsibility to ensure that all users of this unit have read the
Owner’s Manual and are familiar with safety information and precautions.
• This unit should only be used on a level surface and is intended for indoor use
only. XMARK Fitness recommends an equipment mat be placed under the unit to
protect the floor or carpet and for easier cleaning.
• Wear comfortable, good-quality walking or running shoes and appropriate cloth-
ing. Do not use this unit with bare feet, sandals, socks or stockings!
• Always examine your unit before using to ensure all parts are in working order.
• Do not leave children unsupervised near or on the unit.
• Service to your unit should only be performed by an authorized service represen-
tativ
e, unless authorized and/or instructed by a XMARK Fitness technician. Failure
to follow these instructions will void the warranty.
Important Safety Information
4

Assembly
1
2
3
1.
2.
3.
1
30
20
20
2
30
30
31
31
31
2
5
22
22
23
23
4
4
3
21
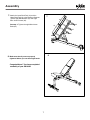
Attach the Front Leg (1) to the Frame (2) with
two M10 x 20mm Bolts (30) and two M10 Locknuts
(20); do not tighten the Bolts yet.
Insert the Rear Stabilizer (5) into the Frame (2)
securing with four the M10 x 20mm Bolts (30) and
four M10 Washers (31); Start all four Bolts, and
then then tighten them.
See step 1.
Tighten the M10 x 20mm Bolts (30).
Attach the Seat Frames (4) to the Seat Bracket
(3) with four the M8 x 40mm Bolts( 22), four M8
Washers (23), and four M8 Locknuts (21); do not
tighten the Bolts yet.
5

Assembly
4
5
6
4.
5.
6.
2
8
4
28
27
27
26
7
7
33
30
30
6
29
29
31
31
20
7
7
25
25
24
24
30
20
11
4
17
17
17
Push four Spacers (17) into the Backrest
Supports (7).
12
Pull the Seat Knob (12), insert the Seat Bracket
(3) into slot in the Frame (2), and release Seat
Knob into an adjustment hole in the Seat Bracket.
3
Attach the Backrest Supports (7) and Seat
Frames (4) to the Frame (2) with an M12 x 180
mm Bolt (26), one Plastic Sleeve (8),two M12
Washers (27) and one M12 Locknut (28).Do not
overtighten the Locknut; the Seat Frames and
Bakckrest Supports must be able to pivot.
Insert Axle (33) to Backrest Adjustment Bar (6)
with two M10 x 20mm Bolts (30).
Insert Backrest Adjustment Bar (6) to the Backrest
Supports (7) with two M10 x 50mm Bolts (29)
two M10 Washers (31) and two M10 Locknuts
(20).
,
Attach the Seat Pad (11) to Seat Frame (4)
with four M6 x 40mm Screws (25) and four M6
Washers (24).
Next, attach an M10 x 20mm Bolt (30) and an
M10 Locknut (20) to the lower end of the Seat
Bracket (3).
3
6

Assembly
7
7.
8.
8
25
25
25
25
25
24
24
24
24
7
10
9
Attach the Lower Back Pad (10) and the
Upper Back Pad (9) to the Backrest Supports
(7) with eight M6 Washers (24) and eight
M6 x 40mm Screws (25).
Make sure that all parts are properly
tightened before you use the weight bench.
Congratulations!! You have completed
assembly of your XM-4440!
7
See step 3. Tighten the eight M6 x 40mm
Bolts (22).

1
2
3
4
5
6
7
7
9
10
11
12
13
13
14
14
14
14
32
32
15
16
16
16
16
16
16
17
17
17
18
18
20
20
20
21
21
22
22
23
23
24
24
24
24
24
24
24
24
24
24
24
25
25
25
25
25
25
25
25
25
25
26
27
27
28
29
29
30
30
30
30
30
30
33
34
19
20
19
8
34
30
31
31
20
31
31
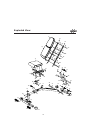
Exploded View
8

1 Front Leg 1
2 Frame 1
3 Seat Bracket 1
4 Seat Frame 2
5 Rear Stabilizer 1
6 Backrest Ajustment Bar 1
7
Backrest Support
2
8 1
9 Upper Back Pad 1
10 Lower Back Pad 1
11 Seat Pad 1
12 Seat Knob 1
13 Rubber 2
14 Square End Cap 50 4
15 Square End Cap 50mm x1.5mm 1
16 Square Plug 25 8
17 Spacer 4
18 Protective Foam 2
19 2
20 M10 Locknut 7
21 M8 Locknut 4
22 M8 x 40mm Bolt 4
23 M8 Washer 4
24 M6 Washer 12
25 M6 x 40mm Screw 12
26 M12 x 180mm Bolt 1
27 M12 Washer 2
28 M12 Locknut 1
29 M10 x 50mm Bolt 2
34 M10 x 45mm Bolt 2
Wheel
Plastic Sleeve
30 M10 x 20mm Bolt 9
31 M10 Washer 6
32 Long End Cap 2
XM-4440
33 1
Axle
Key NO
Description
Qty
Part List
9

Customer Service: 1-800-719-4605
-
 1
1
-
 2
2
-
 3
3
-
 4
4
-
 5
5
-
 6
6
-
 7
7
-
 8
8
-
 9
9
-
 10
10


Mark Fitness XM-4440 Owner's manual
- Type
- Owner's manual
- This manual is also suitable for
Ask a question and I''ll find the answer in the document
Finding information in a document is now easier with AI
Related papers
Other documents
-
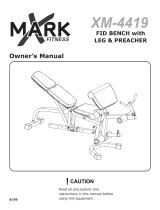 Mark Of Fitness XM-4419 User manual
-
Xmark XM-4437.2 Owner's manual
-
-
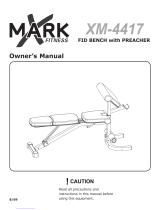 XMark Fitness XM-4417 Owner's manual
-
-
-
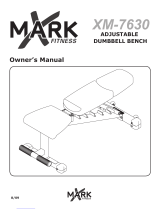 XMark Fitness XM-7630 Owner's manual
-
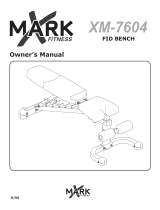 Mark Of Fitness XM-7604 User manual
-
-


