User Manual
English


3
Introduction
1.1 Package Contents
1.2Hardwarespecications
1.3 Pokini features
Quick start guide
2.1 Connecting Pokini i
2.2 Booting Linux
(applies for Pokini Linux)
2.3 Booting Windows 7
(applies for Pokini Windows 7)
2.4 BIOS
Maintenance
3.1Afxingrubberfeet
3.2 Installing hard disk
Drivers
Support
5
5
6
8
11
11
12
12
12
13
13
14
15
15

4

5
Introduction
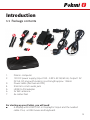
1.1 Package contents
1. Pokini i computer
2. 12V DC power supply (Input 100 - 240 V AC 50/60 Hz, Output 12V
DC 5A, DC plug with locking ) cord length approx. 150cm
3. Powercable(GermanandUS)
4. 3.5mm to cinch audio jack
5. HDMI to DVI adapter
6. 2x WiFi antenna
7. 4xrubberfeet
For starting up your Pokini, you will need:
■
A display with HDMI / DVI or DisplayPort input and the needed
cable.Plus,aUSBmouseandkeyboard.
1
2
3
5
4
7
6

6
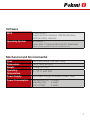
1.2 Hardware specifications
CPU Intel
®
Celeron 827E (64bit,1x1,4GHz,512KBCache)*
Intel
®
Celeron 847E (64bit,2x1,1GHz,512KBCache)*
Intel
®
Corei3-3217UE(64bit,2x1,6GHz,512KBCache)*
Intel
®
Corei7-3517UE(64bit,2x1,7GHz,512KBCache)*
Chipset Intel
®
6/7SeriesSystemControllerHub
Memory 2 slots for DDR3 SO-DIMM(1333)
(max.16GB)
Storage Internalslotfor2.5″SSD(max9,5mm)
Display & Graphics Intel
®
HDGraphics2000*
Intel
®
HDGraphics3000*
Intel
®
HDGraphics4000*
HDMI
>
resolutionupto1920x1200with60Hz
DisplayPort
>
resolution 2560 x 1600 with 60 Hz
Audio 7.1 channel S/PDIF in/out
Network 2x 1000 BaseT RJ45 Ethernet
WLAN802.11b/g/n(MiniPCIwithBT4.0)
USB 2xUSB2.0(480Mb/s),2xUSB3.0(5Gb/s)
Serial mini RS232 (Attention! No adapter included)
eSATA 2x eSATA
Additional Features 2x WLAN antenna connectors
Hardware
* depends on model

7
Case 100%aluminum/diecastbody
Dimensions 190x160x40mm
Weight 1100g incl. SSD
Operating
Temperature
0 – 70 °C with SSD
Power Supply 12Vpowersupply,screwablepowerplug
Power Consumption Idle Modus (S0): 10 watts
Standby(S3):2watts
Soft Off (S5): 2 watts
Mechanical and Environmental
BIOS Phoenix BIOS
Supportedbootdevices:USBthumbdrive,
USBharddisk,network
Operating System Windows
®
7
Linux Mint 13 (www.pokini.de) for download
(Otheroperatingsystemscanbeinstalledbyuser)
Software

8
1.3 Pokini Features
USB
OnthebackofthePokini,followingportscanbefound:
2xUSB2.0with480Mbps
2xUSB3.0(blue)with5Gbps
AllportsdoalsosupportHighspeedUSB2.0.
Serial Port
ThereisaMini-RS232portlocatedontheback.AminiserialtoDB9
adaptercanbepurchasedseparately.
HDMI
DisplayPort
WLAN antenna
2xUSB3.0
Serial
Audio in/out
Power Button
Power plug
(screwable)
2xUSB2.0
2x LAN
2x eSATA

9
DVI
The Pokini i has HDMI and a DisplayPort.
1. HDMI with audio
2. DisplayPort
TobeabletouseaDVIdisplay,usetheHDMI→ DVI adapter.
Pleaseconsiderthattheaudiohastobeconnectedseparately.
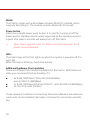
Audio
Onthebackofthecasethereare2built-instandard3,5mmaudiojacks.
Right:
□ Stereo line-out with 3,5mm jack
□ S/PDIF7.1withtheshippedcable
Left:
□ Stereo line-in with 3,5mm jack
□ S/PDIF7.1withtheshippedcable
LAN
Pokini has 2x 10/100/1000 BaseT Ethernet ports using standard RJ45
connectors.UseastandardEthernetcabletoforconnecting.
Theconnectorhasbuilt-inLEDsthatarelitwhenaconnectionisdetected.

10
WLAN
ThePokiniicomeswithaAzureWavemodule(MiniPCI)installed,which
supportsWLANb/g/n.ThemoduleincludesBluetooth4.0aswell.
Power button
Pokinihasatactilepowerpush-button.Itisusedforturningon/offthe
Pokiniandforstandby/resumewhensupportedbytheoperatingsystem.
A push of at least 5 seconds will always turn off the Pokini.
→ Note: Pokini supports auto-on. When connected to power, it will
power-up automatically.
LEDs
The Pokini logo on the front lights up when the system is powered off (Po-
wer LED).
Whenthelogoisblinking>harddriveactivity
Additional hardware (front modules)
TherearedifferentfrontmodulesavailableforthePokinii.Withthesemo-
dules you can extend the functionality of it.
■ 4x RJ45 1000 Base T Ethernet (Intel 82583V)
and4xUSB2.0(480Mbps)
■ 1xRJ451000BaseEthernet(RT28111)and4xUSB2.0(480Mbps)
■ 2x mini PCIe slots (fullsize)
Thesemodules(Funktions-ConnectivityExtensionModules)areextension
cardswichcanbeinstalledinternallytoincreasetheconnectionpossibili-
ties.

11
Quick start guide
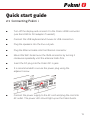
2.1 Connecting Pokini i
■ Turn off the display and connect it to the Pokini HDMI connector
(use the HDMI to DVI adapter if needed).
■ ConnecttheUSBkeyboardandmousetoUSBconnectors.
■ Plug the speakers into the line-out jack.
■ PlugtheEthernetcableintotheEthernetconnector.
■ MounttheWiFiAntennaontheSMAconnectorbyturningit
clockwiserepeatedlyuntiltheantennaholdsrm.
■ Insert the DC plug into the Pokini DC in jack.
■ It is recommended to secure the power plug using the
adjacent screw.
■ Connect the power supply to the AC cord and plug the cord into
ACoutlet.ThepowerLEDshouldlightupasthePokiniboots.

12
Linux Mint 13 loads automatically on power up.
Login:
Username: pokini
Password: rootroot
Uponrstpower-up,youwillbeguidedthroughtheWindowsWelcome
procedurewhichisself-explanatory.TheWindows7serialnumberisprin-
tedontheWindows7labelonthebottomofyourPokini.
Press „F2“ for the BIOS screen to show.
Forenteringthebootmenu,hit„F5“whilebooting.
2.2 Booting Linux (applies to Pokini Linux)
2.3 Booting Windows 7 (applies to Pokini Win7 )
2.4 BIOS

13
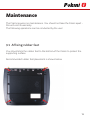
Maintenance
The Pokini requires no maintenance. You should not take the Pokini apart -
thiswillvoiditswarranty.
Thefollowingoperationscanbeconductedbytheuser:
YoushouldsticktherubberfeettothebottomofthePokinitoprotectthe
supporting surface.
Recommendedrubberfeetplacementisshownbelow:
3.1 Affixing rubber feet

14
3.2 Installing Hard Disk
1. Openthescrewsonthebackasshownbelow.
2. Slidethecovertillblock-approx.10mm.
3. Thecoverisnowdetached.Liftthecoveronthesidetoremoveit
completely.

15
Accessories: (not included)
■ VESA mount
■ VESA mount for mounting the Pokini on a wall or TFT display
■ Cap rail mount
Drivers
AlldriverscanbefoundontheincludedCD
or on the internet: www.pokini.de → Products → Pokini i → Downloads
Support
Youcanndloadsofanswersforthemostcommonquestionson
www.pokini.de
Ifyouhavegotmorequestionsorproblems,pleasesendusanemailto:
You have questions of a technical manner?

All rights reserved. © 2014 EXTRA Computer GmbH
V 1.0 / 05-2014
*4050487715184*
-
 1
1
-
 2
2
-
 3
3
-
 4
4
-
 5
5
-
 6
6
-
 7
7
-
 8
8
-
 9
9
-
 10
10
-
 11
11
-
 12
12
-
 13
13
-
 14
14
-
 15
15
-
 16
16