Page is loading ...

Range Hoods
Owners Manual
Installation
Instructions
Wall Mounted
Page 4
Island Mounted
Page 6
Use & Care
Page 9
Warranty &
Registration
Page 13

**Read the complete manual carefully before installaon**
Intended for Domesc Kitchen Use Only
Warnings:
TO REDUCE THE RISK OF FIRE, ELECTRICAL SHOCK OR PERSONAL INJURY, PLEASE OBSERVE THE FOL-
LOWING:
1. Installation and electrical work must be done by a qualied person in accordance with all ap-
plicable codes and standards
2. If the supply cord is damaged, it must be replaced by the manufacturer, its service agent or
a similarly qualied person to avoid a hazard. Any modications that may be required to the
electrical system for the installation of the range hood must only be made by qualied electri-
cians.
3. Before servicing or cleaning unit, switch power o at the service panel. Lock panel to prevent
power from being switched on accidentally.
4. Use this unit only in the manner intended by the manufacturer.
5. Sucient air is needed for combustion and exhausting of gases through the chimney of fuel
burning equipment to prevent back drafting. Follow the heating equipment manufacturer’s
guidelines and safety standards such as those published by the National Fire Protection As-
sociation (NFPA), and the American Society for Heating, Refrigeration and Air Conditioning
Engineers (ASHRAE), and the local code authorities.
6. When cutting or drilling into wall or ceiling, be carefuly to do not damage exsisting electrical
wiring and other hidden utilities.
7. Ducted fans must always be vented to the outdoors.
8. To reduce the risk of re, use only metal ductwork.
9. This unit must be grounded.
TO REDUCE THE RISK OF A RANGE TOP GREASE FIRE:
1. Never leave surface units unattended at high settings. Boil-overs cause smoke and greasy
spillovers that may ignite. Heat oils slowly on low or medium settings.
2. Always turn hood ON when cooking at high heat.
3. Clean ventilating fans frequently. Grease should not be allowed to accumulate on fan or lter.
4. Use proper pan size. Always use cookware appropriate for the size of the surface element.
IMPORTANT SAFETY INFORMATION

WARNING
TO REDUCE THE RICK OF INJURY TO PERSONS IN THE EVENT OF A RANGE TOP GREASE FIRE, OBSERVE
THE FOLLOWING:
1. SMOTHER FLAMES with a close-tting lid, cookie sheet or metal tray, and then turn o the
burner. If the ames do not go out immediately, evacuate and call the re department.
2. NEVER PICK UP A FLAMING PAN. – You may be burned.
3. DO NOT USE WATER, including wet dishcloths or towels – a violent steam explosion will result.
4. Use an extinguisher ONLY if:
• You know you have a Class ABC extinguisher and you already know how to operate it.
• The re is small and contained in the area where it started.
• The re department is being called.
• You can ght the re with your back to an exit.
CAUTION
1. To reduce the risk of re and to properly exhaust air, be sure to duct air outside. Do not vent
exhaust air into spaces within walls or ceiling or into attics, crawl spaces or garages.
2. Take care when using cleaning agents or detergents.
3. Avoid using food products that produce ames under the range hood.
4. The range hood must only be used for the exhaust of cooking fumes in home kitchens. The
manufacturer disclaims all liability for any other use of the appliance.
5. Two installers are recommended because of the large size and weight of this hood.
6. Use with approved cord-connecon kit only.
7. Please read specicaon label on product for further informaon and requirements.

visit us @ www.ardaappliances.com
pg 4
Before You Start...
1. Read this manual carefully and completely.
2. ARDA range hoods conform to ETL/CSA standards.
Please check your local building codes for any addional
requirements.
3. The appliance has been manufactured as class I, there-
fore ground connecon is necessary. A 115V plug is
provided. The range hood must be installed so that that
the plug is easily accessible.
4. This appliance has been designed for use in both ducted
and recirculang modes. Follow the appropriate installa-
on method.
Installaon Instrucons
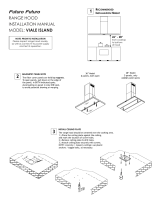
Planning Your Installation
Floor to
Ceiling
Cooking
surface to
bottom of
hood
Centre line
of opening
1. Measure the oor to ceiling height.
This hood can be installed on walls
between 8” and 9” tall.
2. Find the centre point of your open-
ing. Mark a plumb line through this
point from ceiling to your range/
cook-top.
3. Check your range/cook-top User
Manual for the specied minimun
and maximum distance above your
cooking suface. Mark the minimum
clearance on the centre line.
4. Decided where the ductwork will
run between the hood and the out-
side. Short, straight duct runs will
provide the most air ow.
5. If a recirculang kit is necessary, you
may purchase one through your
dealer by contacng us at www.
ardaappliances.ca
WALL MOUNTED HOODS

pg 5
Fixing to the Wall
1. Before mounng the hood, plug in and test all funcons
for proper operaon.
2. Removed the lters from the boom of the hood to pre-
vent damage during the installaon.
3. With assistance, hold the hood temporary in posion
ensuring the boom is above the minimun clearance for
the cooking surface. Mark on the wall the holes for the
two mounng screws.
4. Drill the holes (A) at the distances indicated. Use the
appropriate screws and screw anchors for your wall type
(e.g. reinforced concrete, drywall, etc.). If necessary ,
prepare back wall with cross framing for secure install-
on.
5. Mount the hood on the wall screws. Align it in a hori-
zontal posion realave to cabinets. When the hood has
been adjusted, secure unit by ghtening screws (A).
6. Connect a 6” aluminum duct tube (not included) to the
exhaust piece using duct tape on all seals. (C)
Installing the Ductwork
1. Plan where the ductwork will run between the hood and
the outside. Arda hoods exhaust vercally up through
the ceiling to the roof. They can be ducted to the rear
behind the chimny duct through an outside wall. A short
straight duct run will produce the most air ow. Length
and elbows will reduce the eciency of the blower.
2. Install a roof or wall cap. Connect a 6” round metal duct
to the cap and work backwards toward the hood. Ensure
joints are completely sealed with duct tape.
3. Exhaust air must not be discharged into a ue which is
used for the exhaust fumes from other appliances.
Fixing the Decorave Chimney Duct
1. Carefully losen but do not separate the telescopic chim-
ney duct pieces.
2. Arrange the electrical power supply within the dimen-
sions of the decorave chimney duct.
3. Adjust the width of the support bracket to match the
upper duct. Fix it to the ceiling using the screws (B) so
that it is centred in line with your hood and at a distance
from the ceiling indicated.
4. Aach the inside decorave chimney duct to the support
bracket using provided screws (D).
5. Slide the outer chimny duct down over the exhaust
piece.
to roof cap
to wall cap
decorative
chimney duct
hood
WALL MOUNTED HOODS
B
D

visit us @ www.ardaappliances.com
pg 6
Before You Start...
1. Read this manual carefully and completely.
2. ARDA range hoods conform to ETL/CSA standards.
Please check your local building codes for any addional
requirements.
3. The appliance has been manufactured as class I, there-
fore ground connecon is necessary. A 115V plug is
provided. The range hood must be installed so that that
the plug is easily accessible.
4. This appliance has been designed for use in both ducted
and recirculang modes. Follow the appropriate installa-
on method.
Installaon Instrucons
Planning Your Installation
1. Measure the oor to ceiling height.
This hood can be installed on walls
between 8” and 9” tall.
2. Find the centre point of your range/
cooktop. Drop a plumb line from
your ceiling to this point on your
cooking surface. Mark the ceiling
where the plumb line starts.
3. Around this point, install cross brac-
ing between the ceiling joists for
the island hood to mount to.
4. Check your range/cook-top User
Manual for the specied minimun
and maximum distance above your
cooking suface. The minimum
distance between any element or
ame height and the nearest com-
bustable surface is 61cm (24”).
5. Decided where the ductwork will
run between the hood and the out-
side. Short, straight duct runs will
provide the most air ow.
Floor to
ceiling
Center of
cooking
surface to
ceiling
Ceiling duct opening
Ceiling joists &
cross-bracings
ISLAND MOUNTED HOODS

pg 7
ISLAND MOUNTED HOODS
Fixing to the Ceiling
1.. Remove the hood from the packaging. Plug unit in and
test all funcons before installaon.
2. Separate the inner and outer parts of the telescopic cage.
3. Note the side of the cage that has the arrow on it. When
installed, this is the side of the hood that will have the
controls.
4. Centre the upper cage on the ceiling around the exhaust
duct opening. Ensure that a) the markings coincide with
the cross-bracings between the ceiling joists and b) the
cage is square with the cooking surface below.
5. Mark the upper screw holes on the ceiling.
6. Parally screw three of the four screws into the ceiling at
these markings. Insert the upper cage, rotang to t.
7. Screw in the fourth screw. Tighten the other three. The
cage should now be rmly aached to the ceiling.
8. insert the lower cage over the upper cage. Adjust the
height to the necessary distance using screws supplied.
9. Aach 6” aluminum duct (not included) to the prepared
duct work in the ceiling. Seal all seams.
Installing the Ductwork
1. The mark on the ceiling made in the previous step will
be where your 6” ducng will run through the ceiling.
Around this point install cross bracing between the ceil-
ing joists to support the weight of the hood.
2. Arda island hoods exhaust vercally up through the ceil-
ing to the roof. They can be exhausted sideways above
the ceiling to an eave cap.
3. Install a roof or eave cap. Connect a 6” round metal duct
to the cap and work backwards toward the hood. Ensure
joints are completely sealed with duct tape.
3. Exhaust air must not be discharged into a ue which is
used for the exhaust fumes from other appliances.
Front of Range/Cooktop
Ceiling duct opening
Cross-Bracings
Front of Range/Cooktop
Lower Cage
6” Aluminum Duct

visit us @ www.ardaappliances.com
pg 8
ISLAND MOUNTED HOODS
Front of Range/Cooktop
6” Aluminum Duct
Decorative
Chimney Duct
Front of Range/Cooktop
6” Aluminum Duct
Range Hood
Fixing the Decorave Chimney Duct
1. Carefully separate the telescopic chimney duct pieces.
2. Aach the inner piece of the decorave chimney to the
top of the cage with screws provided.
3. Slide the outer piece of the decorave chimney on to
the cage over the inner chimney and temporarily hold in
place with two screws.
Installing the Range Hood
Please note that to avoid damaging the hood,
installaon requires three people.
1. Remove grease lters from range hood.
2. With the assistance of two other people liing the hood.
from below, raise the unit unl the lower cage sits inside
the range hood lower cage. Be sure the unit is installed
with the controls facing front. Screw hood to cage.
3. Aach 6” aluminum duct to the hood duct connector.
Seal all seams.
4. Plug in the unit. Note: All electrical wiring must be done
by a qualied person and in accordance with all ap-
plicable codes and standards. This range hood must be
properly grounded.
5. Remove temporary screws holding the lower decorave
chimney piece in place.
6. From inside the hood, screw the lower chimney to the
range hood.
7. Re-install the grease lters.

pg 9
Operaons
1. For opmum performance in removing cooking odours,
it is recommended that you turn on your range hood
prior to cooking and you leave it operang for 15 min-
utes aer cooking.
2. Clean the surfaces of the range hood regularly using a
non-abrasive detergent.
3. The an-grease lters capture the grease parcles sus-
pended in the air. They will accumulate grease and dirt
depending on the frequency of the use of your range/
cooktop.
4. In order to prevent a re hazard, it is recommended
that you clean the aluminum lter at least every 2
months
USE AND CARE INSTRUCTIONS
WARNINGS: Do not aempt to remove the l-
ters while the Range Hood is operang.
Discconnect the electrical plug prior to any
maintenance.
This appliance is not intended for use by young
children or inrm persons without supervision.
There should be adequate venlaon in the
room when the Range Hood is used at the same
me as other fuel burning appliances.
Cleaning the lters
1. Remove the lters from the range hood and wash them
in a soluon of water and liquid detergent, leaving to
soak if necessary. Rinse thoroughly with warm water
and leave to dry.
2. The lters may also be washed in the dishwasher.
3. The aluminum panels may alter in color aer several
washes. This is normal and does not alter the perfor-
mance of the hood.
4. Replacement lters are available at
www.ardaappliances.com

visit us @ www.ardaappliances.com
pg 10
USE AND CARE MANUAL
A-O
B- Speed 1
C= Speed 2
D=Speed 3
E= Light
Control Funcons
5 Buon Control
5 Buon Control with Timer
4 Buon Electronic Control
4 Buon Sensor Control
A EDCB
A EDCB
A-Timer/15 minutes
B- Speed 1
C= Speed 2
D=Speed 3
E= Light
DCBA
A EDCB
A- Speed 1/O
B= Speed 2/O
C=Speed 3/O
E= Light
A-Timer/15 minutes
B- Speed Adjust “-”
C= LED Display
D=Speed Adjust “+”
E= Light

pg 11
Lighng
Depending on your model of ARDA hood, there are three
possible types of lighng. Incandescent , halogen and LED.
The illuminaon is designed for use during cooking and
not for prolonged general illuminaon of your kitchen.
Prolonged use of the lights may reduce the life me of the
bulbs.
WARNING: Do not touch or change light bulbs
while the hood is operang. Wait unl the bulb
has cooled before removing.
Changing the Light Bulbs
Use only the same lamps as the original specicaon.
Replacement lights are available through
www.ardaappliances.com
Incandescent lights
Unscrew the light. Careful. The glass may break. Replace
with the same size and waage.
Halogen and LED Lights.
With the grease lter removed, press the light xture out
of its mounng bracket. Unplug the light from the wiring
harness. Avoid direct contact between the lense and your
hands.
Replace the damaged lamp by reversing the steps. Snap in
place.
USE AND CARE MANUAL

visit us @ www.ardaappliances.com
pg 12
Problem Possible Reason Solution
Hood doesn’t turn on.
No electrical supply.
Check the plug is connect-
ed.
Check the main switch is
turned on.
Power cord is damaged Call ARDA service
Poor Airow
Aluminum grease lters
clogged
Clean the lters and replace
when dry.
Charcoal lters clogged. Re-
circulating mode only.
Replace the charcoal lters.
Hood is vibrating Hood is not secured in place
Check the installation of
hood. Tighten mounting
screws.
Motor running but no air
ow
Buttery valve jammed. Contact ARDA Service
Motor stops after a few
minutes
High temperature safety
device activated.
The kitchen is not sufcient-
ly ventilated.
The hood is installed too
near the cooking surface.
The hood must be at least
61cm (24” ) from the stove.
Strong cooking smell.
Fan speed too low
Use one of the higher set-
tings.
Charcoal lters not installed.
In re-circulating mode, char-
coal lters must be installed.
Oil dripping onto stove.
Aluminum grease lter satu-
rated.
Wash the aluminum grease
lters
Whirring sound
Something in contact with
fan blade.
Contact ARDA service
Lights are working but fan
isn’t
Contact ARDA service
Fan is working but lights are
not
Contact ARDA service
Trouble Shoong Guide

pg 13
LIMITED WARRANTY
Integrated Appliances Ltd. warrants all hoods products will be free from defects
in materials or workmanship for a period of ONE YEAR from the date of original pur-
chase. It further warrants the motor (part only) for an addional year. THERE ARE NO
OTHER WARRANTIES, EXPRESS OR IMPLIED, INCLUDING BUT NOT LIMITED TO, IM-
PLIED WARRANTIES OR MERCHANT ABILITY OR FITNESS FOR A PARTICULAR PURPOSE.
Proof of purchase/original invoice may be required to claim warranty. Keep a photo-
copy easily accessible.
If the home in which the hood is installed is sold within the warranty period, the
new owner is protected unl the expiraon of the original of the original purchaser’s
warranty.
During this one-year period, Integrated Appliances Ltd. will at its opon, repair or
replace, without charges, any product or part which is found to be defecve under
normal use and service.
THIS WARRANTY DOES NOT EXTEND TO ALUMINUM FILTERS, LIGHTS OR GLASS
CANOPIES. This warranty does not cover (a) normal maintenance and service (b) any
products or parts which have been subject to misuse, negligence, accident, improper
maintenance or repair (except by an authorized ARDA repair centre), faulty installa-
on or installaon contrary to recommended installaon instrucons or (c) cosmec
damage.
INTEGRATED APPLIANCES LTD. OBLIGATION TO REPAIR OR REPLACE, AT INTEGRAT-
ED APPLIANCES LTD.’S OPTION, SHALL BE THE PURCHASER’S SOLE AND EXCLUSIVE
REMEDY UNDER THIS WARRANTY. INTEGRATED APPLIANCES. LTD. SHALL NOT BE LI-
ABLE FOR INCIDENTAL, CONSEQUENTIAL OR SPECIAL DAMAGES ARISING OUT OF OR
IN CONNECTION WITH PRODUCT USE OR PERFORMANCE.
This warranty applies only within Canada, to hoods installed for use for PRIVATE
SINGLE FAMILY USE. If used for COMMERCIAL, MULTI-FAMILY USE or any other pur-
pose, the warranty will be voided.
Removal or disgurement of the serial plate, will void the warranty.
The purchaser will be responsible for any expenses involved in making the range
hood readily accessible for servicing. The purchaser will be responsible for any ex-
tra charges where the installaon is in a remote locaon such as un-assumed roads,
islands (Vancouver Island and PEI excepted) and areas known as coage country.
Freight damage is not covered by this warranty.
For an ARDA designated service company, please contact Integrated Appliances
Ltd. 1-877-268-4086 or [email protected]om.

visit us @ www.ardaappliances.com
pg 14
Place photocopy of proof of
purchase here

pg 9

Integrated Appliances Ltd.
1290 Martin Grove Road, Toronto, Ontario M4W 2X3
Tel: 416-646-2500 Fax: 416-646-2505
1 800 268-4086
distributed in Canada by
visit us at www.ardaappliances.com
/