Hauppauge 00208 User manual
- Category
- Computer TV tuners
- Type
- User manual

WinTV-HVR-Series
WinTV-NOVA-Series
WinTV-PVR-Series
Reference Manual
English
M-HVRNOVAPVR-V1.0-ENG - 25/07/2007

I
WinTV-HVR-Series
WinTV-NOVA-Series
WinTV-PVR-Series
Reference Manual
Copyright ©Hauppauge Computer Works, 2007
Hauppauge Computer Works, Ltd.
10 Borough High Street
Bank Chambers
London, UK, SE1 9QQ
www.hauppauge.co.uk
Tech Support: (+44) 0207 378 0202
Telephone: (+44) 0207 378 1997
Fax: (+44) 0207 357 9171
Hauppauge Computer Works, Inc.
91 Cabot Court
Hauppauge, NY 11788
www.hauppauge.com
Tech Support: (+1) 631 434 3197
Telephone: (+1) 631 434 1600
Fax: (+1) 631 434 3198
Hauppauge Digital Asia, Pte. Ltd.
Blk 1093, Lower Delta Road #04-05
Tiong Bahru Industrial Estate
Singapore 169204
www.hauppauge.com.sg
Tech Support: (+65) 276 4412
Telephone: (+65) 276 9163
Fax: (+65) 276 9167

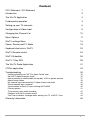
Content
FCC Statement / CE Statement 1
Introduction 2
The WinTV Application 3
Fundamental operation 3
Setting up your TV channels 6
Configuration of Video Input 9
Changing the Channel List 10
Menu Options 11
WinTV settings Menu 14
Pause, Record and TV Mode 19
Keyboard shortcuts in WinTV 23
WinTV Remote control 24
WinTV-Scheduler 26
WinTV 7 Day EPG 29
The WinTV Radio Application 31
VTPlus application 33
Troubleshooting: 35
HcwDriverInstall gives "INF File Open Failed" error 35
No DVB-T digital channels found 35
How-to connect a satellite/cable set top box, VCR or games console 37
Media Center Notes 39
My external input connected by S-Video is black and white 40
Games console slow response 40
Vista switches to Basic UI when starting WinTV2000 40
Primary options 41
TV becomes jumpy while recording 43
Problems with the IR remote control 44
"No Tuner Available" message when starting Live TV in MCE / Vista 44
Warranty Information 45
II

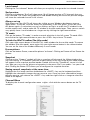
Waste Electrical and Electronic Equipment (WEEE)
The device may not be disposed of with household rubbish. This appliance is labeled in
accordance with European Directive 2002/96/EG concerning used electrical and electronic
appliances (Waste Electrical and Electronic Equipment - WEEE). The guideline determines the
framework for the return and recycling of used appliances as applicable throughout the EU.
To return your used device, please use the return and collection systems available to you.
FCC Statement
Radio Interference Statement:
The WinTV boards have been tested and found to comply with the limits for a Class B digital
device, pursuant to part 15 of the FCC Rules. These limits are designed to provide reasonable
protection against harmful interference in a residential installation. This equipment generates,
uses, and can radiate radio frequency energy and, cause harmful interference to radio com-
munications. However, there is no guarantee that interference will not occur in a particular
installation. If this equipment does cause harmful interference to radio or television reception,
which can be determined by turning the equipment off and on, the user is encouraged to try
to correct the interference by one or more of the following measures:
•reorient or relocate the receiving antenna.
•increase the separation between the equipment and receiver.
•connect the equipment into an outlet on a circuit different from that to which the receiver is
connected.
•consult the dealer or an experienced radio/TV technician for help.
FCC ID: H90WINCAST Assembled in Malaysia
CAUTION: Changes or modifications not expressly approved by the party responsible for
compliance to the FCC Rules could void the user’s authority to operate the equipment.
CE Statement: This equipment has been tested and complies with EN 55013, EN 55020 and
IEC 801-3 part 3 standards.
LEGAL DISCLAIMERS
If you have any feedback regarding the content of this manual we would be happy to receive
your input. Please send any comments to the following address: [email protected]
We have made every effort to ensure that the Text, Pictures and Tables in this manual, and
software programs and hardware are free from errors. However, we cannot guarantee that
errors or omissions do not exist. As a result, we cannot accept liability for any loss, damage
or misunderstanding made directly or indirectly as a result of using our Manual, Software
and/or Hardware.
This manual, as well as the software described in it, is furnished under license and may be
used or copied only in accordance with the terms of such license. The content of this manual
is furnished for informal use only, is subject to change without notice, and should not be con-
strued as a commitment by Hauppauge Computer Works Incorporated. Hauppauge Computer
Works Inc. assumes no responsibility or liability for any errors or inaccuracies that may appe-
ar in this book. No part of this publication may be reproduced or transmitted in any form or
by any means, electronic or mechanical, including photocopying, recording, or storing in a
retrieval system, or translating into any language in any form without the express written per-
mission of Hauppauge Digital Europe S.A.R.L.
All manufacturers' names, product names and any registered and unregistered trademarks
mentioned in this manual are used for identification purposes only and remain the exclusive
property of their respective owners.
Trademarks:
Hauppauge logo and WinTV product name: Hauppauge Computer Works, Inc. Windows,
Video for Windows, NetMeeting and Internet Explorer: Microsoft Corporation. Pentium is a
registered trademark of Intel Corporation. All other trade names are the service mark, trade-
mark or registered trademark of their respective holders.
1
WinTV Reference Manual

Introduction
This manual covers all of the WinTV-PVR, WinTV-NOVA and WinTV-HVR models for display-
ing TV on your PC’s screen. It covers, but is not limited to, the following models:
Personal Video Recorder (Analogue)
WinTV-PVR-USB2
WinTV-PVR-150
WinTV-PVR-250
WinTV-PVR-350
WinTV NOVA Recorder (DVB-T)
WinTV-NOVA-T PCI
WinTV-NOVA-T-USB2
WinTV-NOVA-T-500
WinTV-NOVA-T-Stick
WinTV-NOVA-TD Stick
WinTV-NOVA-S-Plus (DVB-S)
WinTV-NOVA-S-USB2 (DVB-S)
Hybrid Video Recorder (Analogue & DVB-T)
WinTV-HVR-900
WinTV-HVR-1100
WinTV-HVR-1300
WinTV-HVR-1400
WinTV-HVR-3000 (DVB-S)
For models which have particular features (such as the chapter on the DVB-S), we will note
which models these features are available on.
2
WinTV Reference Manual

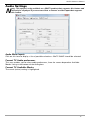
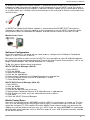
The WinTV-Application
After the installation of the software from the CD-ROM you find see the shortcut "Hauppauge
WinTV" in the Windows Start menu and on your desktop. To start the WinTV application dou-
ble left click on your mouse button.
WinTV Reference Manual
3
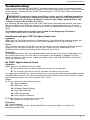
Some control options can be selected by right clicking on the mouse button:
● When watching a "current TV program" a simple right click on the mouse button will display
the current TV list for fast channel changing. You can also change channels by using the
numbers on the keyboard or by pressing the letter on the keyboard for the channel that you
want to view.
● With a right click of the mouse button on the "audio type/language selection" you can chan-
ge the available audio language settings of the current TV program that you are watching.
● With a right click of the mouse button (hold for 2 seconds) in the TV window the control
options are displayed.
In order to re-size the window, move the mouse pointer to the edge of the TV window. This
changes the mouse pointer into a double arrow. Press and hold the left hand mouse button
and drag the window into the desired size, releasing the left mouse button when finished.
Fundamental operation
Channel changing
You can change channels by using the Channel Up or Channel Down buttons on the WinTV.
You can also type a channel number (for example:27) and WinTV will tune to that channel.
Volume change
With the slide bar on the top left hand side of the WinTV application window you can change
the Volume level. Alternatively you can use the keypad on the keyboard <PgUp> for volume
up or <PgDn> for volume down.
Sound on / off
To mute the sound on or off click on the green button below the slider bar. Alternatively you
can use the keys on the keyboard <CTRL> + <M>.
Windowed mode
Minimize
Close WinTV
Snapshot view
window:
Double click on
each “thumbnail” to
see image full size.
Click and hold your
right mouse button
to see image
options.
Click your right mouse button in the
TV window to remove toolbars.
Click again to restore toolbars.
Sound on / off
Channel down
Volume
Always on top
TV mode
Snapshot still
capture
Record-Mode
Configuration
Setup Menu
Channel surf
Last channel
CFG
Configure Snapshot
Freeze picture
Channel up
Playback-Mode
Pause-Mode
(Time-Shift)
TV-Mode
Audio-Type
Current TV
channel
Subtitles on / off

4
WinTV Reference Manual
Last channel
Clicking the “last channel” button will allow you to quickly change to the last viewed channel.
Surf preview
Clicking on the button "Surf" will show up to 16 still image preview of TV channels that you
have scanned. The screen will gradually fill and double clicking on one of the preview images
will show the selected channel in full screen.
Always on top
With Always on Top, WinTV will always be visible on your Windows desktop on top any
applications. To turn on, click the Always on top button. It will turn green. To turn off, click
this button again. A convenient way to use Always-on-Top is to make the TV window in the
no-title mode small, and to make the TV window in the title mode larger. Then you can switch
very quickly from a small window to a larger one by clicking the right mouse button.
TV mode
Click on the button "TV mode", in order to watch television in the full screen TV mode. With
one click to the right mouse button or press the <ESC> key to leave TV mode.
To hide the WinTV toolbar (No-title mode)
Click your right mouse button in the WinTV’s video window for the no-title mode. To restore
the toolbars (the title mode), once again click your right mouse button in the video window.
You can set the size of the window differently in each mode.
Freeze picture
Click on the button Freeze, around the picture "to freeze". Clicking on Freeze will un Freeze the
picture.
Snapshot
Clicking on the “Camera” symbol will take a snapshot still picture of the Video window that
you are viewing. A "Thumbnail" (preview made smaller) of the still image of the video window
will appear in the snapshot preview border. Double click on the "Thumbnail", to see it in full
size. Now you can save the picture using option in the menu "file"/"save under..." on your hard
disk. Clicking the Button CFG allows you to configure the snapshot function.
Saving several snapshots at the same time
Highlight the first image and then hold down the <SHIFT> key on the keyboard and then
highlight the subsequent images that you want to save. Once you have selected the images
that you want to save release the <SHIFT> key and then right click on a image to select the
SAVE to file option.
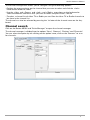
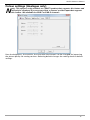
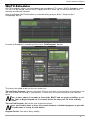
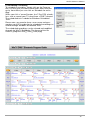
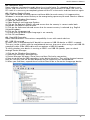
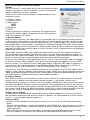
Channel-Menu
To display the channel configuration menu <right> click with the mouse button on the TV
window:

The channel configuration allows you to configure using the following options:
•Position the mouse pointer on the channel that you want to select and click the <Left>
hand mouse button to select.
•Use the <Up> and <Down> and <Left> and <Right> arrow keys on the keyboard to
select the different sub-menu that you want to select and press Enter / Return
•To select a channel list of either TV or Radio you can filter for either TV or Radio channels to
be show in the channel list.
The channel can also be selected by pressing the 1st letter of the channel name on the key-
board.
Channel search
Click on the Button MENU and “Suite Manager” to open the channel manager.
The channel manager is divided into the options "Scan", "Sources", "Devices" and "Channels".
You can select the option by left clicking on the option name, click on the “Sources” to scan
for channels.
5
WinTV Reference Manual

Search for Analogue channels
This section refers to products with RF antenna and Cable tuner.
6
WinTV Reference Manual
Click on the Button MENU and “Suite-Manager” to open the channel manager. Select the
<sources> and highlight the <analog> source.
Automatic channel search
Click on "Autoscan...", in order to start the automatic RF antenna channel scan. The channel
frequencies will scan from 1 to 69. When channels are found they will be listed and the scan-
ning will continue. After the completion of the channel scan a new window of an overview of
the scanned frequencies and the number of found programs are will be displayed.
Manual channel search
You can shorten the channel scan if you know the channel numbers for your local transmitter
by entering the numbers into the channel number and click on Tune. Please refer to the trou-
bleshooting section to find out the channel for your location.
Search for DVB-T channels
N
ote: This section refers to products with DVB-T tuner (WinTV-NOVA-T and WinTV-
HVR series). Select the DVB-T option on the left hand side.
Automatic channel search
Click the <Autoscan> button to start the search for DVB-T channels, ensure that you have
selected your country location. The channel search will count from 1 to 74 and when a signal
is found the box locked will have a tick.
Manual channel search
You can shorten the channel scan if you know the Multiplex Channel Numbers for your local
digital transmitter by entering the numbers into the Channel Number and click on Tune.
Please refer to the troubleshooting section to find out the Multiplex Channel Numbers for
your location.

Search for DVB-S channels
N
ote: This section refers to products with DVB-S tuner (WinTV-NOVA-S series and
WinTV-HVR-3000).
LNB - Configuration and Channel search
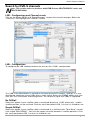
Click on the Button MENU and “Suite-Manager” to open the channel manager. Select the
<sources> and highlight the <DVB-S> source.
7
WinTV Reference Manual
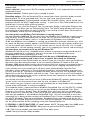
LNB - Configuration
To configure the LNB satellite positions left click on the <LNB> configuration.
The "LNB" (Low Noise block) is located on the head of the SAT antenna. "DiSEqC" is a stan-
dard for the control of several LNBs over a multi-switch. Select the DiSEqC option that suits
your SAT Dish installation and configuration. The control of up to four LNBs is supported.
No DiSEqC
Select this option if your satellite cable is connected directly to 1 LNB, where only 1 orbital
satellite position can be received. Click the small box before LNB_1 so that it is ticked for use.
Simple DiSEqC
Select this option if your satellite cable is connected to a shift box with “Tone Burst” control
(also called “Mini-DiSEqC”. You have the option to select between 2 satellite positions. Click
the small box before LNB_1 so that it is ticked for use.

DiSEqC 1.0
By default this option is selected to DiSEqC Level 1.0. You can select between 4 different
satellite positions. The specific settings can be found from the DiSEqC shift box or DiSEqC
multi-toggle documentation.
After selecting the DiSEqC support you select the option on the left hand side which LNB
should be configured, so that the blue line is highlighted and then select on the right hand
side which satellite from the drop down list which will be used for channel scanning.
The frequency data for "Low Osc", "High Osc" and "LNB SWITCH" are preset for the use of
commercial universal LNBs and do not need to be changed. If these values are changed you
can re-set the default options by clicking on the button "default".
Automatic channel search
Click on "Autoscan...", in order to start the automatic satellite channel scan. The channel fre-
quencies scan will depend on the satellite selection that you selected in the option “Satellite
Sources” and “LNB” position. When channels are found they will be listed and the scanning
will continue. After the completion of the channel scan a new window of an overview of the
scanned frequencies and the number of found programs are will be displayed.
Manual channel search
If you know the frequency, symbol rate and polarization of a certain TV or radio program you
can enter the information to perform a manual channel scan. If you select the option "manual
scanning", enter the values there and you click on the button "scan". The programs found on
this transponder frequency will be listed.
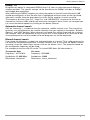
For example on the Astra 28.2 East the TV channel BBC News 24 information is:
Transponder data: You enter:
Frequency: 10.773 MHz Frequency: 10733000
Symbolrate: 22.000 MSps Symbolrate: 22000
Polarization: Horizontal Polarization: Linear_Horizontal
8
WinTV Reference Manual

Configuration a Video Input
When connecting a external source to the WinTV product please ensure that the cables are
connected in the correct order.
N
ote: This section refers to WinTV products with Video Input.
Connecting a Video Recorder or Set top box
We recommend using a SCART to Composite cable for connecting most VCR's and set top
boxes to our devices, this is because unless stated most of these devices will not be able to
output in Svideo, so if you use a SCART to Svideo cable all you will see is a black and white
image.
There may be a switch on the SCART connecting for <IN> or <OUT>, ensure it is set to
<OUT> so that the signal is sent from the SCART to the composite.
If your VCR or Set top box has a S-video output and your WinTV product has S-video input
then you can use a S-video to S-video lead.
You may also need to connect the Red & White RCA phono plugs into the Stereo Line in for
the sound to be transferred. Simply use a Red & White female RCA to Stereo Jack connec-
tion.
Configuring the Composite channel
Click on the Button MENU and “Suite-Manager” to open the channel manager. Select the
<sources> and highlight the <Composite> or <S-video> source .
The video format commonly used in Europe is Pal-BGHIDK, type a name for the channel and
a description and click on <Save> and <Close>.
9
WinTV Reference Manual
Selecting the composite channel in the channel list
To select the Video Channel that you created <right> click with the mouse button on the TV
window and select the channel list. You should see you the channel name you just created at
the bottom of the channel list.

Changing the Channel List
Click on the Button MENU and “Suite-Manager” to open the channel manager. Select the
<Channels> tab.
10
WinTV Reference Manual
The channel list allows you to see all of the available channels that have been scanned.
Channel-Menu
If you right click on one of the channels on the right hand side you will have some of the fol-
lowing options:

Programme Delete
To delete a channel you can either highlight and channel and the right click and select delete
or highlight the name of the channel and press the “DELETE” key on your keyboard. In order
to delete the full channel list you can <Select All> and then delete.
Programme Rename
To rename a channel you have to highlight it and then click on the column “Preferred Name”.
You can then edit the name of the channel.
Programme Number Location
1. Highlight the channel that you want to change in the column “Preferred Number”. You can
now enter a new number that is not already assigned to another channel.
2. To move a channel up or down the list, highlight the channel and then click on the “Move
Channel (UP/DOWN) entry.
Favorite channel list
You have the option of creating a favorites channel list in the order that you want. Simply
click on the channel name on the right hand side and drag the channel name to the left on
top of the Favorite group on the left hand side window.
Creating a new favorites group
You can also create a new channel suite if you prefer to create a new favorites group. Click
on the Add Suite and type in a name for the new suite. If you then highlight “All Channels”
you can then drag the channel on the right hand window into the new suite that you have
created. This is useful if you only want some channels to be shown in your TV channels list.
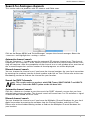
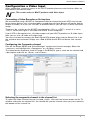
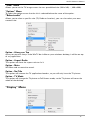
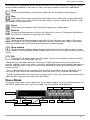
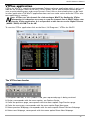
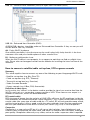
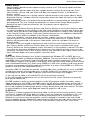
Menu Options
Clicking on the “MENU” button will
give you the following options:
11
WinTV Reference Manual
“4 x 3”, “4 x 3 Pan Scan”, “4 x 3 Letter Box”
Select the TV picture aspect ratio 4 x 3.
“16 x 9”
Select the TV picture aspect ratio 16 x 9.
“Select Channel”
Select the channel that you want to view.
“Suite Manager”
Opens the channel suite manager where you can scan for channels and configure video
input.
”Configuration” Menu
Allows you to configure the “Channels...”, “Audio”, “Snapshots...”, “Preferences...” and
“MPEG Settings”.

“View” Menu
Allows you to set the TV image screen size to a pre-defined size (320 x 240, ..., 800 x 600).
“Options” Menu
To select the option ensure that the tick is selected before the name of the option.
“Select suite”
Allows you to select a specific suite (TV, Radio or favorites), you can also select your own
created suite.
12
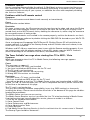
WinTV Reference Manual
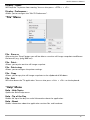
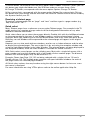
Option - Always on Top
Always on top will always make WinTV be visible on your windows desktop, it will be on top
of any application.
Option - Aspect Radio
This option will force the aspect ratio to 4 x 3.
Option - Mute
Will Mute and un-mute the sound.
Option - No-Title
This option will remove the TV applications borders, so you will only have the TV picture.
Option - TV Mode
This option will change the TV picture to Full Screen mode, so the TV picture will cover the
whole of the desktop.
“Display” Menu

13
WinTV Reference Manual
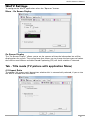
Display - Freeze
Will stop the TV picture from moving. You can also press: <CTRL> + <F>.
Display - Preferences...
Allows you to configure the “WinTV Preferences”.
“File” Menu
File - Save as
After using the “Snap” button you will be able to save that still image snapshots to different
file formats (e.g. Jpeg, BMP etc).
File - Print...
Allows you to print out the still image snapshot.
File - Print setup
Allows you to configure the printer settings.
File - Copy
Allows you to copy the still image snapshots to the clipboard of Windows.
File - Exit
Will close down the TV application. You can also press <Alt> + <F4> on the keyboard.
“Help” Menu
Help - Help Topics
Opens the online help menu.
Help - Tip of the Day
Shows the tip of the day for useful information about the application.
Help - About
Shows information about the application version files and hardware.

14
WinTV Reference Manual
On Screen Display
The “On Screen Display” allows you to set the amount of time the information bar will be
displayed on the screen. The annunciator font allows you to change the font type and colour
that will be used. Where available Closed Captioning (CC) will show subtitles if selected.
Tab - Title mode (TV picture with application Menu)
4:3 Aspect Ratio
The option "4:3 aspect ratio" determines whether this is automatically selected, if you re-size
the WinTV window with the mouse.
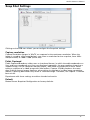
WinTV Settings
To configure the WinTV application select the “Spanner” button.
Menu - On Screen Display

Enforce Aspect ratio
When checked, the image's aspect ratio is preserved as the WinTV window is scaled.
Selecting Enforce Aspect ratio will round off the height and width dimensions of the televi-
sion image in order to maintain the proper aspect ratio.
WinTV can operate as a Screen Saver, or can retain your current Screen Saver. If Allow
Screen Saver is checked, choosing the "Use System Screen Saver" option uses any current
screen saver configuration on your computer. Choosing TV Mode uses WinTV (in full-screen
mode) as the system screen saver.
Tab - No Title mode (TV picture only)
No Title Mode Displays the Television inside the application window, without Title and Menu
bars. This configuration dialog provides Aspect Ratio and Screen Saver settings as described
in Title Mode (above).
Tab - TV Mode (Full screen TV)
TV Mode displays the television image using the entire height and width available to the
monitor screen.
Movies - MPEG Settings
15
WinTV Reference Manual
DVCR Record File Path
Refers to the save path of the actual recorded Video files during the record mode.
Pause Mode Record Path
Refers to the temporary path of the file that is buffered during the pause mode.
Pause Buffer
This sets the maximum size of the Pause Buffer..
Quality Level
Allows you to set the quality level of the recorded MPEG files files, example “DVD 6Mb” for
analog recordings.
N
ote: For digital WinTV product (DVB-S, DVB-T) the default is "DVD 2048 bytes" and
this cannot be changed (native MPEG quality).

Snap Shot Settings
16
WinTV Reference Manual
Clicking on the CFG icon allows you to configure the Snapshot settings:
Capture resolution
Capture Resolution Images in WinTV are captured at the maximum resolution. When the
image is saved to a file name (below), you select a resolution for the snapshot, from 320 x
240 (minimum) to 1600 x 1200 (actual size).
Fields Captured
Fields Captured Broadcast video uses an interlaced format, in which the odd-numbered scan
lines and even-numbered scan lines are displayed separately; the eye combines them into a
smooth image. On the computer monitor output,, both fields are displayed at once. When
taking a snapshot of a video image with little motion, Capture 2 Fields produces the most
data and the clearest image. However, when taking a snapshot of a video image containing
motion, capturing both fields may result in a blurred image. Therefore, use Capture 1 Field for
best results.
Experiment with these settings to achieve the desired results.
Default
Button Resets Snapshot Configuration to factory defaults.

Audio Settings
N
ote: This option is only available on a WinTV product that supports this feature and
will only be displayed if you are tuned into a channel or video input that supports
this feature.
17
WinTV Reference Manual
Audio Mixer Inputs
Click on this item to display a list of possible selections: WinTV WAVE should be selected.
Current TV Audio preferences
This area enables you to select audio preferences, from the source dependent Available
Modes listing at the bottom of the dialog box.
Current TV Available Modes
The actual (active) setting is highlighted.
Page is loading ...
Page is loading ...
Page is loading ...
Page is loading ...
Page is loading ...
Page is loading ...
Page is loading ...
Page is loading ...
Page is loading ...
Page is loading ...
Page is loading ...
Page is loading ...
Page is loading ...
Page is loading ...
Page is loading ...
Page is loading ...
Page is loading ...
Page is loading ...
Page is loading ...
Page is loading ...
Page is loading ...
Page is loading ...
Page is loading ...
Page is loading ...
Page is loading ...
Page is loading ...
Page is loading ...
Page is loading ...
-
 1
1
-
 2
2
-
 3
3
-
 4
4
-
 5
5
-
 6
6
-
 7
7
-
 8
8
-
 9
9
-
 10
10
-
 11
11
-
 12
12
-
 13
13
-
 14
14
-
 15
15
-
 16
16
-
 17
17
-
 18
18
-
 19
19
-
 20
20
-
 21
21
-
 22
22
-
 23
23
-
 24
24
-
 25
25
-
 26
26
-
 27
27
-
 28
28
-
 29
29
-
 30
30
-
 31
31
-
 32
32
-
 33
33
-
 34
34
-
 35
35
-
 36
36
-
 37
37
-
 38
38
-
 39
39
-
 40
40
-
 41
41
-
 42
42
-
 43
43
-
 44
44
-
 45
45
-
 46
46
-
 47
47
-
 48
48


Hauppauge 00208 User manual
- Category
- Computer TV tuners
- Type
- User manual
Ask a question and I''ll find the answer in the document
Finding information in a document is now easier with AI
Related papers
-
Hauppauge WinTV-HVR-1150 User manual
-
Hauppauge TV Receiver WinTV-NOVA-TD User manual
-
Hauppauge WinTV-PVR-150 User manual
-
Hauppauge WinTV-PVR-USB2 Quick setup guide
-
-
-
Hauppauge WinTV HVR-1800 TV Tuner PCIe Capture Card WinTV HVR-1800 User manual
-
-
-
Other documents
-
Acer Aspire X1700 User manual
-
Acer oneTwo (PW.U53) User manual
-
Transystem DVB-T User manual
-
media-tech MT4171 User manual
-
TechniSat HD-Vision DVB-S User manual
-
Actron CP9180 User manual
-
 Cables Direct USB2-LINKVS2 Datasheet
-
Conceptronic C08-017 Datasheet
-
UMC 15/4 User manual
-
 Miglia Technology Infrared Remote Control User manual

