Page is loading ...

NITRO MAX
DRUM MODULE
User Guide
English

2
(1.0) Introduction .......................................................... 4
(1.1) Box Contents ..................................................................................... 4
(1.2) Support ............................................................................................... 4
(1.3) Setup ................................................................................................... 5
(1.3.1) Connection Diagram ...................................................................................................... 5
(1.3.2) Drum Setup and Playing ............................................................................................. 6
(2.0) Features ................................................................. 7
(2.1) Top Panel ........................................................................................... 7
(2.2) Rear Panel ........................................................................................ 12
(2.3) Side Panel ........................................................................................ 13
(2.4) Bottom Panel .................................................................................. 13
(3.0) Basic Functions ................................................... 14
(3.1) Editing and Saving Drum Kits ................................................... 14
(3.2) Playing Along With Songs ......................................................... 16
(3.3) Playing Along With Beats, Rhythms, and Patterns ............ 17
TABLE OF CONTENTS

3
(4.0) Advanced Functions .......................................... 18
(4.1) Adjusting Utility Settings ............................................................ 18
(4.2) Adjusting the Metronome ......................................................... 19
(4.3) Recording ...................................................................................... 20
(4.4) MIDI Settings .................................................................................. 21
(4.5) Connecting to a Bluetooth® Device ....................................... 23
(5.0) Appendix ............................................................ 24
(5.1) Velocity Curves ............................................................................. 24
(5.2) Pad MIDI Note Numbers ............................................................. 25
(5.3) Kits .................................................................................................... 26
(5.4) Sounds ............................................................................................. 27
(5.5) Technical Specifications ............................................................ 33
(5.6) Trademarks & Licenses ............................................................. 34

4
(1.0) Introduction
(1.1) Box Contents
Nitro Max Drum Module
Nitro Max Drum Kit & Accessories
Drumeo Drum Lessons Card
Quickstart Guide
Safety & Warranty Manual
(1.2) Support
For the latest information about this product (system requirements, compatibility
information, etc.) and product registration, visit alesis.com.
For additional product support, visit alesis.com/support.

5
(1.3) Setup
Items not listed in (1.1) Box Contents are sold separately.
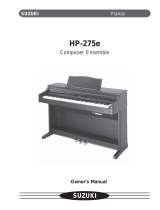
(1.3.1) Connection Diagram
Power
Speakers*
Smartphone, MP3 player, etc.*
Computer*
Use the cable snake to connect the drum module to the
drum/cymbal pads of your electronic drum kit.
* sold separately
Music
Device*
Optional expansion tom and
cymbals available separately.
CYM 2USBPOWER TOM 4 R L/MONO AUX IN
TRIGGER INPUT AUDIO OUTPUT
0.5A9V

6
(1.3.2) Drum Setup and Playing
1. Connect your electronic drum kit's pads to the cable snake, then connect the
cable snake to the Cable Snake Input on the module's bottom panel.
2. Optional: If you have any additional pads (e.g., an extra tom, an extra crash
cymbal), connect them to the module's Tom 4 Input or Crash 2 Input.
3. Connect speakers (sold separately) to the Audio Output and/or connect 1/8"
stereo headphones (sold separately) to the Phones output. Turn the Volume
knob all the way down (counterclockwise).
4. Connect the module to a power source, using the included power adapter (9V
DC, 500 mA, center positive).
5. Press the Power Button to turn the module on.
6. Adjust the Volume knob to an appropriate level and play some drums!
Selecting a Drum Kit: After powering on the module, or after pressing the Kit button,
you will see the Kit indicator and NUM on the display. Use the – and + buttons to
select a drum kit, and start playing! Kits 01-32 are Preset Kits. Kits 33 - 48 are User
Kits (see (3.1) Editing and Saving Drum Kits for more information).
Note: The top Mode LED (Normal Mode), and KIT button LED must be lit in order to
cycle through available Kits.
Using the Click: You can turn the click track (metronome) on or o by pressing the
Click button. Adjust its tempo by pressing Tempo and using the – and + buttons to
set the new BPM (beats per minute). See (4.2) Adjusting the Metronome for more
information about metronome features.

7
(2.0) Features
(2.1) Top Panel
1. Display
This display shows information relevant to the current settings and functions.
2. Bluetooth®
Press this button to pair to a Bluetooth device. The backlit button will be lit solid
when a device is paired. If the button is pressed again, pairing mode will be
canceled. See (4.5) Connecting to a Bluetooth® Device for more details.
3. Volume
Adjusts the output volume of the Audio Output and Phones.
4. Mode
Press to set the function of the three buttons to the left to Normal mode (Kit,
Voice, Song) or Learning mode (Rhythm, Beat, Pattern), indicated by the LEDs.
KIT VOICE SONG
RHYTHM BEAT PATTERN
MODE
SAVE
UTILITY
START/
STOP
RECORD
TEMPO
CLICK
PL AY/
PRACTICE
DRUM
MUTE
NITRO MAXDRUM MODULE
VOLUME
123
4

8
5. Kit / Rhythm
In Normal Mode, press this button to enter the Kit Menu, where you can select a
kit or adjust kit-related settings.
In Learning Mode, press this button to select a rhythm (full kit) to play along to
or adjust pattern-related settings.
Note: To play along with the pre-recorded rhythm pattern, press the
Play/Practice button. To play along without the pre-recorded rhythm pattern
and keep score of your performance, press the Start/Stop button.
6. Voice / Beat
In Normal Mode, press this button to enter the Voice Menu, where you can
select a voice (drum sound) or adjust voice-related settings. In Learning Mode,
press this button to select a beat (snare drum only) to play along to or adjust
pattern-related settings.
Note: To play along with the pre-recorded beat pattern, press the Play/Practice
button. To play along without the pre-recorded beat pattern and keep score of
your performance, press the Start/Stop button.
7. Song / Pattern
In Normal Mode, press this button to enter the Song Menu, where you can select
a song or adjust song-related settings. In Learning Mode, press this button to
enter the Pattern Menu, where you can select a pattern (full kit plus
accompaniment) to play along to or adjust pattern-related settings.
Note: To play along with the pre-recorded pattern, including backing track
drums, press the Play/Practice button. To play along with the pre-recorded
pattern and keep score of your performance without the backing track drums,
press the Start/Stop button.
KIT VOICE SONG
RHYTHM BEAT PATTERN
MODE
SAVE
UTILITY
STA RT/
STOP
RECORD
TEMPO
CLICK
PL AY/
PRACTICE
DRUM
MUTE
NITRO MAXDRUM MODULE
VOLUME
6 75

9
8. Save
While in Kit or Voice mode, press the Save button to save the current kit
settings. Use the – / + buttons to select an available save slot, and then press
Save again. To cancel a change before saving, press Kit, Voice, or Song. See
(3.1) Editing and Saving Drum Kits for more details.
9. Utility
While in Normal Mode (Kit, Voice, or Song), press this button repeatedly to
access the advanced settings for the pads, as well as the module's MIDI settings.
Use the – / + buttons to adjust parameters. See the (4.1) Adjusting Utility
Settings section for more information.
10. – / +
Press to adjust the selected parameter. Use these buttons to change the value
of the setting shown on the display, such as kit numbers or eects levels.
11. Start/Stop
When in the Normal Mode, press this button to start or stop Song playback. See
(3.2) Playing Along With Songs for more details.
When in the Learning Mode, press this button to start or stop the selected
Pattern, Rhythm, or Beat scored performance, once you feel you have learned
the Pattern, Rhythm, or Beat in Play/Practice. Select a Song
/Pattern/Rhythm/Beat using the – / + buttons. Press and hold the Play/Practice
button for 2 seconds to hear the playback of your performance. Press
Start/Stop or Play/Practice again to stop playback. See (3.3) Playing Along
With Beats, Rhythms, and Patterns for more details.
KIT VOICE SONG
RHYTHM BEAT PATTERN
MODE
SAVE
UTILITY
STA RT/
STOP
RECORD
TEMPO
CLICK
PL AY/
PRACTICE
DRUM
MUTE
NITRO MAXDRUM MODULE
VOLUME
10
11
9
8

10
12. Record
While in Normal Mode (Kit, Voice, or Song), press this button once to record-
arm the module. When armed, the button LED wil flash. To start recording,
press Start/Stop or hit a pad. When recording, its LED will light solid. (To stop
recording, press Start/Stop again.) See the (4.3) Recording section for more
information.
13. Tempo
Press to display the current tempo in beats per minute (BPM). Use the – / +
buttons to change it.
14. Click
Press this to turn the click track (metronome) on or o. See the (4.2) Adjusting
the Metronome section for more information.
15. Play/Practice
In Normal Mode, press this button to hear a recorded performance. In Learning
Mode, press this button to start playing the beat, rhythm, or pattern; you can
then play along to it without being scored.
16. Drum Mute
When this button is on, its LED will be lit and the pre-recorded drum part will be
muted so you can hear only your performance and any accompaniment
(backing music). While in Song mode, this button can be pressed again to hear
the pre-recorded drum part. This button will automatically be on while
recording.
KIT VOICE SONG
RHYTHM BEAT PATTERN
MODE
SAVE
UTILITY
STA RT/
STOP
RECORD
TEMPO
CLICK
PL AY/
PRACTICE
DRUM
MUTE
NITRO MAXDRUM MODULE
VOLUME
15
16
13
14
12

11
17. Mobile Device Shelf
Place your device here. While the rubber padding will help keep your device
still, use caution when playing with force as vibrations from heavy playing may
cause the device to move. Please keep your device in landscape mode for the
most stability.
KIT VOICE SONG
RHYTHM BEAT PATTERN
MODE
SAV E
UTILITY
STA R T/
STOP
RECORD
TEMPO
CLICK
PLAY/
PRACTICE
DRUM
MUTE
NITRO MAXDRUM MODULE
VOLUME
17

12
(2.2) Rear Panel
1. Power Input
Connect the included power adapter (9V DC, 500mA, center pin-positive) here,
then connect the adapter to wall power.
Note: To save energy, the drum module will shut down automatically after 30
minutes of no activity. If you do not need this feature or want to adjust the
shutdown time, do the following:
I. Power on the drum module.
II. Press Utility repeatedly until the Power page (POW) is selected.
III. Use the – / + buttons to adjust the shutdown time (30 – 60 minutes, or
OFF).
2. Power Button
Press the Power button to turn the module on or o.
3. USB-B Port
Use a USB cable (sold separately) to connect the module to your computer to
send MIDI information.
Note: Only MIDI information is sent over the USB connection, not audio.
4. Tom 4 Trigger Input (1/4” [6.35 mm] TRS)
Use a standard 1/4" TRS cable to connect this input to an optional drum pad,
which will trigger the Tom 4 sound.
5. Crash 2 Trigger Input (1/4” [6.35 mm] TRS)
Use a standard 1/4" TRS cable to connect this input to an optional cymbal pad,
which will trigger the Crash 2 sound.
6. Audio Output (1/4” [6.35 mm] TRS)
Connect this output to a speaker, amplifier system, or mixer.
7. Aux Input (1/8” [3.5 mm] TRS)
Connect an auxiliary device such as a phone, MP3 player, or CD player here. This
audio will be heard in the Audio Outputs and Phones output. During recording,
the audio from this input will not be recorded.
CYM 2USBPOWER TOM 4 R L/MONO AUX IN
TRIGGER INPUT AUDIO OUTPUT
0.5A9V
1
2 3 45 6 7

13
(2.3) Side Panel
1. Phones Output
Connect your 1/8" (3.5 mm) headphones to this output.
(2.4) Bottom Panel
1. Cable Snake Input
Connect the cable snake included
with the Nitro Max Drum Kit to the
module here.
PHONES
1
1

14
(3.0) Basic Functions
(3.1) Editing and Saving Drum Kits
Important:
• To edit and save your kits, you must be in Normal Mode, with either the Kit or
Voice button lit.
• Remember to save your kits after you have entered the settings you want!
First, press Kit until NUM appears on the display. Then use the – / + buttons to select
your desired kit. Once you've selected your kit, you can edit its settings.
To adjust the kit settings:
1. Press the Kit button to cycle between these other editable kit parameters:
• VOL: Kit volume
• REV*: Kit reverb
• EQH*: Equalization, high frequencies
• EQM*: Equalization, mid frequencies
• EQL*: Equalization, low frequencies
2. Use the – and + buttons to adjust the value.
* The reverb and equalization aect the sound of the kit and song.

15
To adjust the pad settings:
1. Make sure the module is in Normal mode (top Mode LED is lit).
2. Hit the pad whose settings you want to adjust.
3. Press the Voice button.
4. Press – / + buttons to change a sound.
5. Press the Voice button again to view and edit these settings on the display:
• NUM / H-C**: Pad voice (drum, cymbal, or percussion sound)
• VOL: Pad volume
• PAN: Pad panning
• PIT: Pad pitch
• REV: Pad reverb
• MID: MIDI note. See the (5.0) Appendix for a list of the default MIDI note
numbers for each pad.
• P-S: Pad song switch (selects whether or not a song will play when that pad
is struck)
• P-N***: Pad song number (selects which song will play when that pad is
struck, if P-S is set to ON)
6. Use the – and + buttons to adjust the value.
** If the selected pad is the Hi-Hat, you can choose one of the combinations of open and closed
hi-hat sounds (H-C, 001-007).
*** Songs 61 - 80 are pitched, nondrum samples (e.g., bass, piano, vibraphone, etc.) rather than
actual songs, so they're ideal for assigning to a pad, when selecting the "pad song number."
Songs 66 - 80 will change pitch with each hit. Songs 1 - 60 are actual songs.
To save your settings:
1. Press Save.
2. Use the – and + buttons to select the User Kit slot you want to save it to (33 -
48).
3. Press Save again.
To cancel a change before saving, press Kit, Voice, or Song.

16
(3.2) Playing Along With Songs
Important: To play songs, you must be in Normal Mode (Kit, Voice, Song).
To select and play a song:
1. Press the Song button until NUM appears on the display.
2. Use the – and + buttons to select a song.
3. Press Start/Stop to begin playback.
Adjust the tempo by pressing Tempo and using the – and + buttons to adjust the
BPM. Press both – and + buttons simultaneously to reset the tempo to its default
value. Press the Song button to cycle through additional Song settings.
Adjust the volume of the music (not the drum part) by pressing the Song button,
then press the Song button repeatedly until ACC appears on the display. Use the –
and + buttons to adjust the volume. It will return to its default volume setting when
you power the module o.
Adjust the volume of the drum part by pressing the Song button, then press the
Song button until DRM appears on the display. Use the – and + buttons to adjust the
volume. To mute/unmute the drum part entirely, press Drum Mute. It will return to
its default volume setting when you power the module o.

17
(3.3) Playing Along With Beats, Rhythms, and Patterns
Important: To play along with Beats, Rhythms, or Patterns, you must be in Learning
Mode.
1. Press one of these Learning Mode buttons to select how you want to play:
• Beat (BEA): Snare drum only
• Rhythm (RHM): Full kit
• Pattern (PTN): Full kit plus musical accompaniment
2. Use the – and + buttons to select the beat, rhythm, or pattern you want to
practice.
3. To practice without being scored, press Play/Practice (PRA will appear on the
display). After a count-in, the beat, rhythm, or pattern will repeat so you can
practice it.
To play and be scored, press Start/Stop. After a count-in (EXM will appear on
the display), the beat, rhythm, or pattern will play once without the drum part.
Play the drum part as accurately as possible. At the end, you will receive a score
(SCO) based your accuracy. To improve your score, Practice the beat, rhythm, or
pattern without being scored (see above) and try again!
Every played and scored attempt is automatically recorded. Press and hold
Play/Practice for 2 seconds to hear the playback of your practice (PLY). Press
Play/Practice again to stop playback.
Notes:
• If EPY appears on the display, it means the memory is empty because no
recording was made. Play while scoring your performance (as described above)
to record.
• If FUL appears on the display, it means the module's memory became full while
recording. You can clear/overwrite the memory by simply making a new
recording.
To adjust the Learning Mode settings:
Each Learning Mode has dierent adjustable settings. Press the desired Learning
Mode button (Rhythm, Beat, or Pattern) to cycle through the additional settings,
and use the – and + buttons to adjust their values:
• Beat (BEA): (DRM) Drum volume
• Rhythm (RHM): (LEV) Diculty level; (DRM) Drum volume
• Pattern (PTN): (LEV) Diculty level; (ACC) Accompaniment; (DRM) Drum
volume

18
(4.0) Advanced Functions
(4.1) Adjusting Utility Settings
The Utility menu lets you further customize your pad settings and adjust the
module's MIDI settings.
To adjust the Utility settings:
1. Press the Mode button so that Normal Mode (Kit, Voice, Song) is active.
2. Hit the pad whose settings you want to adjust.
3. Press the Utility button repeatedly until the desired setting appears on the
display:
• SEN (Pad sensitivity): Controls how responsive a pad is when you hit it. The
higher the value, the less forcefully you need to play to generate a loud hit.
• THR (Pad threshold): Controls how forcefully you have to hit the pad to
generate a sound. The higher the value, the harder you have to hit it.
• CRO (Pad crosstalk): Crosstalk is the unintentional triggering of a pad when
an adjacent pad is hit. The higher the value, the less likely the pad will be
triggered by crosstalk.
• CUR (Pad velocity curve): Controls the pad's dynamic response relative to
the force (velocity) of your hit. The curves are shown in the (5.0) Appendix
section.
• R-S (Pad rim sensitivity): Controls how responsive a pad's rim is when you
hit it.
• S-S (Hi-Hat "splash" sensitivity): Controls how responsive the hi-hat "splash"
eect is when you hit the pedal. To create this sound, tap your foot on the
pedal but lift it up immediately instead of leaving your foot down.
• LOC (Local Mode): See (4.4) MIDI Settings for more information.
• GM (General MIDI Mode): See (4.4) MIDI Settings for more information.
4. Use the – and + buttons to adjust the value.
To save the settings, press Save. Otherwise, they will return to their default settings
when you power the module o.

19
(4.2) Adjusting the Metronome
The module's built-in metronome can be used when practicing, performing,
recording, or playback.
Using the metronome:
You can turn the click track (metronome) on or o by pressing the Click button.
Adjust its tempo by pressing Tempo and using the – and + buttons to set the new
BPM (beats per minute).
To adjust the metronome settings:
1. Turn on the metronome (by pressing Click), then, while in Normal Mode, press
the Mode button repeatedly until the desired setting appears on the display:
• SIG (Time signature): The time signature the metronome is counting. (When
a "0" is selected as the first number, the first beat will not be indicated by a
dierent metronome sound; every beat will have the same sound.)
• INT (Interval): The subdivisions that the metronome will play.
• VOL (Volume): The metronome volume.
• VOC (Voice): The metronome sound.
2. Use the – and + buttons to adjust the value. The settings will be automatically
saved.

20
(4.3) Recording
To record:
1. Press the Mode button so that Normal Mode (Kit, Voice, Song) is active.
2. Press Record. The button's LED will flash and the metronome will turn on
automatically. This means the module is record-armed.
3. To start recording, press Start/Stop, or hit any pad. The Record LED will light
solid. (To cancel recording instead, press Record again.)
4. To stop recording, press Start/Stop, or press Record. The Record LED will turn
o.
5. To play the recording, press Play/Practice. Press it again to stop playback.
Notes:
• In Learning Mode when Start/Stop is pressed, your performances are
automatically recorded.
• If FUL appears on the display, it means the module's memory became full while
recording. You can clear/overwrite the memory by simply making a new
recording.
To record your performance with a Song:
1. Adjust the Song number (SNG) (as described in the To adjust the recording
settings section below).
2. Start recording (as described in the To record section above).
3. To play the recording, press Play/Practice. Press it again to stop playback.
To adjust the recording settings:
1. Press Record. The button's LED will flash and the metronome will turn on
automatically. This means the module is record-armed.
2. Press Mode until the desired setting appears on the display:
• SNG (Song number): The song that will play in the background.
• KIT (Kit): The drum kit that will be recorded.
• BPM (Tempo): The recording tempo.
• SIG (Time signature): The recording time signature.
• INT (Interval): The subdivisions that the metronome will play.
• DRM (Drum mute): When not set to a song (---) or when set to Song 61-80,
this setting is disabled because an actual song is not selected (Songs 61-80
are actually just samples that can be assigned to the pads). When set to
Song 1-60, you can set this to ON or OFF to turn the original drum part on or
o. Alternatively, you can press the Drum Mute button.
• PRC (Pre-count): When set to ON, there will be a one-measure count-in
before the recording starts. When set to OFF, the recording will start
immediately after you press Start/Stop or hit a pad.
3. Use the – and + buttons to adjust the value. The settings will be automatically
saved.
/