Page is loading ...


Worcester Arbour Assembly Instructions
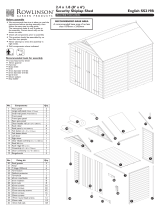
Worcester Arbour Pack List
Item
Description
Quantity
A
1700mm x 595mm Side Panel
2
B
1200mm x 600mm Back Panel
2
C
1200mm x 490mm Floor Panel
1
D
1200mm x 390mm Front Panel
1
E
1200mm x 580mm Hinged Seat Assembly
1
F
1200mm x 450mm Seat Back Rest
1
G
1200mm x 450mm Back Panel (Top)
1
H
840mm x 100mm Fascia Boards
4
J
800mm x 600mm Roof Panels
2
K
170mm x 90mm Pointed Finials
2
L
600mm x 90mm Ridge Capping
1
Fixings
60mm Screws
26
35mm Screws
26

Please take a few moments to check all pack contents listed on page 1 of the Assembly Instructions.
Please contact “Zest for Leisure” directly if any of the pack contents are damaged or missing.
Assembly requires 2 persons.
Tools Required :-Tape Measure, 3mm Drill Bit, Corded / Cordless Drill, Pozidrive PZ2 Screwdriver / Bit.
Set out side panels (A) and any one of the back panels (B) as shown in Pic.1. When setting out, please ensure that the 6no
rearmost pre-drilled pilot holes on side panels (A) are nearest the ground. The seat & floor support battens (pre fitted to side
panels), should locate on the uppermost face of the back panel. The bottom edge of back panel (B) should be aligned with
the underside of the floor support batten on side panels (A).
Insert 4no 60mm screws (i.e. 2no screws per side panel), in pre-drilled pilot holes in side panels (A) and secure back panel
(B) in position. See Pic.2.
Carefully lift the assembly on to its base and locate floor panel (C) on to the floor support battens. See Pic.3. Please ensure
that the floor panel locates fully to the rear corners.
Drill 2no holes (3mm drill bit), to both ends of floor panel (C), and fix to the floor support battens using 4no 35mm screws
(i.e. 2no screws per end). See Pic.4.
Position front panel (D) between the side panels, and located on to the floor support battens. Prior to fixing, ensure that the
front face of panel (D) remains flush with the ends of the floor & seat support battens. See Pic.5. Insert 4no 60mm screws
(i.e. 2no screws per side panel), in the front pilot holes in side panels (A) and secure the front panel in position.
Position the hinged seat assembly (E) on to the seat support battens with the larger of the hinged sections towards the front.
Insert 4no 60mm screws in the pre-drill holes in the rear hinged section of the seat assembly (i.e. 2no screws per end).
Ensuring that the rear edges of seat assembly (E) contact the back panel (B), fix the seat assembly to the seat support
battens. See Pic.6.
Position seat back rest (F) between the side panels. The top of the seat back rest should be positioned parallel with, and
35mm in, from the rearmost face of side panels. The base of seat back rest should locate on the smaller, rear portion of the
hinged seat assembly. Attach the seat back assembly to the side panels using 2no 60mm screws (i.e. 1no screw per side).
See Pic.7.
Position the remaining back panel (B) between the side panels as shown in Pic.8a & 8b. Insert 4no 60mm screws (i.e. 2no
screws per side) and fix.
Position top back panel (G) between the side panels. Insert 4no 60mm screws (i.e. 2no screws per side), in side panel pilot
holes and attach the back panel as shown in Pic.9a & 9b.
Set out roof panels (J) as shown in Pic.10, so that the panel edges contact along their entire length at the ridge. NB the roof
panels (J) must be orientated so that the cladding boards overlap lower adjoining boards (i.e. like roof tiles) to assist with
rainwater dispersal to the low point of the roof.
Attach fascia boards (H) to roof panels (J) as shown in Pic.11 using 3no 35mm screws per board. Drill 3no holes in each of
the fascia boards (H). All pilot holes should be positioned 16mm in from the straight edge, with a hole positioned 100mm in
from either end, with one hole positioned centrally. The straight edge of the fascia board should be flush with the underside
of the roof panel. The ridge end of the fascia board should be flush with the roof panel, with the fascia board extending
beyond the roof panel (approx 30mm) at the low end.
Position and attach centrally, 2no pointed finials (K) to the fascia board / roof panels using 4no 35mm screws (i.e. 2no
screws per finial). See Pic.12.
Insert 6no 35mm screws into pre-drilled pilot holes in ridge capping (L) and position centrally over join in roof assembly and
fix. See Pic.13.
Lift and centralise the roof assembly on to side panels. The roof should overhang the side panels by approximately 130mm
(Horizontal measure from outer face of side panel to end of fascia board). See Pic.14
Drill 4no pilot holes in the roof panel assembly directly above the side panels, and secure using 4no 60mm screws. See
Pic.15.
The Worcester Arbour is now complete.


/