
HTC Desire 310
User guide

Contents
Unboxing
HTC Desire 310 7
Back cover 8
SIM card 9
Storage card 10
Battery 11
Switching the power on or off 14
Setting up your phone
Setting up HTC Desire 310 for the first time 15
Installing an update 15
Checking for updates manually 15
Your first week with your new phone
Basics 16
HTC BlinkFeed 22
Working with text 25
Battery 29
Camera
Using Android Camera 31
Gallery and Video Highlights
Viewing photos and videos in Gallery 32
Editing photos 32
Viewing and editing Video Highlights 32
Personalizing
Making HTC Desire 310 truly yours 34
Changing your wallpaper 34
Personalizing the launch bar 35
Adding a widget to your Home screen 35
Adding apps and other shortcuts on your Home screen 36
Rearranging or removing widgets and icons on your Home screen 37
Grouping apps into a folder 38
Adding a Home screen panel 39
Changing your main Home screen 39
Adding a widget on the lock screen 39
2 Contents

Phone calls
Making a call 40
Calling a speed dial number 40
Making an emergency call 41
Answering or rejecting a call 41
What can I do during a call? 41
Setting up a conference call 42
Checking calls in the Call History 43
Switching between silent, vibrate, and normal modes 43
Messages
Sending a text or multimedia message via Android Messaging 44
People
Your contacts list 45
Setting up your personal contact information 45
Adding a new contact 46
Editing a contact’s information 46
Getting in touch with a contact 46
Importing contacts from your SIM card 46
Importing contacts from the storage 47
Sending contact information 47
Contact groups 47
Search and web browser
Searching HTC Desire 310 and the Web 48
Getting instant information with Google Now 49
Browsing the Web 50
Bookmarking a webpage 51
Clearing your browsing history 51
Email
Adding an email account 52
Checking your mail 53
Sending an email message 53
Reading and replying to an email message 54
Searching email messages 54
Viewing your Gmail Inbox 55
Sending an email message in Gmail 55
Replying to or forwarding email messages in Gmail 56
Music
Listening to music 57
Creating music playlists 57
Adding a song to the queue 58
Travel and maps
Turning location services on or off 59
3 Contents

About Google Maps 59
Getting around maps 59
Searching for a location 60
Exploring places and activities near you 62
Getting directions 62
Google Play and other apps
Getting apps from Google Play 63
Downloading apps from the web 64
Uninstalling an app 64
Using the Clock app 65
Viewing the Calendar 65
Watching videos on YouTube 66
Internet connections
Data connection 68
Managing your data usage 69
Wi-Fi 70
Connecting to a virtual private network (VPN) 71
Using HTC Desire 310 as a Wi-Fi hotspot 72
Sharing your phone's Internet connection by USB tethering 73
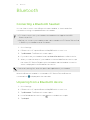
Bluetooth
Connecting a Bluetooth headset 74
Unpairing from a Bluetooth device 74
Storage
Types of storage 75
Copying files to or from HTC Desire 310 75
Encrypting data on HTC Desire 310 75
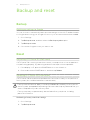
Backup and reset
Backup 77
Reset 77
Settings and security
Adding and syncing an account 79
Removing an account 79
Turning Airplane mode on or off 79
Turning automatic screen rotation off 80
Adjusting the time before the screen turns off 80
Adjusting the screen brightness manually 80
Changing the display language 80
Working with certificates 81
Protecting your SIM card with a PIN 81
Protecting HTC Desire 310 with a screen lock 82
Navigating HTC Desire 310 with TalkBack 82
Trademarks and copyrights
4 Contents


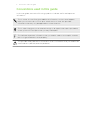
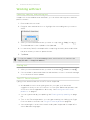
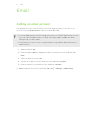
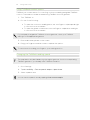
Conventions used in this guide
In this user guide, we use the following symbols to indicate useful and important
information:
This is a note. A note often gives additional information, such as what happens
when you choose to do or not to do a certain action. A note also provides
information that may only be applicable to some situations.
This is a tip. A tip gives you an alternative way to do a particular step or procedure,
or lets you know of an option that you may find helpful.
This indicates important information that you need in order to accomplish a certain
task or to get a feature to work properly.
This provides safety precaution information, that is, information that you need to be
careful about to prevent potential problems.
6 Conventions used in this guide

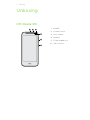
Unboxing
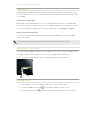
HTC Desire 310
1. POWER
2. Volume controls
3. Front camera
4. Earpiece
5. 3.5mm headset jack
6. USB connector
7 Unboxing

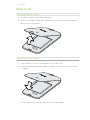
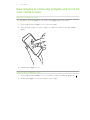
Back cover
Removing the back cover
1. Securely hold HTC Desire 310 facing down.
2. With your thumb or finger, open the back cover from the small opening at the
bottom of HTC Desire 310.
Replacing the back cover
1. Align the back cover onto the top part of HTC Desire 310.
2. Press the sides and the bottom part of the back cover down to lock the cover
into place.
You will hear a click when the back cover is locked in place.
8 Unboxing

SIM card
The SIM card contains your phone number, service details, and memory for storing
phonebook contacts and/or text messages.
Inserting the SIM card
Inserting a smaller size SIM (such as a micro SIM with an adapter or a modified SIM)
may cause the card to not fit properly or damage the card slot.
1. Take the back cover off.
2. Remove the battery.
3. With the SIM card’s gold contacts facing down and its cut-off corner facing out,
insert the SIM card into the SIM card slot.
4. Push the SIM card into place.
Removing the SIM card
Make sure to switch off HTC Desire 310 before removing your SIM card.
1. Take the back cover off.
2. Remove the battery.
3. Slide the SIM card out from the SIM card slot.
9 Unboxing

Storage card
Use a storage card to store your photos, videos, and music.
Inserting the storage card
1. Take the back cover off.
2. Make sure to remove the battery first before inserting the microSD
™
card.
3. Insert the microSD card into the storage card slot with its gold contacts facing
down and push it all the way in.
10 Unboxing

Removing the storage card
1. Take the back cover off.
2. Make sure to remove the battery first before removing the microSD card.
3. Slide the microSD card out from its slot.
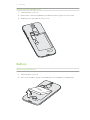
Battery
Removing the battery
1. Take the back cover off.
2. With your thumb or finger, lift the battery from the battery compartment.
11 Unboxing

Inserting the battery
Please use only original batteries that came in the box or replacements that we
recommend.
1. Take the back cover off.
2. Insert the battery (with its exposed copper contacts first) into the battery
compartment.
12 Unboxing

Charging the battery
Before you turn on and start using HTC Desire 310, it is recommended that you charge
the battery.
§ Use only the adapter and the USB cable that came with HTC Desire 310 to charge
the battery. When the battery power is too low, make sure to use the power
adapter to charge, not the USB cable connection with your computer.
§ Do not remove the battery from HTC Desire 310 while you are charging it using the
power or car adapter.
1. Insert the small end of the USB cable into the USB connector.
2. Insert the other end of the USB cable into the power adapter.
3. Plug in the power adapter to an electrical outlet to start charging the battery.
§ As a safety precaution, the battery may stop charging to avoid overheating.
§ When you're using the Internet and charging the battery, HTC Desire 310 may
become warmer. This is normal.
§ To conserve energy, unplug the power adapter from the electrical outlet after you
finish charging.
13 Unboxing

Switching the power on or off
Switching the power on
Press and hold the POWER button until the screen turns on.
When you turn on HTC Desire 310 for the first time, you’ll need to set it up.
Switching the power off
1. If the display is off, press the POWER button to turn it back on, then unlock the
screen.
2. Press and hold the POWER button for a few seconds.
3. Tap Power off on the options menu.
4. Tap OK.
14 Unboxing

Setting up your phone
Setting up HTC Desire 310 for the first time
When you switch on HTC Desire 310 for the first time, you’ll be asked to set it up.
Walk through the on-device setup to choose your Internet connection, sign in to your
Google
®
account, and more.
Some features that need to connect to the Internet such as location-based services
and auto-sync of your online accounts may incur extra data fees. To avoid incurring
these fees, disable these features under Settings.
Installing an update
When Internet connection is on and there's a new software update available, you will
receive a notification.
1. Slide the Notifications panel open, and then tap the system update notification.
2. If you don't want to download the update using your data connection, select
Update over Wi-Fi only.
3. Tap Download.
4. When download is complete, select Install now, and then tap OK.
After updating, HTC Desire 310 will restart.
Checking for updates manually
1. Go to Settings, and then tap About phone
2. Tap Software updates > Check now. HTC Desire 310 checks if updates are
available.
If you don't have Internet connection, you'll be prompted to turn on mobile data or
connect to a Wi-Fi
®
network. Once connected, tap Check now to check for updates.
15 Setting up your phone

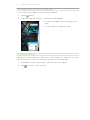
Your first week with your
new phone
Basics
Onscreen navigation buttons
HTC Desire 310 has onscreen navigation buttons at the bottom of the screen which
rotate when you change the orientation.
Goes to the previous screen.
Goes to the home screen.
Shows thumbnails of the most recently used apps.
Swipe up from any of the navigation buttons to access Google search.
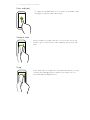
Touch gestures
Use touch gestures to get around the Home screen, open apps, scroll through lists,
and more.
Tap
Tap the screen with your finger when you want to select
onscreen items such as application and settings icons, or press
onscreen buttons.
16 Your first week with your new phone

Press and hold
To open the available options for an item (for example, a text
message), just press and hold the item.
Swipe or slide
Quickly swipe your finger vertically or horizontally across the
screen to go to other Home screen, read the next e-mail, and
more.
Drag
Press and hold your finger with some pressure before you start
to drag. While dragging, don't release your finger until you
have reached the target position.
17 Your first week with your new phone

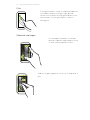
Flick
Flicking the screen is similar to swiping, except that
you need to swipe your finger in light, quicker
strokes, such as when moving right and left on the
Home screen, or flicking through a contacts or
message list.
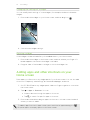
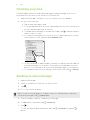
Slide with two fingers
In some apps, like Gallery or the web
browser, slide two fingers apart to zoom
in when viewing a picture or text.
Slide two fingers together to zoom out of the picture or
text.
18 Your first week with your new phone

Sleep mode
Sleep mode saves battery power by putting HTC Desire 310 into a low power state
while the display is off. It also stops accidental button presses when HTC Desire 310 is
in your bag.
Switching to Sleep mode
Briefly press the POWER button to turn off the display and switch to Sleep mode.
HTC Desire 310 also automatically goes into Sleep mode when it’s left idle for a while.
You can change the time before HTC Desire 310 sleeps in the Settings > Display.
Waking up from Sleep mode
To wake HTC Desire 310 up manually, press the POWER button. You may need to
unlock the screen.
HTC Desire 310 automatically wakes up when you have an incoming call.
Unlocking HTC Desire 310
If you're using the default screen lock, you need to unlock HTC Desire 310 before you
can open HTC BlinkFeed
™
, app shortcuts on the widget panels, and more.
To unlock, press and hold the lock icon, and then drag it to any direction.
Opening an app
§ Tap an app on the launch bar at the bottom of the Home screen.
§ To see the Apps screen, tap . Then tap the app you want to use.
§ In the Apps screen, tap and enter the name of the app you're looking for.
19 Your first week with your new phone

Switching between recently opened apps
You can easily access apps you've just recently opened.
1. Tap the button.
2. Slide your finger up or down to see recently-opened apps.
§ To remove an app from the list, drag it left or
right.
§ To switch back to an app, just tap it.
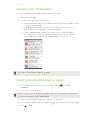
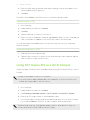
Using Quick Settings
Tap the tiles in Quick Settings to easily turn on Wi-Fi, Bluetooth
®
, and more. You'll also
find a few shortcuts, such as for viewing your profile in the People app.
1. Swipe down from the status bar to open the Notifications panel.
2. Tap to switch to Quick Settings.
20 Your first week with your new phone
Page is loading ...
Page is loading ...
Page is loading ...
Page is loading ...
Page is loading ...
Page is loading ...
Page is loading ...
Page is loading ...
Page is loading ...
Page is loading ...
Page is loading ...
Page is loading ...
Page is loading ...
Page is loading ...
Page is loading ...
Page is loading ...
Page is loading ...
Page is loading ...
Page is loading ...
Page is loading ...
Page is loading ...
Page is loading ...
Page is loading ...
Page is loading ...
Page is loading ...
Page is loading ...
Page is loading ...
Page is loading ...
Page is loading ...
Page is loading ...
Page is loading ...
Page is loading ...
Page is loading ...
Page is loading ...
Page is loading ...
Page is loading ...
Page is loading ...
Page is loading ...
Page is loading ...
Page is loading ...
Page is loading ...
Page is loading ...
Page is loading ...
Page is loading ...
Page is loading ...
Page is loading ...
Page is loading ...
Page is loading ...
Page is loading ...
Page is loading ...
Page is loading ...
Page is loading ...
Page is loading ...
Page is loading ...
Page is loading ...
Page is loading ...
Page is loading ...
Page is loading ...
Page is loading ...
Page is loading ...
Page is loading ...
Page is loading ...
Page is loading ...
Page is loading ...
Page is loading ...
Page is loading ...
Page is loading ...
Page is loading ...
Page is loading ...
-
 1
1
-
 2
2
-
 3
3
-
 4
4
-
 5
5
-
 6
6
-
 7
7
-
 8
8
-
 9
9
-
 10
10
-
 11
11
-
 12
12
-
 13
13
-
 14
14
-
 15
15
-
 16
16
-
 17
17
-
 18
18
-
 19
19
-
 20
20
-
 21
21
-
 22
22
-
 23
23
-
 24
24
-
 25
25
-
 26
26
-
 27
27
-
 28
28
-
 29
29
-
 30
30
-
 31
31
-
 32
32
-
 33
33
-
 34
34
-
 35
35
-
 36
36
-
 37
37
-
 38
38
-
 39
39
-
 40
40
-
 41
41
-
 42
42
-
 43
43
-
 44
44
-
 45
45
-
 46
46
-
 47
47
-
 48
48
-
 49
49
-
 50
50
-
 51
51
-
 52
52
-
 53
53
-
 54
54
-
 55
55
-
 56
56
-
 57
57
-
 58
58
-
 59
59
-
 60
60
-
 61
61
-
 62
62
-
 63
63
-
 64
64
-
 65
65
-
 66
66
-
 67
67
-
 68
68
-
 69
69
-
 70
70
-
 71
71
-
 72
72
-
 73
73
-
 74
74
-
 75
75
-
 76
76
-
 77
77
-
 78
78
-
 79
79
-
 80
80
-
 81
81
-
 82
82
-
 83
83
-
 84
84
-
 85
85
-
 86
86
-
 87
87
-
 88
88
-
 89
89


Ask a question and I''ll find the answer in the document
Finding information in a document is now easier with AI


