Maytag UMV2186AAW15 Owner's manual
- Category
- Microwaves
- Type
- Owner's manual
This manual is also suitable for

Microwave Oven
Owner's Manual
UMV2186AA
Part No. • W10177941

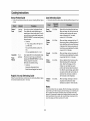
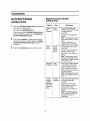
Safety
PRECAUTIONSTOAVOID
POSSIBLEEXPOSURETO
EXCESSIVEMICROWAVE
ENERGY:
(a) Do notattempt to operate this oven withthe door open
since open-door operation can result in harmful exposure to
microwave energy. It is important notto defeat or tamper
with the safety interlocks.
(b) Do not place any object between the front face of the oven
and the door or allow soil or cleaner residue to accumulate
on sealing surfaces.
(c) Do notoperate the oven if it is damaged. It is particularly
important that the oven door close properly and that there is
no damage to the
1) Door (bent ordented),
2) Hinges and latches (broken or loosened),
3) Door seals and sealing surfaces.
(d) The oven should not be adjusted or repaired by anyone
except properly qualified service personnel.
WARNING
Always observe Safety Precautions when using your
oven. Never try to repair the oven on your own - there is
dangerous voltage inside. If the oven needs to be
repaired, call 1-800-253-1301 (U. S. A.) and 1-800-807-
6777 (CANADA) for the name of an authorized service
center near you.
IMPORTANTSAFETY INSTRUCTIONS
When usingany electrical appliance, basic safety precautions
should be followed, including the following:
WARNING
To reduce risk of burns, electric shock, fire, personal
injuryor exposure to excessive microwave energy:
• Readall safety instructionsbefore using the appliance.
• Readand follow the specific "Precautions to Avoid Exposure to
ExcessiveMicrowave Energy"on this page.
• This appliance must be grounded.Connect onlyto properlygrounded
outlets. See "Important Grounding Instructions" on page 4 of this
manual.
• Installor placethis appliance only in accordancewith the installation
instructionsprovided.
• Some items, like whole eggs and food in sealed containers, may
explode if heated in this oven.
• Usethis appliance only for its intended use as describedin the
manual. Do not use corrosivechemicals or vapors in this appliance.
This type of oven isspecifically designed to heat, cook, or dryfood. It
isnot designed for industrial or laboratory use.
• As with any appliance, close supervision is necessary when used by
children.
• Do notoperate this appliance if it has a damaged cord or plug, if it is
notworking properly, or if it has been damaged or dropped.
• This appliance should be serviced only by qualified service
personnel. Contact the nearest authorized service facility for
examination, repair, or adjustment.
• Do notcover or block any ofthe openings on this appliance.
SAVE THESE INSTRUCTIONS

Safety
Important Safety Instructions, continued
• Do not store this appliance outdoors. Do not use near water - for
example, near a kitchen sink, in a wet basement, or near a swimming
pool, etc.
• Keep the inside ofthe ovenclean. Food particles or spattered oils
stuck to the oven walls or floor can cause paint damage and reduce
the efficiency of the oven.
• When cleaning door and oven surfaces, use only mild, nonabrasive
soaps or detergents appliedwith a sponge or softcloth.
• Do not immerse cord or plug in water.
• Keep cord away from heatedsurfaces.
• Do not let cord hang overedge oftable or counter.
• To reducethe risk of fire inthe oven:
a. Do notovercook food. Watch appliancecarefully if paper, plastic,
or other combustible materialsare inside.
b. Removewire twist-ties from plastic cooking bags before placing
bags in oven.
c. If materials insidethe oven ignite, keepthe oven door closed, turn
the oven off, disconnect the powercord, or shut off the power at
the fuse or circuit breaker panel. Ifthe door is opened,the fire may
spread.
d. Do not usethe oven compartment for storage purposes. Do not
leavepaper products, cooking utensils, or food in the oven when
not in use.
• Do not try to preheat oven or operate while empty.
• Do notcook withoutthe glasstray in place onthe ovenfloor. Foodwill
not cook properly without the tray.
• Do not defrost frozen beverages in narrow-neckedbottles. The
containers can break.
• Dishes and containers can become hot. Handlewith care.
• Carefully remove container coverings, directing steam away from
hands and face.
• Remove lidsfrom baby food before heating. After heating baby food,
stir well and test temperature bytasting before serving.
• Do notoperate any other heating or cooking appliance beneath this
appliance.
• Do not mount unit over or near any portion of a heating or cooking
appliance.
• Do not mount over a sink.
• Do notstore anything directly on top ofthe appliancewhen it is in
operation.
• This over-the-range ovenwas designedfor useover rangesno wider
than 91.44 cm(36 inches). It may be installed overboth gasand
electric cooking equipment.
• Liquids,such as water, coffee, ortea are ableto be overheated
beyond the boiling pointwithout appearingto be boiling.Visible
bubbling or boiling when the container is removed from the
microwave oven is not always present.THIS COULD RESULT IN
VERY HOT LIQUIDS SUDDENLY BOILINGOVER WHEN THE
CONTAINER IS DISTURBED OR A SPOONOR OTHER UTENSIL
IS INSERTEDINTO THE LIQUID.
To reduce the risk of injury to persons:
1. Donotoverheattheliquid.
2. Stirtheliquid bothbeforeandhalfwaythroughheatingit.
3. Donot usestraight-sidedcontainerswith narrownecks.
4. Afterheating,allowthe containertostand inthe microwaveovenfor a
shorttimebeforeremovingthecontainer.
5. Use extremecarewheninsertinga spoonor otherutensilintothe
container.
SAVE THESE INSTRUCTIONS

Safety
IMPORTANTGROUNDING
This appliancemustbe grounded.Inthe eventof anelectricalshortcircuit,
groundingreducesthe risk of electricshockby providingan escapewire
for the electricalcurrent.This applianceisequipped with a cordthat
includesagrounding wireand a grounding plug.The plug mustbe
plugged intoan outletthat is properlyinstalledandgrounded.Plugthe
three-prongpowercord into a properlygroundedoutlet ofstandard 115-
120 voltage,60 Hz.Your ovenshould bethe only applianceon this circuit.
WARNING
Improper use of the grounding plug can result in a risk of
electric shock. Consult a qualified electrician or servicer if
you do not understand the grounding instructions or ifyou
are not sure if the appliance is properly grounded.
Do not use an extension cord with this appliance. Ifthe
power cord istoo short, have a qualified electrician or
service technician install an outlet near the appliance.
WARNING
Do not cut or remove the third (ground) prong from the
power cord under any circumstances.
NOTE
Connect the oven only to a 20A or greater and on a dedicated
circuit.
THE VENT FAN
The fan will operate automatically under certain conditions
(see page 15).Take care to prevent the starting and spreading
of accidental cooking fires while the vent fan is in use.
• Inthe event ofa greasefire on the surface units belowthe microwave
oven, smother a flaming pan on the surface unit bycovering the pan
completely with a lid, a cookie sheet or a flat tray.
• Never leave surface units beneath your microwave oven unattended
at high heat settings. Boilovers cause smoking and greasy spillovers
that may igniteand spread ifthe microwave vent fan isoperating. To
minimizeautomatic fan operation, use adequatesized cookware and
usehigh heat on surface units onlywhen necessary.
• Clean Ventilating Hoods Frequently- Greaseshould notbe allowed
to accumulate on hood offilter.
• When flaming foods under the hood,turn the fan on.
• Use care when cleaningthe vent-hood filter. Corrosive cleaning
agent, such as lye-based ovencleaner, may damagethe filter.
SAVE THESE INSTRUCTIONS

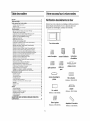
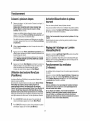
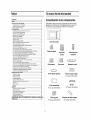
Contents Your New Microwave oven
Safety ....................................................................................................... 2
Contents ................................................................................................... 5
Your New Microwave oven ..................................................................... 5
Checking Parts ....................................................................................................... 5
Setting Up Your Microwave Oven ......................................................... 6
Control Panel Buttons ................................................................................. 7
Operation ................................................................................................. 8
Turning on the Power and Selecting a Display Language ...................................... 8
Using the Option feature ....................................................................... 8
Selecting the Display Weight .................................................................................. 9
Setting the Remind End Signal ............................................................................... 9
Setting the Clock AM/PM ...................................................................... 9
Setting the Daylight Saving Time adjustment ......................................................... 9
Setting the Sound Controls ................................................................................... 10
Setting the Child Protection Lock .......................................................................... 10
Setting and Using the Custom Button ................................................................... 11
Using the Kitchen Timer ....................................................................................... 11
Using the Pause/Cancel Button .......................................................... 11
Using the Help Button ........................................................................................... 11
Using the Add 30sec. Button ................................................................................ 11
Using the Sensor Cook Buttons ............................................................................ 12
Using the Sensor Reheat Button .......................................................................... 12
Using the Auto Defrosting Button ......................................................................... 12
Using the Rapid Defrosting Button ....................................................................... 12
Using the Handy Helper Button ............................................................................ 13
Using the Kids Meals Button ................................................................................. 13
Using the Snack Bar Button .................................................................................. 14
Setting Cooking Times & Power Levels ................................................................ 14
Multi-stage Cooking .............................................................................................. 15
Using the More/Less Buttons ................................................................................ 15
Turning the Turntable On/Off ................................................................................ 15
Turning the Light Bright/Night/Off ........................................................................ 15
Operating the Vent Fan (3 Speed) ......................................................................... 15
Setting the Auto Night Light .................................................................................. 16
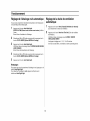
Setting Vent Auto Time Set ................................................................. 16
How to Use the Shelf When Microwaving ............................................................. 17
Cooking Instructions ............................................................................ 18
Cooking Utensils ................................................................................................... 18
Testing Utensils .................................................................................................... 18
Cooking Techniques ............................................................................................. 19
General Tips ........................................................................................ 19
Auto Sensor Cook ................................................................................................. 20
Utensils & Cover For Sensor Cooking .................................................................. 20
Important ............................................................................................. 20
Cooking Guide ...................................................................................................... 23
Recipes ................................................................................................................. 25
Appendix ................................................................................................ 27
Troubleshooting Guide ......................................................................................... 27
Care and Cleaning ................................................................................................ 27
How to Clean the Outside ..................................................................................... 28
Light Bulb Replacement ...................................................................... 28
Exhaust Feature ................................................................................................... 29
Specifications ...................................................................................... 30
WHIRLPOOL CORPORATION MAJOR APPLIANCE WARRANTY ..... 31
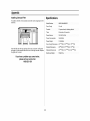
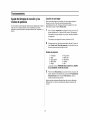
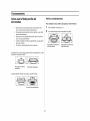
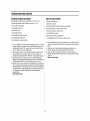
Checking Parts
Unpack your microwave oven and check to make sure that you have all
the parts shown here. If any part is missing or broken, call your dealer.
Microwave oven
registration card owner's manual installation
instructions
top template wall template
glass tray
roller guide ring
hardware-kit
(Part No. : DE92-90505E)
grease filters
(Part No. : DE63-00196A)
charcoal filter
(Part No. : DE63-00367D)
/////t I llll !\\\\
shelf
(Part No.: DE97-OO369A)
exhaust adaptor
(Part No. : DE92-90242A)

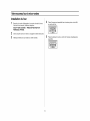
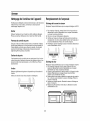
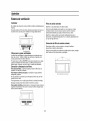
Your New Microwave oven
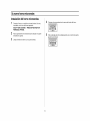
Setting Up Your Microwave Oven
2
3
Plug the cord into a grounded outlet. Once plugged in, the display
on your oven will show:
ENJOY YOUR COOKING --- PRESS OPTION PAD FOR
PERSONAL OPTIONS.
Open the oven door by pulling the handle on the right side of the
door.
Wipe the inside of the oven with a damp cloth.
4
5
Place the pre-assembled ring in the indentation in the center of the
oven.
Place the glass tray securely in the center of the pre-assembled
roller guide.

Your New Microwave oven
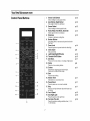
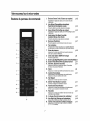
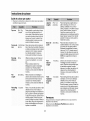
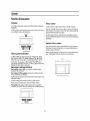
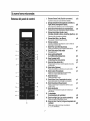
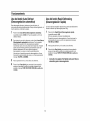
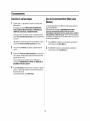
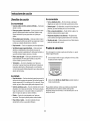
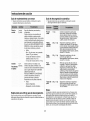
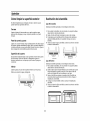
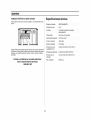
Control Panel Buttons
19
1. Sensor Cook Buttons
Sensor settings to cook popular foods.
2. Auto Defrost, Rapid Defrost
Sets weight of food to be defrosted.
3. Sensor Reheat
Sensor settings to reheat popular foods.
4. Handy Helper, Kids Meals, Snack Bar
Selects type of dish to be reheated.
5. More/Less
Increase or decrease cooking time.
6. Number Buttons
Set cooking times or amounts and power levels other
than high.
7. Power Level
Press this pad to set a power level other than high.
8. Clock am/pro
Sets current time
9. Light Bright/Night/Off Button
10. Turntable On/Off Button
11. Add 30sec.
Press once for every 30sec. of cooking at High power.
12. Option
Press to set non-cooking feature.
13. Custom
Press twice to program ygur favorite recipe.
Press once to cook with that recipe.
14. Start
Press to start cooking.
15. Kitchen Timer
Sets kitchen or convenience timer.
16. Pause/Cancel
Press to pause oven or correct a mistake.
17. Help
Press to see help information about the feature you
are using.
18. Vent 3-Speed
19. Auto Night Light
Press this pad to set the night timer.
20. Vent Auto Time Set
Press this pad when setting ventilation time. (1,3, 5,
10, 30 minutes.)
p.12
p.12
p.12
p.13
p.15
p.14
p.9
p.15
p.15
p.ll
p.8
p.ll
p.ll
p.ll
p.ll
p.15
p.16
p.16

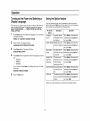
Operation
Turning on the Power and Selecting a
Display Language
The first time you plug the power cord into an outlet, or after there has
been an interruption in power, the display shows after four seconds
ENJOY YOUR COOKING ...... PRESS OPTION PAD FOR PER-
SONAL OPTIONS.
2
Press Option button immediately after plugging in your microwave.
The display will show
PRESS 1--6 TO SELECT VARIOUS OPTIONS
Press 1 button. The display will show:
LANGUAGE CHOICE PRESS OPTION PAD
3
4
Press Option button. The display will show:
ENGLISH PRESS START
Press Option button repeatedly to select the language you wish to
use:
• ENGLISH
• FRENCH
• SPANISH
If you continue to press Option, the settings will cycle in the order
shown here:
ENGLISH, FRENCH, SPANISH
5 Press the Start button.
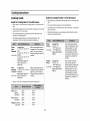
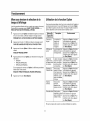
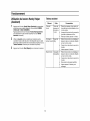
Using the Option feature
Your new microwave oven can be customized to suit your personal
tastes. Simply press Option to set these options. For your convenience,
all the options are summarized in the following table:
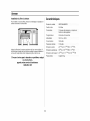
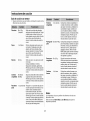
My Choice
options
Language
Choice
Display Weight
Remind End
Signal
Daylight Sav-
ings Time
Adjustment
Sound Controls
Child Lock
Description
Language options
are English, French
and Spanish.
Weight options are
pounds or kilograms.
The Remind End
Signal can be turned
On and Off.
The time can be
advanced one hour
for DST without
resetting the Clock.
Sound Controls can
be turned On and
Off.
This feature prevents
use by unsupervised
children.
Operation
Press Option, 1 and select by
repeatedly pressing Option. To
set, press Start.
Press Option, 2 and select by
repeatedly pressing Option. To
set, press Start.
Press Option, 3 and select by
repeatedly pressing Option. To
set, press Start.
Press Option, 4 and select by
repeatedly pressing Option. To
set, press Start.
Press Option, 5 and select by
repeatedly pressing Option. To
set, press Start.
Press Option, 6 and select by
repeatedly pressing Option. To
set, press Start.
If there is a power interruption, you will need to reset these options.

Operation
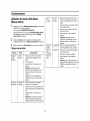
Selecting the Display Weight
You can choose between pounds(LBS) and kilograms(KG).
1 Press Option button and then press the 2 button.
The display shows: LBS OR KG PRESS OPTION PAD
2 Press Option button.
The display shows: LBS
3 Press the Option button repeatedly to select the weight
measurements you wish to use.
4 Press the Start button.
Setting the Remind End Signal
The Remind End Signal can be set On or Off.
1 Press the Option button and then press 3.
The display shows: REMIND END SIGNAL ON/OFF PRESS
OPTION PAD
2
3
Press the Option button to select ON.
The display shows: ON
Press the Start button. The display returns to the time of day.
To turn Remind End Signal off, repeat steps 1-3 above.
Setting the Clock AM/PM
1 Press the Clock button.
The display will show: SELECT AM/PM
2 To select AM or PM, press the Clock button.
3 Use the number buttons to enter the current time.
You must press at least three numbers to set the clock.
For example, if the current time is 5:00, enter 5,0,0.
The display will show: 500
4 Press Clock again. A colon will appear, indicating that the time is
set.
If there is a power interruption, you will need to reset the clock.
You can check the current time while cooking is in progress by
pressing the Clock button.
Setting the Daylight Saving Time
adjustment
1 Press the Option button and then 4.
The display will show: DAYLIGHT SAVING TIME ON/OFF PRESS
OPTION PAD
2
3
Press the Option button to select ON.
Press again to select OFF.
Press the Start button. Time of day will advance one hour.
If OFF is selected, time will go back one hour.
If the clock is set for standard time, this function allows convenient
time changes without needing to reset the clock. Daylight Saving
Time begins for most of the United States at 2 a.m. on the first
Sunday of April, and reverts to Standard time at2 a.m. on the last
Sunday of October.

Operation
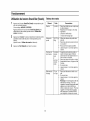
Setting the Sound Controls
1 Press the Option button and then 5.
SOUND CONTROLS PRESS OPTION PAD will appear in the
display.
2 Press the Option button to select ON.
Press again to select OFF.
3 Press the Start button.
Setting the Child Protection Lock
You can lock your microwave oven when unsupervised children are
around.
1 Press the Option button and then 6.
The display will show: CHILD LOCK ON/OFF PRESS OPTION
PAD
2
3
Press the Option button to select ON.
Press again to select OFF.
Press the Start button. The display returns to the time of day.
As this point, the microwave oven cannot be used until it is
unlocked.
To unlock it, repeat steps 1-3 above.
10

Operation
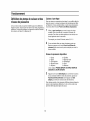
Setting and Using the Custom Button
The Custom button memorizes the time and power setting for a particu-
lar food.
Programming the Custom button
1 Press the Custom button. Press the button twice to delete the
previous Custom setting.
The display shows: ENTER COOKING TIME AND POWER
2 Use the Number buttons to enter the amount of cooking time. The
display will show the amount of time you have set.
3 Press the Power Level button and use the Number buttons to
enter the power level. The display will show the power level you
have set. You can set the power level from 0 to 9.
1= Warm 6 = Simmer
2 = Low 7 = Medium High
3 = Defrost 8 = Reheat
4 = Medium Low 9 = Saute
5 = Medium 0 = High
4 Press the Custom button again. The display will read CUSTOM
RECIPE SAVED.
Using the Custom button
Press the Custom button, then press Start button. You can check the
power level while cooking is in progress by pressing the Power Level
button.
Using the Kitchen Timer
1 Use the Number buttons to set the length oftime you want the
timer to run.
2 Press the Kitchen Timer button.
3 The display counts down and beeps when the time has elapsed.
4 To cancel timer setting: Press Pause/Cancel button twice.
Using the Pause/Cancel Button
The Pause/Cancel button allows you to clear instructions you have
entered. It also allows you to pause the oven's cooking cycle, so that
you can check the food.
• To pause the oven during cooking: press Pause/Cancel button
once. To restart, press Start button.
• To stop cooking, erase instructions, and return the oven display to
the time of day: press Pause/Cancel button twice.
• To clear instructions you have just entered: press Pause/Cancel
button once, then re-enter the instructions.
• To cancel a timer setting: press Pause/Cancel button once.
Using the Help Button
Your microwave offers helpful instructions for many procedures.
When you need feature information and helpful hints, press the
Help button and then press the button that you want to get
information on. Help information is available in 3 languages
(English, French and Spanish).
Using the Add 30sec. Button
This button offers a convenient way to heat food in 30 sec. increments at
the High power level.
Press the Add 30sec. button once for each additional 30 sec. you
want to increase your cooking time by. For example, press it twice
for one minute.
The time will display, and the oven starts automatically.
2 Each time the Add 30sec. button is pressed 30sec. will be added to
the time counting down.
11

Operation
Using the Sensor Cook Buttons
By actually sensing the humidity that escapes as food heats, this feature
automatically adjusts the oven's heating time for various types and
amounts of food.
Press the Sensor Cook button corresponding to the food you are
cooking (Potato, for example).
The display shows Potato and your microwave oven will begin
cooking automatically.
When cooking popcorn, wait at least five minutes between each bag to
avoid overheating the glass tray. Ifyou want to adjust the cooking time,
you can use the More/Less buttons. See page 15 for more information.
If you want to check the current time while cooking is in progress, press
the Clock button.
• See page 21 for the Sensor Cooking Guide.
Using the Sensor Reheat Button
Heating leftovers and precooked foods is easy with your new micro-
wave. By actually sensing the humidity that escapes as food heats, this
feature automatically adjusts the oven's heating time for various types
and amounts of precooked food. All food should be precooked. Plate of
food and casserole should be stored at refrigerator temperature. To use
sensor reheating:
Press Sensor Reheat button.
PLATE OF FOOD 1 SERVING appears in the display.
Press the Sensor Reheat button repeatedly to select the item you
want.
PLATE OF FOOD
CASSEROLE
PASTA REHEAT
2 Press the Start button.
If you want to adjust the heating time, use the More/Less buttons.
See page 15 for more information on the More/Less buttons, ff you
want to check the current time while reheating, press the Clock
button.
The More/Less buttons cannot be used with the Beverage.
• See page 22 for the Sensor Reheat Guide.
Using the Auto Defrosting Button
To thaw frozen food, enter the weight of the food and the microwave
automatically sets the defrosting time, power level and standing time.
1 Press the Auto Defrost button.
The display shows: 0.2 LB (0.1Kg if you have set your oven for
metric measure).
2
To set the weight of your food, press the Auto Defrost button
repeatedly. 0.5 Ib appears in the display when the Auto Defrost
button is pressed twice. The repeated press increases the weight
by 0.5 Ib increments, from 0.5 Ib up to 6.0 Ibs. You can also use the
number buttons to enter the weight of the food directly. The oven
calculates the defrosting time and starts automatically.
Once or twice during defrosting, the oven will beep and the display
will read TURN THE FOOD OVER.
3 Open the oven door, and turn the food over.
4 Press the Start button to resume defrosting even if you do not turn
the food over when TURN THE FOOD OVER is displayed.
Using the Rapid Defrosting Button
The Rapid Defrost function will automatically activate when defrosting
foods that weigh 1.0 Ib only.
2
3
Press the Rapid Defrost button.
The display shows: 3:00
The oven starts automatically.
Once or twice during defrosting, the oven will beep and the display
will read TURN THE FOOD OVER
Open the oven door, and turn the food over.
Press the Start button to resume defrosting even if you do not turn
the food over when TURN THE FOOD OVER is displayed.
• See page 22 for the Rapid(1.0 Ib only) andAuto
Defrosting Guide.
12

Operation
Using the Handy Helper Button
Press the Handy Helper button corresponding to the food you are
cooking. The display shows: MELT CHOCOLATE 1CUP CHIPS.
Press the Handy Helper button repeatedly to select the item you
want.(Refer to the Handy Helper Chart below)
2
Press the Number I or 2 button to select the serving size you want.
Only the 1 button(serving) is available for Soften Cream Cheese
and Melt Chocolate items. (Refer to the Handy Helper Chart below
for the serving)
3 Press the Start button to begin cooking.
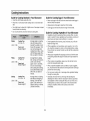
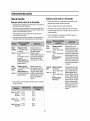
Handy Helper Chart
Item
Melt
Chocolate
Soften Cream
Cheese
Melt Butter
Amount
1 cup
chips or
1 square
8-OZ
package
1 stick
2 sticks
Remarks
• Place chocolate chips or square in a
microwave-safe container.
• When oven beeps, stir chocolate and re-
start oven.
• Stir and let stand 1 minute.
• Unwrap cream cheese and place on
microwave-safe container.
• Cut in half vertically.
• Let stand 2 minutes.
• Unwrap butter and place in a microwave-
safe container.
• Cut in half vertically.
• Coverwith wax paper.
• Let stand 2 minutes, then stir
Using the Kids Meals Button
2
3
Press the Kids Meals button corresponding to the food you are
cooking.
The display shows: CHICKEN NUGGETS
Press the Kids Meals button repeatedly to select the item you
want.(Refer to the Kids Meals Chart below)
Press the Number I or 2 button to select the serving size you want.
(Refer to the Kids Meals Chart below for the serving.)
Press the Start button to begin cooking.
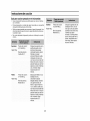
Kids Meals Chart
Item
Chicken
Nuggets
(frozen)
Hot Dogs
French Fries
(frozen)
Frozen
Sandwiches
(in crisping
sleeve)
9-oz
package
size
Amount
1 serving
2 servings
2 hotdogs
4 hot aogs
1 serving
2 servings
1 sandwich
2 sandwiches
Remarks
• Put a paper towel on top of plate and
arrange nuggets in spoke fashion.
• Do not cover.
• Let stand 1 minute after heating.
Note: Refer to package directions for
serving size and amount of food. Use the
MORE, pad if chicken nuggets are not hot
enougn.
• Prick hot dogs and place on plate
• When oven beeps, add buns and re-
start oven.
• Let stand 1 minute after heating.
Note: For the best texture, buns should
be added to hot dogs when the oven
beeps.
• Place 2 paper towels on microwave-
safe plate.
° Arrange french fries on towels. Do not
overlap.
• After cooki0g, plot with additional
paper towel.
• Let stand 1 minute after heating.
Note: Refer to package directions for
serving size and amount of food.
• Place frozen sandwich in susceptor
"crislain£!sleeve" packaged with
sanawlcn.
• Place on microwave-safe plate.
• Remove from"crisping sleeve".
• Let stand 2 minutes after heating.
Note: For larger size sandwiches use
the MORE pad to ncrease the heat ng
time.
13

Operation
Using the Snack Bar Button
2
Press the Snack Bar button corresponding to the food you are
cooking.
The display shows: NACHOS 1 SERVING
Press the Snack Bar button repeatedly to select the item you want.
(Refer to the Snack Bar Chartbelow)
Press the Number I or 2 button to select the serving size you want.
Only the I button(serving) is available for Nachos.
(Refer to the Snack Bar Chart below for the serving)
3 Press Start button to begin cooking.
Snack Bar Chart
Item Weight Remarks
Nachos 1 serving
Chicken Wings
Potato Skins
Cheese Sticks
(frozen)
5-6 oz.
7-8 oz.
1cooked
potato
2 cooked
potatoes
5-7pcs
8-1Opcs
• Place tortilla chips on plate without
overlapping.
• Sprinkle evenly with cheese.
• Contents :
2 cups tortilla chips
1/3 cup grated cheese
• Use pre-cooked, refrigerated chicken
wings.
• Place chicken wings around plate in
spoke fashion.
• Cover with wax paper.
• Let stand 1to 2 minutes after heating.
• Cut cooked potato into 4 even wedges.
Scoup or cutout potato flesh, leaving
about1/4" of skin.
• Place skins in spoke fashion around
plate.
• Sprinkle with bacon, onions and cheese.
• Do not cover.
• Let stand 1to 2 minutes after heating.
• Place cheese sticks on plate in spoke
fashion.
• Do not cover.
• Let stand 1to 2 minutes after heating.
Note: Sizes of cheese stick vary. For
smaller.size cheese nuggets, use the LESS
pad to decrease the heahng time. For larger
size cheese sticks use the MORE pad to
ncrease heat ng t me.
Setting Cooking Times & Power Levels
Your microwave allows you to set up to three different stages of cooking,
each with its own time length and power level. The power level lets you
control the heating intensity from Warm (1) to High (0).
One-stage Cooking
For simple one-stage cooking, you only need to set a cooking time.
The power level is automatically set at High. Ifyou want the power set at
any other level, you must set it using the Power Level button.
1 Use the Number buttons to set a cooking time. You can set a time
from one second to 99 minutes, 99 seconds. To set a time over one
minute, enter the seconds too.
For example, to set 20 minutes, enter 2, O,O,O.
2 If you want to set the power level to something other than High,
press the Power Level button, then use the number buttons to
enter a power level.
Power Levels:
1 = Warm 6 = Simmer
2 = Low 7 = Medium High
3 = Defrost 8 = Reheat
4 = Medium Low 9 = Saut_
5 = Medium 0 = High
The display shows: PRESS START OR ENTER NEXT STAGE
COOKING TIME.
3 Press the Start button to begin cooking. If you want to change the
power level, press Pause/Cancel button before you press the Start
button,and re-enter all of the instructions.
Some recipes require different stages of cooking at different tempera-
tures. You can set multiple stages of cooking with your microwave.
14

Operation
Multi-stage Cooking
Follow steps 1 and 2 in the "One-Stage Cooking" section on the
previous page.
PRESS START OR ENTER NEXT STAGE COOKING TIME
appears in the display.
When entering more than one cooking stage, the Power Level
button must be pressed before the second cooking stage can be
entered.
To set the power level at High for a stage of cooking, press the
Power Level button twice.
2
3
Use the Number buttons to set a second cooking time.
Press the Power Level button, then use the number buttons to set
the power level of the second stage of cooking.
The display shows the power level you have set and PRESS
START OR ENTER NEXT STAGE COOKING TIME
4 Press the Start button to begin cooking, or repeat steps 2 and 3 to
set a cooking time and power level for a third stage of cooking.
When finished, press Start button.
Using the More/Less Buttons
The More/Less buttons allow you to adjust pre-set cooking times.
They only work in the Sensor Reheat, Sensor Cooking(except
Beverage), Add 30 sec, Custom Cook, Kitchen Timer, Handy
Helper, Kids Meals, Snack Bar or Time Cook modes. Use the More/
Less button only after you have already begun cooking with one of these
procedures.
1 To ADD more time to an automatic cooking procedure: Press the
More(9) button.
2 To REDUCE the time of an automatic cooking procedure: Press the
Less(1 ) button.
Turning the Turntable On/Off
For best cooking results, leave the turntable on.
It can be turned off for large dishes.
Press Turntable On/Off button to turn the turntable on or off.
Sometimes the turntable can become too hot to touch.
Use pot holders touching the turntable during and after cooking.
Turning the Light Bright/Night/Off
Press the Light Bright / Night/Off button to adjust the light or turn it
on/off.
Press Light Bright/Night/Off once for on light, twice for the night light
and three times to turn the light off.
Operating the Vent Fan (3 speed)
The vent fan removes steam and other vapors from surface cooking.
Press Vent Fan 3 speed button once for High fan speed, twice for
Medium fan speed and three times for Low fan speed or four times to
turn the fan off.
Note:
The Vent Fan protects the microwave from too much heat rising
from the cooktop below it. It automatically turns on if it senses too
much heat.
If you have turned the fan on, you may find that you cannot turn it
off. The fan will automatically turn off when the internal parts are
cool. It may stay on for 30 minutes or more after the cooktop and
microwave controls are turned off.
15

Operation
Setting the Auto Night Light
The Auto Night Light can be set to come on and go off at desired times.
1 Press the Auto Night Light button.
ENTER ON TIME will appear in the display.
Enter the time of day for the light to come on.
2 Select AM or PM by pressing the CLOCK AM/PM button.
3
Press the Auto Night Light button.
The display will show: ENTER OFF TIME
Enter the time of day for the light to go off.
4 Select AM or PM by pressing the CLOCK AM/PM button.
5 Press the Auto Night Light button.
Note:
To review the Night light settings, press the Auto Night Light button.
To turn the Night light off, press 0 after selecting the Auto Night Light.
Setting Vent Auto Time Set
1
2
Press Vent (3 Speed) button to select Vent fan speed.
Press the Vent Auto Time Set button.
The display will show: AFTER 1 MINUTE VENT FAN OFF
The setting time ranges are 1, 3, 5, 10, 30 minutes.
After setting time, the Vent Fan will automatically turn off.
16

Operation
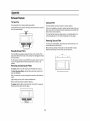
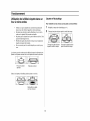
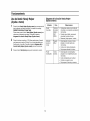
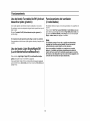
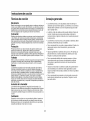
How to Use the Metal Shelf When
Microwaving
• Make sure the shelf is positioned properly inside the
microwave to prevent damage to the oven from arcing.
• Do not use a microwave browning dish on the shelf. The shelf
could overheat.
• Do not use the oven with the shelf on the microwave floor.
This could damage the microwave.
• Use pot holders when handling the shelf-it may be hot.
• Do not use the metal shelf when cooking popcorn.
Food microwaves best when placed on the turntable or on the shelf in
the lower position.
For best results Uneven results
The shelf gives you the option to reheat more than one dish of food at
the same time.
2-level reheating
Shelf and Reheating
To reheat on 2 levels or to reheat 2 dishes on the lower level:
1 Multiply reheat time by 1V2.
2 Switch places after V2the time.
Switch place after 1/2 time Switch place after 1/2 time
17

Cooking Instructions
Cooking Utensils
Recommended Use
• Glass and glass-ceramic bowls and dishes -- Use for heating or
cooking.
• Microwavable browning dish -- Use to brown the exterior of small
items such as steaks, chops, or pancakes. Follow the directions
provided with your browning dish.
• Microwavable plastic wrap -- Use to retain steam. Leave a small
opening for some steam to escape and avoid placing it directly on
the food.
Wax paper -- Use as a cover to prevent spattering.
Paper towels and napkins -- Use for short-term heating and
covering; they absorb excess moisture and prevent spattering. Do
not use recycled paper towels, which may contain metal and can
catch fire.
• Paper plates and cups -- Use for short-term heating at low
temperatures. Do not use recycled paper, which may contain metal
and can catch fire.
Thermometers i Use only those labeled "Microwave Safe" and
follow all directions. Check the food in several places. Conventional
thermometers may be used once the food has been removed from
the oven.
Limited Use
• Aluminum foil -- Use narrow strips of foil to prevent overcooking of
exposed areas. Keep the foil no more than 1-2 inches long and 1
inch wide. Using too much foil can damage your oven, so be careful.
• Ceramic, porcelain, and stoneware -- Use these if they are
labeled "Microwave Safe". If they are not labeled, test them to make
sure they can be used safely. Never use dishes with metallic trim.
• Plastic -- Use only if labeled "Microwave Safe". Other plastics can
melt.
• Straw, wicker, and wood -- Use only for short-term heating, as
they can be flammable.
Not Recommended
• Glass jars and bottles -- Regular glass is too thin to be used in a
microwave, and can shatter.
• Paper bags -- These are afire hazard, except for popcorn bags that
are designed for microwave use.
• Styrofoam plates and cups -- These can melt and leave an
unhealthy residue on food.
• Plastic storage and food containers -- Containers such as
margarine tubs can melt in the microwave.
• Metal utensils -- These can damage your oven. Remove all metal
before cooking.
Testing Utensils
If you are not sure whether a dish is microwave-safe or not, you can per-
form this test:
1 Fill a measuring cup with water and put it inside your oven, next to
the dish you want to test.
2 Press the Add 30sec. button once to heat them for 30 seconds at
High power.
The water should be warm and the dish you are testing should be cool. If
the dish is warm, then it is absorbing microwave energy and is not
acceptable for use in the microwave.
18

Cooking Instructions
Cooking Techniques
Stirring
Stir foods such as casseroles and vegetables while cooking to distribute
heat evenly. Food toward the outside of the dish absorbs more energy
and heats more quickly, so stir from the outside to the center. The oven
will turn off when you open the door to stir your food.
Arrangement
Arrange unevenly shaped foods, such as chicken pieces or chops, with
the thicker, meatier parts toward the outside of the turntable where they
receive more microwave energy. To prevent overcooking, place thin or
delicate parts toward the center of the turntable.
Shielding
Shield food with narrow strips of aluminum foil to prevent overcooking.
Areas that need shielding include poultry wing-tips, the ends of poultry
legs, and corners of square baking dishes. Use only small amounts of
aluminum foil. Larger amounts can damage your oven. Keep the foil no
more than 1-2 inches long and 1 inch wide.
Turning
Turn foods over midway through cooking to expose all parts to micro-
wave energy. This is especially important with large items such as
roasts.
Standing
Foods cooked in the microwave build up internal heat and continue to
cook for a few minutes after the oven stops. Let foods stand to complete
cooking, especially foods such as roasts and whole vegetables. Roasts
need this time to complete cooking in the center without overcooking the
outer areas. All liquids, such as soup or hot chocolate, should be shaken
or stirred when cooking is complete. Let liquids stand a moment before
serving. When heating baby food, stir well and test the food temperature
before serving.
Adding Moisture
Microwave energy is attracted to water molecules. Food that is uneven
in moisture content should be covered or allowed to stand so that the
heat disperses evenly. Add a small amount of water to dry food to help it
cook.
Venting
After covering a dish with plastic wrap, vent plastic wrap by turning back
one corner so excess steam can escape. Make sure to vent the wrap
away from hands and face. Venting towards you could result in burns on
your hands and face.
General Tips
• Dense foods, such as potatoes, take longer to heat than lighter
foods. Foods with a delicate texture should be heated at a low power
level to avoid becoming tough.
• Altitude and the type of cookware you are using can affect cooking
time. When using a new recipe, use the minimum cooking time and
check the food occasionally to prevent overcooking.
• Foods with a non-porous skin such as potatoes or hot dogs, should
be pierced to prevent bursting.
• Frying with heating oil or fat is not recommended. Fat and oil can
suddenly boil over and cause severe burns.
• Some ingredients heat faster than others. For example, the jelly
inside a jelly doughnut will be hotter than the dough. Keep this in
mind to avoid burns.
• Home canning in the microwave oven is not recommended because
all harmful bacteria may not be destroyed by the microwave heating
process.
• Although microwaves do not heat the cookware, the heat is from the
food often transferred to the cookware. Always use pot holders when
removing food from the microwave and instruct children to do the
same.
Making candy in the microwave is not recommended as candy can
heat to very high temperatures. Keep this in mind to avoid injury.
19

Cooking Instructions
Auto Sensor Cook
The Auto Sensor allows you to cook your food automatically by detect-
ing the amount of humidity generated from the food while cooking.
• When cooking food, humidity is generated. The Auto Sensor
determines the proper time and power level by detecting the
humidity from the food, eliminating the need to set the cooking time
and power level.
• When you cover a container with its lid or plastic wrap during Sensor
Cooking, the Auto Sensor will detect the humidity generated after the
container has been saturated with steam.
• Shortly before cooking ends, the remaining cooking time will begin
its count down. This will be a good time for you to rotate or stir the
food for even cooking if it is necessary.
• Before Auto Sensor cooking, food may be seasoned with herbs,
spices or browning sauces. A word of caution; salt or sugar may
cause burn spots on food so these ingredients should be added after
cooking.
• The More/Less pad is used to increase or decrease cooking time.
Use this pad to adjust the degree of cooking to suit your personal
taste.
Utensils & Cover For Sensor Cooking
To obtain good cooking results with this function, follow the
directions for selecting appropriate containers and covers in the
charts in this book.
Always use microwave-safe containers and cover them with their lids
or with plastic wrap. When using plastic wrap, turn back one corner
to allow steam to escape at the proper rate.
Always cover with the lid intended for the utensil being used. If the
utensil does not have its own lid, use plastic wrap.
Fill containers at least half full.
Foods that require stirring or rotating should be stirred or turned at
the end of the Sensor Cook cycle, when the time has started to count
down on the display.
Important
• It is not advisable to use the Auto Sensor cooking feature on a
continuous cooking operation, i.e. one cooking operation
immediately after another.
• Install the oven in a well ventilated location for proper cooling and
airflow and to ensure the sensor will operate accurately.
• To avoid poor results, do not use the Auto Sensor when the room
ambient temperature is too high or too low.
• Avoid placing the oven near high moisture appliances, since this will
interfere with the proper performance of the Auto Sensor.
• Always keep the inside of the oven clean. Wipe all spills with a damp
cloth.
This oven is designed for household use only.
20
Page is loading ...
Page is loading ...
Page is loading ...
Page is loading ...
Page is loading ...
Page is loading ...
Page is loading ...
Page is loading ...
Page is loading ...
Page is loading ...
Page is loading ...
Page is loading ...
Page is loading ...
Page is loading ...
Page is loading ...
Page is loading ...
Page is loading ...
Page is loading ...
Page is loading ...
Page is loading ...
Page is loading ...
Page is loading ...
Page is loading ...
Page is loading ...
Page is loading ...
Page is loading ...
Page is loading ...
Page is loading ...
Page is loading ...
Page is loading ...
Page is loading ...
Page is loading ...
Page is loading ...
Page is loading ...
Page is loading ...
Page is loading ...
Page is loading ...
Page is loading ...
Page is loading ...
Page is loading ...
Page is loading ...
Page is loading ...
Page is loading ...
Page is loading ...
Page is loading ...
Page is loading ...
Page is loading ...
Page is loading ...
Page is loading ...
Page is loading ...
Page is loading ...
Page is loading ...
Page is loading ...
Page is loading ...
Page is loading ...
Page is loading ...
Page is loading ...
Page is loading ...
Page is loading ...
Page is loading ...
Page is loading ...
Page is loading ...
Page is loading ...
Page is loading ...
Page is loading ...
Page is loading ...
Page is loading ...
Page is loading ...
Page is loading ...
Page is loading ...
Page is loading ...
Page is loading ...
Page is loading ...
Page is loading ...
Page is loading ...
Page is loading ...
Page is loading ...
Page is loading ...
Page is loading ...
Page is loading ...
Page is loading ...
Page is loading ...
Page is loading ...
Page is loading ...
-
 1
1
-
 2
2
-
 3
3
-
 4
4
-
 5
5
-
 6
6
-
 7
7
-
 8
8
-
 9
9
-
 10
10
-
 11
11
-
 12
12
-
 13
13
-
 14
14
-
 15
15
-
 16
16
-
 17
17
-
 18
18
-
 19
19
-
 20
20
-
 21
21
-
 22
22
-
 23
23
-
 24
24
-
 25
25
-
 26
26
-
 27
27
-
 28
28
-
 29
29
-
 30
30
-
 31
31
-
 32
32
-
 33
33
-
 34
34
-
 35
35
-
 36
36
-
 37
37
-
 38
38
-
 39
39
-
 40
40
-
 41
41
-
 42
42
-
 43
43
-
 44
44
-
 45
45
-
 46
46
-
 47
47
-
 48
48
-
 49
49
-
 50
50
-
 51
51
-
 52
52
-
 53
53
-
 54
54
-
 55
55
-
 56
56
-
 57
57
-
 58
58
-
 59
59
-
 60
60
-
 61
61
-
 62
62
-
 63
63
-
 64
64
-
 65
65
-
 66
66
-
 67
67
-
 68
68
-
 69
69
-
 70
70
-
 71
71
-
 72
72
-
 73
73
-
 74
74
-
 75
75
-
 76
76
-
 77
77
-
 78
78
-
 79
79
-
 80
80
-
 81
81
-
 82
82
-
 83
83
-
 84
84
-
 85
85
-
 86
86
-
 87
87
-
 88
88
-
 89
89
-
 90
90
-
 91
91
-
 92
92
-
 93
93
-
 94
94
-
 95
95
-
 96
96
-
 97
97
-
 98
98
-
 99
99
-
 100
100
-
 101
101
-
 102
102
-
 103
103
-
 104
104


Maytag UMV2186AAW15 Owner's manual
- Category
- Microwaves
- Type
- Owner's manual
- This manual is also suitable for
Ask a question and I''ll find the answer in the document
Finding information in a document is now easier with AI
in other languages
Related papers
-
Maytag JMV8186AAS14 Owner's manual
-
Whirlpool JMV8186AAS User manual
-
Maytag UMV2186AA Series User manual
-
-
Amana AMC5143AAQ User manual
-
Maytag MMC5193AAB User manual
-
-
-
-
Whirlpool UMC5200BCS User manual
Other documents
-
Danby DMW14SA1BDB Owner's manual
-
Samsung MW5593G User manual
-
Danby DMW14SA1WDB User manual
-
 Mr. Goodbar SCDG 3470 Installation guide
-
Jenn-Air Microwave Oven JMV8186AA User manual
-
-
-
-
-
