Page is loading ...

®
Owners Manual
Table of Contents ..... 2
Manuel du proprietaire
Table des mati_res .... 10
Manual del Usuario
Indice ........................ 18
CAUTION: Read and Save All Instructions
AVISO: Lea y guarde todas las instrucciones
ATTENTION: Lisez et conservez ces instructions
COPY YOUR MODEL AND SERIAL NUMBER HERE:
If you need service or call with a question have this information ready:
ESCRIBA EL MODELO Y NUMERO DE SERIE AQUI:
Si usted necesita Ilamar a reparaciones o hacer una pregunta tenga a mano esta informaci6n:
NOTEZ CI-DESSOUS LE NUM#RO DE S#RIE ET DE MODELE DE VOTRE APPAREIL:
Vous devez avoir cette information a portee de la main si vous tel6phonez pour obtenir de I'aide
ou poser une question.
Model \ Modelo \ Modele:
Serial Number \ NQmero de serie \ Numero de serie:
Purchase Date \ Fecha de compra \ Date d'achat:
Sears Roebuck and Co. Hoffman Estates IL 60179 USA 1-35395-001 Rev. 03

Readthisbookcarefully.ItisintendedtohelpyouoperateandmaintainyournewKenmoreFreezerproperly.Thefeatures
describedinthismanualarenotincorporatedonallmodels.Itisimportantthatyoufamiliarizeyourselfwiththefeatures
presentonyourmodel.
TABLEOFCONTENTS
Introduction
TableofContents
Warranty
MaintenanceAgreement
ImportantSafetyInstructions
ProtectChildren
TheKeyEjectLock
InstallationInstructions
ChooseaLocation
RemovePackagingMaterial
ElectricalSupply
OperatingInstructions
CoolingtheFreezerFirst
2
2
2
2
3
3
3
4
4
4
4
5
5
Features
ColdControlKnob
Lights - Interior
-PowerLight
KeyEjectLock
SlidingBaskets
DefrostDrain
DefrostIndictator
DefrostingInstructions
CleaningInstructions
ElectricalandMechanicalFailure
ChildEntrapmentInformation
Troubleshooting
Toll-FreeNumbers
5
5
5
5
6
6
6
6
6
7
7
7
8
9
FULLONEYEARWARRANTYONFREEZER.
Foroneyearfromthedateofpurchasewhenthisfreezerisoperatedandmaintainedaccordingtoinstructionsattached
toorfurnishedwiththeproductSearswillrepairthisfreezerfreeofchargeifdefectiveinmaterialorworkmanship.
FULLFIVE*YEARWARRANTYONSEALEDREFRIGERATIONSYSTEM.
Forfive*yearsfromthedateofpurchase,whenthisfreezerisoperatedandmaintainedaccordingtoowner'sinstructions
attachedtoorfurnishedwiththeproduct,Searswillrepairthesealedsystem(consistingofrefrigeration,connecting
tubing,andcompressor),freeofcharge,ifdefectiveinmaterialsorworkmanship.Theabovewarrantycoverageapplies
onlytofreezerswhichareusedforstorageoffoodforprivatehouseholdfoodstoragepurposes.
WARRANTYSERVICEISAVAILABLEBYCONTACTINGTHENEARESTSEARSSERVICECENTERINTHE
UNITEDSTATESORCANADA.
ThiswarrantyappliesonlywhilethisproductisinuseintheUnitedStatesorCanada.Thiswarrantygivesyouspecific
legalrightsandyoumayalsohaveotherrightswhichvaryfromstatetostateorprovincetoprovince.
* Length ofwarranty may vary in Canada. Contact your local Sea rs Store, Catalogue Outlet, or Sears Service Center for complete details.
SEARS IS AT YOUR SERVICE.
Your freezer has added value when you consider that Sears has nationwide service units staffed by professional technicians
specifically trained to service all appliances Sears sell.
ADD TO THE VALUE OF YOUR KENMORE; BUY A SEARS MAINTENANCE AGREEMENT.
Sears Kenmore freezers are designed, built and tested for years of dependable use. Yet any appliance may need service
from time to time. The Sears Maintenance Agreement offers you our maximum protection plan against unexpected repair
bills. Contact your salesman or nearest service center for details.
-2-

IMPORTANT SAFETY INSTRUCTIONS
Read all instructions before using this appliance.
WARNING: When using this appliance_ always exer-
cise basic safety precautions including the following:
1. This freezer must be properly installed in accordance
with the installation instructions before it is used. See
grounding instructions.
2. Never unplug your freezer by pulling on the power
cord. Always grip the plug firmly and pull it straight
out from the outlet. Never use an extension cord.
3. Unplug your freezer before cleaning changing a
lightbulb or making any repairs.
NOTE: We recommend that all repairs be )erformed
by a qualified technician.
4. Turning the temperature control knob to the off
position does not remove power to the electrical
circuit.
5. Immediately replace all electrical service cords that
have become frayed or otherwise damaged. Do not
use a cord that shows cracks or abrasion damage
along its length or at either the plug or connector end.
6. After your freezer is in operation_ do not touch the
cold surface& particularly when hands are damp or
wet. Skin may adhere to these extremely cold
surfaces.
7. Do not operate your freezer in the presence of
explosive fumes.
8. Use this appliance only for its intended purposes as
described in this Use and Care Book.
Protect Children
Children may suffocate if they crawl into a freezer to
hide or play.
Remove the lid of a freezer not in use_even if you plan
to discard the freezer. Many communities have laws
requiring you to take this safety precaution.
Destroy the carton and any plastic bags after the freezer
is unpacked. Children might use them for play. Cartons
covered with bedspreads or plastic sheets can become
airtight chambers.
Remove all staples from the carton. Staples can cause
severe cuts to people or destroy finishes.
The Key Eject Lock
If your freezer is equipped with a lock it can help reduce
the hazard of child entrapment.
NOTE: Be sure to keep your key in a safe location out
of the reach of children.
To lock or unlock the freezer_ you must hold the key in
the lock while turning. The lock is spring loaded so the
key cannot be left in the lock.
If the key is Iost_contact your nearest Sears outlet for a
replacement. Always give the complete model and
serial number of your freezer when requesting a
replacement key.
_3_

INSTALLATION INSTRUCTIONS
Choose a Location
Locate the freezer so that extension cords are not
necessary.
Your freezer operates most efficiently when located in
an area where the temperature is normally between
0°C (32°F) and 43°C (110°F).
Extreme temperatures can shorten the freezer's life.
Very high temperatures (such as in an unventilated
garage in summer) also will make your freezer run
more increasing its operating cost.
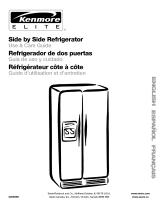
To provide adequate clearance around the freezer for
proper heat dissipation_ allow 3" of air space on all
sides of the freezer and a minimum 1" at the back.
Leave room above the freezer for the lid to open all
the way.
Illl HH
Allow room to open lid Min. 1 inch at back
Clean the freezer interior and parts to remove dust from
shipping and packaging. Clean the inside of the freezer
with a mild detergent.
Electrical Supply
The freezer should always be plugged into its own
individual 120V_60 HZ electrical grounded outlet which
is protected by its own 15 ampere fuse or circuit breaker.
This will help prevent overload of house wiring circuit&
which could cause a possible fire hazard by overheating
wires.
Do not plug the freezer into an outlet controlled by a
wall switch or a pull cord which may be turned off
accidentally.
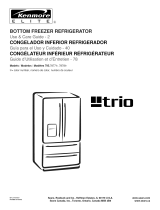
If the electrical outlet you intend to use will not
accept the three-prong plug, you must have a
properly grounded three-prong outlet installed by a
qualified electrician. Do not, under any
circumstances, cut or remove the round grounding
prong from the plug.
If you are not sure the outlet is adequately grounded_
you should have a qualified electrician check the outlet.
Properly Polarized and
Grounded Outlet
Be sure to install your freezer on a floor strong
enough to support it when it is fully loaded. The
freezer must be solidly positioned on the floor if it is
to function at its best. Shims may be used to level
freezer this wherever the floor is too uneven.
If the location selected for your freezer is damp or
moist, as in some basement& place 2" x 4" boards
along its entire length to ensure adequate support.
Make sure the boards are placed directly under the
feet of the freezer.
Remove Packaging Material
Remove all shipping tape and cardboard inside and
outside the freezer. If there is adhesive residue le_ on
the freezer it may be removed with warm water and
mild detergent. Do not use a solvent such as lighter or
cleaning fluid or an abrasive cleaner which may harm
the finish.
As you remove the tape and cardboard, check for
accessory items.
Three=Pronged (Grounding) Plug
No food should be stored in the freezer until the freezer
has obtained the set operating temperature. Refer to
Cooling the Freezer First on page 5.
Do not use an extension cord.
_4-

OPERATING INSTRUCTIONS
Cooling the Freezer First
After plugging the freezer in, it must run for 3 hours in
order to cool before placing any food inside. Make sure
the cold control knob is set at (Factory Settings).
The cold control knob has been preset at the factory at
the standard operating temperature (position 4). The
freezer temperature may be adjusted by setting the cold
control knob from number 1 (warmest) to number 7
(coldest). Setting the cold control knob at the number
"0" where it clicks will switch off power to the compres-
sor
NOTE: When the cold control knob is set at position "0"
the temperature in the freezer will rise to room
temperature and the freezer contents will defrost.
Setting the cold control knob to number "0"
position (Off) does not remove power to the freezer.
Do not attempt to do any cleaning, repairs or
defrost the freezer without first unplugging the
freezer.
LIGHTS
Interior Light
The interior light is located on the inside of the freezer
lid. The light turns on when the lid is opened and turns
off when the lid is closed. Replacement bulbs may be
obtained through your nearest Sears parts department.
NOTE: Freezers without a cold control knob are preset
at position 4 at the factory and cannot be adjusted.
When the freezer is first started, the compressor will run
constantly until the cabinet is cold. After the cabinet is
cooled the compressor will cycle on and off as needed
to keep the freezer at the set temperature.
The outside of your freezer may feel warm. This is
normal. The freezer's design and main function is to
remove heat from packages and air space inside the
freezer. This heat is transferred to the room air through
the outside walls of the freezer so they usually feel
warm to the touch.
Power Light
The power light is amber in color and is located on the
handle of the freezer. The purpose of the power warning
light is to warn you when there is an interruption in
power to the freezer. When the power light is on, the
freezer is receiving electrical power. If the light is off
there is an absence of power to the freezer (due to
blown fuse tripped circuit breaker, loose power cord,
etc.) This light does not guarantee a sufficiently cold
temperature inside.
IMPORTANT: The power light indicates electrical power
only. It does not indicate that there is a sufficiently cold
temperature inside the freezer.
FEATURES
The features described below are not incorporated on all
FREEZERS. It is important that you familiarize yourself
with the features present on your freezer.
Cold Control Knob
The cold control knob is located at the lower right hand
side of the cabinet.
NOTE: Freezers without a cold control knob are preset at
the factory and cannot be adjusted.
-5-

Lock ,,.,
-- Power Light
Defrost Indicator
The defrost indicator is black and is located in the center
of the back wall of the food liner. The purpose of the
defrost indicator is to indicate when the freezer should be
defrosted.
Key Eject Lock
The key eject lock is located in the center of the handle.
The key is packaged in the plastic bag with the use and
care guide.
When the defrost indicator is no longer visible because it
is covered with frost, the freezer should be defrosted to
maintain optimum freezing performance.
DEFROSTING INSTRUCTIONS
The purpose of the lock is to keep your frozen food
supply secure and to help reduce the hazard of child
entrapment.
To lock or unlock the freezer you must hold the key in the
lock while turning. The lock is spring loaded so the key
cannot be left in the lock.
NOTE: Be sure to keep your key in a safe location out
of the reach of children.
Sliding Baskets
Store small packages in baskets to avoid losing them in
the bottom of freezer. The baskets can be moved from
side to side or removed when loading or unloading food
below. To remove simply lift the baskets out. To
replace the baskets lower them into place.
Additional baskets are available from your nearest Sears
parts department.
Defrost Drain
The outer cabinet drain plug is located on the outside of
the freezer at the front bottom le_ hand corner. The
interior plug is located on the
inside of the freezer on the left
side of the floor. The drain hose
adaptor can be located in the
plastic bag with the Use & Care
Guide. The purpose of the defrost
drain is to allow quicker and more
convenient clean up of water. Drain Cap
Step 1. Remove the outer cabinet drain plug by twisting
and pulling.
Step 2. Insert the drain hose adaptor into the drain hole
and connect the hose to the adaptor. Run the hose down
towards a suitable drain.
Do not use any electrical device in defrosting your
freezer.
Depending on the climate you live in, humidity and usage,
your freezer may need defrosting only once or twice a
year. If possible, choose a time to defrost when your
food supply is at its lowest.
DO NOT use an ice pick or sharp edged instrument as it
may damage or scratch the freezer.
For Periodic Complete Cleaning and Frost Removal
If the frost is too thick or too hard to be scraped, we
suggest you do the following:
1. Remove the power cord plug from the outlet and open
your freezer lid.
2.
Remove all the food from the freezer. Your food may
be temporarily stored in large corrugated paper boxes,
insulated bags, towels or wrapped in
newspapers to preserve coldness.
NOTE: If your freezer has a defrost water drain, a
hose adaptor is packaged in the literature bag. Re-
move the drain cap on the front of the freezer, insert
the hose connector and attach the hose. A_er attach-
ing the hose, remove the drain plug inside cabinet.
Sponge remaining moisture from the bottom of the
freezer. (See page 6 for details of defrost drain).
3.
You may speed defrosting by removing large, loose
pieces of frost before they melt.
NOTE: Water may drip from the back of the lid during
defrosting. This is normal.
Step. 3. Remove the interior drain plug by twisting and
pulling. When the water in the freezer has been drained
replace the parts removed earlier.
-6-

4. Afterthefrostiscompletelyremoved,rinsetheinside
ofthefreezerwithasolutionofwarmwaterandbaking
soda(aboutonetablespoonofsodatoeachquartof
water).Youmayusemildsoapandwarmwater,but
followwithabakingsodasolution.Rinsewithclean
waterandwipedry.DONOTuseharshorgritty
cleanersintheinterior.
CleaningInstructions
Inorderto retainthefinishofthefreezercabinet,inside
andoutside,washtheenamelledandplasticpartswithwarm
waterandmildsoaponly,thenrinseanddry.Donotuse,
underany circumstances,a grit soapor a kitchen
scouringcleanserastheytendtoscratchthefinish.
WARNING:Whencleaninginthevicinityofelectri-
calparts,(lamp&switche&control&etc.)squeeze
excessmoistureoutofyourspongeorclothsothatit
isbarelydamp.Thiswillpreventwaterorliquidfrom
gettingintoanyelectricalpartandcausingapossible
shockhazardwhenthefreezerispluggedinagain.
NOTE:Ifyourfreezerhasadefrostdrain,replace
thisplugontheinsideandthedraincaponthe
outside.
5. Drythegasketonthelid.
6. Pluginthefreezerattheelectricaloutlet.Turnthe
temperaturecontrolknobtoitsregularsettingandwait
forthefreezertocooldownthenreturnthefoodto
thefreezer.
Electricaland Mechanical Failure
In case of a failure, it is recommended to keep the freezer
well covered with blankets. This will help to preserve the
"cold" on the inside of the foodliner. Be sure to remove
the blankets when the power is restored. If no help is
available within 12 hours then the freezer contents should
be transferred into a neighbor's freezer or commercial
freezer-lockers.
In the event of mechanical or electrical failure of the freezer,
contact your nearest Sears' Service Center immediately.
Provide the complete information for your freezer: model
number and serial number. These are shown on the serial
plate located inside the freezer. Before calling for service
please consult the troubleshooting instructions on the
following page.
Warning: Risk of Child Entrapment
Never allow children to operate, play with, or crawl inside a freezer or refrigerator.
If you are storing a refrigerator or freezer:
1. Block the door open: Glue thick wooden blocks to the door so it can't close.
Be sure to use strong glue and place the blocks high, out of children's reach. Leave only
enough room to allow ventilation to keep appliance from collecting mildew.
2. Band, tape or secure the door shut: Use strong tape and wrap it all
the way around the appliance several times or pass a heavy duty chain
around the appliance and through the handle(s) and then padlock it
ensuring it cannot slide loose.
Before you throw away your old refrigerator or freezer:
1. Take off the lid or door: The hinge of chest type freezers are under spring tension.
Instructions for removal of the hinges are found on the back of the freezer.
2. Cut off any electrical wires: Ordinary household tools are all you need.
3. Leave the shelves in place: so that children my not easily climb inside.
I
I
I
Talk to your children about the dangers of playing around or inside any container that might shut them in.
WHY all these precautions?
Each year children die because they climb inside an old refrigerator or freezer the door closes and they are
trapped inside and suffocate.., usually in less than 10 minutes!
Please take a few minutes and prevent such a needless tragedy.
If you are selling your old appliance or giving it away, put this manual inside so the new owners will know
what to do when they discard or store the unit.
"7"

TROUBLESHOOTING
The freezer does not operate.
Check to make sure the freezer is plugged in at the
wall outlet.
If the plug is secure and the freezer stills fails to
operate_ plug a lamp or a small appliance into the
same outlet to determine if there is a tripped circuit
breaker or burned-out fuse.
Check to ensure the cold control knob is not set to
Position "0" (off).
The freezer runs too frequently or too long.
Excessive frost or a package may be holding the lid
open.
The temperature control knob has been reset to a
colder temperature setting.
The lid was opened too frequently or too long.
A large quantity of unfrozen food has recently been
added to the freezer.
The room temperature is unusually warm (extended
period of warm weather).
There is inadequate air circulation space behind the
cabinet. The freezer needs proper clearance at the
back and sides.
The freezer temperature is too warm.
The freezer may not be plugged in at the wall outlet.
The lid was opened too frequently or too long.
There is excessive frost built-up around the lid or a
package may be holding the lid open.
The cold control knob is set too low or is set in the off
position.
The unit may need to be defrosted.
The freezer temperature is too cold.
The cold control knob is set on too high a number.
Foods are drying out.
Packages are not properly wrapped or sealed.
Moisture is collecting on the outside of the cabinet
or lid.
Extended hot and/or humid weather will cause this
collection of moisture to occur.
The freezer lid won't fully close.
A package may be holding the lid open.
There is excessive frost built-up
The freezer clicks and does not run.
The power to the freezer has recently been disrupted
and then restored Unplug the freezer for 30 minutes
to allow the refrigeration system to equalize
Noisy operation or vibration.
The floor may be weak causing the freezer to vibrate
when the compressor is on. Placing 2" x4" boards
under the length of the freezer will help support it and
reduce the noise vibration.
The cabinet is not positioned solidly on the floor. Use
shims to correct for an uneven floor.
There is uneven food distribution in the freezer.
Redistribute the food in a uniform manner.
Excessive frost build-up.
The lid was opened too frequently or too long.
A package may be holding the lid open.
Extended hot and/or humid weather.
-8-

For the repair or replacement parts you need
delivered directly to your home
Call7 am- 7 pro,7daysa week
1-800-366-PART
(1-800-366-7278)
CANADA: 1-800-665-4455
For in-home major brand repair service
Call24hoursa day,7daysa week
1-800- 4 - REPAIR
(1-800-473-7247)
CANADA: 1-800-665-4455
For the location of a Sears Repair
Service Center in your area
Call24hoursa day,7daysa week
1-800- 488-1222
For information on purchasing a
Sears Maintenance Agreement
or to inquire about an existing Agreement
Call9am -5 pm,Monday-Saturday
1-800- 827-6655
SEARS
America's Repair Specialists
-9-
/