Page is loading ...

@8 CK£BECKER 1
INSTRUCTION
MANUAL
DATE CODE
Catalog Number BV2500, BV9000
BEFORE YOU CALL, HAVETHE FOLLOWING INFORMATION AVAILABLE, CATALOGNo.,TYPE
No., AND DATECODE. IN MOST CASES, A BLACK & DECKER REPRESENTATIVE
CAN RESOLVE YOUR PROBLEM OVER THE PHONE. IFYOU HAVEA SUGGESTION OR
COMMENT, GIVE US A CALL. YOUR FEEDBACK ISVITALTO BLACK & DECKER.
KEYINFORMATIONYOU SHOULDKNOW:
i efore operating, make sure that either the blower or vacuum tube assembly is locked
in place.
ThepowerswitchmustbeOFFin order to depressthe releasebuttonfor changing blower
and vacuum tube assemblies.
SAVETHISMANUALFORFUTUREREFERENCE•
VEA ELESPANOLEN LA CONTRAPORTADA.
INSTRUCTIVO DE OPERACION, CENTROS DE SERVICIO Y P©LIZA DE GARANTJA.
ADVERTENCIA: LEASE ESTE INSTRUCTIVO ANTES DE USAR EL PRODUCTO.
Form No. 625233-00 Cat. # BY2500, BY9000 (MAY-04)
Copyright © 2004 Black & Decker Printed in Mexico
TO REDUCERISKOF INJURY:
" Before any use, be sure everyone using this tool reads and understands all safety instructions and other
information contained in this manual.
• Save these instructions and review frequently prior to use and in instructing others.
/_ WARNING: When using an electric appliance, basic safety precautions should always be followed
to reduce risk of fire, electric shock, and personal injury, including the following.
z_WARNING: Some dust created by this product contains chemicals known to the State of California to
cause cancer, birth defects or other reproductive harm. Some examples of these
chemicals are:
• compounds in fertilizers
• compounds in insecticides, herbicides and pesticides
• arsenic and chromium from chemically treated lumber
To reduce your exposure to these chemicals, wear approved safety equipment such as dust masks that are
specially designedto filter out microscopic particles.
/k WARNING: This product contains chemicals, including lead, known to the State of California to
causecancer, and birth defects or other reproductive harm. Wash hands after handling.
CAUTION: Wear appropriate personalhearingprotectionduring use. Undersomeconditionsand
duration of use,noisefrom thisproductmay contributeto hearingloss.
READ ALLINSTRUCTIONS BEFOREUSING BLOWER.
• READand follow all instructions.
• DO NOT place inlet or outlet of vacuum near eyesor ears when operating.
• THIS APPLIANCE IS PROVIDED WITH DOUBLE INSULATION. Use only identical replacement parts. See instructions for
servicing of double insulated appliances.
• STOREIDLETOOLS. When not in use, the unit should Bestored in a dry, high or locked-up place- out of reach of children.
• DON'T OVERREACH. Keep proper footing and balance at all times.
• DO NOT pick up anything that is burning or smoking, such as cigarettes, matches or hot ashes.
• MAINTAIN TOOL WITH CARE. Keep fan area clean for Best and safest performance. Follow instructions for proper
maintenance.
• DO NOT attempt to repair the BIower/vac. Toassure product safety and reliability, repairs, maintenance, and adjustments
should be performed By Black & Decker service centers or authorized service stations, always using Black & Decker
replacement parts.
• DO NOT operate blower/vac in a gaseous or explosive atmosphere. Motors in these tools normally spark, and the sparks
might ignite fumes.
• DO NOT use to pick up flammable or combustible liquids such as gasoline or use in areas where they may Be present.
• USEEXTRACARE when cleaning on stairs.
• DO NOT leave appliance when plugged in. Unplug from outlet when not in use and before servicing.
• DO NOT allow to be used as a toy. Close attention is necessary when used By or near children. Not recommended for use by
children.
• DO NOT attempt to clear clogs from tool without first unplugging it.
• USEONLY as described in this manual. Use only manufacturer's recommended attachments.
• DO NOT usewith damaged cord or plug. If appliance is not working as it should, has been dropped, damaged, leftoutdoors,
or dropped intowater, return it to a service center.
• DO NOT pull or carry By cord, use cord as a handle, or pull cord around sharp edges or corners. Keep cord away from
heated surfaces.
• DO NOT unplug By pulling on cord. Tounplug, grasp the plug, not the cord.
• DO NOT put any objects into openings. Do not usewith any opening blocked; keep free of dust, lint, hair and everything that
may reduce air flow.
• KEEPhair, loose clothing, fingers, and all parts of Body away from openings and moving parts.
• TURN OFF all controls Before unplugging.
• DO NOT vacuum water, other liquids, or wet objects such as leaves. Never immerse any part of the tool in liquid.
• DO NOT handle plug or appliance with wet hands.
• KEEPCHILDREN, BYSTANDERSAND ANIMALS AWAY from thework area a minimum of 30 feet (10 meters) when starting or
operating the tool.
• INSPECTTHEAREA Before using the tool. Remove all debris and hard objects such as rocks, glass, wire, etc. that can ricochet,
be thrown, or otherwise cause in ury or damage during operation. As a vacuum, the tool is designed to pick up dry material
such as eaves, grass, sma twigs,and Bitsof paper. Do not vacuum stones, grave, meta, Broken g ass, etc.
/kWARNING: Toreduce the risk of electrical shock; do not expose to rain, do not useon wet surfaces.
Store indoors.
,"k WARNING: Turn off and unplug unit, then wait until fan stops or at least 10 seconds Before removing the blower or
vacuum tube assemblies.
SAVE THESE INSTRUCTIONS
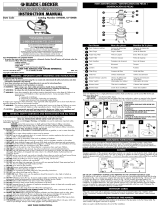
ReleaseButton
B0ut0ndeD_gagement OFF ON
B0t0nesdeLiberaci6n Arr_t EnMarche
Apagada Encendid0
0
Switch
Interraptor
0
ExtensionTube
TubedeRallange
Tub0de
\
!
VacuumTube
Tube
0
\ \
0
o
0
BlowingMode
Souffleuse
MododeSoplad0r
0
0
VacuumingMode
Aspirateur
MododeAspiradora
......i A i /
J • ._,
Your Blower/Vac is double-insulated to give you added safety. In a double insulated appliance, M'o systemsof insulation are
provided instead ofgrounding. No grounding means is provided on a double insulated appliance, nor should a means for
grounding be addedto the appliance. Servicing a double insulated appliance requires extreme care and knowledge of the
system and should Be done only by qualified service personnel. Replacementparts for a double insulated appliance must Be
identical to the parts they replace. A double insulated appliance is markedwith the words double insulated or "double
insulation". The symbol (square within a square) may also Be marked on the appliance.
Double insulated tools have 2-wire cords and can be used with 2-wire or 3-wire extension cords. Only round jacketed
extension cords should be used, and we recommend that they be listed by Underwriters Laboratories (U.L.) (C.S.A. in
Canada). If the extension will be used outside, the cord must Be suitable for outdoor use. Any cord marked as outdoor can also
Be used for indoor work.
An extension cord must have adequate wire size (AWG or American Wire Gauge) for safely, and to prevent lossof power and
overheating. The smaller the gauge number of the wire, the greater the capacity of the cable, that is 16 gauge has more
capacity than 18 gauge. When using more than one extension to make up the total length, be sure each individual extension
contains at leastthe minimum wire size.
To determine the minimum wire size required, refer to the chart Below. Before using an extension cord, inspect it for loose or
exposed wires, damaged insulation, and defective fittings. Make any needed repairs or replace the cord if necessary.
Volts
120V
240V 0-50
Ampere Rating
More Not more American Wire Gage
Than Than
0 - 6 18 16 16 14
6 - 10 18 16 14 12
10- 12 16 16 14 12
12- 16 14 12 Not Recommended
Minimum Gage forCordSets
TotalLengthof Cordin Feet
0-25 26-50 51-100 101-150
51-100 101-200 201-300

To reduce the risk of electric shock, this equipment has a polarized plug (one blade iswider than the other). This equipment
must be used with a suitable polarized 2 wire or 3 wire extension cord. Polarized connections wili fit together only one way.
Make sure that the receptacle end of the extension cord has large and small blade slot widths. If the plug does not fit fuliy into
the extension cord, reverse the plug. If it still does not fit, obtain a suitable extension cord. If the extension cord does not fit
fully into the outlet, contact a aualified electrician to instail the proper outlet. Do not change the tool plug or extension cord in
any way.
• SECURING POWER SUPPLY CORD - Secure the extension cord in the tool's built-in cord retainer as shown in Figure 12 or
secure the power supply cord and a suitable extension cord as shown in Figure 13.
NOTE: The switch will not operate if the release button, shown in Figure 1, is depressed.
Toturn the tool ON, slide the switch forward, as shown in Figure 1. To turn tool OFF,slide switch to the rear.
USEAS A BLOWER:ALWAYSWEARSAFETYGLASSES,WEARA FILTERMASK IFTHEOPERATIONISDUSTY.USEOF
RUBBERGLOVESAND SUBSTANTIALFOOTWEARISRECOMMENDEDWHENWORKINGOUTDOORS.FORHOUSEHOLD
USEONLY.
• BLOWER MODE
Ensure that the unit is switched OFF and is disconnected from thepower supply. Assemble blow tube as shown in Figure 2.
(This only needs to be done the first time you assemble the unit.)
Z_WARNING: When turning the tool off for tube instaJiation or any other reason, wait 10 seconds for the fan to stop
rotating before disassembly.
Attach the blower tube assembly (The assembly includes the blower tubes, the fan chamber and the blower air speed
control mechanism) to the front of the tool, as shown in Figure 3 by inserting point A into the matching recess marked
point B, also shown in Figure 3. Swing the tube up to engage the lock, as shown in Figure 4.
NOTE: The lock will not engage if the ON/OFF switch is in the forward (ON) position.
Hold the end of the blower tube approximately 7 inches (180mm) above the ground and turn the tool ON. Using a sweeping
motion, from side to side, advance slowly keeping the accumulated debris (leaves,grass clippings etc.) in front of you, as
shown in Figure 5. Once you have blown the debris into a pile, you can convert to vacuum mode to coiled the debris for
disposal.
• BLOWER AIR SPEEDCONTROL
Your Blower Vac has a variable air speed feature thatallows you to select the air speed thatbest fits your needs. Toadjust the
air speed, simply slide the orange collar. This will allow movement over the fuji range of
I 3/4"(44.5mm).With the slide collar inthe "A" position, as shown in Figure 6, the maximum blower speed will be 200 mph
(320 kph). When pushed forward toposition "C" ( as far from the tool housing as possible; about I 3/4"{44.5mm}) the speed
will be approximately 140 mph (225 kph). Position "B" (midway between the two) permits infinite adjustment between
positions "A" and "C". A little practice will help you determine what is the best speed for your application.
USE AS A VACUUM CLEANER:ALWAYS WEAR SAFETYGLASSES.WEAR A FILTERMASK IFTHEOPERATION IS DUSTY.USE
OF RUBBER GLOVES AND SUBSTANTIAL FOOTWEAR IS RECOMMENDED WHEN WORKING OUTDOORS. FOR
HOUSEHOLD USEONLY.
• REMOVING THEBLOWER TUBEASSEMBLY
Switch off the unit and unplug from the outlet.
To disconnect the blower tube assembly from the tool, depress the release button, shown in Figure 1, ensuring that the tube
does not fall to the ground.
NOTE: The release button will not depress if the ON/OFF switch is in the forward (ON) position.
• VACUUMING MODE
Ensure that the unit is switched off and disconnected from the power supply. Position the vacuum tube and extension tube as
shown in Figure 7. Pushthe extension tube into the vacuum tube until it snaps into place and the arrows shown in Figure 7A
are covered as in Figure 7B. If necessary, this can be made easier by wiping the end of the extension tube with a cloth
dampened with soapy water only.
Attach the vacuum tube assembly (The assembly includes the extension tube, the vacuum tube and the fan chamber.) to the
front of the tool. Insert point "A", shown in Figure 8, into the matching recess in the front of the tool point "B", also shown in
Figure 8, and swing the tube up to engage the lock, as shown in Figure 9.
Attach the collection bag to the vacuum outlet using the bayonet fitting, as shown in Figure 10.
Hold the vacuum as shown in Figure 11. Tilt the vacuum tube slightly and use a sweeping action similar to the action described
under Blower Mode. The light debris will flow into and through the vacuum tube into the collection bag. Things such as leaves
and small twigs will be mulched as they pass through the fan chamber so that the collection bag will hold a lot of debris.
When the collection bag gets full, suction will noticeably decrease. Turn off and unplug the tool and unzip the bag to empty
before continuing to operate.
Z_CAUTION: NEVER UNZIP THECOLLECTION BAG WITHOUT FIRSTTURNING OFFAND UNPLUGGING THE
VACUUM.
NOTE: tf thesuction decreases and thebogis not full, the vacuum tube is probably clogged with debris. Turn off and
unplug the vacuum and clear the tube before continuing.
• CLEANING AND STORAGE
TURN OFF AND UNPLUG TOOL! (Unplug extension cord at power source.)
Use only mild soap and a damp cloth to clean the too]. Cban out any clippings which may have accumulated in the
Blower/Vac. When used properly with dry leaves the fan chamber of your Blower/Vac should remain clean. If damp earth
and debris are ingested some of the particles may build up on the inside of the fan chamber. If this hap.l_ensthe performance
of the unit will decrease. This area can be cleaned out by gently wiping out with a damp rag after disconnecting from the
power source. Your Blower/Vac should be stored in a dry place.
Z_CAUTION: DO NOT POUR OR SPRAYWATERON THE TOOL IN AN ATTEMPTTO CLEAN.
Do not store the tool on or adjacent to fertilizers or chemicals. Such storage can cause rapid corrosion of the metal parts.
Use only mild soap and a damp cloth to dean the tool Never Jetany liquid get inside the tool; never immerse any part of the
tool into a liquid.
Recommended accessories for usewith your tool are available from your local dealer or authorized service center, if you
need assistance regarding accessories, please call: 1-800-54-HOW-TO (544-6986).
Z_WARNING: The use of any accessory not recommended for use with this tool could be hazardous.
Leaf Collection System Cat. No. BV-O06 (Available from your dealer at extra cost.) (BV-006 is included with BV9000).
The Leaf Collection S!stem replaces the collection bag with a systemof collecting debris directly into a 30-33 gallon trash can.
Complete directions tor the system's use are included. (Trash can not included.)
Toassure product SAFETYand RELIABILITY,repairs, maintenance and ad ustment (including brush inspection and
replacement) should be performed by authorized service centers or other qualified service organizations, always using
identical replacement parts.
Black & Decker offers a full network of company-owned and authorized service locations throughout North America. All
Black & Decker Service Centers are staffed with trained personnel to provide customers with efficient and reliable power tool
service.
Whether you need technical advice, repair, or genuine factory replacement parts, contact the Black & Decker location
nearest you.
To find your local service location, refer to the yellow page directory under "Tools--Electric" or call: 1-800-54-HOW-TO
(544-6986).
Black & Decker (U.S.) inc. warrants this product for two years against any defects in material or workmanship. The defective
product will be replaced or repaired at no charge in either of two ways:
GUIDE D'UTILISATIOH
RENSEIGNEMENTS IMPORTANTS
• Avant de faire fonctionner I'outil, s'assurerque le souffleur ou I'assemblage du tube
d'aspiration soit bien enclench6.
• Mettre I'interrupteur en position d'arr+t (<<OFF>>)avant d'enfoncer le bouton de
d+clenchementen vue de remplacer I'assemblage dusouffleur ou du tube d'aspiration.
AFINDEREDUIRELESRISQUESDEBLESSURES:
• Avant toute utilisation, s'assurerque tousceux qui se serventde I'outil lisent etcomprennenttoutesles
mesures de s_curit_ et tout autre renseignement contenus dans le present guide.
• Conserver ces mesures et les relire fr_quemment avant d'utiliser I'outil ou d'en expliquer le fonctionnement
d'autres personnes.
z_AVERTISSEMENT: Afin de r_duire les risques d'incendie, de secousses _lectriques ou de blessures
Iorsqu'onutilise des outils _lectriques,il taut toujours respecterles mesures de
s_curit_ suivantes.
z_AVERTISSEMENT : Le produit g_n_rede la poussi_requi peutrenfermer des produitschimiques.
Selon I%tat de la Californie, ces produits chimiques peuvent causer le cancer
ainsi que des malformations cong_nitales, et ils pr_sentent d'autres dangers au
syst_me reproductif humain. Voici des exemples de tels produits chimiques :
les compos_s d'engrais;
i les compos_s d'insecticides, et pesticides;
d'herbicides de
I'arsenic et le chrome provenant de bois traitS.
Afin de minimiser les risques, porter de I%quipement de s_curit_ approuv_ comme des masques
antipoussi_res sp_cialement concu pour filtrer les particules microscopiques.
AVERTISSEMENT: Le produitrenferme des produitschimiques,dont du plomb. Selon I%tat de la
Californie, ce produit chimique peut causer le cancer ainsi que des
malformations cong_nitales, et i/pr_sente d'autres dangers au syst_me
reproductif humain. Se laver les mains apr_s I'utilisation.
/k MISE EN GARDE : Porter un dispositifappropri_ de protectionde I'oui'e Iors de I'utilisation du
produit. Dans certaines conditions et dur_es d'utilisation, le produit peut _mettre un
niveau de bruit provoquant la perte de I'oui'e.
LIRETOUTES LES DIRECTIVES AVANT D'UTILISER L'OUTIL
• LIREet respecter toutes Jesmesures de sScuritS.
• NE PASporter J'entr_eou Jasortie du tube de J'aspirateur c1proximit8 des yeux ou des oreiJJesJorsque J'outiJfonctionne.
• L'OUTILESTMUNI D'UNE DOUBLEISOLATION. UtiJiser seuJementdes pi_ces de rechange identiques. Voir Jesdirectives sur
J'entretien des outiJsc1double isolation.
• RANGER LESOUTILS NON UTILISESdans un endroit sec, situ_ en hauteur ou ferm_ _ cJ_,hors de portSe des enfants.
• NE PASDEPASSERSA PORTEE.Toujours demeurer dans une position stable et garder son 8quiJibre en tout temps.
• NE PASaspirer d'objets en combustion teJsJesm_gots de cigarette, des aJJumettesou des cendres chaudes.
• BIEN ENTRETENIRI.'OUTIL. Garder JeventiJateur propre afin d'optimiser et de sScuriser Jerendement. Suivre Jesdirectives
d'entretien.
• NE PAStenter de r_parer J'outiJ. Pour garantir JasScurit_ et JafiabiJit_ du produit, JesrSparations, en confier J'entretien et Jes
r_gJages _ un centre de service Black & Decker ou c1un atelier d'entretien autoris_ utiJisant uniquement des pisces de
rechange Black & Decker.
• NE PAS utiJiserJ'outiJdans des endroits o0 J'atmosphSre renferme desvapeurs combustibles ou explosives. Les_tinceJJesque
produit habitueJJement Jemoteur en marche Pourraient enflammer ces produits.
• NE PAS se servir de J'outiJpour ramasser des Jiquides inflammables ou combustibles (comme de J'essence) ni J'utiJiserdans
des endroits o0 de teJsproduits peuvent se trouver.
• FAIRETRESATTENTION Jorsqu'on travaiJJedans des escaJiers.
• NE PASJaisserJ'outiJbranch8 sans surveillance. Le dSbrancher Jorsqu'on ne s'en sert Pos et avant d'en faire J'entretien.
• ILNE S'AGIT PASd'un ouet. Faire PorticuJiSrement attention Jorsqu'un enfant utiJiseJ'outiJou qu'on s'en sert pros d'un enfant.
Iest d_consei 8 de aisser un enfant se servir de 'outi.
• NE PAStenter de d_bJoquer J'outiJavant de JedSbrancher.
• UTILISER SEULEMENT I.'OUTIL de Ja mani_re prescrite dans Je present guide. UtiJiser uniquement Jesaccessoires
recommand_s par Jefabricant.
• NE PAS utiJiserJorsque Jecordon ou Jafiche sont endommagSs. Confier J'outiJ _ un centre de service Jorsqu'iJ ne fonctionne
Pos convenabJement, Jorsqu'iJ esttomb_ ou endommag_, Jorsqu'iJ a _t8 Jaiss__ J'ext_rieur ou Jorsqu'iJest tomb_ c1J'eau.
• NE PAStirer sur Jecordon ni seservir du cordon pour transporter J'outiJ. Ne Pos tirer sur Jecordon pros d'ar_tes tranchantes
ou de coins, t_Joigner Jecordon de toute surface chauff_e.
• NE PASd_brancher J'outiJen tirant sur Jecordon. Pour Jed_brancher, en saisir Jafiche et non Jecordon.
• NE RIEN insSrer dans Jesouvertures. Nepas utiJiser J'outiJ Jorsqu'une ouverture est bouchSe; garder Jesouvertures exemptes
de PoussiSre, de charpie, de cheveux et de tout ce qui peut r_duire JedSbit d'air.
• ELOIGNERJescheveux, JesvStements ampJes, Jesdoigts et Jecorps des ouvertures ainsi que des pi_ces mobiles.
• METTRETOUTESLESCOMMANDES HORS FONCTION avant de dSbrancher J'outiJ.
• NE PASutiJiserpour aspirer de J'eau, tout autre Jiquide ou des objets mouiJbs comme des feuiJJes.Ne jamais immerger J'outiJ,
au compJet ou en Portie.
• NE PASmanipuJer Jafiche ni J'outiJavec Jesmains mouiJJ_es.
• S'ASSURER QUE LESENFANTS, LESOBSERVATEURS ET LESANIMAUX SETROUVENT/_. UNE DISTANCE minimale de
10 mStres (30 pieds) de Jasurface de travail Jorsqu'on dSmarre J'outiJou qu'on s'en sert.
• EXAMINER LA ZONE avant d'utiJiser J'outiJ.EnJevertout dSbris ou objet dur (comme des pierres, du verre, des ilk) qui Pout
ricocher, _tre 8ject8 ou provoquer des bJessuresou des dommages Jots de J'utiJisation de J'outiJ. Lorsqu'on se sert de J'outiJ
pour aspirer, ceJui-ci estcon cu pour ramasser des matSriaux secs (comme des feuiJJes,de J'herbe, de petites branches et des
bouts de papier). Ne pas aspirer des roches, du gravier, du m_taJ,du verre cass8 ou d'autres objets sembJabJes.
z_AVERTISSEMENT: Afin de minimiser Jesrisques de secousses_Jectriques, protSger de JapJuie, ne Pos s'en servir
sur des surfaces mouiJbes et ranger c1J'int_rieur.
zLAVERTISSEMENT: ArrSter et dSbrancher J'apporeiJ. Attendre au moins 10 secondes ou usqu'_ ce que Je
ventiJateur s'arr_te compJStementavant de retirer J'assembJage du souffJeur ou du tube
d'aspiration.
CONSERVERCESMESURES.
La souffleuse-aspirateur _ double isolation procure une protection suppJ+mentaire. Dans ce typo d'outil, Jesdeux syst+mes
d'isolant rempiacent la mise _ la terre, li n'y a aucun moyen de mettre I'outil c1la terre et aucun syst+me de mise _ ia terre ne
doit +tre a out+ c1I'outii. L'entretien d'un outil c1double isolation exige beaucoup de soin et une exceilente connaissance du
syst+me; il ne devrait +tre confi+ qu'cl un technicien comp+tent. Les pi+ces de rechange de ce type d'outii doivent +tre
identiques aux pi+ces d'origine. Un outii c1double isolation porte I'inscription <<DOUBLE INSULATED>>ou <<DOUBLE
INSULATION>>. Lesymbole (uncarr+ _ I'int+rieur d'un carr+) Pout aussi figurer sur I'outil.
The first, which will result in exchanges only, is to return the product to the retailer from whom it was purchased (provided
that the store is a participating retailer). Returns should be made within the time period of the retailer's policy for exchanges
(usually 30 to 90 days after the sale). Proof of purchase may be required. Please check with the retailer for their specific
return policy regarding returns that are beyond the time setfor exchanges.
The second option is to take or send the product (prepaid) to a Black & Decker owned or authorized Service Center for
repair or replacement at our option. Proof of purchase may be required. Black & Decker owned and authorized Service
Centers are listed under "Tools-Electric" in the yellow pages of the phone directory.
This warranty does not apply to accessories. This warranty gives you specific legal rights and you may have other rights
which vary from state to state. Should you have any questions, contact the manager of your nearest Black & Decker Service
Center.
This product is not intended for commercial use.
Im ortedby
Black& _)l_cker(U.S.)Inc.,
701 E.Joppa Rd.
Towson,MD 21286 U.S.A.
See 'Tools-Electric'
- Yellow Pages -
for Service & Sales
Les outils _ double isolation soot munis d'un cordon bifilaire et iJspeuvent _tre utiJis_savec un cordon de ralJonge muni de 2
ou de 3 fiJs. II taut seuJement utiliser des cordons de raJlonge c1gaine ronde et iJsdevraient _tre homoJogu_s par J'organisme
am+ricain Underwriters Laboratories (U.L.) ou la CSA (au Canada). Lorsque le cordon de rallonge est utilis+ c1I'ext+rieur, il
doit +tre pr+vu _ cet effet. Tout cordon ext+rieur Pout servir c1hnt+rieur.
Les cordons de rallonge doivent +tre faits de conducteurs de calibre appropri+ (AWG oujauge am+ricaine des ills) par
mesure de s+curit+ et afin de pr+venir les pertes de puissance et bs surchauffes. Lenum+ro de calibre du fil est inversement
proportionnei _ la capacit+ du cordon. Ainsi, un cordon de calibre 16 a une capacit+ sup+rieure _ un cordon de calibre 18.
Lorsqu'ii est n+cessaire d'utiliser plus d'un cordon de railonge, veiller _ ce que chaque cordon ait au moins le calibre
minimal.
Le tableau ci-dessous permet de d+terminer le calibre minimal des cordons.Avant d'utiliser un cordon de railonge, s'assurer
qu'il n'y a Pos de ills d+nud+s ni d+tach+s, et que I'isolant et les raccords ne sont Pos d+fectueux. Effectuer les r+porations
n+cessaires ou remplacer le cordon, le cas +ch+ant.
Tension
120V
240V
Intensit_ (A)
Au Au
moins plus
0 6
6 10
10 12
12 16
Calibre minimal des cordons de rallonge
Longueur totale du cordon en pieds
De0625 De26650 De516100 De1016150
De0650 De516100 DelO16200 De2016300
Calibre moyen de fil (AWG)
18 16 16 14
18 16 14 12
16 16 14 12
14 12 Nonrecommand_
/