Page is loading ...

When using electrical appliances, basic safety precautions should always be
followed, including the following:
❑ Read all instructions.
❑ Do not touch hot surfaces. Use handles or knobs.
❑ To protect against risk of electrical shock, do not immerse cord, plug, or any
non-removable parts of this oven in water or other liquid.
❑ Close supervision is necessary when any appliance is used by or near
children.
❑ Unplug from outlet when not in use and before cleaning. Allow to cool
before putting on or taking off parts.
❑ Do not operate any appliance with a damaged cord or plug or after the
appliance malfunctions or is dropped or damaged in any manner. Return
the appliance to the nearest authorized service facility for examination,
repair, or electrical or mechanical adjustment. Or, call the appropriate toll-
free number listed on the cover of this manual.
❑ The use of accessory attachments not recommended by the appliance
manufacturer may cause injuries.
❑ Do not use outdoors.
❑ Do not let cord hang over edge of table or counter, or touch hot surfaces.
❑ Do not place on or near a hot gas or electrical burner, or in a heated oven.
❑ Extreme caution must be used when moving an appliance containing hot oil
or other hot liquid.
❑ Turn all controls to OFF before inserting or removing plug from wall outlet.
❑ Do not use appliance for other than intended use.
❑ Oversize foods or metal utensils must not be inserted in this appliance, as
they may create a fire or risk of electric shock.
❑ A fire may occur if the toaster oven is covered or touching flammable
material including curtains, draperies, walls and the like, when in operation.
Do not store any item on top of unit when in operation.
❑ Do not clean with metal scouring pads. Pieces can break off the pad and
touch electrical parts resulting in a risk of electric shock.
❑ Extreme caution should be used when using containers constructed of other
than metal or glass.
❑ Do not store any material, other than manufacturer's recommended
accessories, in this oven when not in use.
❑ Do not place any of the following materials in the oven: paper, cardboard,
plastic wrap, and the like.
As a safety feature, this product is equipped with a grounded plug, which will only
fit into a three-prong outlet. Do not attempt to defeat this safety feature. Improper
connection of the grounding conductor may result in the risk of electric shock.
Consult a qualified electrician if you are in doubt as to whether the outlet is properly
grounded.
a) A short power-supply cord is to be provided to reduce the risk resulting from
becoming entangled in or tripping over a longer cord.
b) Longer extension cords are available and may be used if care is exercised in
their use.
c) If an extension cord is used,
1) The marked electrical rating of the cord set or extension cord should
be at least as great as the electrical rating of the appliance, and
2) The cord should be arranged so that it will not drape over the countertop
or tabletop where it can be pulled on by children or tripped over
unintentionally.
If the appliance is of the grounded type, the extension cord should be a
grounding-type 3-wire cord.
If the power supply cord is damaged, it should be replaced by qualified
personnel. In Latin America, by an authorized service center.
❑ Do not cover crumb tray or any parts of the oven with metal foil. This will
cause overheating of the oven.
❑ To stop toasting, turn toast browning control to OFF. To stop baking or
broiling, turn temperature control OFF and Timer to 0.

This product is for household use only.
$ " 65 *0 /
THIS OVEN GETS HOT. WHEN
IN USE, ALWAYS USE OVEN
MITTS OR POT HOLDERS
WH EN TOUCHING ANY OUTER
OR INNER SURFACE OF THE
OVEN
1. Wash all parts as instructed in the Care and Cleaning section.
2. Insert the Crumb Tray underneath the bottom heating elements.
3. Plug the unit into a standard outlet.
1. Insert the Slide Rack in the rack slot with the curved end toward
the back of the oven . It is not necessary to preheat the oven
for toasting.
2. Set the Toast Browning Control as desired. For best results, select
the medium setting for your first cycle, then adjust lighter or darker
to suit your taste.
3. Turn Temperature Control to Toast setting. The On Indicator Light comes on and stays on
during the toasting cycle. When toasting is done, you hear a bell sound. The On Indicator Light
goes out.
4. To stop toasting at any time, open the oven door. The heating elements and the On Indicator
Light go out.
5. Turn the Toast Browning Control to Off.
6. Using an oven mitt or pot holder, open the door and slide out the Slide Rack to remove food.
For best results, when making consecutive batches of toast, allow a short cool down period
between toasting cycles.
1. Place Bake Pan containing food to be cooked on the Slide Rack.
2. Turn the Temperature Control to the desired temperature setting.
a. If not using the Bake Timer, turn the control to On and monitor the food.
b. If using the 60-Minute Bake Timer, turn the control to the desired number of minutes.
For best results, always preheat the oven for 5 minutes.
3. The upper and lower heating elements will cycle on and off to maintain the temperature.
To stop cooking, open the oven door. To continue cooking, close the door. Check food for
doneness at minimum time.
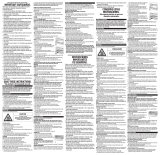
1
2
3
4
5
6
9
10
11
7
8

4. When finished cooking, turn the Temperature Control to Off.
5. If using the 60-Minute Bake Timer, you will hear a bell sound once it reaches the set time. If
not, when cooking is done, turn the Timer to 0 (off). The On Indicator Light goes out.
6. Using an oven mitt or pot holder, open the door and slide out the Slide Rack to remove the
Bake Pan.
When broiling, preheat oven for 5 minutes.
1. Insert the Broil Rack in the Bake Pan and place both on the Slide
Rack.
2. Turn the Temperature Control to Broil and the 60-Minute Bake
Timer Control to On.
3. To stop cooking, open the door. Check food for doneness at minimum cooking time.
4. When finished broiling, using an oven mitt or pot holder, slide out Slide Rack to remove
Bake Pan.
5. Turn Temperature Control to Off and 60-Minute Bake Timer to 0 (off).
This product contains no user serviceable parts. Refer service to qualified service personnel.
1. Turn off unit, unplug from wall outlet and let it cool before cleaning.
2. Clean the glass door with a nylon pad and sudsy water. Do not use a spray glass cleaner.
3. To remove Slide Rack, open the door, pull the rack forward and out. Wash in warm, sudsy
water or in the dishwasher. To remove stubborn spots, use a polyester or nylon pad. To replace
the Slide Rack, open the door completely, slide into the rack slot and close the door.
4. Wash the Bake Pan and Broil Rack in warm, sudsy water or in the dishwasher. To minimize
scratching, use a polyester or nylon pad.
5. To remove the Crumb Tray, grasp the handle at the front of the
oven and pull it out . Dispose of crumbs and wash the tray in
warm, sudsy water. Remove stubborn spots with a nylon mesh pad.
Be sure to dry thoroughly before inserting the tray back into the
oven.
1. Unplug the oven and let it cool, then wipe with a soapy sponge or
nylon pad after each use.
2. Do not use a chemical oven cleaner. Do not use any abrasive cleansers or scouring pads as
they may harm the coating. Dry with paper towel or soft cloth.
Let the oven cool completely before cleaning any outer surface. Wipe with a damp cloth or sponge
and dry with paper towel or soft cloth.
Metal, ovenproof glass without lids or ceramic bakeware can be used in your oven. Follow
manufacturer’s instructions. Be sure the top edge of the container is at least 1½” (3.81 cm) away
from the upper heating elements.
Unit is not heating or stops
heating.
Electrical outlet is not
working or oven is
unplugged.
Check to make sure
outlet is working. Both
the temperature control
and the timer must be
set in order for the oven
to function.
Second toasting is too dark. Setting on toast is too dark. If doing repeated
toasting in the oven,
select a shade slightly
lighter than the previous
setting.
Moisture forms on the inside of
the glass door during toasting.
The amount of moisture
differs in different products,
whether bread, bagels or
frozen pastries.
The moisture that forms
on the oven door is
quite common and will
usually disappear during
the toasting cycle.
Since the oven is closed
the moisture cannot
evaporate as it would in
a toaster.
Food is overcooked or
undercooked.
Temperature and cook time
may need to be adjusted.
As your toaster oven
is much smaller than
a regular oven, it may
heat up faster and cook
faster. Try lowering the
temperature 25 degrees
from the suggested
temperature in a recipe
or on a label.
There is burnt food odor or
smoking when oven is being
used.
There are remnants of food in
crumb tray or on the walls of
the oven.
Refer to the directions
in the
section of
this Use & Care booklet.
Make sure all parts of
the oven, baking pan
and rack are clean.
Heating elements do not seem
to be on.
The heating elements cycle
on and off during baking.
Check the oven to make
certain the function
desired is being used.
On broil, only the top
element is on.

For service, repair or any questions regarding your appliance, call the appropriate 800
number on cover of this book. Please return the product to the place of purchase.
Also, please mail product back to manufacturer, nor bring it to a service center.
You may also want to consult the website listed on the cover of this manual.
• Any defect in material or workmanship provided; however, Applica’s liability will not
exceed the purchase price of product.
• One year after date of purchase.
• Provide you with a reasonably similar replacement product that is either new or factory
refurbished.
• Save your receipt as proof of date of sale.
• Visit the online service website at www.prodprotect.com/applica, or call toll-free
1-800-231-9786, for general warranty service.
• If you need parts or accessories, please call 1-800-738-0245.
• Damage from commercial use
• Damage from misuse, abuse or neglect
• Products that have been modied in any way
• Products used or serviced outside the country of purchase
• Glass parts and other accessory items that are packed with the unit
• Shipping and handling costs associated with the replacement of the unit
• Consequential or incidental damages (Please note, however, that some states do not
allow the exclusion or limitation of consequential or incidental damages, so this
limitation may not apply to you.)
• This warranty gives you specic legal rights. You may also have other rights that vary
from state to state or province to province.
Para servicio, reparaciones o preguntas relacionadas al producto, por favor llame al
número del centro de servicio en el país donde usted compró su producto.
NO devuelva el producto al fabricante. Llame o lleve el producto a un centro de servicio
autorizado.
• La garantía cubre cualquier defecto de materiales o de mano de obra. Applica no se
responsabiliza por ningún costo que exceda el valor de compra del producto.
• Por dos años a partir de la fecha original de compra.
On peut utiliser du verre refractaire sans couvercle ou des ustensiles en ceramique dans ce four
Suivre les instructions du fabricant. S’assurer que le bord superieur du conteneur est a au moins
3,81 cm (1½ pulg) de l’element chauffant superieur.
L’appareil ne chauffe pas ou
cesse de chauffer.
La prise de courant est
défectueuse ou le four n’est
pas branché.
S’assurer que la prise
de courant fonctionne
bien. Le régulateur
de température et la
minuterie doivent être
réglés pour que le four
fonctionne.
Le deuxième grillage est trop
foncé.
Le four est réglé à un degré
de grillage trop foncé.
Si vous effectuez des
grillages répétés dans
le four, sélectionner
un degré de grillage un
peu moins élevé que le
réglage précédent.
Une buée se forme à l’intérieur
de la porte en verre pendant le
grillage.
La quantité d’humidité
présente varie selon les
produits, que ce soit du pain,
des bagels ou des pâtisseries
congelées.
La formation de buée
sur la porte du four
est assez courante et
disparaît généralement
pendant le cycle de
grillage. Comme le four
est fermé, l’humidité
ne peut pas s’évaporer
comme elle le fait dans
un grille pain.
Les aliments sont trop ou pas
assez cuits.
La température et le temps de
cuisson doivent possiblement
être réglés.
Comme un grille pain
four est beaucoup
plus petit qu’un four
ordinaire, il peut
réchauffer et cuire plus
rapidement. Essayer de
diminuer la température
suggérée dans une
recette ou sur une
étiquette de 25 degrés.
Il y a une odeur d’aliments
brûlés ou de la fumée lorsque
le four fonctionne.
Il peut y avoir des restes
d’aliments dans le plateau à
miettes ou sur les parois du
four.
Voir les directives à la
section
du
guide d’utilisation et
d’entretien. S’assurer que
toutes les pièces du four,
la plaque de cuisson et
la grille sont propres.
Les éléments chauffants ne
semblent pas fonctionner.
Les éléments chauffants
s’allument et s’éteignent
pendant la cuisson.
Vérier le four an de
s’assurer qu’il est réglé
à la fonction désirée.
Pendant le grillage,
seul l’élément du haut
fonctionne.

is a trademark of The Black & Decker Corporation, Towson, Maryland, USA
Marca registrada de The Black & Decker Corporation, Towson, Maryland, E.U.
Marque de commerce déposée de la société The Black & Decker Corporation, Towson, Maryland, É.-U.
R12006/7-25-42E/F
CAT. NO . EHB5 00
TYPE 1 1 60 W 12 0 V
AC ONLY 60Hz
CAT. NO . EHB5 00
TYPE 1 1 60 W 12 0 V
AC ONLY 60Hz
CAT. NO . EHB5 00
TYPE 1 1 60 W 12 0 V
AC ONLY 60Hz
Applica Manufacturing S. de R.L de C.V
Presidente Mazaryk No111, 1er Piso
Col. Chapultepec Morales, Mexico D.F
Delegacion Miguel Hidalgo
CP 11570
Mexico
Art. 123 No. 95
Col. Centro, C.P. 06050
Deleg. Cuauhtemoc
Venta de Refacciones y Accesorios
01 800 714 2503
Copyright © 2008 Applica Consumer Products, Inc.
Pub. No. 1000003183-RV01
Made in People’s Republic of China
Printed in People’s Republic of China
Presidente Mazaryk No111, 1er Piso
Col. Chapultepec Morales, Mexico D.F
Delegacion Miguel Hidalgo
CP 11570
Mexico
01 (800) 714 2503
Fabricado en la República Popular de China
Impreso en la República Popular de China
Fabriqué en République populaire de Chine
Imprimé en République populaire de Chine
/