Kohler K-994-4-CP Installation guide
- Category
- Sanitary ware
- Type
- Installation guide

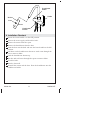
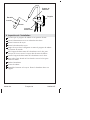
Installation Guide
Floor-Mount Bath Faucet
Français, page “Français-1”
Español, página “Español-1”
K-994 K-10129
1144501-2-E

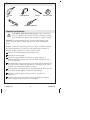
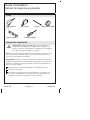
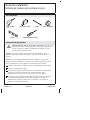
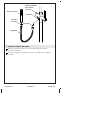
Tools
Important Information
CAUTION: Risk of personal injury. Do not use the bath
filler as a grab bar or support bar when entering or exiting
the bath. The bath filler is not designed to support weight.
NOTICE: To avoid damage to the O-rings on the bottom of the
faucet, keep the faucet vertical and use care when installing the
faucet.
NOTE: A minimum operating pressure of 45 psi (310 kPa) required
for proper operation. If a pressure of less than 45 psi (310 kPa) is
present, contact a plumber or choose another faucet.
Observe all local plumbing and building codes.
Shut off the water supply.
A drill bit is provided for installation to wood support. A
different drill bit is required for concrete floor installations; this
bit is not provided.
The dimensions given assume the spout and bath are mounted on
the same surface. Adjust the dimensions accordingly if the spout
and bath are mounted on different surfaces.
If this product is installed with an overflowing bath, the outer rim
of the bath should slightly overlap the 2x4 framing.
Installer supplied copper tubing must be 5/8″ OD (1/2″
Nominal).
Carefully review this document and any appropriate rough-in
sheets. Design the bath enclosure accordingly.
Sealant Tape
Pencil
Phillips Screwdriver
Tape Measure
Level
Drill
1144501-2-E 2 Kohler Co.

Important Information (cont.)
The appearance of your faucet may differ from the illustrations in
this guide. The instructions still apply.
Kohler Co. 3 1144501-2-E

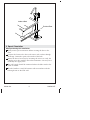
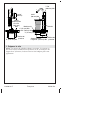
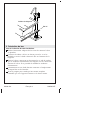
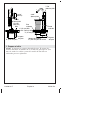
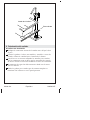
1. Prepare the Site
NOTICE: Adequate floor support is required. The wood support
must be a minimum of 2″ (51 mm) thick by 6″ (152 mm) wide. 2x6
lumber is NOT adequate for this application.
26-3/8"
(670 mm) Min
27-3/16"
(691 mm)
Max
5-13/16"
(148 mm)
2" (51 mm) Min
2-3/4" (70 mm) Max
7-7/8"
(200 mm) Min
3-3/8"
(86 mm) Min
Finished
Wall
Finished
Floor
Floor
Joist
2" (51 mm) Min
6" (152 mm) Min
Floor
Joist
Wood Support
6" (152 mm) Min Width
1144501-2-E 4 Kohler Co.

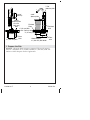
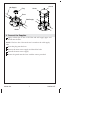
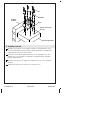
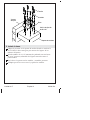
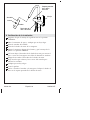
2. Spout Orientation
When performing this installation:
Verify correct spout orientation before securing the base to the
floor.
Connect the faucet to the base with screws and washers through
the flange. Orient the spout to the inside of the bath.
Rotate the base if necessary by loosening the screws to verify the
supplies are in line with the base inlet connections. You may have
to modify the supply lines.
The cold supply should be connected where the blue mark or the
notch is located.
Test the handle to verify full rotation will not interfere with the
bathing fixture or the back wall.
Inside of Bath
Finished Floor
Kohler Co. 5 1144501-2-E

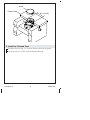
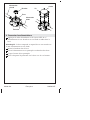
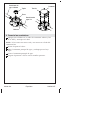
3. Install the Base
Locate the position on the wood support where the base will be
installed. Use the base as a guide to mark the mounting hole
locations.
Drill 1-1/2″ (380 mm) deep holes with a 3/16″ drill bit (provided)
using the marked locations as the center point.
Secure the base to the support with the screws and washers
provided.
Verify the base is level and tighten the screws.
Washer
Screw
Ø 3/16"
Mounting Hole
Wood Support
Floor Joist
Base
1144501-2-E 6 Kohler Co.

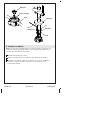
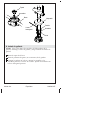
4. Connect the Supplies
Apply sealant tape on the ½″ NPT hot and cold supply pipes and
thread into the base.
NOTE: The base has a blue mark and a notch on the cold supply
side.
Insert the plug into the base.
Turn on the main water supply and check for leaks.
Turn off the main water supply.
Secure the guard onto the base with the screws provided.
Guard
Screw
Plug
Hot Supply
Cold Supply
Notch
Base
Kohler Co. 7 1144501-2-E

5. Install the Finished Floor
Finish the floor leaving a 3″ (76 mm) diameter hole for the guard.
Cut the guard so it is flush with the finished flooring.
Finished Floor
Guard
Ø 3" (76 mm)
1144501-2-E 8 Kohler Co.

6. Install the Faucet
NOTICE: To avoid damage to the O-rings on the bottom of the
faucet, keep the faucet vertical and use care when installing the
faucet.
Remove the plug from the base.
Remove the rubber protector (not shown) from the faucet.
Place the faucet onto the base and insert the screws and washers
provided through the flange. Tighten the screws using the hex
wrench provided.
Escutcheon
Hex
Wrench
Screw
Flange
O-Rings
Plug
Base
Washer
Kohler Co. 9 1144501-2-E

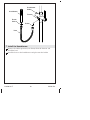
7. Install the Handshower
Remove the rubber protector (not shown) from the diverter and
install the hose.
Install the hose to the handshower and place into the holder.
Diverter
Handshower
Holder
Handshower
Screen
Washer
Hose
Gasket
1144501-2-E 10 Kohler Co.

8. Installation Checkout
Ensure the faucet handle is in the OFF position.
Turn on the water supply and check for leaks.
Remove the aerator from the spout.
Remove the handshower from the hose.
Point the hose into the bath and turn the faucet handle to the ON
position.
Pull down on the handshower diverter to send water through the
hose to remove debris.
Push the handshower diverter up.
Run hot and cold water through the spout to remove debris.
Check for leaks.
Turn the faucet off.
Reinstall the aerator and the hose. Place the handshower into the
handshower holder.
Washer
Insert
Aerator
Handshower
Holder
Handle
Handshower
Diverter
Kohler Co. 11 1144501-2-E
Page is loading ...
Page is loading ...
Page is loading ...
Page is loading ...
Page is loading ...
Page is loading ...
Page is loading ...
Page is loading ...
Page is loading ...
Page is loading ...
Page is loading ...
Page is loading ...
Page is loading ...
Page is loading ...
Page is loading ...
Page is loading ...
Page is loading ...
Page is loading ...
Page is loading ...
Page is loading ...
Page is loading ...
-
 1
1
-
 2
2
-
 3
3
-
 4
4
-
 5
5
-
 6
6
-
 7
7
-
 8
8
-
 9
9
-
 10
10
-
 11
11
-
 12
12
-
 13
13
-
 14
14
-
 15
15
-
 16
16
-
 17
17
-
 18
18
-
 19
19
-
 20
20
-
 21
21
-
 22
22
-
 23
23
-
 24
24
-
 25
25
-
 26
26
-
 27
27
-
 28
28
-
 29
29
-
 30
30
-
 31
31
-
 32
32


Kohler K-994-4-CP Installation guide
- Category
- Sanitary ware
- Type
- Installation guide
Ask a question and I''ll find the answer in the document
Finding information in a document is now easier with AI
in other languages
- français: Kohler K-994-4-CP Guide d'installation
- español: Kohler K-994-4-CP Guía de instalación
Related papers
-
Kohler 994-4-CP Installation guide
-
Kohler K-T97328-4-CP Installation guide
-
Kohler T97331-4-BN Installation guide
-
-
-
-
-
Kohler 11748-KS-NA Installation guide
-
-
Kohler K-101-BV Installation guide
Other documents
-
TrafficMASTER 18576 Installation guide
-
 Brizo T70305-PN Installation guide
-
 Newport Brass 2500-5503/26 Installation guide
-
HOUSE OF ROHL RH0506F1 User manual
-
 Mizu 9512144 Installation guide
-
Jade Bath 8408-00-10 Installation guide
-
Sioux Chief 552-B22 Installation guide
-
Keeney SOU-DC-45CP Installation guide
-
 A&E Bath & Shower 151010 Operating instructions
-
WaterWorks CXT311 Installation guide


