MyBinding Intimus S14.95 6mm x 60mm Industrial Cross Cut Shredder User manual
- Category
- Paper shredders
- Type
- User manual
Page is loading ...
Page is loading ...
Page is loading ...
Page is loading ...
Page is loading ...

INSTALLATION REQUIREMENTS:
Be certain that three phase current is available at
the point of installation (see TECHNICAL DATA
for information concerning required pre-fusing of
the electrical outlet).
Note: Since this machine can weigh up to 475
kg, it is essential to check the permissible load
per square meter of the oor.
intended purpose!
in closed rooms within a temperature
range of 10 to 40° C!
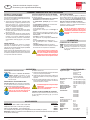
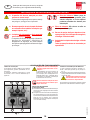
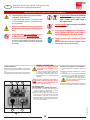
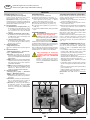
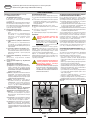
SUMMARY OF NUMBERED PARTS:
6 = Housing (g. 1, 2, 4)
7 = Table (g. 1, 2, 4, 5, 6)
8 = Guard panel (g. 1, 2, 4)
9 = Bag frame (g. 9)
10 = Discharge door (g. 9)
11 = Rubber band (g. 9)
12 = Conveyer belt (g. 1, 2)
13 = Conveyor belt retainer (g. 1)
14 = Cable holders (g. 6)
15 = Angle guard (g. 5) (optional)
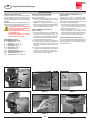
SETTING UP THE SHREDDER:
1. Remove the external wooden covers.
2. Remove the protective sheet material.
3. Lift the machine little by little from the pallet with
the help of a pallet jack, and then set it onto the
oor on the rollers.
Note: The pallet must be unscrewed and
dismantled piece by piece to this end, and the
machine must be grasped, lifted and set back
down again with the pallet jack after each dis-
mantling operation.
POSITIONING OF THE TABLE (7)
(gs. 1, 2 and 3):
1. Unscrew each of the 3 screws with washers
on the front wall of the housing (6) and on the
front of the conveyor belt attachment (13) as
well as the one screw on both sides under the
protective plate (8) (see arrow markings Fig.
1).
2. Slightly undo each of the upper screws on the
left and right of the protective plate (see arrow
marking g. 2), swivel the table (7) forwards
through 180° and tighten both screws again.
3. Using the previously unscrewed eight screws
and washers, screw the table to the housing
(3 at the front, 2 on the side) and the front of
the conveyor belt attachment (3 screws) (g.
3).
INSTALLATION OF THE
PROTECTIVE BRACKET (15) (gs. 4 and 5):
If required, the contact surface of the table
can be widened by installing two protective
brackets (15) (g. 5) instead of the two protective
plates (8) (g. 4) (see also under “SPECIAL
ACCESSORIES”)
1. Unscrew each of the 4 screws with washers
on the side wall of the housing (6) on the left
and right and on the table (see arrow markings
g. 4).
2. Remove both protective plates (8) and screw
the two protective brackets (15) onto the side
wall of the housing (6) on the left and right and
to the table (7) with the aid of the previously
unscrewed screws and washers.
COILING UP THE POWER CABLE (g. 6):
If the entire length of the power cable is not required
at the respective location, or when moving the ma-
chine from one location to another, the power cable
can be coiled up around the cable holders.
g. 3
g. 2
g. 1
g. 4 g. 6
g. 5
14.95
13
12
7
8
6
7
8
12
8
7 15
14
14
6
7
7
6
86434 9 10/12
6
INSTALLATION
GB
Translation of the Original Operation Manual
Übersetzung der Originalbetriebsanleitung

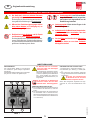
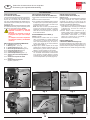
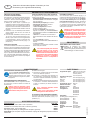
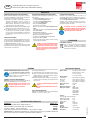
CHECKING THE RUNNING DIRECTION:
1. Switch on the main switch (1) (g. 8); i.e. to
position „1“.
2. Place rotary switch (2) in position „1“ (g.
7).
3. Check that the shredder is running in the correct
direction and correct the phase relation of the
power plug if necessary.
Correcting the phase relation of the
Now that everything has been correctly assembled
and connected, you can proceed to operating
the machine.
be fed with paper or cardboard!
Shredding other data carriers can cause
injury(e.g. by splintering of hard materials)
or may damage the shredder (e.g. des-
truction of the cutting system).
Make sure that no loops occur when
feeding strip material. Danger of
POWER SUPPLY CONNECTION:
a) The maximum value for loop impedance at the
mains connection point is 0.5 Ohms.
b) The conductor cross-section of the power
supply line should be of a magnitude so as
to cause a 15% voltage drop in the case of a
machine blockage (inhibit current = 3 x nominal
current).
APPLICATION:
The 14.95 shredder is used in all areas where
large quantities of printed material need to be
shredded.
The machine can shred cardboard and crumpled
paper as easily as it shreds smooth paper.
IMPORTANT SAFETY PRECAUTIONS
<< Danger of injury! Keep all loose articles of
clothing, ties, jewelery, long hair or other
loose objects away from opening!
<< Danger of injury! Never insert ngers into ope-
ning!
<< In case of danger switch the machine off with the
mains switch, or with the emergency switch, or
unplug the machine!
<< Always unplug the machine from the mains power
supply before opening the machine!
Repairs may only be performed by trained per-
sonnel!
<< The machine may not be operated by more than
one person at any given time!
The machine was designed for safe operation by “one
person only”.
<< During the shredding process no other work
may be performed on the machine (for example
cleaning, etc.)!
<< The machine is not a toy, and is not suitable for
use by children!
The overall technical safety concept of this machine
(dimensions, feed openings, emergency shutdown
devices etc.) does not provide for any guarantee
regarding hazard-free operation by children.
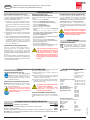
g. 7
14.95
12
3 4
5
86434 9 10/12
7
INITIAL START UP
GB
Translation of the Original Operation Manual
Übersetzung der Originalbetriebsanleitung

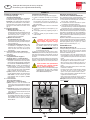
OPERATING FUNCTIONS (Fig. 7):
1 = Main switch (emergency-stop)
This switch turns the machine either on (po-
sition „1“) or off (position „0“).
Note: Each time the machine is switched
on, the multifunction relay is automatically
reinitialised. This is indicated by the control
displays (4 and 5) (g. 7) which blink for a
few seconds.
2 = Rotary switch
a) „Cutting system forward“ („1“)
Turning this switch to position „1“ starts
the cutting system and the conveyor belt.
Material can now be fed to the shredder.
b) „Cutting system reverse“ („R“)
Turning this switch to position „R“ starts
the cutting system and the conveyor belt
in reverse.
c) „Cutting system stop“ („0“)
Turning this switch to position „0“ switches
the shredder off, thereby halting the cutting
system and the conveyor belt.
3 = Pilot lamp „ready“
Lights when the main switch (1) is opera-
ted.
4 = Pilot lamp
„paper jam“ / „motor fault“ /
„Electrical malfunction“
a) Lights up when too much paper is fed to
the cutters (see description „AUTOMATIC
RESPONSE IN CASE OF OVER-LOA-
DING“).
b) Blinks when the shredder motor is overloa-
ded, thereby activating the built-in thermal
protection. This leads to a break in the
circuit necessary for active operation.
For more information please turn to the
section headed „Motor Fault“.
c) Blinks if one of the integrated contactors
fails. At the same time, the control display
(5) lights up. Please refer to the „ELECTRI-
CAL MALFUNCTION“ heading for further
details.
5 = Pilot lamp
„collecting bag full“ / „door open“ /
„Electrical malfunction“
a) Blinks when the collecting bag is full and
needs to be emptied. At the same time the
machine switches off automatically.
b) Lights up when the door is not closed. The
machine then switches off automatically
and it cannot be started as long as the
door is open.
c) Lights up if one of the integrated contactors
fails. At the same time, the control display
(4) blinks. Please refer to the „ELECTRI-
CAL MALFUNCTION“ heading for further
details.
OPERATING THE MACHINE:
The procedure is as follows:
1. Move the main switch (1) to position „1“.
2. Turn the rotary switch „Cutting system forward“
(2) to position „1“. The cutting system and the
conveyor belt now begin to run.
Attention: The machine will only operate when
a) the main switch (1) has been switched on
(position „1“),
b) the rotary switch (2) has been switched on
(position „1“ or ”R“),
c) the discharge door (10) for emptying the bag
is closed.
MATERIAL FEED:
than the machine itself stands, when
feeding paper to the machine!
Standing on an raised platform (such as
pallets or boxes placed in front of the
machine) reduces the distance between
operator and cutting system to a level
which does not meet the required safety
standard.
Feed material for the shredder can consist of
stacks of smooth paper (up to about 190 sheets,
depending on the type and size of paper); and
also crumpled paper and cardboard. Place any
material to be shredded on the moving conveyor
belt which feeds it to the cutting system.
It is advisable to place stacked paper diagonally
on the belt. In this way, the corner of the stack will
be fed to the cutting system rst, thus avoiding a
sudden overload.
-
indicated in the technical data!
Should the machine become overloaded,
-
AUTOMATIC RESPONSE
IN CASE OF „OVERLOADING“:
In case you accidentally overload the shredder,
it will automatically alleviate the problem as
follows:
1. The cutting system becomes jammed. The pilot
lamp (4) (g. 7) lights up.
2. The cutting system runs briey in reverse,
thereby freeing the material to be shredded.
3. The cutting system automatically switches back
to forward mode.
This sequence is automatically repeated by the
machine up to three times. If the machine still
detects “overloading”, the cutting system runs in
reverse once more for a specied period of time
and is then shut down.
Redistribute returned material and continue
shredding with a smaller amount of material. The
machine must rst be switched off with the rotary
switch (2) (g. 7) (position “0”), and then back on
again (position “1”) to this end.
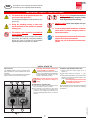
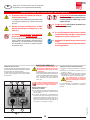
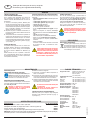
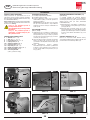
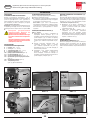
EMPTYING THE COLLECTING BAG (Fig. 8):
When the collecting bag is full, the machine turns
off automatically. The pilot lamp (5) (g. 7) lights
up. Empty the collecting bag as follows:
- Set a pallet or a trolley in front of the discharge
door in order to facilitate removal of the full
bag.
- Open the door only a little bit (10) and level
off the cone of shredded material, which has
accumulated in the bag, with your hand.
- Open the door and swivel the bag frame with
bag out onto the pallet or trolley.
- Remove the rubber band, remove the bag and
dispose of its contents.
- Feed the empty bag through the bag frame
from below, and put the edges of the bag ap-
proximately 10 cm over the frame outwardly.
- Secure the bag to the frame with the help of the
rubber band.
- Close the door, at the same time swivelling the
bag frame and bag into the housing, and lock.
Note: The machine will only run with closed
door!
14.95
g. 8
9 11 10
g. 7
12
3 4
5
86434 9 10/12
8
OPERATION
GB
Translation of the Original Operation Manual
Übersetzung der Originalbetriebsanleitung

TAKING OUT EXCESS PAPER
IN CASE OF OVERLOAD:
If the shredder has stopped due to an overload
(motor protection) take the excess paper out of
the inlet as follows:
1. Briey turn the “cutting system reverse” switch
(2) (g. 7) to position “R”. The cutting system and
the conveyor belt run in reverse. The material is
released and returned by the conveyor belt.
2. Redistribute the returned material, or remove
some of it from the conveyor belt (12).
3. After allowing the motor to cool down for
approximately 10 minutes (depending upon
ambient temperature), the machine can once
again be started in the forward direction and
shredding can be continued (rotary switch (2)
(g. 7) in position “1”).
MOTOR FAULT:
The machine is equipped with a thermally protec-
ted motor. Should this motor be overloaded, it will
switch off automatically. In such case the pilot lamp
„MOTOR FAULT“ (4) (g. 7) ashes.
After a cooling down period of approx. 10 minutes
(depending on the room temperature) you can
restart the machine and continue shredding.
FAULT CHECKLIST:
If the machine is not functioning properly, you
should check the following:
- is the plug conneted to the mains?
- is the mains switch (1) turned on?
- is the rotary switch (2) turned on?
- is the door (10) closed?
- is the collecting bag full?
The bag has to be emptied.
- is there a paper jam?
Follow the instructions under „AUTOMATIC
RESPONSE IN CASE OF OVER-LOADING“.
- is the motor overloaded?
Please refer to the section headed „MOTOR
FAULT“.
- Has one of the contactors failed?
See description under „ELECTRICAL MAL-
FUNCTION“.
- is there a phase failure?
Check the three-phase fuse at the power supply
socket, and replace if necessary.
other faults are statable, the machine
-
partment.
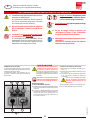
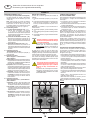
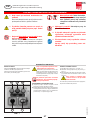
CUTTING SYSTEM
MAINTENANCE (6x50 mm):
After approximately 2 hours of con-
tinuous operation, spray some of the
included special oil onto an absorbant
sheet of paper and feeded to the cutting
system.
GEAR BOX MAINTAINANCE:
Both synchron gears, as well as the chain wheels
and drive chains must be greased monthly.
before the machine is opened.
Proceed as follows:
1. Remove the left-hand housing side panel and
the covering hood.
2. Grease the above mentioned parts with a brush
or a grease gun, and a standard, commercially
available grease.
3. Mount the side panel and the covering hood
and plug in the mains plug. The machine can
once again be placed into operation.
ENERGY SAVING TIP:
Be certain that the machine is turned off overnight
(main switch (1) (g. 7) switched to „0“).
ELECTRICAL MALFUNCTION:
If the control display (5) (g. 7) lights up and the
control display (4) (g. 7) blinks at the same time,
one of the integrated contactors is no longer
functional and the machine may no longer be
operated.
Switch the machine off at the mains switch (1)
(g. 7), pull the mains plug from the socket and
notify your dealer.
switch and lock it with a padlock be-
14.95
86434 9 10/12
9
MALFUNCTION
MAINTENANCE
ACCESSORIES
Description Order-No.
Plastic bag, 600 x 490 x 1500 x 0,06 mm 99969
Receptacle, 620 x 430 x 740 mm (optional) 75970
Lubrication bottle, 110 ml (6x50 mm) 88035
Angle guard set for extended table (optional) 86223
Note: Please contact your dealer when ordering accessories and replacement parts.
TECHNICAL DATA
Cutting width: 3,8x40 mm (cross-cut)
6x50 mm (cross-cut)
5.8 mm (strips)
11.8 mm (strips)
Cutting capacity:
3,8x40 mm: 120-130 sheets (70 g/m
2
)
6x50 mm: 120-130 sheets (70 g/m
2
)
5.8 mm: 130-140 sheets (70 g/m
2
)
11.8 mm: 180-190 sheets (70 g/m
2
)
Working width: 428 mm
Power input: 7 kW
Power output: 4 kW
Supply voltage: 400V/50Hz
230V/50Hz
415V/50Hz
220V/60Hz
200V/50Hz
200V/60Hz
Pre-fusing:
(gl fuse, type 1 assignment)
400V-415V/50Hz: 25 A
220V-230V/50Hz: 32 A
200V/50Hz: 35 A
Length: 1680 mm
Width: 1210 mm
Height: 1640 mm
Noise level: approx. 63 dB(A)
Weight: approx. 435 kg
GB
DISPOSING OF THE MACHINE:
Dispose of the machine in an
environmentally sound fashion at the end
of its useful service life. Do not dispose of
any of the parts included in the machine
or its packaging with household trash.
DISPOSING
Translation of the Original Operation Manual
Übersetzung der Originalbetriebsanleitung
Page is loading ...
Page is loading ...
Page is loading ...
Page is loading ...
Page is loading ...
Page is loading ...
Page is loading ...
Page is loading ...
Page is loading ...
Page is loading ...
Page is loading ...
Page is loading ...
Page is loading ...
Page is loading ...
Page is loading ...
Page is loading ...
Page is loading ...
Page is loading ...
Page is loading ...
Page is loading ...
Page is loading ...
Page is loading ...
Page is loading ...
Page is loading ...

14.95
86434 9 10/12
NAME: NAME:
SB-Nr. / DWG NO.:
M1
3~
H1K1
X1
Q3
H3
Q1 Q2
H2
Q4
K2
erstellt / PREPARED: geprüft / PROVED:
S1
X1
2
K2
X1
1
2A T
2A T
2A T
F3
F1
F2
zurück
reverse
arrière
vor
forward
avant
X1
1
X1
2
X1
3
X1
L1
X1
L2
X1
L3
X1
N
A2
A1
X1
PE
22
54
53
61
53
61
62
62
54
21
K1
K2
22
A1
A2
21
X1
V1
X1
W1
X1
U1
2
T1
2
T1
2
T1
2
T1
5
L3
K1
3
L2
20.05.05
--
Blattanzahl / NO.
OF SHEETS:
Blatt / SHEET:
Änderungsindex/
REVISION:
6
T3
2
T1
4
T2
5
L3
1
L1
3
L2
M1
S4
S2
grün
green
vert
gelb
yellow
jaune
S0
R1
rot
red
rouge
R2
Änderung/REVISION:
--
J. Erlecke
b- Schütz-Überwachung hinzu / J. Erlecke
a- Blatt 1 entfällt Not-Aus optional / J. Weber
c- Text Anschluß Trafo hinzu / J. Erlecke
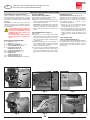
wiring diagram / diagramme de connexions
Type 698-xxx
alternativ NOT - AUS - Leiste
Model "14.95"
S5
NOT - AUS - Leiste (OPTION)
EMERGENCY STOP BAR (OPTION)
BANDE D' ARRÊT D' URGENCE (OPTION)
S4
Korb VOLL
RECEPTACLE FULL
RÉCIPIENT PLEINT
S0
Hauptschalter
MAIN SWITCH
INTERRUPTEUR GÉNÉRAL
S3
Tür AUF
DOOR OPEN
PORTE OUVERTE
S1
Schalter VOR - ZURÜCK
FORWARD and REVERSE BUTTON
INTERRUPTEUR AVANT ET ARRIÉRE
S2
Drehzahl-Überwachung
SPEED CONTROL
CONTRÔLE DE VITESSE
40 VA
T1
L3L1 L2
T3T2T1
X1
9
X1
10
X1
8
X1
7
X1
5
X1
6
X1
4
K1
S3
K2
S5
Transformator T1
entsprechend Anschluß-
Spannung primärseitig
geklemmt
Transformer T1 must be
primary connected in
accordance to the supply
voltage
Transformateure doit être
branché primaire en
accord avec le voltage
demandé
2 x 22k, 9W
PEPEWVU 1L3 3 1042PE 5N 6 7 8 9L1 L2
I3 1I2 I1I7I8L
N
I4
2
1
2
11
22
I6 I5
0
R
1
1
3
42
1
1
Ser.no.
--
991.0330.3-c
B1
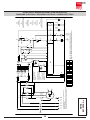
Brücke B1 = Standard, muss für Not-Aus-Leiste (Option) entfernt werden
bridge B1 = Standard, must be removed for optional emergency stop bar
pontage B1 = Standard, doit être enlevé pour la bande d' arrêt d' urgence (option)
Anschlußkonfiguration und max. Vorsicherung siehe
Bedienungsanleitung
terminal configuration and max. fuse see instruction manual
raccordement configuration et max. fusible voir manuel
-5%
440V
200V
415V
400V
208V
220V
380V
+5%
230V
0 0
A1
34
SCHALTBILD / WIRING DIAGRAM / PLAN DE MONTAGE
DIAGRAMA ELÉCTRICO / ESQUEMA ELECTRICO / SCHEMA ELETTRICO
SB-No.
991.0330.4-c

14.95
86434 9 10/12
35
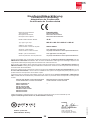
Bezeichnung der Maschine: Datenshredder
Type of machine: Document Shredder
Description de la machine: Destructeur de Document
Descripcion de la máquina: Destructora de Documentos
Modell / Model / Modèle / Modelo:
14.95
Typ / Type / Type / Tipo: 698-6S + 698-12S + 698-4C + 698-6C
Artikel-Nr. / item number /
numéro d‘article / número de la pieza: 698901-698999
Serien-Nr. / serial number /
siehe Typenschild / see name plate
numéro de série / número de serie:
voir plaque d‘identi cation / mirar la placa de identi cación
Baujahr / year of manufacture /
siehe Typenschild / see name plate /
année de production / año de producción:
voir plaque d‘identi cation / mirar la placa de identi cación
Hiermit wird bestätigt, dass vorgenanntes Produkt den Anforderungen der Maschinen-Richtlinie 2006/42/EG sowie der
EMV-Richtlinie 2004/108/EG einschließlich allen bis heute veröffentlichten Änderungen bzw. Nachträgen entspricht. Das
vorgenannte Produkt entspricht folgenden harmonisierten bzw. nationalen Normen:
We do hereby certify that the above mentioned product meets the requirements set forth in EEC-Guidelines 2006/42 and
EMC 2004/108/EEC including all changes and addendums to date thereto. The above mentioned product meets the following
harmonized and national standards:
Nous Vous Con rmons que le produit cité ci-dessus correspond aux exigences des directives 2006/42/CEE ainsi qu’ à la
directive CEM 2004/108/CEE, ci-inclus toutes les modi cations ainsi que tous les suppléments publiés jusqu’à ce jour. Le
produit mentionné correspond aux normes citées ci-après:
Con rmamos que los productos arriba citados cumplen las exigencias de las directivas 2006/42/CEE y CEM 2004/108/
CEE, incluidas todas las modi caciones publicadas hasta la fecha. Los productos citados corresponden con las siguientes
normas:
Harmonisierte Normen / harmonized standards Nationale Normen / national standards
normes harmonisées / normas armonizadas normes national / normas nacional
EN ISO 12100:2011-03 ---
EN ISO 13857:2008
EN 349:1993+A1:2008
EN 1088:1995+A2:2008
EN 60204-1:2006+A1:2009
EN 61000-4-2:2009
EN 61000-4-5:2006
CE-Bevollmächtigter / authorized person of CE / personne autorisée de la CE / persona autorizada por CE:
Ingmar Schmidt; Bergheimer Straße 6-12; D-88672 Markdorf / Germany
Konformitätserklärung
Certi cate of Conformity
Attestation de Conformité
Certi cado de Conformidad
2012/08
ppa. K. Grundmann
Leiter Technik
Head of Technical Dpt.
Responsable Dép. Technique
Jefe del Departamento Técnico
Postfach / p.o.box 1420
D-88672 Markdorf / Germany

86434 9 10/12
Dieses Papier ist aus 100 % Altpapier ohne optische Aufheller hergestellt
International Network
Headquarters
USA MARTIN YALE Industries ☏ +1 / 260 563-0641
251 Wedcor Avenue fax +1 / 260 563-4575
www.martinyale.com
Germany MARTIN YALE INTERNATIONAL GmbH ☏ +49 / (0) 7544 60-0
Bergheimer Straße 6-12 fax +49 / (0) 7544 60-248
www.martinyale.de, www.intimus.com
Branch Ofces
South Africa MARTIN YALE Africa ☏ +27 / (0) 11 838 72 81
Unit B3 Mount Royal Business Park fax +27 / (0) 11 838 73 22
Marshall Town, Johannesburg
P. O. BOX 1291, Houghton 204
www.martinyale.co.za
United Kingdom MARTIN YALE International ☏ +44 / (0) 1293 44 1900
Unit C 2 The Fleming Centre, Fleming Way fax +44 / (0) 1293 61 11 55
www.intimus.co.uk
France MARTIN YALE International S.A.R.L. ☏ +33 / (1) 70 00 69 00
40 Avenue Lingenfeld fax +33 / (1) 70 00 69 24
www.martinyale.fr
Spain MARTIN YALE Ibérica S.L. ☏ +34 / 9 02 22 31 31
Avenida de la Platja, 120 bajos fax +34 / 9 02 22 31 32
www.martinyale.es
Italy MARTIN YALE Italia srl [email protected]
Via A. Manzoni, 37
20900 Monza (MB)
www.martinyale.it
Sweden MARTIN YALE Nordic AB ☏ +46 / 8 556 165 80
Rotebergsvägen 1 fax +46 / 8 748 02 85
www.martinyale.se
P.R. China MARTIN YALE International Trading (Beijing) ☏ +86 / 10 844 710 71 / 72 / 73
Room 260D, C Building fax +86 / 10 844 710 75
Chaoyang District, Beijing 100027, PRC
www.martinyale.com.cn
-
 1
1
-
 2
2
-
 3
3
-
 4
4
-
 5
5
-
 6
6
-
 7
7
-
 8
8
-
 9
9
-
 10
10
-
 11
11
-
 12
12
-
 13
13
-
 14
14
-
 15
15
-
 16
16
-
 17
17
-
 18
18
-
 19
19
-
 20
20
-
 21
21
-
 22
22
-
 23
23
-
 24
24
-
 25
25
-
 26
26
-
 27
27
-
 28
28
-
 29
29
-
 30
30
-
 31
31
-
 32
32
-
 33
33
-
 34
34
-
 35
35
-
 36
36


MyBinding Intimus S14.95 6mm x 60mm Industrial Cross Cut Shredder User manual
- Category
- Paper shredders
- Type
- User manual
Ask a question and I''ll find the answer in the document
Finding information in a document is now easier with AI
in other languages
- italiano: MyBinding Intimus S14.95 6mm x 60mm Industrial Cross Cut Shredder Manuale utente
- français: MyBinding Intimus S14.95 6mm x 60mm Industrial Cross Cut Shredder Manuel utilisateur
- español: MyBinding Intimus S14.95 6mm x 60mm Industrial Cross Cut Shredder Manual de usuario
- Deutsch: MyBinding Intimus S14.95 6mm x 60mm Industrial Cross Cut Shredder Benutzerhandbuch
- русский: MyBinding Intimus S14.95 6mm x 60mm Industrial Cross Cut Shredder Руководство пользователя
- português: MyBinding Intimus S14.95 6mm x 60mm Industrial Cross Cut Shredder Manual do usuário
- čeština: MyBinding Intimus S14.95 6mm x 60mm Industrial Cross Cut Shredder Uživatelský manuál
Related papers
-
MyBinding Intimus S16.50 6 x 15 x 50 Industrial Cross Cut Shredder User manual
-
MyBinding Pro 802 CC User manual
-
 Baum Baum 714Xa Operations User manual
-
-
-
-
-
MyBinding 390.3 1x5mm User manual
-
MyBinding HSM Classic 225.2C Level 3 Cross Cut Shredder User manual
-
MyBinding HSM Securio B24C Level 4 Micro Cut User manual

Other documents
-
Martin Yale MY 3000 SC Operating Instructions Manual
-
-
Martin Yale Pro 130 CP4 Operating instructions
-
-
Worx WG401E Datasheet
-
-
Intimus Pacmaster VS Operating instructions
-
-
Dynex DX-OP102991 User manual
-