Pioneer DEQ-P6600 User manual

Category
AV receivers
Type
User manual
Thank you for buying this Pioneer product.
Please read through these operating instructions so you will know how to operate
your model properly. After you have finished reading the instructions, keep this man-
ual in a safe place for future reference.
Before You Start
About this unit 3
About this units optical input 3
Features 3
About this manual 3
Precautions 4
In case of trouble 4
Resetting the microprocessor 4
Whats What
Head unit 5
Digital Signal Processor
Introduction of DSP adjustments 6
Using the sound field control 6
Using the position selector 7
Using balance adjustment 7
Adjusting source levels 8
Using the dynamic range control 8
Using the down-mix function 8
Using the direct control 9
Using the Dolby Pro Logic B 9
Adjusting the Music mode 9
Setting the speaker setting 10
Correcting the subwoofers phase 10
Selecting a cross-over frequency 11
Adjusting the speaker output levels 11
Adjusting the speaker output levels using a
test tone 12
Using the time alignment 12
Selecting the time alignment
adjustment mode 13
Adjusting the time alignment 13
Using the equalizer 13
Recalling equalizer curves 13
Adjusting 3-band parametric
equalizer 14
Using the auto-equalizer 15
Auto TA and EQ (auto-time alignment and
auto-equalizing) 15
Before operating the auto TA and EQ
function 16
Carrying out auto TA and EQ 16
Initial Settings
Correcting distorted sound 18
Resetting the audio functions 18
Additional Information
Troubleshooting 19
Understanding auto TA and EQ error
messages 20
Terms 21
Specifications 22
Contents
En
2
About this unit
Important
! Following functions cannot be operated when
DVH-P7000R, DVH-P5000MP or AVH-
P6500DVD is connected to this unit.
Using the down-mix function
Using the Dolby Pro Logic B
Selecting the time alignment adjustment
mode
Using the auto-equalizer
Auto TA and EQ (auto-time alignment and
auto-equalizing)
Resetting the audio functions
! If DVH-P7000R, DVH-P5000MP or AVH-
P6500DVD is connected to this unit, operation
of following function is limited.
Selecting a cross-over frequency
About this units optical input
This unit provides two optical inputs, however,
units that can be connected to each input are
limited. Refer to following chart, and use the
optical inputs correctly. Otherwise, this unit
may not operate properly.
Optical 1 input
(head unit)
Optical 2 input
(DVD player)
AVH-P6600DVD
AVX-P8DVD
AVX-P7300DVD
SDV-P7
XDV-P9
XDV-P9B
AVH-P6500DVD
DVH-P5000MP
DVH-P7000R
Optical 2 input is not available.
! Only the system with AVH-P6600DVD can
use both optical 1 input and optical 2 input.
Otherwise, optical 2 input is not available.
Features
Dolby Digital/DTS compatibility
When using this unit with a Pioneer DVD
player, you can enjoy the atmosphere and exci-
tement provided by DVD movie and music
software featuring 5.1 channel recordings.
! Manufactured under license from Dolby La-
boratories. Dolby, Pro Logic, and the
double-D symbol are trademarks of Dolby
Laboratories.
! DTS and DTS Digital Surround are regis-
tered trademarks of Digital Theater Sys-
tems, Inc.
About this manual
This unit features a number of sophisticated
functions ensuring superior reception and op-
eration. All the functions have been designed
for the easiest possible use, but many are not
self-explanatory. This operation manual will
help you benefit fully from this units potential
and to maximize your listening enjoyment.
We recommend that you familiarize yourself
with the functions and their operation by read-
ing through the manual before you begin
using this unit. It is especially important that
you read and observe precautions noted on
the next page and in other sections.
Before You Start
En
3
English
Section
01
Precautions
! Keep this manual handy as a reference for
operating procedures and precautions.
! Always keep the volume low enough so
that you can hear sounds from outside the
vehicle.
! Protect this unit from moisture.
! If the battery is disconnected or dis-
charged, the preset memory will be erased
and must be reprogrammed.
In case of trouble
Should this product fail to operate properly,
contact your dealer or nearest authorized Pio-
neer Service Station.
Resetting the microprocessor
The microprocessor must be reset under the
following conditions:
! Prior to using this unit for the first time
after installation
! If the unit fails to operate properly
! When strange or incorrect messages ap-
pear on the display
% Press RESET with a pen tip or other
pointed instrument.
RESET button
Before You Start
En
4
Section
01
Head unit
Operate this unit with the connected head
unit. Instructions in this operation manual use
AVH-P6600DVD as an example head unit.
For more details concerning operation, please
refer to head units operation manual.
1 VOLUME
Rotate it to increase or decrease the vo-
lume.
2 SOURCE button
This unit is turned on by selecting a source.
Press to cycle through all the available
sources.
3 ATT button
Press to quickly lower the volume level, by
about 90%. Press once more to return to the
original volume level.
4 EQ button
Press to select various equalizer curves.
5 Joystick
Use to adjust the selected audio function
and turn it on or off (substitute for the touch
panel key).
5
4
1
2
3
Whats What
En
5
English
Section
02
Introduction of DSP
adjustments
1
By carrying out the following settings/adjust-
ments in the order shown, you can create a fi-
nely-tuned sound field effortlessly.
1 Setting the speaker setting
2 Using the position selector
3 Auto TA and EQ (auto-time alignment and auto-
equalizing)
4 Adjusting the time alignment
5 Adjusting the speaker output levels using a
test tone
6 Selecting a cross-over frequency
7 Adjusting the speaker output levels
8 Adjusting 3-band parametric equalizer
1 DSP display
Shows the DSP function names.
% Touch A.MENU and then touch DSP to
display the DSP function names.
The DSP function names are displayed and
operable ones are highlighted.
# When A.MENU is not displayed, you can dis-
play it by touching the screen.
# You can also display MENU by clicking the
joystick.
# To go to the next group of function names,
touch NEXT.
# To return to the previous group of function
names, touch PREV.
# When playing discs recorded with more than
96 kHz sampling frequency, you cannot use audio
functions. Also, equalizer curve setting,
POSITION, AUTO EQ and AUTO TA will be can-
celled.
# When playing discs recorded with more than
96 kHz sampling frequency, audio is outputted
from front speaker only.
# When selecting the FM tuner as the source,
you cannot switch to SLA.
# When playing other than the DVD disc, you
cannot switch to D.R.C.
# When neither FRONT-L nor FRONT-R is se-
lected in POSITION, you cannot switch to
TIME ALIGNMENT.
# To return to the previous display, touch BACK.
# To return to the display of each source, touch
ESC.
Note
If you do not operate the DSP function within
about 30 seconds, the display is automatically re-
turned to the source display.
Using the sound field control
The SFC function creates the sensation of a
live performance.
! The acoustics of different performance en-
vironments are not the same and depend
on the extent and contour of space through
which sound waves move and on how
sounds bounce off the stage, walls, floors
and ceilings. At a live performance you
hear music in three stages: direct sound,
early reflections, and late reflections, or re-
verberations. Those factors are programed
into the SFC circuitry to recreate the acous-
tics of various performance settings.
1 Press EQ and hold to switch to SFC
function.
Press EQ and hold until SFC appears in the
display.
Digital Signal Processor
En
6
Section
03
# To switch to equalizer function, press EQ and
hold again.
2 Press EQ to select the desired SFC
mode.
Press EQ repeatedly to switch between the fol-
lowing mode:
MUSICAL (musical)DRAMA (drama)
ACTION (action)JAZZ (jazz)HALL (hall)
CLUB (club)OFF (off)
Note
If the source is a 2-channel LPCM audio or a 2-
channel Dolby Digital audio and you select SFC
effects that are most applicable for 5.1-channel
audio (i.e., MUSICAL, DRAMA or ACTION), we
recommend turning Dolby Pro Logic B on. On the
other hand, when selecting SFC effects that are
intended for use with 2-channel audio (i.e., JAZZ,
HALL or CLUB), we recommend turning Dolby
Pro Logic B off.
Using the position selector
One way to assure a more natural sound is to
accurately position the stereo image, putting
you right in the center of the sound field. The
position selector function lets you automati-
cally adjust the speaker output levels and in-
serts a delay time to match the number and
position of occupied seats. When used in con-
junction with the SFC, the feature will make
the sound image more natural and offer a pa-
noramic sound that envelops you.
1 Touch A.MENU and DSP and then touch
POSITION.
2 Touch c/d/a/b to select a listening po-
sition.
Touch one of these, c/d/a/b, to select a lis-
tening position as listed in the table.
Key Display Position
c FRONT-L Front seat left
d FRONT-R Front seat right
a FRONT Front seats
b ALL All seats
# To cancel the selected listening position,
touch the same key again.
Note
When you make adjustments for listening posi-
tion, the speakers are automatically set for appro-
priate output levels. You can tailor them if you
want as discussed under the heading of Adjust-
ing the speaker output levels using a test tone or
Adjusting the speaker output levels.
Using balance adjustment
You can select a fader/balance setting that
provides an ideal listening environment in all
occupied seats.
1 Touch A.MENU and DSP and then touch
FADER/BALANCE.
2 Touch a or b to adjust front/rear
speaker balance.
Each time you touch a or b it moves the
front/rear speaker balance towards the front or
the rear.
FRONT:25 REAR:25 is displayed as the front/
rear speaker balance moves from front to rear.
# FR:00 is the proper setting when only two
speakers are used.
3 Touch c or d to adjust left/right speak-
er balance.
Each time you touch c or d it moves the left/
right speaker balance towards the left or the
right.
Digital Signal Processor
En
7
English
Section
03
LEFT:25 RIGHT:25 is displayed as the left/
right speaker balance moves from left to
right.
Adjusting source levels
SLA (source level adjustment) lets you adjust
the volume level of each source to prevent ra-
dical changes in volume when switching be-
tween sources.
! Settings are based on the FM tuner volume
level, which remains unchanged.
1 Compare the FM tuner volume level
with the level of the source you wish to ad-
just.
2 Touch A.MENU and DSP and then touch
SLA.
3 Touch a or b to adjust the source vo-
lume.
Each time you touch a or b it increases or de-
creases the source volume.
SLA +4 SLA 4 is displayed as the source vo-
lume is increased or decreased.
Notes
! The MW/LW tuner volume level can also be
adjusted with source level adjustments.
! Video CD, CD and MP3/WMA are set to the
same source level adjustment volume auto-
matically.
! DVD and the optional DVD player are set to
the same source level adjustment volume
automatically.
! External unit 1 and external unit 2 are set to
the same source level adjustment volume
automatically.
! AUX (auxiliary input) and AV (video input) are
set to the same source level adjustment vo-
lume automatically.
Using the dynamic range
control
The dynamic range refers to the difference be-
tween the largest and softest sounds. The dy-
namic range control compresses this
difference so that you can clearly hear sounds
even at low volume levels.
! The dynamic range control is effective only
on Dolby Digital sounds.
! When playing other than the DVD disc, you
cannot switch to D.R.C.
1 Touch A.MENU and DSP and then touch
D.R.C.
2 Touch a to turn the dynamic range con-
trol on.
# To turn dynamic range control off, touch b.
Using the down-mix function
This function cannot be operated when DVH-
P7000R, DVH-P5000MP or AVH-P6500DVD is
connected to this unit.
The down-mix function allows you to play back
multi-channel audio in 2 channels.
1 Touch A.MENU and DSP and then touch
DOWN MIX.
2 Touch
or to switch the setting.
! Lt/Rt Down mix so that the surround
components can be restored (decoded).
! Lo/Ro Stereo mix the original audio that
do not contain channel modes such as sur-
round components.
Digital Signal Processor
En
8
Section
03
Using the direct control
You can override audio settings to check for ef-
fectiveness of your audio settings.
! All audio functions are locked out when the
direct control is on except VOLUME.
! If the source is a 2-channel LPCM audio or
a 2-channel Dolby Digital audio and you
select ON, audio is heared only over front
left/right speakers.
1 Touch A.MENU and DSP and then touch
DIGITAL DIRECT.
2 Touch a to turn the direct control on.
# To turn direct control off, touch b.
Using the Dolby Pro Logic B
This function cannot be operated when DVH-
P7000R, DVH-P5000MP or AVH-P6500DVD is
connected to this unit.
Dolby Pro Logic B creates five full-bandwidth
output channels from two-channel sources to
achieve high-purity matrix surround.
! If both the center and the rear speakers are
set to OFF, you cannot use this function.
! Dolby Pro Logic B supports up to 48kHz
sampling rate stereo source and has no ef-
fect on other types of source.
1 Touch A.MENU and DSP and then touch
NEXT.
2 Touch DOLBY PRO LOGIC B.
3 Touch any of the following touch panel
keys to select the desired mode.
! MOVIE The Movie mode suitable for
movie playback
! MUSIC The Music mode suitable for
music playback
! MATRIX The Matrix mode for when FM
radio reception is weak
! OFF Turn Dolby Pro Logic B off
! MUSIC ADJUST Adjust the Music mode
# You can operate MUSIC ADJUST only when
MUSIC has been selected.
Adjusting the Music mode
You can adjust the Music mode with the fol-
lowing three controls.
! Panorama (PANORAMA) extends the front
stereo image to include the surround
speakers for an exciting wraparound ef-
fect.
! Dimension (DIMENSION) allows you to
gradually adjust the sound field either to-
wards the front or the rear.
! Center Width (CENTER WIDTH) allows cen-
ter-channel sounds to be positioned be-
tween the center speaker and the left/right
speakers. It improves the left-center-right
stage presentation for both the driver and
the front passenger.
1 Touch A.MENU and DSP and then touch
NEXT.
2 Touch DOLBY PRO LOGIC B.
3 Touch MUSIC and then touch
MUSIC ADJUST.
# You can operate MUSIC ADJUST only when
MUSIC has been selected.
4 Touch or to select PANORAMA
(panorama).
Each time you touch
or selects the item
in the following order:
PANORAMA (panorama)DIMENSION (di-
mension)CENTER WIDTH (center width)
Digital Signal Processor
En
9
English
Section
03
5 Touch to turn the panorama control
on.
# To turn the panorama control off, touch .
6 Touch and then touch or to ad-
just front/surround speaker balance.
Each time you touch
or it moves the
sound towards the front or the surrounds.
+3 3 is displayed as the front/surround
speaker balance moves from front to sur-
rounds.
7 Touch
and then touch or to ad-
just the center image.
Each time you touch
or it gradually
spreads the center channel sound into the
front left and right speakers over a range 07.
3 is the default and its recommended for
most recordings. 0 places all center sound in
the center speaker. 7 places all center sound
equally in the left/right speakers.
Setting the speaker setting
You need to make with/without (or yes/no) and
size (bass reproducing capacity) selection/ad-
justments depending on the installed speak-
ers. The size needs to be set to LARGE (large)
if the speaker is capable of reproducing
sounds of about 100 Hz or below. Otherwise
select SMALL (small).
! Low frequency range is not output if the
subwoofer is set to OFF and the front and
rear speakers set to SMALL or OFF.
! It is imperative that non-installed speakers
be set to OFF.
! Set the front or rear speaker to LARGE if
the speaker is capable of reproducing bass
content, or if no subwoofer is installed.
1 Touch A.MENU and DSP and then touch
NEXT.
2 Touch SPEAKER SETTING.
3 Touch
or to select the speaker to
be adjusted.
Each time you touch
or selects the
speaker in the following order:
FRONT (front speakers)CENTER (center
speaker)REAR (rear speakers)
SUB WOOFER (subwoofer)PHASE (sub-
woofer setting)
# You can switch to PHASE only when the sub-
woofer has been set to ON.
4 Touch or to select the correct size
for the selected speaker.
Each time you touch
or selects the size
in the following order:
OFF (off)SMALL (small)LARGE (large)
# You cannot select OFF, when FRONT (front
speakers) have been selected.
# You can select ON or OFF, when
SUB WOOFER (subwoofer) has been selected.
# You can switch REVERSE (reverse phase) or
NORMAL (normal phase), when PHASE (subwoo-
fer setting) has been selected.
Correcting the subwoofers phase
If trying to boost the bass output of the sub-
woofer doesnt do much or rather makes you
feel that the bass gets more murky, this may
indicate that the subwoofers output and bass
content you hear over other speakers cancel
each other out. To remove this problem, try
changing the phase setting for the subwoofer.
1 Touch A.MENU and DSP and then touch
NEXT.
2 Touch SPEAKER SETTING.
Digital Signal Processor
En
10
Section
03
3 Touch or to select SUB WOOFER
(subwoofer).
Each time you touch
or selects the
speaker in the following order:
FRONT (front speakers)CENTER (center
speaker)REAR (rear speakers)
SUB WOOFER (subwoofer)PHASE (sub-
woofer setting)
4 Touch
to turn subwoofer output on.
# To turn subwoofer output off, touch .
5 Touch and then touch or to se-
lect the phase of subwoofer output.
Touch
to select normal phase and
NORMAL appears in the display. Touch
to
select reverse phase and REVERSE appears in
the display.
Note
When playing a 2-channel mono source with Pro
Logic B turned on, there may be occasions when
the following will occur:
! No audio is outputted if the center speaker
setting is SMALL or LARGE and no center
speaker is installed.
! Audio is heard only over the center speaker if
installed and the center speaker setting is
SMALL or LARGE.
Selecting a cross-over
frequency
If DVH-P7000R, DVH-P5000MP or AVH-
P6500DVD is connected to this unit, operation
is slightly different.
You can select a frequency, under which
sounds are reproduced through the subwoo-
fer. If the installed speakers include one whose
size has been set to SMALL, you can select a
frequency, under which sounds are repro-
duced through a LARGE speaker or subwoo-
fer.
1 Touch A.MENU and DSP and then touch
NEXT.
2 Touch CROSS OVER.
3 Touch
or to select the speaker to
be adjusted.
Each time you touch
or selects the
speaker in the following order:
FRONT (front speakers)CENTER (center
speaker)REAR (rear speakers)
SUB WOOFER (subwoofer)
# If DVH-P7000R, DVH-P5000MP or AVH-
P6500DVD is connected to this unit, you cannot
operate this procedure.
4 Touch or to select cross-over fre-
quency.
Each time you touch
or selects cross-
over frequencies in the following order:
6380100125160200 (Hz)
Note
Selecting a cross-over frequency is to set a cross-
over frequency of the subwoofers L.P.F. (low-pass
filter) and that of the SMALL speaker H.P.F. (high-
pass filter). The cross-over frequency setting has
no effect if the subwoofer is set to OFF and other
speakers are set to LARGE or OFF.
Adjusting the speaker
output levels
You can readjust the speaker output levels
using a test tone while listening to music.
1 Touch A.MENU and DSP and then touch
NEXT.
Digital Signal Processor
En
11
English
Section
03
2 Touch SP Lev.
3 Touch
or to select the speaker to
be adjusted.
Each time you touch
or selects the
speaker in the following order:
FRONT-L (front speaker left)CENTER (center
speaker)FRONT-R (front speaker right)
REAR-R (rear speaker right)REAR-L (rear
speaker left)SUB WOOFER (subwoofer)
# You cannot select speakers whose size is set
at OFF.
4 Touch or to adjust the speaker
output level.
Each time you touch
or increases or de-
creases the speaker output level. +10 10 is
displayed as the level is increased or de-
creased.
Note
To adjust the speaker output levels in this mode is
the same as making the speaker output levels at
TEST TONE. Both provide the same results.
Adjusting the speaker output
levels using a test tone
A convenient test tone allows you to easily get
the overall balance right among the speakers.
1 Touch A.MENU and DSP and then touch
NEXT.
2 Touch TEST TONE.
3 Touch START to start the test tone out-
put.
The test tone is outputted. It rotates from
speaker to speaker in the following sequence
at intervals of about two seconds. The current
settings for the speaker over which you hear
the test tone are shown in the display.
FRONT-L (front speaker left)CENTER (center
speaker)FRONT-R (front speaker right)
REAR-R (rear speaker right)REAR-L (rear
speaker left)SUB WOOFER (subwoofer)
Check each speaker output level. If no adjust-
ments are needed, perform step 5 to stop the
test tone.
# You can also start the test tone output by mov-
ing the joystick up.
# The settings do not appear for speakers
whose size is set OFF.
4 Touch or to adjust the speaker
output level.
Each time you touch
or increases or de-
creases the speaker output level. +10 10 is
displayed as the level is increased or de-
creased.
# The test tone rotates to the next speaker after
about two seconds from the last operation.
5 Touch STOP to stop the test tone out-
put.
# You can also stop the test tone output by mov-
ing the joystick down.
Notes
! If needed, select speakers and adjust their ab-
solute output levels. (Refer to Adjusting the
speaker output levels on the previous page.)
! To adjust the speaker output levels in this
mode is the same as making the speaker out-
put levels at SP Lev. Both provide the same re-
sults.
Using the time alignment
The time alignment lets you adjust the dis-
tance between each speaker and the listening
position.
Digital Signal Processor
En
12
Section
03
Selecting the time alignment
adjustment mode
This function cannot be operated when DVH-
P7000R, DVH-P5000MP or AVH-P6500DVD is
connected to this unit.
You can select the time alignment adjustment
mode.
1 Touch A.MENU and DSP and then touch
NEXT.
2 Touch TIME ALIGNMENT.
3 Touch any of the following touch panel
keys to select the time alignment.
! INITIAL Initial time alignment (factory set-
ting)
! AUTO TA Time alignment created by auto
TA and EQ. (Refer to Auto TA and EQ (auto-
time alignment and auto-equalizing) on
page 15.)
! CUSTOM Adjusted time alignment that
you can create for yourself
! OFF Turn the time alignment off
! ADJUSTMENT Adjust the time alignment
as desired
# You cannot select AUTO TA if auto TA and EQ
has not been carried out.
# You cannot select ADJUSTMENT when
neither FRONT-L nor FRONT-R is selected in
POSITION.
Adjusting the time alignment
You can adjust the distance between each
speaker and the selected position.
! An adjusted time alignment is memorized
in CUSTOM.
1 Touch A.MENU and DSP and then touch
NEXT.
2 Touch TIME ALIGNMENT and then
touch ADJUSTMENT.
# You cannot select ADJUSTMENT when
neither FRONT-L nor FRONT-R is selected in
POSITION.
3 Touch the speaker to be adjusted.
# You cannot select speakers whose size is set
at OFF.
4 Touch a or b to adjust the distance be-
tween the selected speaker and the listen-
ing position.
Each time you touch a or b increases or de-
creases the distance. 0.0cm 500.0cm is dis-
played as the distance is increased or
decreased.
5 Touch ESC to return to the playback dis-
play.
Using the equalizer
The equalizer lets you adjust the equalization
to match car interior acoustic characteristics
as desired.
Recalling equalizer curves
There are seven stored equalizer curves which
you can easily recall at any time. Here is a list
of the equalizer curves:
Display Equalizer curve
SUPER BASS Super bass
POWERFUL Powerful
NATURAL Natural
VOCAL Vocal
FLAT Flat
CUSTOM1 Custom 1
CUSTOM2 Custom 2
Digital Signal Processor
En
13
English
Section
03
! CUSTOM1 and CUSTOM2 are adjusted
equalizer curves.
! When FLAT is selected no supplement or
correction is made to the sound. This is
useful to check the effect of the equalizer
curves by switching alternatively between
FLAT and a set equalizer curve.
1 Press EQ and hold to switch to equali-
zer function.
Press EQ and hold until an equalizer curve
name appears in the display.
# To switch to SFC function, press EQ and hold
again.
2 Press EQ to select the equalizer.
Press EQ repeatedly to switch between the fol-
lowing equalizers:
SUPER BASSPOWERFULNATURAL
VOCALFLATCUSTOM1CUSTOM2
Adjusting 3-band parametric
equalizer
For CUSTOM1 and CUSTOM2 equalizer
curves, you can adjust the front, rear and cen-
ter equalizer curves separately by selecting a
center frequency, an equalizer level and a Q
factor for each band.
! A separate CUSTOM1 curve can be cre-
ated for each source.
! A CUSTOM2 curve can be created com-
mon to all sources.
! The center speaker largely determines the
sound image and getting the balance right
isnt easy. We recommend reproducing a 2-
ch. audio (a CD for example) and getting
the balance right among the speakers ex-
cept for the center, and then reproducing a
5.1-ch. audio (Dolby Digital or DTS) and ad-
justing the center speaker output to the
balance you have already got among the
other speakers.
1 Touch A.MENU and DSP and then touch
NEXT twice.
2 Touch PRESET EQ.
3 Touch
or to select the desired
item.
Each time you touch
or selects the item
in the following order:
FRONT (speakers)LOW (bands)Low (cen-
ter frequency)L (equalizer level)WIDE (Q
factor)
4 Touch
or to select the speaker to
be adjusted.
Touch
or until the desired speaker ap-
pears in the display.
REAR (rear speakers)CENTER (center speak-
er)FRONT (front speakers)
# You cannot select speakers whose size is set
at OFF.
5 Touch and then touch or to se-
lect the equalizer band to be adjusted.
Each time you touch
or selects equalizer
bands in the following order:
LOW (low)MID (mid)HIGH (high)
6 Touch
and then touch or to se-
lect the center frequency of selected band.
Touch
or until the desired frequency ap-
pears in the display.
40Hz50Hz63Hz80Hz100Hz125Hz
160Hz200Hz250Hz315Hz400Hz
500Hz630Hz800Hz1kHz1.25kHz
1.6kHz2kHz2.5kHz3.15kHz4kHz
5kHz6.3kHz8kHz10kHz12.5kHz
7 Touch
and then touch or to ad-
just the equalizer level.
Each time you touch
or increases or de-
creases the equalizer level. +06 06 is dis-
played as the level is increased or decreased.
Digital Signal Processor
En
14
Section
03
8 Touch and then touch or to se-
lect the desired Q factor.
Each time you touch
or switches be-
tween the following Q factor:
WIDE (wide)NARROW (narrow)
# You can adjust parameters for each band of
the other speakers in the same way.
Note
You can select a center frequency for each band.
You can change the center frequency in 1/3-oc-
tave steps, but you cannot select frequencies that
have intervals shorter than 1 octave among the
center frequencies of the three bands.
Using the auto-equalizer
This function cannot be operated when DVH-
P7000R, DVH-P5000MP or AVH-P6500DVD is
connected to this unit.
The auto-equalizer is the equalizer curve cre-
ated by auto TA and EQ (refer to Auto TA and
EQ (auto-time alignment and auto-equalizing)
on this page).
You can turn the auto-equalizer on or off.
1 Touch A.MENU and DSP and then touch
NEXT twice.
2 Touch AUTO EQ.
# You cannot use this function if auto TA and
EQ has not been carried out.
3 Touch a to turn the auto-equalizer on.
# To turn auto-equalizer off, touch b.
Auto TA and EQ (auto-time
alignment and auto-
equalizing)
This function cannot be operated when DVH-
P7000R, DVH-P5000MP or AVH-P6500DVD is
connected to this unit.
The auto-time alignment is automatically ad-
justed for the distance between each speaker
and the listening position.
The auto-equalizer automatically measures
the car interior acoustic characteristics, and
then creates the auto-equalizer curve based
on that information.
WARNING
To prevent accidents, never carry out auto TA and
EQ while driving. When this function measures
the car interior acoustic characteristics to create
an auto-equalizer curve, a loud measurement
tone (noise) may be outputted from the speakers.
CAUTION
! Carrying out auto TA and EQ under the follow-
ing conditions may damage the speakers. Be
sure to check the conditions thoroughly be-
fore carrying out auto TA and EQ.
When speakers are incorrectly connected.
(e.g., When a rear speaker is connected to
a subwoofer output.)
When a speaker is connected to a power
amp delivering output higher than the
speakers maximum input power capabil-
ity.
! If the microphone is placed in an unsuitable
position the measurement tone may become
loud and measurement may take a long time,
resulting in a drain on battery power. Be sure
to place the microphone in the specified loca-
tion.
Digital Signal Processor
En
15
English
Section
03
Before operating the auto TA
and EQ function
! Carry out auto TA and EQ in as quiet a
place as possible, with the car engine and
air conditioning switched off. Also cut
power to car phones or portable telephones
in the car, or remove them from the car be-
fore carrying out auto TA and EQ. Sounds
other than the measurement tone (sur-
rounding sounds, engine sound, tele-
phones ringing etc.) may prevent correct
measurement of the car interior acoustic
characteristics.
! Be sure to carry out auto TA and EQ using
the supplied microphone. Using another
microphone may prevent measurement, or
result in incorrect measurement of the car
interior acoustic characteristics.
! When front speaker is not connected, auto
TA and EQ cannot be carried out.
! When this unit is connected to a power
amp with input level control, auto TA and
EQ may not be possible if you lower power
amp input level. Set the power amps input
level to the standard position.
! When this unit is connected to a power
amp with an LPF, turn off the LPF on the
power amp before carrying out auto TA and
EQ. In addition, the cross-over frequency
for built-in LPF of an active subwoofer
should be set to the highest frequency.
! The time alignment value calculated by
auto TA and EQ may differ from the actual
distance in the following circumstances.
However, the distance has been calculated
by computer to be the optimum delay to
give accurate results for the circum-
stances, so please continue to use this
value.
When the reflected sound within a vehi-
cle is strong and delays occur.
When delays occur for low sounds due
to the influence of the LPF on active
subwoofers or external amps.
! Auto TA and EQ changes the audio settings
as below:
The fader/balance settings return to the
center position. (Refer to page 7.)
The equalizer curve switches to FLAT.
(Refer to page 13.)
It will be adjusted automatically to high
pass filter setting for front, center and
rear speaker.
! If you carry out auto TA and EQ when a pre-
vious setting of this already exists, the set-
ting will be replaced.
Carrying out auto TA and EQ
1 Stop the car in a place that is as quiet
as possible, close all doors, windows and
the sun roof, and then turn the engine off.
If the engine is left running, engine noise may
prevent correct auto TA and EQ.
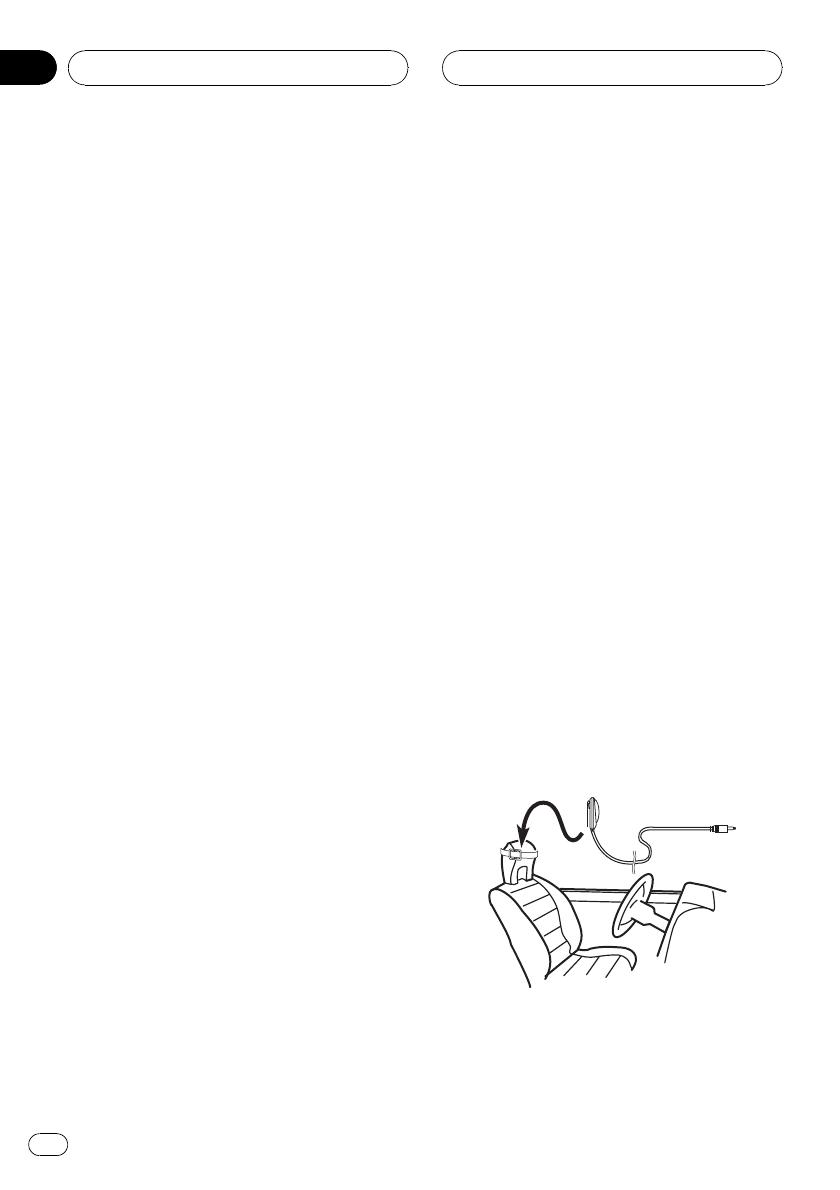
2 Fix the supplied microphone in the cen-
ter of the headrest of the drivers seat, fa-
cing forward, using the belt (sold
separately).
The auto TA and EQ may differ depending on
where you place the microphone. If desired,
place the microphone on the front passenger
seat to carry out auto TA and EQ.
3 Turn the ignition switch to ON or ACC.
If the cars air conditioner or heater is turned
on, turn it off. Noise from the fan in the air
Digital Signal Processor
En
16
Section
03
conditioner or heater may prevent correct auto
TA and EQ.
# Press SOURCE to turn the source on if this
unit is turned off.
4 Select the position for the seat on
which the microphone is placed.
Refer to Using the position selector on page 7.
# If no position is selected before you start auto
TA and EQ, FRONT-L is selected automatically.
5 Press SOURCE and hold until the unit
turns off.
6 Press and hold EQ to enter the auto TA
and EQ measurement mode.
7 Plug the microphone into the micro-
phone input jack on this unit.
8 Touch START to start the auto TA and
EQ.
9 Get out of the car and close the door
within 10 seconds when the 10-second
count-down starts.
The measurement tone (noise) is outputted
from the speakers, and auto TA and EQ be-
gins.
# When all speakers are connected, auto TA
and EQ is completed in about nine minutes.
# To stop auto TA and EQ, touch STOP.
# To cancel auto TA and EQ part way through,
touch BACK or ESC.
10 When auto TA and EQ is completed,
Complete is displayed.
When correct measurement of car interior
acoustic characteristics is not possible, an
error message is displayed. (Refer to Under-
standing auto TA and EQ error messages on
page 20.)
11 Touch ESC to cancel the auto TA and EQ
mode.
12 Store the microphone carefully in the
glove compartment.
Store the microphone carefully in the glove
compartment or any other safe place. If the
microphone is subjected to direct sunlight for
an extended period, high temperatures may
cause distortion, color change or mal-
function.
Digital Signal Processor
En
17
English
Section
03
Correcting distorted sound
You can minimize distortion that may be
caused by the equalizer curve settings.
Setting an equalizer level high can cause dis-
tortion. If high sound is crippled or distorted,
try switching to LOW. Normally, leave the set-
ting at HIGH to ensure quality sound.
1 Touch A.MENU and INITIAL and then
touch NEXT.
2 Touch DIGITAL ATT.
3 Touch
or to switch the digital at-
tenuator setting.
Touch
to select low setting and LOW ap-
pears in the display. Touch
to select high
setting and HIGH appears in the display.
Resetting the audio
functions
This function cannot be operated when DVH-
P7000R, DVH-P5000MP or AVH-P6500DVD is
connected to this unit.
You can reset all audio functions except vo-
lume.
1 Touch A.MENU and INITIAL and then
touch NEXT.
2 Touch AUDIO RESET.
3 Touch RESET.
Ready to reset. Are you sure? appears in the
display.
4 Touch RESET again to reset audio func-
tions.
The reset end was carried out. appears in
the display.
# To cancel resetting the audio functions, touch
CANCEL.
Initial Settings
En
18
Section
04
Troubleshooting
Common
Symptom Cause Action
Power doesnt turn on.
No functions come on.
Cables or connectors are not cor-
rectly connected.
Check whether the cables are plugged in cor-
rectly and firmly.
The fuse is blown. Rectify the reason for the fuse blowing, then
replace the fuse. Be very sure to install the
correct fuse with the same rating.
No sounds are heard.
The volume level will not rise.
Cables are not connected correctly. Connect the cables correctly.
The front, rear, left and right speak-
ers are not properly adjusted in level
balance.
Adjust the relative levels between the speak-
ers correctly. (Page 7)
Sound is not heard over a speci-
fic speaker.
The speaker size is set to OFF. Make the correct size setting for the speaker.
(Page 10)
The speaker level is set too low. Increase the speaker level setting to get the
balance right with the other speakers. (Page
11)
The center speaker size is set to
SMALL or LARGE whereas no cen-
ter speaker is installed.
Set the center speaker size to OFF. (Page 10)
Audio/DSP
Symptom Cause Action
Speakers are not available to be
adjusted.
Their size settings is at OFF. Make the correct size settings. (Page 10)
Time alignment is not available. Listening position is not set cor-
rectly.
Set listening position correctly. (Page 7)
Their size settings is at OFF. Make the correct size settings. (Page 10)
The subwoofer is not available to
switch its phase.
The subwoofer is set to OFF. Set the subwoofer to ON. (Page 10)
Bass content is not heard. The subwoofer is set to OFF and yet
other speakers are set to OFF or
SMALL in size.
Make the correct settings. (If no subwoofer is
installed, the front or rear speaker needs to
be set to LARGE.) (Page 10)
Ocassionally no sounds are out-
put when Dolby Pro Logic B is
turned on.
The center speaker setting is at
SMALL or LARGE whereas no cen-
ter speaker is installed.
Change the center speaker size setting to
OFF. (If the audio source is mono and Dolby
Pro Logic B is turned on, sound is heard over
the center speaker only.) (Page 10)
Occasionally no sounds are
heard over speakers other than
the center one.
Dolby Pro Logic B is turned on. Turn Dolby Pro Logic B off. (If the audio
source is mono and Dolby Pro Logic B is
turned on, sound is heard over the center
speaker only.) (Page 9)
Turning dynamic range control
on has no effects.
The currently reproduced sound is
not Dolby Digital coded.
The feature is only effective on Dolby Digital
sounds. (Page 8)
Additional Information
En
19
English
Appendix
Symptom Cause Action
No sounds are heard. Optical cables are incorrectly con-
nected.
Connect the cables correctly. (Page 3)
DVD player setting
Symptom Cause Action
No sounds come from the DVD
player only.
Optical cables are incorrectly con-
nected.
Connect the cables correctly.
The DVD player is not properly set
for output.
Make the correct output setting. (See the
manual for the DVD player.)
Understanding auto TA and EQ error messages
When correct measurement of car interior acoustic characteristics is not possible using the auto
TA and EQ, an error message may appear on the display. If an error message appears, refer to the
table below to see what the problem is and the suggested method of correcting the problem. After
checking, try again.
Message Cause Action
Error check MIC Microphone is not connected. Plug the supplied microphone securely into
the jack.
Error check front SP, Error
check FL SP, Error check FR SP,
Error check center SP, Error
check RL SP, Error check RR SP,
Error check subwoofer
The microphone cannot pick up the
measuring tone of a speaker.
! Confirm that the speakers are connected
correctly.
! Correct the input level setting of the power
amp connected to the speakers.
! Set the microphone correctly.
Error check noise The surrounding noise level is too
high.
! Stop your car in a place that is as quiet as
possible, and switch off the engine, air condi-
tioner or heater.
! Set the microphone correctly.
Additional Information
En
20
Appendix
Terms
Dolby Digital
Dolby Digital provides multi-channel audio
from up to 5.1 independent channels. This is
the same as the Dolby Digital surround sound
system used in theaters.
Dolby Pro Logic B
Dolby Pro Logic B can create five full-band-
width output channels from two-channel
sources. This new technology enables a dis-
crete 5-channel playback with 2 front chan-
nels, 1 center channel, and 2 rear channels. A
music mode is also available for 2-channel
sources in addition to the movie mode.
DTS
This stands for Digital Theater Systems. DTS is
a surround system delivering multi-channel
audio from up to 6 independent channels.
Dynamic range control
Dolby Digital has a function for compressing
the difference between the loudest and softest
sounds: Dynamic range control. This control
ensures sounds with an increased dynamic
range are heard clearly even at low volume le-
vels.
Linear PCM (LPCM)/Pulse code
modulation
This stands for linear pulse code modulation,
which is the signal recording system used for
music CDs and DVDs. Generally, DVDs are re-
corded with higher sampling frequency and
bit rate than CDs. Therefore, DVDs can provide
higher sound quality.
Optical digital output/input
By transmitting and receiving audio signals in
a digital signal format, the chance of sonic
quality deteriorating in the course of transmis-
sion is minimized. An optical digital output/
input is designed to transmit and receive digi-
tal signals optically.
Additional Information
En
21
English
Appendix
1 / 1

Pioneer DEQ-P6600 User manual

Category
AV receivers
Type
User manual

Ask a question and I''ll find the answer in the document

Finding information in a document is now easier with AI

Ask the document