
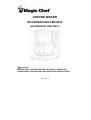
COFFEE MAKER
MCCM1NW12/MCCM1NB12
-HOUSEHOLD USE ONLY-
CAUTION:
BEFORE USE, PLEASE READ AND FOLLOW ALL IMPORTANT
SAFEGUARDS, PRECAUTIONS AND OPERATING INSTRUCTIONS.
{PAGE }

{PAGE }
Table of Contents
Safety Instructions -------------------------------------------- 3-5
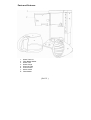
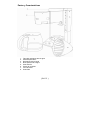
Parts and Features -------------------------------------------- 6
Operating Instructions --------------------------------------- 7
Auto Drip-Stop -------------------------------------------------- 7-8
Cleaning and Maintenance --------------------------------- 8
Mineral Deposit and Decalcifying ------------------------ 8-9
Warranty ---------------------------------------------------------- 10
Spanish Section ------------------------------------------------ 11-20

What You Need to Know About Safety Instructions
Warning and Important Safety Instruction appearing in this manual are not meant
to cover all possible conditions and situations that may occur. Common sense,
caution and care must be exercised when installing, maintaining, or operating
appliance.
Always contact your dealer, distributor, service agent or manufacturer about
problems or conditions you do not understand.
When using electrical appliances, basic safety precaution should always be
followed, including the following:
IMPORTANT SAFEGUARDS
1) Read all instructions.
2) This appliance is for household use only. Do not use outdoors.
3) Do not use this appliance for other than its intended use.
4) Before using for the first time, check if voltage indicated on the base
of the appliance corresponds to the voltage in your home.
5) Do not turn the power on unless this appliance is properly assembled.
6) Close supervision is necessary when any appliance is used by or
near children.
7) Do not operate any appliance with a damaged cord or plug, or after
the appliance malfunctions or has been damaged in any manner.
Return appliance to authorized service center for examination, repair
or adjustment.
{PAGE }

8) The use of attachments or accessories not recommended or sold by
the manufacturer may result in fire, electric shock or injury.
9) Unplug the appliance from the outlet when not in use, assembling
and disassembling, and before cleaning. Make sure the appliance
cools down completely before assembling, disassembling and
cleaning.
10) Do not let cord hang over edge of table or counter, or touch hot
surfaces.
11) Do not place the appliance on or near a hot gas or electric burner, or
in a heated oven.
12) Do not touch hot surfaces. Use handles or knobs.
13) To connect, always plug the cord into the wall outlet first, and then
press “Start”. To disconnect, press “Stop” and then remove plug from
wall outlet.
14) Never use the carafe on a range top or in a conventional microwave
oven.
15) Never use warm or hot water to fill the water tank. Use cold water
only.
16) Snap the lid securely to the carafe before serving.
17) Scalding may occur if the cover is lifted or removed during the
brewing cycle.
18) Do not set a hot carafe on a wet or cold surface.
19) Do not use a cracked carafe, or a carafe that has a loose or
weakened handle.
20) Do not clean the coffee maker with scouring powders, steel wool
pads, or other abrasive materials.
WARNING:
To protect against electric shock, fire, and injury to persons, do not
immerse main cord, plug or unit in water or any other liquid.
{PAGE }

{PAGE }
CAUTION:
This product is equipped with a polarized plug (one blade is wider
than the other blade) as a safety feature to reduce the risk of
electrical shock. This plug will fit into a polarized outlet only one
way. This is a safety feature. If you are unable to insert the plug into
the electrical outlet, try reversing the plug. If the plug still does not
fit, contact a qualified electrician.
Never use the plug with an extension cord unless the plug can be
fully inserted into the extension cord. Do not alter the plug of the
appliance or any extension cord used with this appliance. Do not
attempt to defeat the safety purpose of the polarized plug.
SAVE THESE INSTRUCTIONS
Page is loading ...

{PAGE }
Before Your First Use
Carefully unpack the coffee maker and remove all packaging materials. Wipe the
heating stand with a clean, damp cloth. Do not immerse the heating stand in
water or other liquid. To remove any dust that may have accumulated on the
removable parts during packaging, wash the carafe, lid and filter basket with
warm soapy water. Rinse and dry. We recommend that prior to brewing your first
pot of coffee, you “brew” just the cold water without ground coffee or a paper filter.
This will remove any dust that may have settled inside the coffee maker.
Operating Instructions
1) Place your coffee maker on a flat, level surface, such as a countertop. Plug
the coffee maker into a 120_volt 60Hz AC only outlet.
2) Swing out the filter basket holder(2) to your left and place a filter or paper
filter into the filter basket(8). Place the desired amount of ground coffee into
the paper filter. Close the filter basket until it snaps in place.
NOTE: Do not operate your coffee maker if the filter basket holder does not
close completely. If the filter basket holder does not close completely,
check to see that the filter basket is properly seated and snap the door
back into its place.
3) Lift and open the water tank lid(1). Then fill the glass carafe(7) with cold
water and pour into the water tank(3). You can measure how many cups
you want to make by looking at the gauge on the carafe handle or the water
gauge(4) on the side of the water tank(3).
4) Close the water tank lid(1) and place the glass carafe(7) on the warming
plate(5).
5) Push the “On/Off” switch to turn on the coffee maker and start brewing.
6) The warming plate will stay warm as long as the coffee maker is on. To turn
off, push the “On/Off” switch to “Off” position.
Auto Drip-Stop
Your coffee maker is equipped with an auto drip-stop feature. If you wish to
temporarily remove the glass carafe from the warming plate at any time during
the brewing cycle, the auto drip-stop feature will temporarily stop the brewing,
causing no coffee to drip from the filter basket to the warming plate. Replacing
the glass carafe on the warming plate will restart the brewing cycle.
NOTE: If the glass carafe was removed during the brewing cycle, return it
within 30 seconds or the filter basket may overflow.

{PAGE }
Cleaning and Maintenance
COMPLETELY CLEAN AND DRY ALL PARTS AFTER EVERY USE.
Be sure to unplug the appliance before cleaning. To protect against electrical
shock, do not immerse cord, plug or unit in water or other liquid.
The glass carafe, carafe lid, and filter basket may be washed with warm soapy
water, or placed in the top rack of the dishwasher. Do not place any other part or
parts of your coffee maker in the dishwasher. The heating plate may be wiped
with a clean, damp cloth when necessary. Never use harsh or abrasive cleaners
on any part or parts of your coffee maker.
To clean the filter basket holder, first, remove from the main unit. To remove,
swing-open the filter basket holder completely and remove the filter basket and
the filter. Hold the bottom of the filter basket holder next to the hinge and lift and
pull away. Clean in warm soapy water. To reinsert the filter basket holder, insert
the top pin into the top hinge. While pressing the filter basket holder upwards
slightly, fit the bottom pin into the bottom hinge.
During cleaning of the filter basket, the spring (located lower back of the handle)
may become detached. If not reattached, it may prevent the anti-drip function
from working properly.
Never immerse the heating plate or main housing in water or any other liquid. Do
not try to clean the inside of the water chamber with a cloth, this will leave a
residue of lint and may clog your coffee maker. Just rinse with cold water
periodically.
Mineral Deposits and Decalcifying
Mineral deposit build-up frequently occurs in coffee makers. This build-up is quite
normal and is caused by minerals commonly found in drinking water. Periodically,
your coffee maker will need cleaning to remove any mineral deposits that may
form. Excessive steaming or prolonged brewing cycle is a sign that your coffee
maker needs decalcifying. During decalcifying, more steaming will occur than
while brewing coffee.
1) Lift carafe lid. Pour two tablespoons of white vinegar in the carafe and add
cold water and fill up carafe.
2) Pour vinegar/water solution into water tank.
3) Place the glass carafe on the warming plate.
4) Open the filter basket holder and place a coffee filter into the filter basket.
5) Press power button to turn the coffee maker on.

{PAGE }
6) Let half of the cleaning solution brew into the carafe, and then press the
power button again to turn the coffee maker “Off”.
7) Let the coffee maker cool for 15 minutes to soften the mineral deposits.
8) Pour the liquid that brewed into the carafe back into the water tank.
9) Turn the coffee maker on and let all the cleaning solution brew into the carafe.
10) Turn the coffee maker off. Discard the cleaning solution and used coffee filter.
11) Fill the coffee maker with fresh water and follow the steps in the “Before Your
First Use” to flush out remaining cleaning solution.
12) Hand wash carafe and lid with hot soapy water. Do not place in dishwasher.
SAVE THESE INSTRUCTIONS

{PAGE }
Magic Chef Limited Warranty
This Magic Chef product is warranted, to the original purchaser or gift recipient,
to be free from any manufacturing defects under normal use and conditions for a
period of one (1) year from the date of purchase as shown on retailer’s receipt.
The obligation of Magic Chef under this warranty shall be limited to repair or
replacement (at our option) during the warranty period, of any part that proves to
be defective in material or workmanship under normal installation and use. The
product is returned to Magic Chef or an Authorized Service Center
POSTAGE
PREPAID. A copy of the original receipt along with your name, address and
phone number must accompany products returned. Include a description of the
defect along with the date you purchased the product.
This warranty shall be invalid if the product is damaged as a result of misuse,
abuse, negligence, defacement, destruction, accident, fire or other casualties or
alterations in any manner. Improper repair, improper use of electrical voltages or
currents, alteration of serial number, maintenance by any person or entity other
than our own Service Facility or Center, or any use not in conformity with product
instruction, shall render this warranty invalid.
Magic Chef assumes no responsibility for damage resulting from the use of this
product in a manner or location other than that for which it was intended.
WARRANTY CONDITIONAL TO NORMAL AND NON-COMMERCIAL USE OF
THIS APPLIANCE FOR DOMESTIC USE ONLY.
For the nearest Authorized Service Center, contact:
Magic Chef Customer Service: 1-888-775-0202
Or visit our website at www.magicchef-ewave.com
Magic Chef is a trademark of the Maytag Corporation and is
used under license to MC Appliance Corp. All rights reserved.

CAFETERA
MCCM1NW12/MCCM1NB12
-USO DOMESTICO EXCLUSIVAMENTE-
PRECAUCIÓN:
ANTES DE USAR, SÍRVASE LEER Y OBSERVAR TODAS LAS
ADVERTENCIAS, PRECAUCIONES E INSTRUCCIONES DE USO.
{PAGE }
Page is loading ...
Page is loading ...
Page is loading ...
Page is loading ...
Page is loading ...
Page is loading ...
Page is loading ...
Page is loading ...
Page is loading ...
-
 1
1
-
 2
2
-
 3
3
-
 4
4
-
 5
5
-
 6
6
-
 7
7
-
 8
8
-
 9
9
-
 10
10
-
 11
11
-
 12
12
-
 13
13
-
 14
14
-
 15
15
-
 16
16
-
 17
17
-
 18
18
-
 19
19
-
 20
20


Magic Chef CM1N User manual
- Category
- Coffee makers
- Type
- User manual
Ask a question and I''ll find the answer in the document
Finding information in a document is now easier with AI
in other languages
- español: Magic Chef CM1N Manual de usuario
Related papers

Other documents
-
Professional Series PS77651 User manual
-
Bella 12 Cup programmable coffee maker User manual
-
Windmere CM-41A User guide
-
-
Groupe Brandt CG-2006X Owner's manual
-
Sunbeam 3289 User manual
-
-
-
Oster 3265 User manual
-