Page is loading ...

1
Gas Laundry Center
Centro de lavado a gas
Use & Care Guide
Guía de uso y cuidado
English / Español
TM
Model / Modelo: 2671532
P/N 134779000B (0807)
Sears Brands Management Corporation
Hoffman Estates, IL 60179 U.S.A.
www.kenmore.com
www.sears.com
Sears Canada Inc.
Toronto, Ontario, Canada M5B 2C3
www.sears.ca
233D1549P001 49-90423-0 08-11

2
TABLE OF CONTENTS
Sears Brands Management Corporation,
Hoffman Estates, IL 60179
Sears Canada Inc.,
Toronto, Ontario, Canada M5B 2C3
KENMORE APPLIANCE
WARRANTY
© KCD IP, LLC
Kenmore Limited Warranty
When installed, operated and maintained according to all
supplied instructions, if this appliance fails due to a defect in
material and workmanship within one year from the date of
purchase, call 1-800-4-MY-HOME® to arrange for free re-
pair.
If this appliance is ever used for other than private family
purposes, this warranty applies for only 90 days from the
date of purchase.
This warranty covers only defects in material and work-
manship. Sears will NOT pay for:
1. Expendable items that can wear out from normal use, in-
cluding but not limited to filters, belts, light bulbs, and
bags.
2. A service technician to instruct the user in correct product
installation, operation or maintenance.
3. A service technician to clean or maintain this product.
4. Damage to or failure of this product if it is not installed,
operated or maintained according to the all instructions
supplied with the product.
5. Damage to or failure of this product resulting from acci-
dent, abuse, misuse or use for other than its intended pur-
pose.
6. Damage to or failure of this product caused by the use of
detergents, cleaners, chemicals or utensils other than those
recommended in all instructions supplied with the product.
7. Damage to or failure of parts or systems resulting from un-
authorized modifications made to this product.
Disclaimer of implied warranties; limitation of remedies
Customer’s sole and exclusive remedy under this limited war-
ranty shall be product repair as provided herein. Implied
warranties, including warranties of merchantability or fitness
for a particular purpose, are limited to one year or the short-
est period allowed by law. Sears shall not be liable for inci-
dental or consequential damages. Some states and provinces
do not allow the exclusion or limitation of incidental or con-
sequential damages, or limitation on the duration of implied
warranties of merchantability or fitness, so these exclusions
or limitations may not apply to you.
This warranty applies only while this appliance is used in the
United States or Canada.
This warranty gives you specific legal rights, and you may
also have other rights which vary from state to state.
Kenmore Appliance Warranty .................................................... 2
PROTECTION AGREEMENTS ...................................................... 3
Safety Instructions .......................................................................... 4
Operation Instructions
Control Panel Washer .................................................................. 7
Control Settings Washer .............................................................. 7
Features Washer ............................................................................ 9
Loading and Using the Washer ................................................. 10
Care and Cleaning of the Washer ........................................... 10
Control Panel Dryer ...................................................................... 11
Control Settings Dryer .................................................................. 11
Care and Cleaning of the Dryer ................................................ 12
Loading and Using the Dryer ..................................................... 13
Troubleshooting Washer ............................................................. 14
Troubleshooting Dryer ................................................................. 17
Installation instructions ................................................................ 19
Nominal Product Dimensions ..................................................... 21
Installation Sequence
1. Preparing for installation of New Appliance ...................... 22
2. Gas Requirements ................................................................... 22
3. Reconnecting Gas ................................................................... 23
4. Leak Test ................................................................................... 24
5. Electrical Connection Information ........................................ 24
6. Exhaust Information ................................................................ 24
7. Exhaust Connection ................................................................. 25
8. Leveling and Stabilizing Your Appliance ............................ 26
9. Dryer Exhaust To Right, Left Or Bottom Cabinet .............. 27
10. Plumbing Information ........................................................... 28
11. Connecting To Plumbing Facilities ....................................... 28
12. Mobile Or Manufactured Home Installation .................... 29
13. Alcove Or Closet Installation ............................................... 29
14. Bathroom or Bedroom Installation ...................................... 29
15. Servicing .................................................................................. 29
Consumer Support ....................................................... Back Cover

3
PROTECTION AGREEMENTS
Once you purchase the Agreement, a simple phone call is all
that it takes for you to schedule service. You can call anytime
day or night, or schedule a service appointment online.
The Master Protection Agreement is a risk free purchase. If
you cancel for any reason during the product warranty pe-
riod, we will provide a full refund. Or, a prorated refund
anytime after the product warranty period expires. Purchase
your Master Protection Agreement today!
Parts and labor not just for repairing defects, but to help
keep products operating properly under normal use. Our
coverage goes well beyond the product warranty. No
deductibles, no functional failure excluded from cover-
age— real protection.
Expert service by a force of more than 10,000 authorized
Sears service technicians, which means someone you can
trust will be working on your product.
Unlimited service calls and nationwide service, as often
as you want us, whenever you want us.
"No-lemon" guarantee – replacement of your covered
product if four or more product failures occur within
twelve months.
Product replacement if your covered product can’t be
fixed.
Annual Preventive Maintenance Check at your request –
no extra charge.
Fast help by phone – we call it Rapid Resolution – phone
support from a Sears representative on all products. Think
of us as a "talking Use & Care Guide."
Power surge protection against electrical damage due to
power fluctuations.
$250 Food Loss Protection annually for any food spoilage
that is the result of mechanical failure of any covered re-
frigerator or freezer.
Rental reimbursement if repair of your covered product
takes longer than promised.
10% discount off the regular price of any non-covered re-
pair service and related installed parts.
The Master Protection Agreement also helps extend the life
of your new product. Here’s what the Agreement* includes:
Congratulations on making a smart purchase. Your new
Kenmore® product is designed and manufactured for years
of dependable operation. But like all products, it may require
preventive maintenance or repair from time to time. That's
when having a Master Protection Agreement can save you
money and aggravation.
Master Protection Agreements
Sears Installation Service
For Sears professional installation of home appliances, ga-
rage door openers, water heaters, and other major home
items, in the U.S.A. or Canada call 1-800-4-MY-HOME®.
Some limitations and exclusions apply. For prices and addi-
tional information in the U.S.A. call 1-800-827-6655.
* Coverage in Canada varies on some items. For full details
call Sears Canada at 1-800-361-6665.
In the space below, record your complete model number, se-
rial number, and purchase date. You can find this information
on the model and serial number label located on the prod-
uct.
Have this information available to help you obtain assistance
or service more quickly whenever you contact Sears concern-
ing your appliance.
Model number
Serial number
Purchase date
Save these instructions and your sales receipt for future
reference.
PRODUCT RECORD

4
WASHER/DRYER SAFETY
WARNING! For your safety, the information in this Use & Care Guide must be followed to minimize the risk
of fire or explosion, electric shock, or to prevent property damage, personal injury, or death.
WATER HEATER SAFETY
Under certain conditions, hydrogen gas may be produced in
a water heater that has not been used for two weeks or
more. Hydrogen gas can be explosive under these circum-
stances.
If the hot water has not been used for two weeks or more,
prevent the possibility of damage or injury by turning on all
hot water faucets and allowing them to run for several min-
utes. Do this before using any electrical appliance which is
connected to the hot water system. This simple procedure will
allow any built-up hydrogen gas to escape. Since the gas is
flammable, do not smoke or use an open flame or appliance
during this process.
Your safety and the safety of others are very important.
We have provided many important safety messages in this Use & Care Guide and your appliance. Always read and
obey all safety messages.
This is the safety alert symbol.
This symbol alerts you to potential hazards that can kill or hurt you and others.
All safety messages will follow the safety alert symbol and either the word "DANGER" or "WARNING".
These words mean:
You can be killed or seriously injured if you don’t immediately follow instruc-
tions.
DANGER
WARNING
You can be killed or seriously injured if you don’t follow instructions.
All safety messages will tell you what the potential hazard is, tell you how lo reduce the chance of injury, and tell you
what can happen if the instructions are not followed.
- Do not store or use gasoline or other flammable vapors and liquids in the vicinity of this or any other ap-
pliance.
- WHAT TO DO IF YOU SMELL GAS:
• Do not try to light a match, or cigarette, or turn on any gas or electrical appliance.
• Do not touch any electrical switch; do not use any phone in your building.
• Clear the room, building or area of all occupants.
• Immediately call your gas supplier from a neighbor’s phone. Follow the gas supplier’s instructions care-
fully.
• If you cannot reach your gas supplier, call the fire department.
- Installation and service must be performed by a qualified installer, service agency or the gas supplier.

5
PROPER INSTALLATION
This appliance must be properly installed and located in ac-
cordance with the Installation Instructions before it is used.
• Properly ground appliance to conform with all governing
codes and ordinances. Follow details in Installation Instruc-
tions.
• Install or store where it will not be exposed to temperatures
below freezing or exposed to the weather, which could
cause permanent damage and invalidate the warranty.
• Connect to a properly rated, protected and sized power
supply circuit to avoid electrical overload.
• Remove all sharp packing items and dispose of all shipping
materials properly.
Exhaust/Ducting
1. Gas dryers MUST be exhausted to the outside.
2. Use only rigid metal 4” diameter ductwork inside the
dryer cabinet. Use only UL approved rigid metal or flex-
ible metal 4” diameter ductwork for exhausting to the out-
doors. Never use plastic or other combustible, easy-to-
puncture ductwork.
For complete details, follow the Installation Instructions in this
Use & Care Guide.
WARNING!
YOUR LAUNDRY AREA
• Keep the area underneath and around your appliances free
of combustible materials, (lint, paper, rags, etc.), gasoline,
chemicals and other flammable vapors and liquids.
• Keep the floor around your appliances clean and dry to re-
duce the possibility of slipping.
• Keep all laundry aids (such as detergents, bleaches, etc. )
out of the reach of children, preferably in a locked cabinet.
Observe all warnings on container labels to avoid injury.
• Never climb on or stand on this stacked unit Laundry Cen-
ter.
• Do not allow anyone, in particular children, to climb on,
hang from, stand on, play on or in the appliance. Close su-
pervision of children is necessary when the appliance is
used near children.
• Do not store items that may burn or melt (such as clothing,
paper material, plastics or plastic containers, etc.) on top of
the appliance nor hang them from the door.
Note: This appliance is designed so that the washer and
dryer can be operated at the same time.
IMPORTANT SAFETY INFORMATION
READ ALL INSTRUCTIONS BEFORE USING.
WHEN USING YOUR APPLIANCE
• Use this appliance only for its intended purpose as de-
scribed in this Use & Care Guide.
• Do not mix chlorine bleach with ammonia or acids such as
vinegar and/or rust remover. Mixing different chemicals
can produce a toxic gas which may cause death.
• Never attempt to operate this appliance if it is damaged,
malfunctioning, partially disassembled, or has missing or
broken parts, including a damaged cord or plug.
• Never reach into the appliance while it is moving. Before
loading, unloading or adding clothes, wait until the machine
has completely stopped.
• Clean the lint filter before each load to prevent lint accu-
mulation inside the dryer or in the room. DO NOT OPER-
ATE THE DRYER WITHOUT THE LINT FILTER IN PLACE.
• Do not wash or dry articles that have been cleaned in,
washed in, soaked in or spotted with combustible or explo-
sive substances (such as wax, oil, paint, gasoline, degreas-
ers, dry-cleaning solvents, kerosene, etc. ). These substances
give off vapors that may ignite or explode. Do not add
these substances to the wash water. Do not use or place
these substances around the dryer during operation.
• Do not place items exposed to cooking oils in your dryer.
Items contaminated with cooking oils may contribute to a
chemical reaction that could cause a clothes load to catch
fire.
• Any article on which you have used a cleaning solvent or
that contains flammable materials (such as cleaning cloths,
mops, towels used in beauty salons, restaurants or barber
shops, etc.) must not be placed in or near the dryer until
solvents or flammable materials have been removed. There
are many highly flammable items used in homes such as
acetone, denatured alcohol, gasoline, kerosene, some
household cleaners, some spot removers, turpentines, waxes,
wax removers and products containing petroleum distillates.
• The laundry process can reduce the flame retardancy of
fabrics. To avoid such a result, carefully follow the garment
manufacturer’s care instructions.
• Do not dry articles containing rubber, plastic or similar ma-
terials such as padded bras, tennis shoes, galoshes, bath
mats, rugs, bibs, baby pants, plastic bags, pillows, etc. that
may melt or burn. Some rubber materials, when heated,
can under certain circumstances produce fire by spontane-
ous combustion.
• Do not store plastic, paper or clothing that may burn or
melt on top of the dryer during operation.

6
• Garments labeled Dry Away from Heat or Do Not Tumble
Dry (such as life jackets containing Kapok) must not be put
in your dryer. Do not dry fiberglass articles in your dryer.
Skin irritation could result from the remaining particles that
may be picked up by clothing during subsequent dryer
uses.
• To minimize the possibility of electric shock, unplug this ap-
pliance from the power supply or disconnect the appliance
at the household distribution panel by removing the fuse or
switching off the circuit breaker before attempting any
maintenance or cleaning (except the removal and cleaning
of the lint filter).
NOTE: Turning the Cycle Selector knob to an off position or
pressing PAUSE does NOT disconnect the appliance from
the power supply.
• The interior of the machine and the exhaust duct connec-
tion inside the dryer should be cleaned at least once a year
by a qualified technician. See the Loading and Using the
Dryer section.
• If yours is a gas dryer, it is equipped with an automatic
electric ignition and does not have a pilot light. DO NOT
ATTEMPT TO LIGHT WITH A MATCH. Burns may result
from having your hand in the vicinity of the burner when
the automatic ignition turns on.
• You may wish to soften your laundered fabrics or reduce
the static electricity in them by using a dryer-applied fabric
softener or an antistatic conditioner.
• We recommend you use either a fabric softener in the
wash cycle, according to the manufacturer’s instructions for
those products, or try a dryer-added product for which the
manufacturer gives written assurance on the package that
the product can be safely used in a dryer. Service or per-
formance problems caused by use of these products are the
responsibility of the manufacturers of those products and
are not covered under the warranty to this appliance.
WHEN NOT IN USE
• Grasp the plug firmly when disconnecting this appliance to
avoid damage to the cord while pulling. Place the cord
away from traffic areas so it will not be stepped on,
tripped over or subjected to damage.
• Turn off water faucets to relieve pressure on hoses and
valves and to minimize leakage if a break or rupture should
occur. Check the condition of the fill hoses; we recommend
changing the hoses every 5 years.
• Before discarding the appliance, or removing it from ser-
vice, remove the washer and dryer lids to prevent children
from hiding inside.
• Do not attempt to repair or replace any part of this appli-
ance or attempt any servicing unless specifically recom-
mended in this Use & Care Guide or in published user-re-
pair instructions that you understand and have the skills to
carry out.
• Do not tamper with controls.
READ AND FOLLOW THIS SAFETY INFORMATION CAREFULLY.
SAVE THESE INSTRUCTIONS

7
B
A
C
D E
F
Rinse & Spin
Fluff
Touch Up
Detergent
Fabric
Softner
Liquid
Bleach
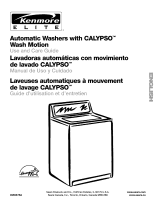
ABOUT THE WASHER CONTROL PANEL
Step 1
• Add detergent
• Add fabric softener (optional)
• Add bleach (optional)
Quick Start Guide
Step 4
• Close lid
• Push START
Step 3
• Select load size and other
wash options
• Select wash cycle
Step 2
• Add clothes
Your washer has a security system that prevents opening the
lid during the spin cycle. The lid lock prevents anyone (espe-
cially children) from reaching into the washer while the bas-
ket is spinning. The lid lock will be released within 5 seconds
after the basket stop spinning. Trying to open the lid while
locked could result in injuries. If the lid does not unlock after
spinning, please contact service.
NOTE: If there is a power outage the lid lock can take 3 min-
utes to release.
Controls
The wash cycle controls the length and intensity of the wash-
ing process. The knob can be turned in either direction. Turn-
ing the Cycle Selector knob after starting a cycle will stop
the washer and reset the cycle to the new selection. Press
START to begin the new cycle selection.
The chart below will help you match the wash cycle setting
with your clothing. The chart is ranked from longest to short-
est cycle time and wash intensity. (Cycles vary by model.)
Lid Lock
Wash Cycle Selector
A
NORMAL - For heavy to lightly soiled cottons, household
linens, work and play clothes.
CASUAL - For wrinkle-free and permanent press items, and
knits.
DELICATES - For lingerie and special-care fabrics with
light to normal soil.
SPIN ONLY - For draining the tub and spinning water out
of clothes.
RINSE & SPIN - Rinses and spins non-soiled items where a
rinse only is desired.
OFF - Washer is turned off and the START button does not
function.
NOTE: When the control is turned to OFF, the STATUS lights
are off.
NOTE: The cycle selector does not rotate during the opera-
tion of the washer.
Set this option when adding fabric softener to the washer.
Fabric Softener
B
LID LOCKED

8
STATUS lights
C
The STATUS lights show the stage the washer is in. When the
selector knob is set to a new cycle, the STATUS lights will
flash momentarily, showing the stages the cycle will go
through.
STATUS light Illuminates
When the fabric softener option has been
selected.
When the washer is in the wash portion
of the cycle.
When the washer is in the rinse portion of
the cycle.
When the washer draining and/or spin-
ning.
When the washer lid is locked. This fea-
ture prevents the lid from being opened
while the washer is in the spin cycle or
coasting to a stop.
ON
WASH
RINSE
SPIN
LID LOCKED
NOTE: If the STATUS lights are blinking, the operation of the
washer has been paused. To resume operation press the
START button (the lid must be closed).
Temperature
D
Load Size
E
START
F
Select the water temperature for the wash and rinse cycles.
Always follow fabric manufacturer’s care label or instructions
when laundering.
Automatic Temperature Control senses the incoming water
temperature and adjusts the fill water to obtain a more pre-
cise temperature range for all wash temperatures. For ex-
ample, in a COLD wash selection, some warm water may be
added to reach a temperature needed to better dissolve de-
tergents. Often, detergents are not completely dissolved in
very cold water, especially in cooler climates.
During winter months, when the water entering your home is
colder, or for locations with very cold water year round, use
the Automatic Temperature Control COLD to help dissolve
powdered detergents and to improve the cleaning of your
clothes.
The TAP COLD feature turns the Automatic Temperature
Control feature on your washer off, and uses your household
tap water temperature for a COLD wash. This can provide
energy savings by reducing the amount of hot water used in
your wash.
Loosely load clothes no higher than the top row of holes in
the washer basket.
AUTO LOAD SENSING- This selection automatically pro-
vides the correct amount of water suited to the size and type
of load placed in the unit.
Press START to begin the cycle. With the lid closed pressing
START again will PAUSE the cycle and STATUS lights will
blink. To continue the cycle, close the lid and press START
again. The water fill will continue with the lid opened, except
when AUTO LOAD SENSING is selected as the load size.
(The lid must be closed to continue filling when AUTO LOAD
SENSING is selected.)
If the lid is opened during the cycle, the cycle will PAUSE
and the STATUS lights will blink. To resume the cycle, close
the lid and press START.
If the machine is paused for more than 24 hours, the cycle
will be cancelled. To stop the cycle, turn the Cycle Selector
to the OFF position.

9
ABOUT THE WASHER FEATURES
The Fabric Softener Dispenser
The fabric softener dispenser automatically releases liquid
fabric softener at the proper time during the cycle.
Do not stop the washer during the first spin. This will cause
the dispenser to empty too soon. To use, follow these steps:
1. Make sure dispenser is securely attached to agitator.
2. Use only diluted liquid fabric softener. Pour into dispenser,
using amount recommended on package.
Never pour fabric softener directly on clothes. It may stain
them.
NOTE: Do not pour bleach into FABRIC SOFTENER dispenser.
3. Add water to dispenser until it reaches the maximum fill
line.
4. Select FABRIC SOFTENER button on control panel for
proper dispersion of the fabric softener.
Do not pour anything
into the agitator if the
dispenser is removed.
Cleaning the Fabric Softener Dispenser
1. Remove the dispenser from the top of the agitator.
2. Separate the dispenser cup from the cover by grasping the
top and pushing down on the inside of the cup with your
fingers. Dispenser cup will pop free from the cover.
Separate for cleaning
3. To clean the dispenser, soak both the dispenser cup and
the dispenser cover in the following solution:
• 1 US gallon (3.8 liters) warm water
• 1/4 cup (60 ml) heavy-duty liquid detergent
• 1 cup (240 ml) bleach
4. If necessary, loosen buildup with a clean, soft cloth after
soaking. Do not use a stiff brush; you may roughen the sur-
face of the dispenser.
5. Rinse and reassemble dispenser. Place dispenser back on
the agitator.
Liquid Bleach Funnel
The water fill dilutes liquid chlorine bleach as the washer fills
for the wash cycle.
1. Check clothing care labels for special instructions.
2. Measure liquid bleach carefully, following instructions on
the bottle.
• Never pour undiluted liquid chlorine bleach directly onto
clothes or into the wash basket.
• Do not pour powdered bleach into bleach funnel.
3 Before starting the washer, pour measured amount of
bleach directly into bleach funnel. Avoid splashing or over-
filling dispenser. If you prefer to use powdered bleach,
add it into the wash basket with your detergent.
• Do not mix chlorine bleach with ammonia or acids such
as vinegar and/or rust remover. Mixing can produce a
toxic gas which may cause death.
NOTE: Do not pour bleach into FABRIC SOFTENER dispenser.

10
LOADING AND USING THE WASHER
Always follow fabric manufacturer’s care label when laundering.
Loading the Washer
Load dry items loosely, no higher than the top row of holes in
the washer basket. When loading wet items, make sure you
set the load/water level high enough to allow the items to
move freely. Water level should just cover the clothes. To
add items after washer has started, lift the lid and submerge
additional items next to the agitator.
• Do not wrap long items like sheets or pants around the
agitator.
• Do not wash fabrics containing flammable materials
(waxes, cleaning fluids, etc.).
• Agitation will not start with the lid up.
Proper Use of Detergent
Add detergent and start the washer before adding clothes so
that the detergent can work effectively. Using too little or too
much detergent is a common cause of laundry problems. You
can use less detergent if you have soft water, a smaller load
or a lightly soiled load.
Sorting Wash Loads
Sort by color (whites, lights, colors), soil level, fabric type
(sturdy cottons, easy care, delicates) and whether the fabric
produces lint (terry cloth, chenille) or collects lint (velveteen,
corduroy).
CARE AND CLEANING OF THE WASHER
Wash Basket: Leave the lid open after washing to allow
moisture to evaporate. If you want to clean the basket, use a
clean soft cloth dampened with liquid detergent; then rinse.
(Do not use harsh or gritty cleaners.)
Fill Hoses: We recommend changing the hoses every 5
years.
Exterior: Immediately wipe off any spills. Wipe with damp
cloth. Try not to hit surface with sharp objects.
Moving and Storage: Ask the service technician to remove
water from drain pump and hoses. See the Installation In-
structions section on how to reinstall the shipping rod to keep
the tub stationary when moving the washer. Do not store the
washer where it will be exposed to the weather.
Long Vacations: Be sure water supply is shut off at faucets.
Drain all water from hoses if weather will be below freezing.

11
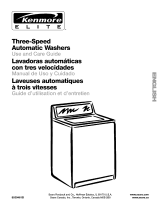
ABOUT THE DRYER CONTROL PANEL
IMPORTANT: Clean the lint filter each time you use the dryer
Fabric Care/Temperature
1
For regular to heavy cottons.
Automatic cycles automatically determine fabric dryness.
Select LESS if you want your clothes slightly damp at the end
of the drying cycle. Select EXTRA if you want them to feel
drier. Timed cycles run for a selected time.
For fluffing items without heat. Use
the TIMED DRY cycle.
For delicates, synthetics and items
labeled tumble dry low.
For synthetics, blends, delicates
and items labeled permanent
press.
Start
2
Drying Cycles
Auto Cycle / Timed Cycle
For automatic sensored drying. The
timer does not rotate during the cycle
until the thermostats sense that the
clothes are dry, then the timer rotates
automatically to OFF.
For manual drying. The timer rotates
during the entire cycle.
AUTO CYCLE
TIMED DRY
Close the dryer door. Press START. Opening the door during
operation will stop the dryer. To restart the dryer, close the
door and select START to complete the cycle.
NORMAL
CASUAL
DELICATES
FLUFF
NORMAL
For removing wrinkles from items that
are clean and dry or that are very
lightly damp.
Touch Up
Set the Cycle Selector at the desired
drying time.
TIMED DRY
For delicate items, special-care fab-
rics and knits.
DELICATES
For wrinkle-free, permanent press
and delicate items, and knits.
CASUAL
For freshening or fluffing up already
dry clothing, fabrics, linens and pil-
lows. Provides 10 minutes of no heat
tumbling.
Fluff
For cottons and most linens. For most
loads, select OPTIMUM Dry.
Note: This appliance is designed so that the washer and dryer can
be operated at the same time.
1
2
Rinse & Spin
Fluff
Touch Up

12
CARE AND CLEANING OF THE DRYER
The Exterior
Wipe or dust any spills or washing compounds with a damp
cloth. Dryer control panel and finishes may be damaged by
some laundry pretreatment soil and stain remover products.
Apply these products away from the dryer. The fabric may
then be washed and dried normally. Damage to your dryer
caused by these products is not covered by your warranty.
The Exhaust Hood
Use a mirror to check that the inside flaps of the hood move
freely when operating. Make sure that there is no wildlife
(birds, insects, etc.) nesting inside the duct or hood.
The Exhaust Duct
Inspect and clean the exhaust ducting at least once a year to
prevent clogging. A partially clogged exhaust can lengthen
the drying time.
Follow these steps:
1. Turn off electrical supply by disconnecting the plug from
the wall socket.
2. Disconnect the duct from the dryer.
3. Vacuum the duct with the hose attachment and reconnect
the duct.
The Lint Filter
Clean the lint filter before each use. Slide out the grid that
covers the filter. Run your fingers across the filter. A waxy
buildup may form on the lint filter from using dryer-added
fabric softener sheets. To remove this buildup, wash the lint
screen in warm, soapy water. Dry thoroughly and replace.
Do not operate the dryer without the lint filter and grid in
place. Have a qualified technician vacuum the lint from the
dryer once a year.
Clean lint from mesh

13
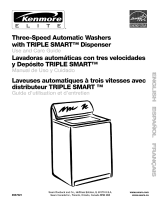
Venting the Dryer
For the best drying performance, the dryer needs to be prop-
erly vented. The dryer will use more energy and run longer if
it is not vented to the specifications below. Carefully follow
the details on Exhausting in the Installation Instructions.
• Use only rigid metal 4” diameter ductwork inside the
dryer cabinet. Use only rigid metal or UL approved flex-
ible metal 4” diameter ductwork for exhausting to the out-
side.
• Do not use plastic or other combustible ductwork.
• Use the shortest length possible.
• Do not crush or collapse ductwork.
• Avoid resting the duct on sharp objects.
• Venting must conform to local building codes.
LOADING AND USING THE DRYER
Correct Venting
Incorrect Venting

14
Troubleshooting Tips
Save time and money! Review the charts on the following pages. You may not need to call for service.
BEFORE YOU CALL FOR SERVICE...
Water
Measure your detergent carefully. Use less soap if you have soft
water, a smaller load or a lightly soiled load.
Too much detergentToo many suds
What to doPossible Causes
Water leaks Use less detergent. Use less soap if you have soft water, a smaller
load or a lightly soiled load.
Using too much detergent
Fill hoses or drain hose is improp-
erly connected
Make sure hose connections are tight at faucets and rubber
washers are installed. Make sure end of drain hose is correctly
inserted in and secured to drain facility.
Household drain may be clogged Check household plumbing. You may need to call a plumber.
Constant water pressure to the fill
hoses at the water source
Tighten hoses at the faucets and turn the water off after each
use. Check condition of the fill hoses; they should be replaced
every 5 years.
Water temperature
seems incorrect
Cooler water temperatures provide
improved energy efficiency
Make sure house water heater is delivering water at 120° F
(48° C).
House water heater is not set prop-
erly
Turn off the water source and remove the water connection hoses
from the upper back of the washer. Use a brush or toothpick to
clean the screens in the machine. Reconnect the hoses and turn
the water back on.
Water valve screens are stopped
up
Turn both hot and cold faucets fully on and make sure hoses are
connected to correct faucets.
Water supply is turned off or im-
properly connected
New laundry detergents have been formulated to work with
cooler water temperatures without affecting wash performance.
Water pumped out
before cycle is
complete
The pump leaves a little water in its intake and this is diluted
with clean rinse water.
This is normalCan hear but not
see water at the
end of the cycle
The washer may pause during the spin cycle to remove soapy
water more efficiently.
This is normalWasher pauses dur-
ing spin cycle
Straighten drain hose and make sure washer is not sitting on it.
Top of drain outlet should be less than 8 ft (2.5 m) above floor.
Drain hose is kinked or improperly
connected
Water won’t drain
Reset cycle.Lid lifted or cycle was put in pause
for over 24 hours

15
Washer Operation What to doPossible Causes
When the machine is manually turned off, the shifter will disengage the
motor before completely shutting down. If lid is raised before the motor
is disengaged, it will resume when lid is closed.
Washer won’t oper-
ate
Washer is unplugged Make sure cord is plugged securely into a working outlet.
Water supply is turned off Turn both hot and cold faucets fully on.
Controls are not set properly Check controls.
Lid is open—safety feature
prevents agitation and spin-
ning when lid is up
Close lid and reset cycle, to the beginning if necessary.
Circuit breaker/fuse is
tripped/blown
Check house circuit breakers/fuses. Replace fuses or reset breaker.
Washer should have separate outlet.
Electronics need to be reset Unplug washer, wait 2 minutes, plug back in and press START.
START was not pressed Press START.
Lid magnet missing Call for service.
Movement inside
machine when shut
off
Shifting mechanism is dis-
engaging the motor
Washer Performance
What to doPossible Causes
Clothes too wet
Sort whites or lightly colored items from dark colorsDye transfer
Check fabric softener package for instructions and follow directions for
using dispenser.
Pretreat stain and rewash.
Incorrect use of fabric soft-
ener
Colored spots
Make sure the spin cycle selected matches the load you are washing.
Some fabrics will feel wetter when rinsed with cold water.
Incorrect spin cycle selected
Grayed or yellowed
clothes
Sort clothes by color. If fabric label states wash separately, unstable
dyes may be indicated.
Dye transfer
Add detergent as wash basket fills with water before you load clothes.Detergent is not dissolving
Select load size to match clothes load.Washer is overloaded
Make sure water heater is delivering water at 120° F (48° C).Water is not hot enough
Use a water conditioner or install a water softener.Hard water
Use more detergent (especially with larger loads). Be sure to follow de-
tergent manufacturer’s directions.
Not enough detergent
Check fabric softener package for instructions and follow directions for
using dispenser.
Lint or residue on
clothes
Clothes are air or line dried If you do not dry your clothes with a clothes dryer, your clothes may re-
tain more lint.
Incorrect sorting Separate lint producers from lint collectors.
Washing too long Wash small loads for a shorter time than larger loads.
Detergent not dissolving Add detergent as wash basket fills with water, before you load clothes.
Try a liquid detergent.
Use warmer water temperature.
Overloading Load clothes no higher than the top row of holes in the washer basket.
Incorrect use of fabric soft-
ener

16
Washer Performance
What to doPossible Causes
Pilling
Rinse items that may have chemicals on them before washing.Chemicals like hair bleach or dye,
permanent wave solution
Check bleach package instructions for proper amount.
Never add undiluted bleach to wash or allow clothes to come in
contact with undiluted bleach.
Undiluted chlorine bleach
Fasten snaps, hooks, buttons and zippers.
Remove loose items like pins, objects in pockets and sharp but-
tons.
Turn knits (which snag easily) inside out.
Pins, snaps, hooks, sharp buttons,
belt buckles, zippers and sharp ob-
jects left in pockets
Snags, holes, tears,
rips or excessive
wear
While this is not caused by the washer, you can slow the pilling
process by washing garments inside out.
Result of normal wear on poly-cot-
ton blends and fuzzy fabrics
Wrinkling
Wash in warm or cold water.Repeated washing in water that is
too hot
Match Cycle selection to the type of fabric you are washing (es-
pecially for easy care loads).
Incorrect wash and dry cycles
Load your washer so clothes have enough room to move freely
with water covering all of the clothes.
Overloading or incorrect water
level
Avoid mixing heavy items (like work clothes) with light items (like
blouses).
Try a fabric softener.
Improper sorting
Washer Sounds What to doPossible Causes
The relay makes a click sound when activated. The water level ac-
tivates the relay and stops filling.
Relay switch"Click" when water stops
filling
At the end of agitate, the motor makes short agitation strokes to
redistribute the load.
Clothing redistributionQuick short agitation
sounds at end of agitate
This machine has a drive system that doesn’t use gears. This sound
is the motor rotating back and forth to agitate your laundry.
Electric motor reversing di-
rection
Back and forth "swoosh"
or light "clicking" sound
during agitate
The drive system will engage at the start of agitate and disengage
when agitate is complete. This occurs multiple times during the
wash.
Shifter mechanism is en-
gaging or disengaging
"Metallic clicking"
When the pump starts drawing in air, It starts to gurgle. The
washer should then begin spinning and the sound will continue until
it is done spinning.
"Clicking" behind Control
Panel during fill
Automatic Temperature
Control Valve
This valve mixes in cold and hot water. The "clicking" is the valve
turning on and off. Water volume changes during fill Automatic
Temperature Control Valve This valve mixes in cold and hot water.
The sound changes when the valves are turned on and off.
Motor "whining up" or
"coasting down" in spin
Motor ramping up/down
during spin cycle
The motor will speed up incrementally during the spin cycle. When
spin is complete, it will coast until it stops.
"Humming" Water drain pump The drain pump will make a humming sound when pumping out
water after agitation stops and continue until spin is complete.
"Gurgling" Water drain pump

17
Dryer Problem What to doPossible Causes
Check the house fuse/circuit breaker box and replace fuse or re-
set breaker. Note: Most electric dryers use 2 fuses/breakers.
Fuse is blown/circuit breaker is
tripped
Make sure the dryer plug is pushed completely into the outlet.Dryer is unpluggedDryer doesn’t start
Make sure gas shutoff at dryer and main shutoff are fully open.Gas service is off
Check the house fuse/circuit breaker box and replace both fuses
or reset both breakers. Your dryer may tumble if only one fuse is
blown or one breaker tripped.
Fuse is blown/circuit breaker is
tripped; the dryer may tumble but
not heat
Dryer doesn’t heat
Sometimes stains which cannot be seen when the clothes are wet
appear after drying. Use proper washing procedures before dry-
ing.
Clothes were not completely clean
Use your dryer to dry only clean items. Dirty items can stain
clean items and the dryer.
Drying dirty items with clean ones
Follow directions on fabric softener package.Improper use of fabric softenerGreasy spots on
clothes
Move dryer to an even floor space, or adjust leveling legs as
necessary until even.
Some shaking/noise is normal.
Dryer may be sitting unevenly
Dryer shakes or
makes noise
Lint on clothes
Empty all pockets before laundering clothes.Paper, tissue, etc. left in pockets
Separate large loads into smaller ones.Overloading
See suggestions in this section under STATIC.Static electricity can attract lint
Sort lint producers (like chenille) from lint collectors (like cordu-
roy).
Improper sorting
Clean lint screen before each load.Lint filter is full
Automatic drying times will vary according to the type of heat
used (electric, natural or LP gas), size of load, types of fabrics,
wetness of clothes and condition of exhaust ducts.
Type of heatInconsistent drying
times
Try a fabric softener.Synthetics, permanent press and
blends can cause static
Try a fabric softener.
Adjust setting to LESS (dry).
Overdrying
Try a fabric softener.
Some fabric conditioner dryer sheets can be used in accordance
with the manufacturer’s instructions.
No fabric softener was usedStatic occurs

18
Dryer Problem What to doPossible Causes
If you are drying only one or two items, add a few items to en-
sure proper tumbling.
Underloading
Do not put more than one washer load in the dryer at a time.Overloading/combining loads
Replace fuses or reset circuit breakers. Since most dryers use 2
fuses/breakers, make sure both are operating.
Blown fuses or tripped circuit
breaker
Check installation instructions for proper ducting/venting.
Make sure ducting is clean, free of kinks and unobstructed.
Check to see if outside wall damper operates easily.
Check the Installation Instructions to make sure the dryer venting
is correct.
Improper or obstructed ducting
Clean lint filter before every load.Lint filter is full
Match control settings to the load you are drying.Controls improperly set
Large, heavy fabrics contain more moisture and take longer to
dry. Separate large, heavy fabrics into smaller loads to speed
drying time.
Large loads of heavy fabrics (like
beach towels)
Separate heavy items from lightweight items (generally, a well-
sorted washer load is a well-sorted dryer load).
Improper sortingClothes take too
long to dry
Separate large loads into smaller ones.Overloading
Remove items when cycle ends and fold or hang immediately.Letting items sit in dryer after cycle
ends
Select a shorter drying time.
Remove items while they still hold a slight amount of moisture.
Select LESS dry setting.
OverdryingClothes are
wrinkled
To avoid shrinkage, follow garment care labels exactly.
Some items may be pressed back into shape after drying
If you are concerned about shrinkage in a particular item, do not
machine wash or tumble dry it.
Some fabrics will naturally shrink
when washed. Others can be
safely washed, but will shrink in the
dryer
Clothes shrink

19
INSTALLATION INSTRUCTIONS
BEFORE YOU BEGIN
Read these instructions completely and carefully.
• IMPORTANT- Save these instructions for local inspector’s
use.
• IMPORTANT- Observe all governing codes and ordinances.
• Note to Installer - Be sure to leave these instructions with
the customer.
• Note to Customer - Keep these instructions for future refer-
ence.
• Before the appliance is removed from service or discarded,
remove the washer and dryer door.
• Inspect the dryer exhaust outlet and straighten the outlet
walls if they are bent.
• Service information and the wiring diagram are located at
the access panel.
• Do not allow children on or in the appliance. Close supervi-
sion of children is necessary when the appliance is used
near children.
• Install the appliance where the temperature is above 50° F
(10° C) for satisfactory operation of the dryer control sys-
tem.
Tools You Will Need
WARNING RISK OF FIRE
• To reduce the risk of severe injury or death, follow all installation
instructions.
• Appliance installation must be performed by a qualified in-
staller.
• Install the appliance according to these instructions and in ac-
cordance with local codes. In the absence of local codes, instal-
lation must comply with National Fuel Gas Code, ANSIZ223.1/
NFPA 54 or the Canadian Natural Gas and Propane Installation
Code, CSA B149.1.
• California Safe Drinking Water and Toxic Enforcement Act. This
act requires the governor of California to publish a list of sub-
stances known to the state to cause cancer, birth defects or
other reproductive harm and requires businesses to warn cus-
tomers of potential exposure to such substances. Gas appliances
can cause minor exposure to four of these substances, namely
benzene, carbon monoxide, formaldehyde and soot, caused pri-
marily by the incomplete combustion of natural gas or LP fuels.
Properly adjusted dryers will minimize incomplete combustion.
Exposure to these substances can be minimized further by prop-
erly venting the dryer to the outdoors.
• This appliance must be exhausted to the outdoors.
• Use only 4" rigid metal ducting for exhausting the appliance to
the outdoors.
• DO NOT install a clothes dryer with flexible plastic ducting ma-
terials. If flexible metal (semi-rigid or foil-type) duct is installed,
it must be UL listed and installed in accordance with the instruc-
tions found in the section "Connecting The Dryer To House Vent"
on this Use & Care Guide. Flexible venting materials are known
to collapse, be easily crushed, and trap lint. These conditions will
obstruct dryer airflow and increase the risk of fire.
• Do not install or store this appliance in any location where it
could be exposed to water and or weather.
• Save these instructions. (Installers: Be sure to leave these instruc-
tions with the customer).
Materials You Will Need
Parts Supplied
1 Cable Tie
2 Washer Hoses
2 Rubber Washers
(washers may be
in water hoses)
2 Stainer Screens/
Ruber Washers
In the state of Massachusetts, installation must be per-
formed by a qualifiedor licensed contractor, plumber, or
gasfitter qualified or licensed by the state.
• When using ball type gas shut-off valves, they should be
T-handle type.
• A flexible gas connector, when used, must not exceed 3
feet.
10 Adjustable Wrenches (2)
Level
8 Pipe Wrench
Slip Joint Pliers
Flat Blade Screwdriver1/4 Nutdriver
4 Dia. Metal Duct
(Recommended)
4 Dia. Flexible Metal (Semi-Rigid)
UL Listed Transition Duct
(If Needed)
Kit WX08X10077 (Includes 2 Elbows)
4 Dia. Flexible Metal (Foil Type)
UL Listed Transition Duct
(If Needed)
4 Cover Plate (If Needed)
(Kit WE1M454)
Duct Tape Gloves
Safety Glasses
Exhaust Hood
4 Diam. Metal
Elbow
4 Duct Clamps (2)
or
4 Spring Clamps (2)
Flexible Gas Line Connector
Pipe Compound
Soap Solution For
Leak Detection

20
Installation requirements location
This appliance must be installed on firm flooring to minimize
vibration during spin cycle. Concrete flooring is best, but
wood base is sufficient, provided floor support meets FHA
standards. This appliance should not be installed on rugs or
exposed to weather.
Plumbing
WATER PRESSURE - Must be 20 psi minimum to 120 psi
maximum.
WATER TEMPERATURE - Household water heater should be
set to deliver water at 120 °F (50 °C) IN THE WASHER when
hot wash is selected.
SHUTOFF VALVES - Both hot and cold shutoff valves (fau-
cets) should be supplied.
DRAIN - Water may be drained into standpipe or set tub.
Discharge height MUST NOT BE LESS THAN 30 INCHES,
and no more than 8 feet above the base of the washer.
Standpipe must be 1-1/2 inches minimum inside diameter
and must be open to atmosphere.
Electrical requirements
CAUTION: Before plugging in washer, read the following
electrical requirements.
CAUTION: For personal safety, do not use an extension cord
or adapter plug with this appliance. Do not, under any cir-
cumstances, cut or remove the third grounding prong from
the power cord. Follow national electrical codes and ordi-
nances. This appliance must be supplied with the voltage and
frequency indicated on the rating plate (located at the top
of the dryer front panel), and connected to an individual,
properly grounded branch circuit, protected by a 15- or 20-
amp circuit breaker or time-delay fuse. If the electric supply
provided does not meet the above requirements, call a li-
censed electrician.
Step 1 Verify Your Gas Installation (see section 2).
Step 2 Prepare the Area and Exhaust for Installation of ap-
pliance (see section 1).
Step 3 Check and Insure the Existing External Exhaust is
Clean (see section 1) and Meets Attached Installation
Specifications (see section 6).
Step 4 Remove the Foam Shipping Pads (see section 1).
Step 5 Move the appliance to the Desired Location.
Step 6 Level your appliance (see section 8).
Step 7 Connect the Gas Supply (see section 3) and check for
leaks (see section 4).
Step 8 Connect the External Exhaust (see section 7).
Step 9 Connect to plumbing facilities (see section 11).
Step 10 Connect the Power Supply (see section 5).
Step 11 Check the Operation of the Power Supply, Gas Con-
nections, and Venting.
Step 12 Place the Use & Care Guide in a Location Where
They Will Be Noticed By the Owner.
For Alcove or Closet Installation see section 13.
For Bathroom or Bedroom Installation see section 14.
For Mobile or Manufactured Home see section 12.
Installation Sequence
/