Page is loading ...
Copyright © 2001Applica Consumer Products, Inc.
Pub. No. 177275-00-RV00
Printed in People’s Republic of China
Impreso en la República Popular China
Imprimé en République populaire de Chine
*
is a trademark of The Black & Decker Corporation, Towson, Maryland, USA
*Marca registrada de
The Black & Decker Corporation,
Towson, Maryland, E.U.
*Marque de commerce déposée de la société
The Black & Decker Corporation,
Towson, Maryland, É.-U.
36
FULL ONE-YEAR WARRANTY
Applica warrants this product against any defects that are due to faulty material or workmanship
for a one-year period after the original date of consumer purchase. This warranty does not
include damage to the product resulting from accident, misuse, or repairs performed by
unauthorized personnel. If the product should become defective within the warranty period, or
you have questions regarding warranty or service, call Consumer Assistance and Information toll
free at: 1-800-231-9786.
This warranty gives you specific legal rights and you may also have other rights which vary from
state to state or province to province.
Applica Consumer Products, Inc.
Product may vary slightly from what is illustrated.
El producto puede variar ligeramente del ilustrado.
Le produit peut différer légèrement de celui illustré.
UN AÑO COMPLETO DE GARANTIA (Este párrafo no se aplica a E.U.A. ni a Canadá)
Applica garantiza este producto contra cualquier defecto originado por fallas en los materiales o
en la mano de obra por un período de un año a partir de la fecha original de compra. Esta
garantía no es válida cuando: a) el producto se utilice en condiciones distintas a las normales, b)
el producto no se opere de acuerdo con el instructivo de uso que le acompaña, c) el producto
sea alterado o reparado por personas no autorizadas. Si el producto resulta con defectos dentro
del período de garantía, lo repararemos o reemplazaremos según sea necesario, sin costo
alguno. Para que esta garantía sea válida debe presentar el producto con su recibo de compra
y/o la tarjeta de registro correspondiente. Esta garantía le otorga derechos específicos, y usted
podría tener otros que pueden variar en su país. Si tiene alguna pregunta, comuníquese con una
sucursal o centro de servicio más cercano autorizado por Black & Decker.
Nota: Usted podrá encontrar partes, componentes, consumibles y accesorios en los centros de
servicio autorizados. Esta garantía incluye los gastos de transportación que se deriven de su
cumplimiento dentro de su red de servicio.
GARANTIE COMPLÈTE DE UN AN
Applica garantit le produit pour un an à compter de la date d’achat, contre tout vice de matière
ou de fabrication. La garantie ne couvre pas les dommages causés par un accident, une
mauvaise utilisation ou des réparations effectuées par des personnes non autorisées. Advenant
le fonctionnement irrégulier du produit dans les délais prescrits, ou pour toute question relative à
la garantie ou au service, communiquer sans frais avec le service à la clientèle au numéro
suivant : 1 800 231-9786.
Les modalités de la présente garantie donnent des droits légaux spécifiques. L’utilisateur peut
également se prévaloir d’autres droits selon l’état ou la province qu’il habite.
Séries SK200-SK300 Series
READ AND SAVE THIS USE AND CARE BOOK
POR FAVOR LEA ESTE INSTRUCTIVO ANTES DE USAR EL PRODUCTO
LIRE ET CONSERVER CE GUIDE D’ENTRETIEN ET D’UTILISATION
*
?
U.S.A./CANADA 1-800-231-9786
MEXICO 01-800-714-2499
http://www.applicaconsumerproductsinc.com
Multi-Cuisine
™
& Deep Dutch
™
Electric Skillets (English, page 2)
Sartenes eléctricos (Español, página 12)
Poêles à frire électriques (Français, à la page 24)
1250W 120V 60 Hz
1250W 220V 50/60 Hz
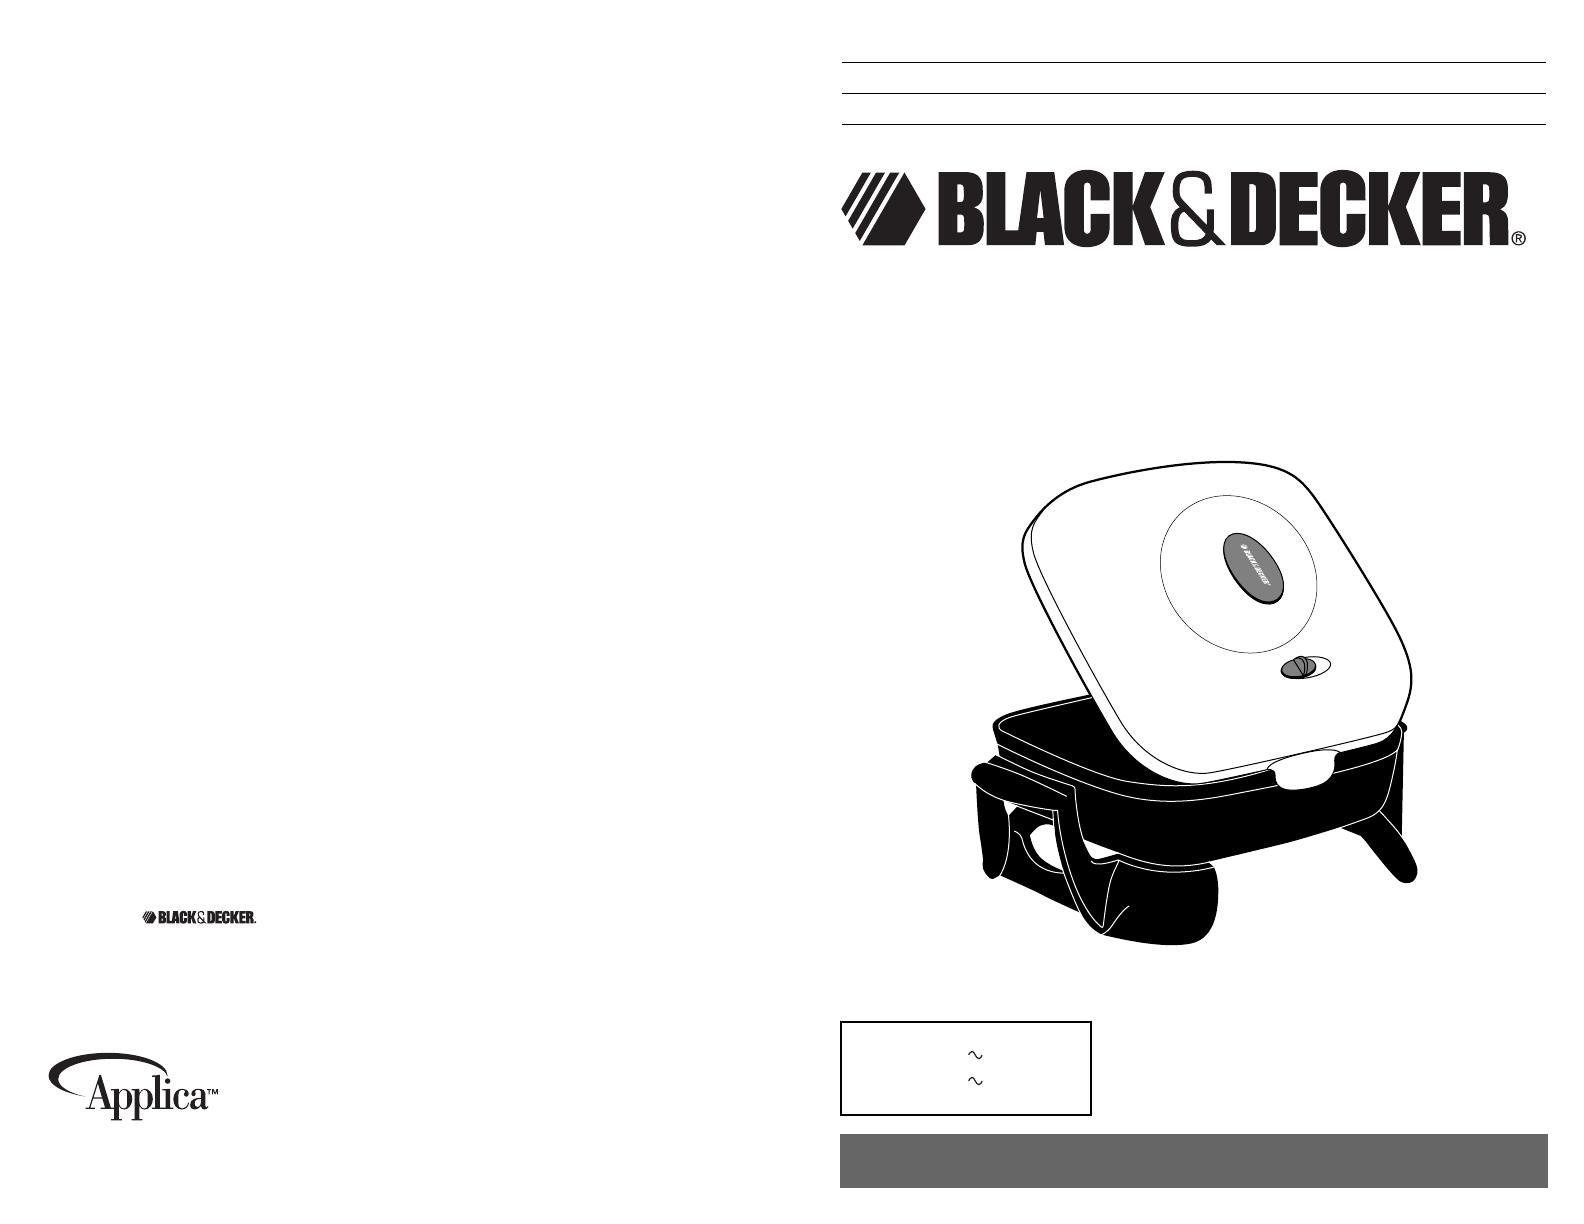
3
Skillet Pan
Lid
Lid Handle
Vent
Probe
Temperature Control/
Signal Light
Handles
GROUNDED PLUG (120V Models Only)
As a safety feature, this product is equipped with a grounded plug, which will only fit
into a three-prong outlet. Do not attempt to defeat this safety feature. Improper
connection of the grounding conductor may result in the risk of electric shock. Consult
a qualified electrician if you are in doubt as to whether the outlet is properly grounded.
SPECIAL ATTENTION:
The use of an extension cord is not recommended. However, if it is absolutely
necessary, be sure that the cord is (1) No. 14 AWG minimum size and rated no less than
1875 watts; (2) UL Listed; (3) as short as possible (long cords can overheat, as well as
trip circuit breakers); (4) not used for operating more than one appliance at a time.
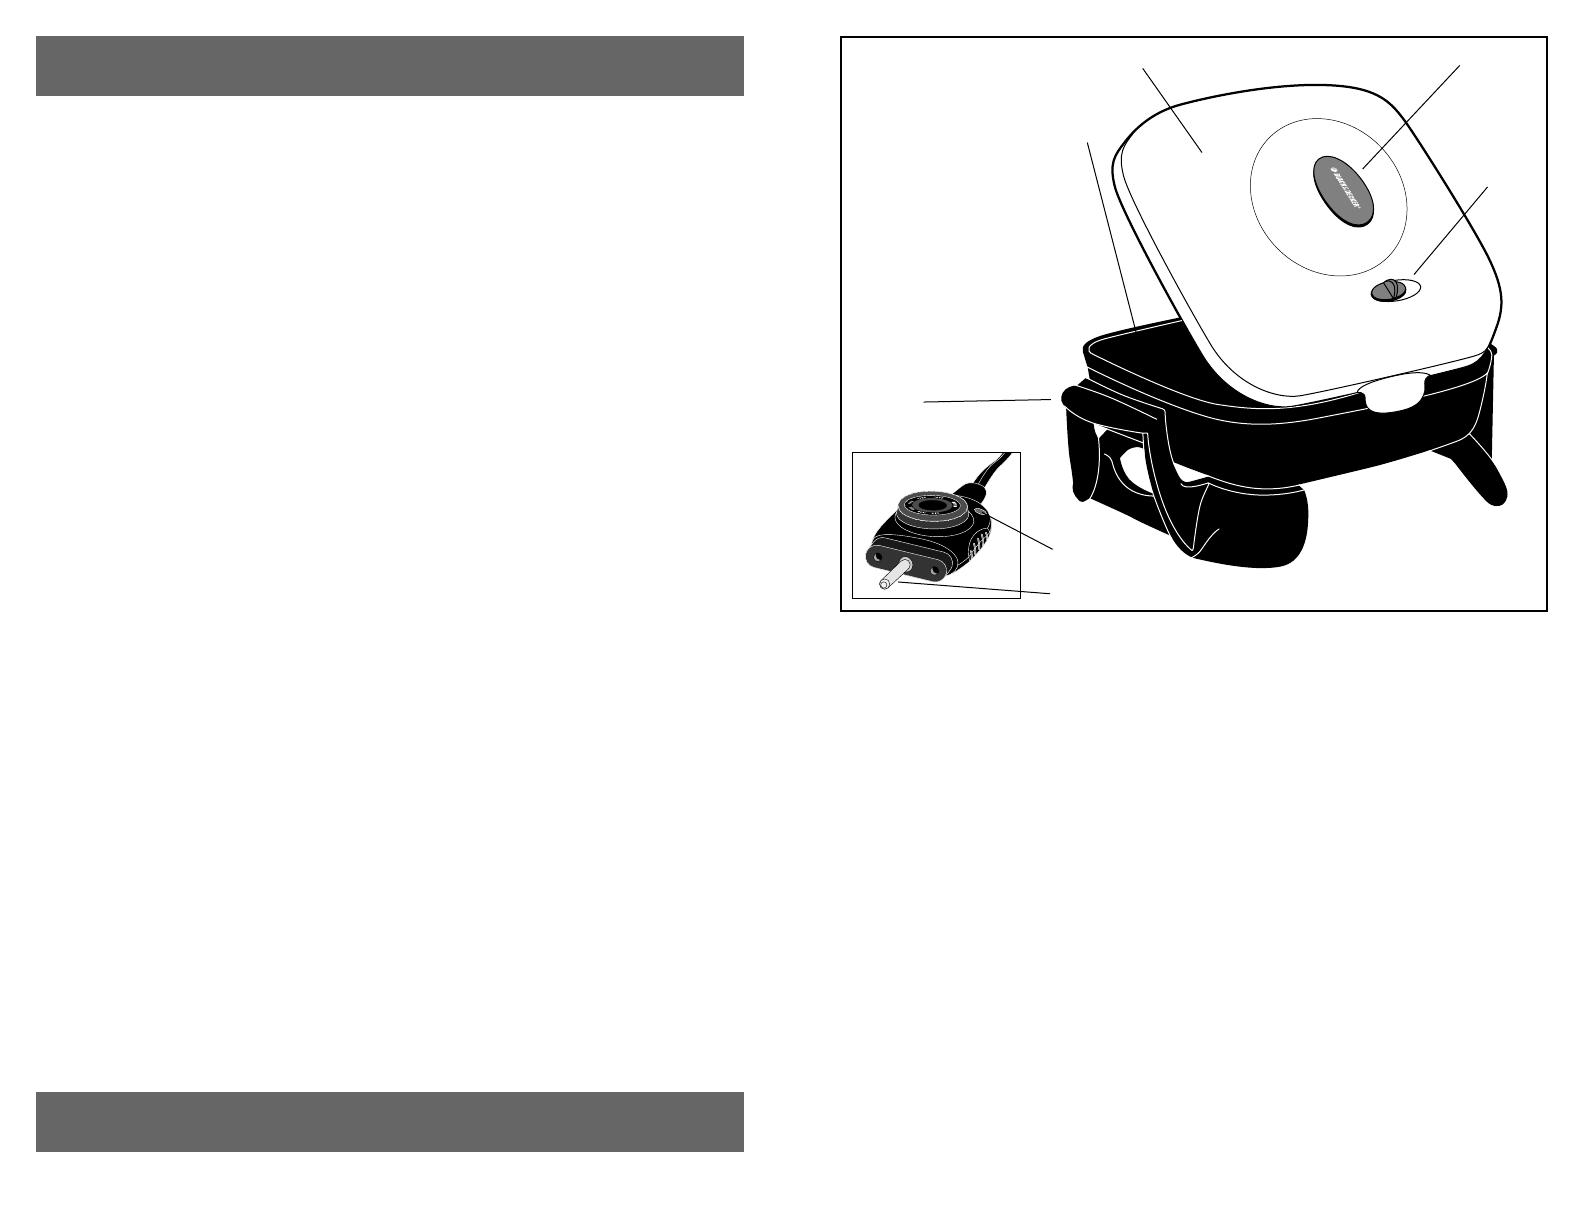
ASSEMBLE BEFORE FIRST USE
1. Place the Skillet Pan upside down on a table or counter and remove the screws. Be
sure the metal washers remain in place over the holes.
2. Position each Handle overhanging the edge of the counter for easier assembly so
that the holes in the Handles line up with the holes in the raised “mounting” area on
the bottom of the Skillet Pan.
NOTE: For models with the Tilt-Leg Feature, decide which side of the Pan you would
like to have raised (see “Tilt-Leg Feature”). We recommend installing the handle with
the tilt-leg on the control side so that juices will flow to the opposite end for easier
basting; however, you may choose either side.
3. Use the screws to secure the Handles to the Skillet Pan. DO NOT OVER-TIGHTEN as it
may crack the Handles. Turn the Skillet Pan back over and place it on a flat, level
surface to be sure the Handles and Feet sit level.
2
IMPORTANT SAFEGUARDS
SAVE THESE INSTRUCTIONS
When using electrical appliances, basic safety precautions should always be
followed including the following:
■ Read all instructions.
■ Do not touch hot surfaces. Use handles or knobs.
■ To protect against electric shock, do not spill on or immerse cord, plug, or
Temperature Control in water or other liquids.
■ Close supervision is necessary when any appliance is used by or near
children.
■ Unplug from outlet when not in use and before cleaning. Allow to cool before
putting on or taking off parts.
■ Do not operate any appliance with a damaged cord or plug or after the
appliance malfunctions or is dropped or damaged in any manner. Return the
appliance to the nearest authorized service facility for examination, repair, or
electrical or mechanical adjustment. Or, call the appropriate toll-free number
listed on the cover of this manual.
■ The use of accessory attachments not recommended by the appliance
manufacturer may cause injuries.
■ Do not use outdoors.
■ Do not let cord hang over edge of table or counter where it can be
accidentally pulled or touch hot surfaces.
■ Do not place on or near a hot gas or electric burner or in a heated oven.
■ Use extreme caution when moving an appliance containing hot oil or other
hot liquids.
■ Always attach Temperature Control to the Skillet first, then plug the cord into
the wall outlet. To disconnect, turn the Control to “Off,” then remove the plug
from the wall outlet.
■ Do not use the Skillet for other than intended use.
■ When oil is heated to a high temperature in any vessel, flammable gases are
given off. Do not expose a flame to these gases as they could ignite and
cause a fire hazard. Do not operate in the presence of explosive and/or
flammable fumes.
■ To avoid eruption, burns and fire hazards, never cover the Skillet when
heating oil.
■ This appliance is intended for household use only, not for commercial or
industrial use. Use for anything other than intended will void the warranty.
5
Tilt-Lid Feature
The Lid is designed with an extended piece
featuring slots that fit onto the back or sides of
the Skillet Pan body to position the Lid at an angle
(B). Use this feature as a convenient rest position
for the Lid when you are sautéing, stirring, or
turning food. In the tilted position, splatters and
condensation will drip back down into the Pan.
Carefully lift the Lid up to remove it from the Pan
edge when done for easy placement on the Skillet.
Lid Vent
The Skillet Lid has a built-in Vent. Slide the Vent open to
allow for escaping steam when crisping or browning (C).
CAUTION: Be careful if adjusting the Vent when the Skillet is
on to avoid escaping steam and potential burns..
Tilt-Leg Feature (Certain Models Only)
The Tilt-Leg raises one side of the
Skillet slightly so that oils, fats, or other
liquids will drain to the opposite side
as they collect. This feature is great for
pan broiling and basting foods while
cooking. To use, pull the Leg straight
down so that it stands under the
handle. (D) Be careful not to pull too
far. CAUTION: Be careful not to push
down on or strain the Tilt-Leg.
Cleaning
1. Unplug the cord, remove the Temperature Control by pulling it straight out, and allow
the Skillet Pan to cool completely before cleaning. CAUTION: The Control may be
warm after long use so be careful when removing it. WHEN THE TEMPERATURE
CONTROL HAS BEEN REMOVED, the Pan and Lid can be completely immersed in
soapy water or placed in a dishwasher. The Lid is dishwasher-safe — TOP RACK
ONLY. Over time and use, the Lid may discolor: this is normal.
2. If washing by hand, use a sponge or nylon pad with liquid detergent. Do not use any
abrasive cleaners, coarse cleansers, or metal pads as they may damage the non-
stick coated surface. After washing, dry the Pan thoroughly giving special attention to
the Socket area. Do no use metal pads to clean electrical pins.
4
How To Use
“Conditioning” The Pan
IMPORTANT: Before first use, remove the Control and wash the Skillet Pan and Lid in
soapy water; dry thoroughly. To preserve the non-stick coating, condition the Pan by
spreading a light coating of cooking oil over the inside surfaces. Wipe away excess oil
with a paper towel. Do not use non-stick cooking spray to condition. You will not have to
re-condition again after first use.
NOTE: Only use the Temperature Control provided with this Skillet. Other controls may
fit but will not provide proper performance.
1. Set the Temperature Control to “Off” and
push the Probe firmly into the socket on the
Skillet Pan (A). Be sure the Control is
securely inserted. Always attach the
Control to the Pan FIRST before plugging
into an outlet.
2. Preheat the Skillet Pan before adding any
grease or vegetable oil unless the recipe
says to add fats first. Some foods do not
require Skillet preheating. Use the charts
and recipes in this book as a guide for
procedures. To preheat the Skillet, turn the
Temperature Control Knob to the
recommended setting. When the Signal Light goes out, the Skillet is preheated.
During cooking, the Signal Light will cycle on and off indicating that the temperature
selected is being maintained.
3. Some recipes call for simmering which means to cook foods in liquid just below the
boiling point. The simmer point varies depending on the type of liquid and amount of
food. To simmer, bring the food or liquid to a boil by turning the Temperature Control
Knob to around 350°F (177°C). When the liquid begins to boil, slowly turn the Control
Knob back until the Signal Light goes out. Cover and simmer for the length of time
necessary. The Light will cycle on and off frequently to maintain the simmer
temperature.
4. While the handles and base “feet” are heat-resistant, do not cook on heat-sensitive
surfaces. Once cooking is complete, you can remove the Control to bring the Skillet
Pan to a table for easy serving. To remove, be sure the Control is unplugged and set
at Off. Using a pot holder or mitt, hold the Skillet with one hand and the pull the
Temperature Control out from the Pan with the other.
NOTE: Some counter and table surfaces are sensitive to heat. Take care to avoid
damaging linoleum, vinyl tile, painted or varnished surfaces. Heat-resistant formica
and porcelain enamel surfaces are not affected providing the underside of the pan is
clean. When in doubt, use a heat- resistant pad or hot plate under the Skillet.
5. Use plastic, rubber, non-stick coated, or wood utensils when cooking and serving. If
using metal utensils, take care not to dig into the non-stick finish. Do not cut food on
the surface using a knife to avoid scratching the non-stick coating.
6. To prevent accidental burning, use pot holders when touching the Lid and lift it only
by the top handle. Use pot holders and extreme caution when moving the Skillet if it
contains hot liquids.
A
B
D
C
NOTE:
If the power supply cord is damaged, it must be replaced by the manufacturer
or its service agent or a similarly qualified person in order to avoid a hazard.
Need Help?
For service, repair, or any questions regarding your appliance, call the appropriate
“800” number on the cover of this book. Do NOT return the product to the place of
purchase. Do NOT mail the product back to the manufacturer nor bring it to a service
center. You may also want to consult the website listed on the cover of this manual.

76
General Temperature Ranges
Warm Setting
Used to keep foods that have been prepared in the Skillet at serving temperature for a
short period of time. Adjust temperature up to keep foods warm for longer periods of time.
Low Heat – 200°F to 250°F (93°C – 121°C)
Use for warming, simmering, steaming, and gentle boiling. Some foods are started at
higher temperatures then reduced to low heat to finish the cooking process. Use for
cooking special dessert sauces, such as Cherries Jubilee, and puddings.
Medium Heat — 250°F to 325°F (121°C – 163°C)
Use for eggs, bacon, and sausage, or to sauté vegetables such as onions, green pepper,
or mushrooms. Also to cook roasts and other cuts of meat after they have been
browned at higher temperatures.
High Heat — 325°F to 400°F (163°C – 204°C)
Use to brown, sear, pan fry (with fat), deep fry, and pan broil meats without fat and to
stir fry meats and vegetables (with fat). Breaded foods such as vegetables, meats, fish,
and poultry are pan fried in this temperature range with a small quantity of fat.
PAN FRYING AND COOKING
Approx. Approx.
Food Preheat Temp Time/Mins. Directions
BACON
Regular Slices, No 325°F 10-12 Place in COLD Skillet. Separate slices
up to 8 163°C when positioned in Pan. Turn as
necessary. Drain on toweling.
CHICKEN
3
1
⁄2-4
1
⁄2 pounds Yes 400°F 20 Dredge chicken pieces in mixture of
1.59 kg-2.04 kg 204°C
1
⁄2 cup flour, 2 tsp. salt, 1 tsp. paprika,
Cut-up Brown
1
⁄4 tsp. pepper. Spray Skillet with
Broiler-Fryer non-stick cooking spray. Preheat at
325°F 30-40 400°F (204°C). Brown chicken, meaty
163°C side first, turning once, for about
Finish 20 mins. Reduce temperature to 325°F
(163°C); cover, with vent open, and cook
30-40 mins. or until chicken is tender.
Turn occasionally during cooking.
EGGS
Fried, up to 5 Yes 275°F 4-6 Melt 1 tbsp. fat in Skillet and spread over
135°C surface; fry eggs until done. Turn as
desired.
Approx. Approx.
Food Preheat Temp Time/Mins. Directions
EGGS, cont’d.
Scrambled, Yes 250°F 4-6 Melt 1 tbsp. fat and spread over surface.
Mixture of 4 eggs 121°C For 4 eggs, beat thoroughly with
1
⁄4 cup
milk,
1
⁄4 tsp. salt, dash pepper. When
mixture begins to set, stir bottom and
sides until eggs are cooked to suit
personal taste.
FISH FILLETS
1 pound, 1/4” thick Yes 375°F 5-8 Dip fish in mixture of 1 beaten egg and
.45 kg/.64 cm fillets 191°C 1 tbsp. milk, then in 1 cup seasoned
bread crumbs. Add 2 tbsp. oil to
preheated Skillet. Fry fillets until golden
brown on both sides.
FRANKFURTERS
10/package No 325°F 12 -14 Place in COLD Skillet. Turn carefully to
163°C avoid breaking skin; turn often until
browned on all sides.
FRENCH TOAST
Up to 5 slices Yes 350°F 2-4 Beat 2 eggs thoroughly with 2 tbsp.
177°C melted butter or margarine, 2 tbsp. milk
and
1
⁄4 tsp. salt. Dip bread slices in
mixture, turning so both sides are coated.
Lightly grease preheated Skillet. Add
bread, brown on one side; then the other.
HAM
Precooked Slice Yes 325°F 5-8 Slash fat edge at 2” (5 cm) intervals to
1
⁄2” (1.27cm) tp 163°C prevent curling. Fry ham on both sides
3
⁄4” (1.91cm) thick until lightly browned. Turn frequently.
HAMBURGERS
1
⁄4 lb. (.11kg) each, Yes 350°F 12-15 med Add patties to preheated Skillet. Brown
1
⁄2” (1.27cm) thick, 177°C 16 -20 well on both sides, turning occasionally.
up to 6 done
PANCAKES,
Up to 4 Yes 350°F 2-4 Prepare your favorite pancake recipe.
177°C Lightly grease preheated Skillet with
vegetable oil if recipe does not contain
fat. For each pancake, use about
1
⁄4 cup
batter. Turn when bubbles appear on top
surface and edges look dry. Brown on
other side.
PORK CHOPS,
With Bone, Yes 350°F 10 Trim off fatty edges. Brown chops,
Up to 6, 177°C turning occasionally. Reduce
1
⁄2” (1.27cm) to Brown temperature to 250°F (121°C). Cover and
3
⁄4” (1.91 cm) thick 250°F 15-25 and cook until well done, but not dry.
121°C
Finish
POTATOES,
1
1
⁄2-2 lbs. (.68-.90 kg) Yes 350°F 25-30 Place in 2-3 tablespoons hot bacon fat or
(about 3 large) 177°C vegetable oil. Cook and brown, turning
1
⁄8” (.32 cm) thick slices frequently.
SANDWICHES
Grilled, Up to 5 No 350°F 6-8 Spread cheese or other favorite filling
177°C between bread slices. Lightly spread
softened butter or margarine on outside
of bread; place in COLD Skillet. Grill each
side until browned, about 3-4 minutes/side.
Cooking Guides
The cooking temperatures and times in the GUIDES are approximate. You may have to
adjust them depending on food size, quantity, temperature, and personal taste. Foods at
room temperature need less cooking time than foods taken from the refrigerator. You
might need to reduce the temperature/time for small quantities of food. Choose one of
the following for grease or fat, depending on personal preference: butter, margarine, oil,
shortening, drippings.

9
3. Dry excess moisture from foods with paper towels before frying. If foods are frozen,
remove large ice crystals. This reduces oil spattering.
4. Add food to hot oil carefully to prevent spatter. Do not overfill Pan.
5. Do not use plastic utensils in hot cooking oil — they will melt.
6. Use a good quality vegetable oil for frying. Do not use butter, bacon fat, lard,
margarine, or olive oil since these fats tend to smoke and/or burn easily.
7. To help keep the oil from dropping below proper frying temperature, add food to oil in
small batches and wait 3-5 minutes before frying additional batches.
8. Use the foods below as a guide. If frying other foods, experiment to find the best cooking
time.
9. Allow fried foods to drain on paper toweling before serving.
Approx. Approx.
Food Temp Frying Time Directions
CHICKEN TENDERS
1 lbs. (.45kg) 400°F 8-10 mins. Add 1 quart vegetable oil (946ml) to Skillet.
(about 8) 204°C Preheat at 400°F (204°C). until light goes out.
Mix together 1 beaten egg and 1 tbsp. milk. Dip
tenders into egg mixture, then in 1 cup
seasoned bread crumbs. Add to Skillet. Cook,
turning frequently.
FISH FILLETS
About 1
3
⁄4 lbs. 400°F 13-15 mins. Add 1 quart vegetable oil (946ml) to Skillet.
(.78kg) , 204°C Preheat at 400°F (204°C). until light goes out.
1” (2.54cm) thick Mix together 1 beaten egg and 1 tbsp. milk. Dip
cut into serving fillets into egg mixture, then in
3
⁄4-1 cup
pieces seasoned bread crumbs. Add to Skillet.
Cook, turning about every 5 mins. Handle fillets
gently to prevent breakage.
ONION RINGS
2 medium onions, 400°F 2 mins. Add 1 quart vegetable oil (946ml) to Skillet.
1
⁄4”(.64cm) thick 204°C Preheat at 400°F (204°C) until light goes out.
slices separated Make batter by adding
1
⁄2 cup all-purpose flour,
into rings
1
⁄2 tsp. baking powder,
1
⁄4 tsp. parsley,
1
⁄4 tsp. salt,
and dash pepper to mixing bowl. Stir in 1 beaten
egg and
1
⁄3 cup milk. Toss onion rings in batter.
Add about 15-20 rings to hot oil. Turn after 1 min.
Repeat with remaining rings.
8
Approx. Approx.
Food Preheat Temp Time/Mins. Directions
SAUSAGE
Links or patties, No 325°F 15-25 Place in COLD Skillet; turn carefully and
Up to 12 links, or 163°C often until golden brown and well done,
5 patties but not dry. Links take slightly longer
than patties.
STEAK
Cube, Up to 5, Yes 350°F 3-8 Slash edges to prevent curling if
1
⁄2” (1.27cm) thick 177°C necessary. Add steaks and cook to
Sandwich, Up to 8, desired doneness. Thicker steaks take
1
⁄4”(.64 cm) thick slightly longer.
ROASTING
Because of variations in Skillets and cuts of meat and poultry, it is important to use a meat
thermometer when roasting to accurately determine internal temperature. Insert
thermometer into the thickest piece of meat or poultry, making sure it does not touch a
bone or any part of the Skillet and roast according to the temperature on the thermometer.
Approx. Approx.
Food Temp Roasting Time Directions
BEEF POT ROAST
Boneless Rump or 400°F 30 mins. browning Preheat Skillet at 400°F (204°C). Brown meat
Bottom Round – 204°C time on all sides. Drain accumulated fat from Skillet.
About 4 lbs. Brown Reduce temperature to 300°F (154°C). Cover,
(2.27kg) 300°F 40-45 mins./lb.(kg) with vent closed. Cook, turning every
1
⁄2 hour,
154°C cooking time until meat is tender. Save drippings for gravy
Roast if desired. For less crisp exterior, add
1
⁄2 cup
water to Skillet as needed.
CHICKEN 375°F 25 mins. Preheat Skillet to 375°F (191°C). Brown
1 or 2 Broiler- 191°C browning time chicken on all sides. Reduce temperature to
Fryer, Brown 300°F (154°C). Drain off accumulated fat, if
About 4 lbs. each 300°F 1:00-1:15 hours desired. Cover Skillet, with vent open. Halfway
(2.27kg) 154°C cooking time through cooking period, turn chicken and
Roast roast until well done.
PORK ROAST
Boneless Pork 400°F 15 min. Preheat Skillet at 400°F (204°C); brown roast
Loin, About 3 lbs. 204°C browning time on all sides. Reduce temperature to 300°F
(1.36kg) Brown (154°C). Drain off accumulated fat. Position
300°F 1:00–1:15 hours roast fat side down in Skillet. Cover, with vent
154°C cooking time open. Turn about every
1
⁄2 hour during cooking.
Roast Roast well done.
DEEP FRYING GUIDE
Use about 1 quart vegetable oil (946 ml) in the Skillet for deep frying. (This is the
maximum amount of oil that should be used for deep fat frying.) Turn the Temperature
Control to the highest setting with vegetable oil in the Skillet. Do not add food until the
Signal Light goes out.
CAUTION: When oil is heated to a high temperature, flammable gases are given off. Do
not expose a flame to these gases as they could ignite and cause a fire hazard. To
avoid eruption, burns, and fire hazards, never cover the Skillet when heating oil.
Additional deep frying tips:
1. Food should be uniform in size.
2. Whenever possible, let refrigerated foods stand at room temperature for 30 minutes
before frying. For frozen foods, remove from freezer just before frying.
Recipes
FLAVORFUL PORK TENDERLOINS WITH FENNEL
2 pork tenderloins, about 2 fennel bulbs, sliced into
1 pound (.45 g) each, trimmed 1-inch (2.5 cm) pieces
Salt and pepper to taste 2 shallots, chopped
1 tablespoon butter 6 tablespoons balsamic vinegar
1 tablespoon olive oil 1 tablespoon chopped fresh sage
1. Preheat Skillet at 400°F (204°C). Season pork with salt and pepper to taste.
2. Add butter and oil to preheated Skillet, spreading over surface.
3. Brown pork on all sides, about 12 minutes. Transfer to a platter.
4. Add fennel and shallots; sauté until tender and golden, about 10 minutes, stirring often.
5. Add vinegar and sage. Stir into fennel mixture. Return pork to Skillet. Bring to a boil, cover, with
vent closed, and reduce heat to a simmer. Cook until well done, about 25-30 minutes longer.
6. Slice pork into
1
⁄2-inch (1.27 cm) medallions, and serve with fennel mixture.
Makes: 4-6 servings.

1110
VEGETABLE BEEF TERIYAKI
1
1
⁄
2
pounds (.68 kg) top round London broil, 10 oz. (280g) fresh mushrooms, sliced
thinly sliced 1 can (8 oz./240ml) sliced water chestnuts,
1
⁄
2
cup soy sauce drained
1
⁄
3
cup lemon juice
1
⁄
2
pound (.23kg) fresh snow peas
2 tablespoons brown sugar 1 tablespoon cornstarch
1 tablespoon vegetable oil 2 tablespoons water
1. Add meat slices, soy sauce, lemon juice and brown sugar to a large plastic bag. Close securely
and mix contents thoroughly. Allow to marinate at least 30 minutes or overnight (in refrigerator).
2. Preheat Skillet at 350°F (177°C). Add vegetable oil, and spread over surface of pan.
3. Add meat mixture to Skillet. Stir-fry until lightly browned, about 3-4 minutes. Add mushrooms,
water chestnuts and snow peas. Stir into meat mixture.
4. Cover, with vent open, and cook 3-4 minutes, stirring occasionally.
5. In measuring cup, combine cornstarch with water. Reduce heat to medium, push food to one
side, and add cornstarch mixture. Stir constantly until liquid thickens slightly. Then stir into beef
mixture.
6. Serve over hot rice, if desired.
Makes: 6 servings.
CHEESY CHICKEN TOSTADOS
Non-stick cooking spray 2 cups shredded Cheddar cheese
1
⁄
2
cup frozen chopped onion 4 flour tortillas, oven browned
1 can (4.5 oz/126g) chopped green chilies Sour cream
1 can (10 oz/280g) premium chunk chicken Ready-to-serve greens
breast, broken up Salsa, favorite kind
1 can (14.5 oz/435ml) beef or chicken broth Ready-made guacamole
1. Spray Skillet with non-stick cooking spray, and preheat at 350°F.
2. Add onions to Skillet and sauté to brown lightly.
3. Stir in chopped chilies; reduce heat to 250°F (121°C). Add chicken and broth. Bring to a boil,
reduce heat to a simmer. Cover, with vent closed, and simmer for 10-15 minutes.
4. Reduce heat to low and stir in cheese. Stir until cheese has melted and mixture is blended.
5. To serve, place toasted tortilla on plate. Top with
1
⁄2 cup chicken mixture, spreading to edges of
tortilla. Add desired toppings prior to serving, or pass them at the table.
6. Repeat with remaining tortillas and chicken mixture.
Makes: 4 servings.
EL PASO CHICKEN PILAF
Non-stick cooking spray 2 cups frozen corn kernels
1 can (14.5 oz/435ml) chicken broth 1 can (15.5 oz/434g) black beans,
1 package (6.09 oz/170 g) rice pilaf mix drained and rinsed
1-1
1
⁄
2
teaspoons cumin 1 can (14.5 oz/406g) seasoned
1
⁄
4
-
1
⁄
2
teaspoon red pepper flakes diced tomatoes
2 cups cooked chicken strips, cut into
1
⁄
2
cup chopped fresh tomato
1-inch (2.5 cm) chunks
1
⁄
3
cup water
1. Spray Skillet with non-stick cooking spray, and preheat at 350°F (177°C).
2. Add chicken broth to Skillet, and bring to a boil. Stir in rice pilaf mix, rice seasoning packet,
cumin and red pepper flakes. Bring to a boil; cover, with vent closed, and reduce heat to a
simmer.
3. Simmer for about 15-20 minutes.
4. Stir in remaining ingredients. Cover, with vent closed, and bring to a boil. Reduce heat to a
simmer. Cook about 10 minutes, or until rice is done and pilaf is heated.
5. Serve topped with shredded Cheddar cheese, if desired.
Makes: About 6 servings.
PINEAPPLE UPSIDE-DOWN CAKE
1 package (18.5 oz/518g) yellow cake mix 1 cup packed light brown sugar
1
1
⁄
3
cups water 1 can (19 oz/532g) pineapple slices,
1
⁄
3
cup vegetable oil well drained
3 eggs 8 maraschino cherries, halved and drained
6 tablespoons butter or margarine
1
⁄
4
cup chopped nuts
1. Prepare cake mix according to package directions.
2. While mixing cake batter, preheat Skillet to 275°F (135°C). Melt butter or margarine in Skillet.
Add brown sugar, stirring until dissolved. Spread evenly over bottom of Skillet.
3. Arrange pineapple slices over sugar mixture. Decorate with cherries and nuts.
4. Spread batter uniformly over pineapple. Cover Skillet, with vent open. Bake 18-22 minutes or
until toothpick inserted in center comes out clean.
5. Carefully remove Lid from Skillet to prevent condensed moisture from dropping onto cake.
Using a spatula, loosen cake from sides of Skillet. Immediately invert Skillet on a serving plate.
Leave it a few moments and then lift off. Serve cake warm or cold with whipped cream or ice
cream, if desired.
Makes: 16 servings.
The following 2 recipes are for the Deep Dutch™ Skillet (SK300) Model Only
HEARTY GROUND BEEF AND CABBAGE SOUP
1 pound (.45 kg) lean ground beef 2 cans (14
1
⁄
2
oz./435ml each) beef broth
1 teaspoon ready-to-use minced garlic 1 cup small shell pasta, uncooked
1 package (14 oz./420ml) ready-to-use, 1 teaspoon mixed herbs
shredded coleslaw 1 teaspoon Worcestershire sauce
1 can (46 fluid oz./1380 ml) tomato juice
1. Preheat Deep Dutch™ at 350°F (177°C).
2. Add ground beef and garlic to Deep Dutch Skillet; cook until meat is browned. Drain any fat
from Deep Dutch Skillet.
3. Add coleslaw; reduce heat to 300°F (154°C) and cook until cabbage is crisp-tender, about 5
minutes.
4. Add tomato juice, beef broth, pasta, mixed herbs and Worcestershire sauce to Deep Dutch
Skillet. Bring to a boil, reduce heat to simmer and cook covered, with vent closed, for 20-25
minutes, or until pasta is done.
5. Stir once or twice during cooking.
Makes: 6 servings.
TASTY VEGETARIAN CHILI
2 cans (28 oz./840ml each) whole tomatoes, 2 cans (4.5 oz./126g each) chopped
undrained green chilies
1 can (19 oz./532g) red kidney beans, 1 cup frozen corn kernels
rinsed and drained 2 tablespoons chili powder
1 can (19 oz./532g) white kidney beans, 2 teaspoons ground cumin
rinsed and drained 1 teaspoon salt
1 can (19 oz./532g) black beans, 1 can (6 oz./168 g) tomato paste
rinsed and drained
1. Preheat Deep Dutch™ Skillet at 350°F (177°C).
2. Add all ingredients to Deep Dutch Skillet, except tomato paste. Bring to a boil. Reduce heat to a
simmer, and cook for 30 minutes.
3. Add tomato paste and simmer for another 30 minutes, stirring occasionally.
Makes: About 8 servings.
/