Page is loading ...

User Manual
Digital Countertop
Oven
Manual de Instrucciones Horno Digital para
Mostrador
P.N. 154625
Visit us at www.oster.com
MODEL/MODELO
TSSTTVDFL1
It’s what we’re made of.
For over 100 years, the Oster
®
brand has been defining innovation, power and durability.
Some say our line of uniquely designed and built appliances last forever. The Oster
®
Designed for Life Series is the next generation of innovative products that are
professionally designed, timelessly styled and backed by legendary performance.

English-2
IMPORTANT SAFEGUARDS
When using electrical appliances, basic safety precautions should always
be followed, including the following:
READ AND SAVE THESE
INSTRUCTIONS
• READALLINSTRUCTIONS,PRODUCTLABELSANDWARNINGS
BEFOREUSINGTHECOUNTERTOPOVEN.
• Donottouchhotsurfaces.Alwaysuseovenmittswhenhandlinghotmaterials
andallowmetalpartstocoolbeforecleaning.Alwaysusetheovenhandles
when moving the unit.
• Whentheunitisnotinuseandbeforecleaning,pressthe“Start/Cancel”
buttonandremovethecountertopovenfromthepoweroutlet.Allowtheunit
to cool thoroughly before putting in or taking off parts.
• Toprotectagainstriskofelectricalshock,donotimmersethecord,plug,or
appliance in water or any other liquids.
• Closesupervisionisalwaysnecessarywhenthisoranyapplianceisusednear
children. This appliance is not for use by children.
• Donotoperatethisoranyappliancewithafrayedordamagedcordorplug
or after the appliance malfunctions or is dropped or has been damaged in
anymanner.ReturnthecountertopoventothenearestAuthorizedSunbeam
ApplianceServiceCenterforexamination,repairorelectricalormechanical
adjustment.
• Donotuseattachmentsnotrecommendedbythemanufacturer;theymay
cause fire, electric shock or personal injury.
• Donotuseoutdoorsorforcommercialpurposes.
• Donotusethisapplianceforotherthanitsintendeduse.
• Donotletthecorddangleovertheedgeofatabletoporcountertoportouch
hot surfaces.
• Donotplacetheappliancenearahotgasorelectricburnerorinaheated
oven.
• Extremecautionshouldbeusedwhenusingcontainersconstructedofmaterial
other than metal or glass.
• Afiremayoccurifthecountertopoveniscoveredortouchingflammable
materials, including curtains, draperies, walls, etc., when in operation. Do not
store any items on top of the appliance when in operation.
• Whenusingcountertopoven,pulltheunitoutaminimumof6inchesaway
from the wall or other cords.

English-3
• Donotstoreanymaterials,otherthanmanufacturer’srecommended
accessories, in this unit when not in use.
• Donotplaceanyflammablematerialsinoven,suchaspaper,cardboard,
plastic or any materials that may catch fire or melt.
• Donotcovertheoventrayorrackwithmetalfoil.Thiswillcauseoverheating
of the appliance.
• Oversizedfoodsormetalutensilsmustnotbeinsertedintheapplianceasthey
may create a fire or risk of electrical shock.
• Donotcleanwithmetalscouringpads.Piecescanbreakoffthepadandtouch
electrical parts involving a risk of electrical shock.
• Useextremecautionwhenremovingpanordisposingofhotgreaseorother
hot liquids.
• Toturnthisapplianceoff,pressthe“Start/Cancel”buttonandremovecord
fromoutlet.TheLCDwillturnoffafter30secondsofinactivity.
This Unit Is for Household Use Only
Short Power Supply Cord Instructions
Ashortpower-supplycordisprovidedtoreducetheriskresultingfrom
becomingentangledinortrippingoveralongercord.Anextensioncord
maybeusedifcareisexercisedinitsuse.Ifanextensioncordisused,the
electrical rating of the cord must be at least as great as the electrical rating
of the appliance. The extension cord should be arranged so that it will not
drape over the countertop or tabletop where it can be pulled on by children
or tripped over unintentionally.
For Products Purchased in the United States and Canada Only
Toreducetheriskofelectricalshock,thisappliancehasapolarizedplug(one
bladeiswiderthantheother).Thisplugfitsapolarizedoutletonlyoneway;
iftheplugdoesnotfitfullyintotheoutlet,reversetheplug.Ifitstilldoesnot
fit, contact a qualified electrician.
Do not attempt to defeatthis safety feature.
SAVE THESE INSTRUCTIONS

English-4
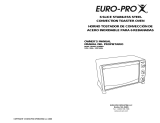
Product diagram
1. LCD Display
2. Function Selector Knob – Select cooking function by turning knob
to desired setting.
3. Start/Cancel Button – Press this button to turn the appliance off.
4. Turbo Convection Heat Button –Usetoactivateorcancel
turbo convection heat.
5. Time Control Knob –Adjustthedialtothedesiredtime
6. Temperature Control Knob –Adjustthedialthermostattodesiredtemperature.
7. Removable Wire Rack –See“PositioningRack”section.
8. Tempered Glass Door – For front viewing of food.
9. Two Rack Positions
10. Removable Crumb Tray – For crumb or fallen food particles collection.
Pulls out for easy cleaning.
11. Baking Pan/Cookie Sheet in One and Broil Rack –Useforallyourbaking
needs, broiling and grilling needs.
12. Easy Clean Interior Walls –Allowsfastcleanup.
1
9
11
5
6
2
4
10
7 8
12
3

English-5
a c
f
b
d
e
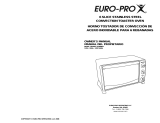
LCD Display
a. Functions Indicator –Toast,Bagel,Pizza,Bake,Broil,
Cookies,Roast,Warm,Defrost,Reheat
b. Function Indicator Arrow
c. 1-7 color shade setting indicator
d. Time Indicator
e. Turbo Convection Heat Icon
f. Temperature Indicator
Preparing Your Toaster Oven
Ifyouareusingyourtoasterovenforthefirsttime,please:
•Removeanystickersfromthesurfaceoftheoven.
•Openovendoorandremoveallprinteddocumentsandpaperfrom
inside the toaster oven.
•Cleantherackandpanwithhotwater,asmallamountofdishwashing
liquid and a nonabrasive sponge or cleaning pad.
DONOTIMMERSETHECORD,PLUGORBODYOFTHEUNIT
INWATER.
•Drytheunitthoroughlybeforeusing.
•Selectalocationforthetoasteroven.Thelocationshouldbeinanopen
area on a flat counter where the plug will reach an outlet.
•Plugthetoasterovenintoanelectricaloutlet.

English-6
using Your toaster oven (see Fig. 1)
Plug the unit in. The unit will emit two long
“beeps”andtheLCDscreenwillilluminate.The
function option will appear with an indicator on
thepresetTOASTfunction.TheLCDandthe
Start/Cancelbuttonlightwillbeilluminatedfor
30 seconds and then go out if no other buttons or
knobs are pressed or moved.
PLEASE NOTE: oncetheblueLCDdisplaygoes
out – you can press or move any button or knob to
“wakeup”thedisplayandoperateasnormal.
Step 1. Select Function
Turn the Function Knob to choose one of
thefollowing10optionsfromthemenu:
Toast,Bagel,Pizza,Bake,Broil,Cookies,
Roast,Warm,DefrostandReheat.The
indicator arrow will move from function to
function as the knob is turned.
NOTE:Ifthecookingprocessisnotstartedorno
further button is pressed or knob is turned
within 30 seconds the blue backlight and
theStart/CancelButtonLightwillturnoff.
Step 2. Time:
Turn the time knob to increase or decrease
the cooking time. The maximum time
setting is 60 minutes.
Step 3. Temperature:
Turn the temperature knob to increase or
decrease the temperature setting.
Figure 1

English-7
using the toast Function (see Fig. 2)
Step 1. Turn the Function Knob to the Toast
function.WhenyouselecttheToastfunction,
the 1-7 color shade setting indicator will
becomevisibleontheLCD.Bothupperand
lower heating elements will heat.
DefaultColorShadeSettingis4.Thiswill
be the default every time the Toaster Oven
isunpluggedandpluggedbackin.Ifthe
Toaster Oven remains plugged in since
the last time you have selected a different
shadefortheToastfunction(evenifnot
activated), the unit will remember the last
shade setting you selected.
NOTE: The top rack position is recommended for
toasting.
The temperature is not adjustable for
the Toast function. The time adjusts
automatically with shade adjustment.
The temperature or time is not adjustable
during the Toast function.
Step 2. To adjust the shade color:
Turn the Time Knob to adjust the shade color.
The color shade-setting indicator will show
your selection as you turn the knob.
Step 3. To Start:
PresstheStart/CancelButtontostartthe
toastingprocess.TheredStart/Cancel
Buttonlightwillilluminate.TheLCD
Display will show the Toast Function, the
shade color selection and the countdown
time. The unit will begin to operate and the
timer will start counting down.
WhentheToastingiscomplete,theunit
willemit3beeps.TheLCDandtheStart/
CancelButtonLightwillturnoffafter30
seconds.
Figure 2
NOTE:YoucancancelthetoastingcycleatanytimebypressingtheStart/Cancel
Buttononce.TheredStart/CancelButtonlightwillturnoffwhenevera
function has been completed or a function is manually cancelled.

English-8
using the Bagel Function (see Fig. 3)
Step 1. TurntheFunctionKnobtotheBagelfunction.
WhenyouselecttheBagelfunction,the1-7
color shade setting indicator will become visible
ontheLCD.Theupperandlowerheating
elementswillheat.DefaultColorShadeSetting
is 4. This will be the default every time the
Toaster Oven is unplugged and plugged back
on.IftheToasterOvenremainsplugged-in
since the last time you have selected a
differentshadefortheBagelfunction(evenif
not activated), the unit will remember the last
shade setting you selected.
NOTE: The top rack position is recommended for bagel
toasting. For best results toast bagel with cut
side up.
The temperature is not adjustable for the
Bagelfunction.Thetimeadjustsautomatically
with shade adjustment. The temperature
ortimeisnotadjustableduringtheBagel
function.
Step 2. To adjust the shade color:
Turn the Time Knob to adjust the shade color.
The color shade-setting indicator will show your
selection as you turn the knob.
Step 3. To Start:
PresstheStart/CancelButtontostartthe
bageltoastingprocess.TheredStart/Cancel
Buttonlightwillilluminate.TheLCDDisplay
willshowtheBagelFunction,theshadecolor
selection and the countdown time. The unit
will begin to work and the timer will start
counting down.
WhentheBageltoastingiscomplete,theunit
willemit3beeps.TheLCDandtheStart/
CancelButtonLightwillturnoffafter30
seconds.
Figure 3
NOTE:Youcancancelthebageltoastingcycleatanytimebypressingthe
Start/CancelButtononce.TheredStart/CancelButtonlightwillturn
off whenever a function has been completed or a function is manually
cancelled.

English-9
using the Pizza/ turBo convection heat
Function (see Fig. 4)
Step 1. TurntheFunctionKnobtothePizza
function.WhenyouselectthePizza
function,theTurboConvectionHeatwill
automatically activate.
Step 2. IfyouwishtoswitchtotheregularPizza
function, press the Turbo button once to
turnofftheTurboConvectionHeatdefault
selection. The blue light of the Turbo
ConvectionHeatbuttonwillturnoff.
TheTurboConvectionHeatFunctionturns
on a built-in fan that circulates hot air in
the oven chamber, cooking your food faster
and more evenly.
Default Temperature: 400ºF.
Default Time: 16 minutes.
Step 3. To set the temperature:
Turn the Temperature Knob if you wish to
increase or decrease the temperature setting.
ForthePizzaFunction,thetemperature
can be set from 350 to 450ºF in 25-degree
increments.
Step 4. To set the time:
Turn the Time Knob if you wish to
increase or decrease the cooking time.
ThemaximumtimesettingforPizzais60
minutes(1hour).Onceyouhaveselected
the desired cooking time, press the Start
button to initiate the cooking process.
Step 5. To Start:
PresstheStart/CancelButtontostartthe
cookingprocess.TheredStart/Cancel
Buttonlightwillilluminate.TheLCD
DisplaywillshowthePizzaFunction,
the countdown time and the selected
temperature. The unit will begin to work
and the timer will start counting down.
Figure 4

English-10English-10
WhenthePizzafunctioncycleiscomplete,
theunitwillemit3beeps.TheLCDandthe
Start/CancelButtonLightwillturnoffafter
30 seconds.
NOTE:Youcancancelthecookingcycleatany
timebypressingtheStart/CancelButton
once.TheredStart/CancelButtonlight
will turn off whenever a function has
been completed or a function is manually
cancelled.
using the Bake/ turBo convection heat
Function (see Fig. 5)
Step 1. TurntheFunctionKnobtotheBake
function.WhenyouselecttheBake
function,theTurboConvectionHeatwill
automatically activate.
Step 2. IfyouwishtoswitchtotheregularBake
function, press the Turbo button once to
turnofftheTurboConvectionHeat.The
bluelightoftheTurboConvectionHeat
button will turn off.
TheTurboConvectionHeatFunctionturns
on a built-in fan that circulates hot air in
the oven chamber, cooking your food faster
and more evenly.
Default Temperature: 325ºF.
Default Time: 30 minutes.
Step 3. To set the temperature:
Turn the Temperature Knob if you wish to
increase or decrease the temperature setting.
FortheBakeFunction,thetemperature
can be set from 150 to 450ºF in 5-degree
increments.
Figure 5

English-11
Step 4. To set the time:
Turn the Time Knob if you wish to
increase or decrease the cooking time.
ThemaximumtimesettingforBakeis60
minutes(1hour).Onceyouhaveselected
the desired cooking time, press the Start
button to initiate the cooking process.
Step 5. To Start:
PresstheStart/CancelButtontostartthe
cookingprocess.TheredStart/Cancel
Buttonlightwillilluminate.TheLCD
DisplaywillshowtheBakeFunction,
the countdown time and the selected
temperature. The unit will begin to work
and the timer will start counting down.
WhentheBakingcycleiscomplete,theunit
willemit3beeps.TheLCDandtheStart/
CancelButtonLightwillturnoffafter30
seconds.
NOTE:Youcancancelthecookingcycleatany
timebypressingtheStart/CancelButton
once.TheredStart/CancelButtonlight
will turn off whenever a function has
been completed or a function is manually
cancelled.
Figure 5

English-12
using the Broil Function (see Fig. 6)
Step 1. TurntheFunctionKnobtotheBroil
function.WhenyouselecttheBroilfunction,
the upper heating elements will heat.
Default Temperature: 450ºF.
Default Time: 10 minutes.
Step 2. To set the temperature:
Turn the Temperature Knob if you wish to
increase or decrease the temperature setting.
FortheBroilFunction,thetemperature
can be set from 400 to 450ºF in 25-degree
increments.
Step 3. To set the time:
Turn the Time Knob if you wish to
increase or decrease the cooking time.
ThemaximumtimesettingforBroilis60
minutes(1hour).Onceyouhaveselected
the desired cooking time, press the Start
button to initiate the cooking process.
Step 4. To Start:
PresstheStart/CancelButtontostartthe
broilingprocess.TheredStart/Cancel
Buttonlightwillilluminate.TheLCD
DisplaywillshowtheBroilFunction,
the countdown time and the selected
temperature. The unit will begin to work
and the timer will start counting down.
WhentheBroilingcycleiscomplete,the
unitwillemit3beeps.TheLCDandthe
Start/CancelButtonLightwillturnoffafter
30 seconds.
NOTE:Youcancancelthebroilingcycleatany
timebypressingtheStart/CancelButton
once.TheredStart/CancelButtonlight
will turn off whenever a function has
been completed or a function is manually
cancelled.
Figure 6

English-13
using the cookies/turBo convection heat
Function (see Fig. 7)
Step 1. TurntheFunctionKnobtotheCookies
function.WhenyouselecttheCookies
function,theTurboConvectionHeatwill
automatically activate.
Step 2. IfyouwishtousetheregularCookies
function, press Turbo button once to turn
offtheTurboConvectionHeat.Theblue
lightoftheTurboConvectionHeatbutton
will turn off.
TheTurboConvectionHeatFunctionturns
on a built-in fan that circulates hot air in
the oven chamber, cooking your food faster
and more evenly.
Default Temperature: 350ºF.
Default Time: 11 minutes.
Step 3. To set the temperature:
Turn the Temperature Knob if you wish to
increase or decrease the temperature setting.
FortheCookiesFunction,thetemperature
can be set from 150 to 450ºF in 5-degree
increments.
Step 4. To set the time:
Turn the Time Knob if you wish to
increase or decrease the cooking time. The
maximumtimesettingforCookiesis60
minutes(1hour).Onceyouhaveselected
the desired cooking time, press the Start
button to initiate the cooking process.
Figure 7

English-14
Step 5. To Start:
PresstheStart/CancelButtontostartthe
cookingprocess.TheredStart/Cancel
Buttonlightwillilluminate.TheLCD
DisplaywillshowtheCookiesFunction,
the countdown time and the selected
temperature. The unit will begin to work
and the timer will start counting down.
WhentheCookiesfunctioncycleis
complete, the unit will emit 3 beeps. The
LCDandtheStart/CancelButtonLightwill
turn off after 30 seconds.
NOTE:Youcancancelthecookingcycleatany
timebypressingtheStart/CancelButton
once.TheredStart/CancelButtonlight
will turn off whenever a function has
been completed or a function is manually
cancelled.
using the roast/turBo convection
Function (see Fig. 8)
Step 1. TurntheFunctionKnobtotheRoast
function.WhenyouselecttheRoast
function,theTurboConvectionHeatiswill
automatically activate.
Step 2. IfyouwishtousetheregularRoast
function, press the Turbo button once to
turnofftheTurboConvectionHeat.The
bluelightoftheTurboConvectionHeat
button will turn off.
TheTurboConvectionHeatFunctionturns
on a built-in fan that circulates hot air in
the oven chamber, cooking your food faster
and more evenly.
Default Temperature: 350ºF.
Default Time: 60 minutes.
Figure 8

English-15
Step 3. To set the temperature:
Turn the Temperature Knob if you wish to
increase or decrease the temperature setting.
FortheRoastFunction,thetemperature
can be set from 150 to 450ºF in 5-degree
increments.
Step 4. To set the time:
Turn the Time Knob if you wish to
increase or decrease the cooking time.
ThemaximumtimesettingforRoastis60
minutes(1hour).Onceyouhaveselected
the desired cooking time, press the Start
button to initiate the cooking process.
Step 5. To Start:
PresstheStart/CancelButtontostartthe
cookingprocess.TheredStart/Cancel
Buttonlightwillilluminate.TheLCD
DisplaywillshowtheRoastFunction,
the countdown time and the selected
temperature. The unit will begin to work
and the timer will start counting down.
WhentheRoastingcycleiscomplete,the
unitwillemit3beeps.TheLCDandthe
Start/CancelButtonLightwillturnoffafter
30 seconds.
NOTE:Youcancancelthecookingcycleatany
timebypressingtheStart/CancelButton
once.TheredStart/CancelButtonlight
will turn off whenever a function has
been completed or a function is manually
cancelled.
Figure 8

English-16
using the Warm Function (see Fig. 9)
Step 1. TurntheFunctionKnobtotheWarmfunction.
WhenyouselecttheWarmfunction,thelower
heating element will heat.
Default Temperature: 150ºF.
Default Time: 60 minutes.
YoumaymanuallyactivatetheTurbo
ConvectionHeatbypressingtheTurbo
button once to turn it on. The blue light of
the Turbo button will turn on.
Step 2. To set the temperature:
Turn the Temperature Knob if you wish to
increase or decrease the temperature setting.
FortheWarmFunction,thetemperature
can be set from 150 to 200ºF in 25-degree
increments.
Step 3. To set the time:
Turn the Time Knob if you wish to
increase or decrease the warming time.
ThemaximumtimesettingforWarmis60
minutes(1hour).Onceyouhaveselected
the desired warming time, press the Start
button to initiate the warming process.
Step 4. To Start:
PresstheStart/CancelButtontostartthe
warmingprocess.TheredStart/Cancel
Buttonlightwillilluminate.TheLCD
DisplaywillshowtheWarmFunction,
the countdown time and the selected
temperature. The unit will begin to work
and the timer will start counting down.
WhentheWarmingcycleiscomplete,the
unitwillemit3beeps.TheLCDandthe
Start/CancelButtonLightwillturnoffafter
30 seconds.
NOTE:Youcancancelthewarmingcycleatanytime
bypressingtheStart/CancelButtononce.The
redStart/CancelButtonlightwillturnoff
whenever a function has been completed or a
function is manually cancelled.
Figure 9

English-17
using the deFrost Function (see Fig. 10)
Step 1. Turn the Function Knob to the Defrost
function.
Default Temperature: 450ºF.
Default Time: 16 minutes.
YoumaymanuallyactivatetheTurbo
ConvectionHeatbypressingtheTurbo
button once to turn it on. The blue light of
the Turbo button will turn on.
Step 2. To set the temperature:
Turn the Temperature Knob if you wish to
increase or decrease the temperature setting.
For the Defrost function, the temperature
can be set from 150 to 450ºF in 5-degree
increments.
Step 3. To set the time:
Turn the Time Knob if you wish to increase
or decrease the defrosting time. The
maximum time setting for Defrost is 60
minutes(1hour).Onceyouhaveselected
the desired defrosting time, press the Start
button to initiate the cooking process.
Step 4. To Start:
PresstheStart/CancelButtontostartthe
defrostingprocess.TheredStart/Cancel
Buttonlightwillilluminate.TheLCD
Display will show the Defrosting function,
the countdown time and the selected
temperature. The unit will begin to work
and the timer will start counting down.
WhentheDefrostingcycleiscomplete,the
unitwillemit3beeps.TheLCDandthe
Start/CancelButtonLightwillturnoffafter
30 seconds.
NOTE:Youcancancelthedefrostingcycleatany
timebypressingtheStart/CancelButtononce.
TheredStart/CancelButtonlightwillturn
off whenever a function has been completed
or a function is manually cancelled.
Figure 10

English-18
using the reheat Function (see Fig. 11)
Step 1. TurntheFunctionKnobtotheReheat
function.
Default Temperature: 325ºF.
Default Time: 15 minutes.
YoumaymanuallyactivatetheTurbo
ConvectionHeatbypressingtheTurbo
button once to turn it on. The blue light of
the Turbo button will turn on.
Step 2. To set the temperature:
Turn the Temperature Knob if you wish to
increase or decrease the temperature setting.
FortheReheatfunction,thetemperature
can be set from 150 to 450ºF in 5-degree
increments.
Step 3. To set the time:
Turn the Time Knob if you wish to increase
or decrease the reheating time. The maximum
timesettingforReheatis60minutes(1hour).
Once you have selected the desired reheating
time, press the Start button to initiate the
reheating process.
Step 4. To Start:
PresstheStart/CancelButtontostartthe
reheatingprocess.TheredStart/Cancel
Buttonlightwillilluminate.TheLCD
DisplaywillshowtheReheatFunction,
the countdown time and the selected
temperature. The unit will begin to work
and the timer will start counting down.
WhentheReheatingcycleiscomplete,the
unitwillemit3beeps.TheLCDandthe
Start/CancelButtonLightwillturnoffafter
30 seconds.
NOTE:Youcancancelthereheatingcycleatany
timebypressingtheStart/CancelButton
once.TheredStart/CancelButtonlight
will turn off whenever a function has
been completed or a function is manually
cancelled.
Figure 11

English-19
Positioning Pan
• To accommodate a wide variety of foods the oven has two rack positions.
The rack can be inserted in the oven in the upper or lower rack guides. The
rackwillfitintoeitheroftherackguidesinsideoftheCountertopOven.
(SeeFigureBelow)
• Beforeremovingtherackallowtheunittocool.
• To remove the rack, open the oven door and pull the rack towards the
front of the oven. The rack will slide on the rack guides on the inside of the
oven.
PLEASENOTE:theovenrackmaytiltdownwardcausingfoodtoshift
when the rack is pulled out, proceed with caution.
• Positioningoftheovenrackwilldependonthesizeofthefoodand
desiredbrowning.Movetheracktothelowerrackpositiontopreventtop
browning and move the rack to the upper rack position to prevent bottom
burning.
• Forbesttoastingresults,positiontherackintheupperrackguide.
rack guide
oPtions

English-20
cleaning Your countertoP oven
DONOTIMMERSEINLIQUIDS.
Step 1. PresstheStart/CancelButtonOFFandremoveplugfromelectrical
outlet.Allowtocool.
Step 2. Wipeunitdownwithdampcloth.DONOTIMMERSEINWATER.
Makesuretoonlyusemild,soapywater.Abrasivecleaners,scrubbing
brushes and chemical cleaners will damage the coating on this unit.
Step 3. RemovecrumbtraybypullingoutofCountertopOven.
Step 4. Shakeoffcrumbsfromcrumbtray.Cleaningthecrumbtrayoften
will avoid any accumulations.
Step 5. Removewirerackandcleanwithdampclothorplaceintoprackof
dishwasher.
storing Your countertoP oven
Allowtheappliancetocoolcompletelybeforestoring.Ifstoringthe
CountertopOvenforlongperiodsoftimemakecertainthattheCountertop
Oveniscleanandfreeoffoodparticles.StoretheCountertopOveninadry
location such as on a table or countertop or cupboard shelf. Other than the
recommended cleaning, no further user maintenance should be necessary.
/