
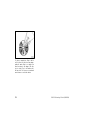
1
2005 ECHO from Aug. ’04 Prod. (OM52636U)
OPERATION OF INSTRUMENTS AND
CONTROLS
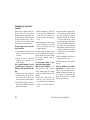
Overview of instruments and controls
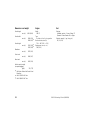
Instrument panel overview 2. . . . . . . . . . . . . . . . . . . . . . . . . . . . . . . . . . . . .
Instrument cluster overview 4. . . . . . . . . . . . . . . . . . . . . . . . . . . . . . . . . . . .
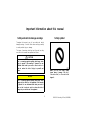
Indicator symbols on the instrument panel 7. . . . . . . . . . . . . . . . . . . . . . .
SECTION
1
-
1

2
2005 ECHO from Aug. ’04 Prod. (OM52636U)
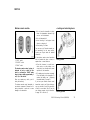
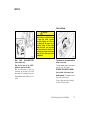
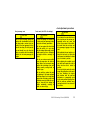
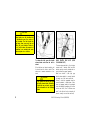
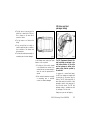
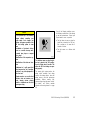
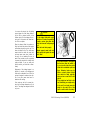
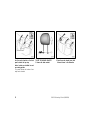
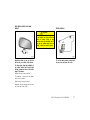
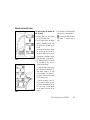
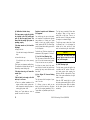
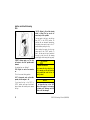
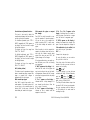
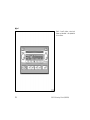
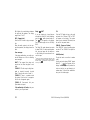
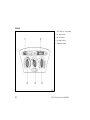
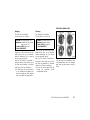
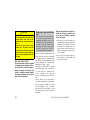
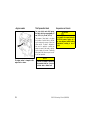
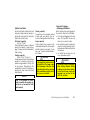
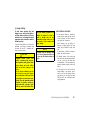
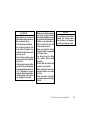
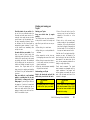
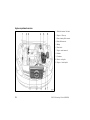
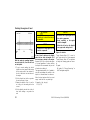
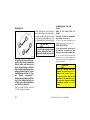
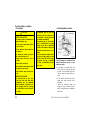
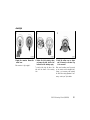
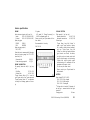
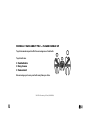
Instrument panel overview
1. Side vents
2. Instrument cluster
3. Center vents
4. Rear view mirror remote control levers
5. Auxiliary box
6. Power door lock switches
(with power windows)
7. Power window switches
8. Glove box
9. Automatic transmission selector lever or
manual transmission gear shift lever
10. Parking brake lever
11. Power door lock switch
(without power windows)
12. Hood lock release lever
13. Window lock switch
SU11001a

3
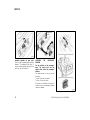
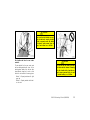
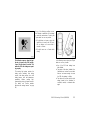
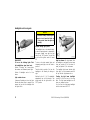
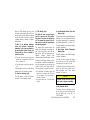
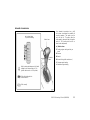
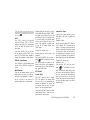
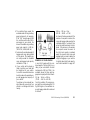
2005 ECHO from Aug. ’04 Prod. (OM52636U)
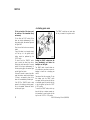
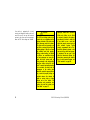
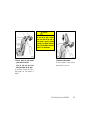
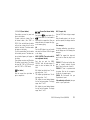
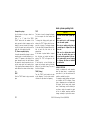
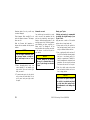
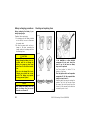
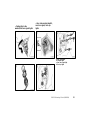
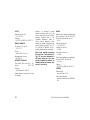
1. Headlight and turn signal switches
2. Wiper and washer switches
3. Rear window defogger switch
4. Emergency flasher switch
5. Clock
6. Air conditioning controls
7. Security indicator light/Front passen-
ger’s seat belt reminder light
8. Audio system
9. Cigarette lighter/Power outlet
10. Ashtray/Coin box
11. Ignition switch
12. Tilt steering lock release lever
13. Power rear view mirror control switches
14. Instrument panel light control knob
SU11002a

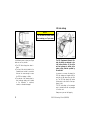
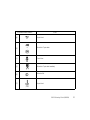
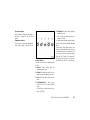
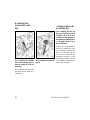
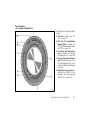
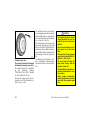
4
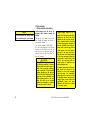
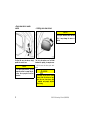
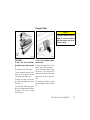
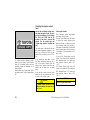
2005 ECHO from Aug. ’04 Prod. (OM52636U)
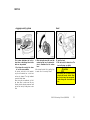
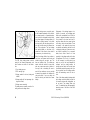
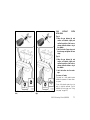
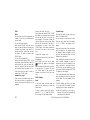
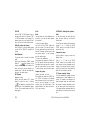
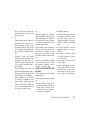
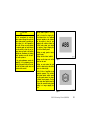
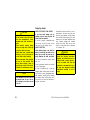
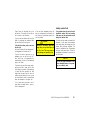
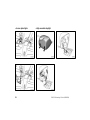
SU11015
1. Service reminder indicators and
indicator lights
2. Speedometer
3. Fuel gauge
4. Odometer and two trip meters
5. Trip meter reset knob
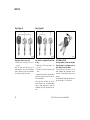
Instrument cluster overview
Type A

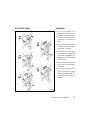
5
2005 ECHO from Aug. ’04 Prod. (OM52636U)
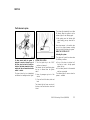
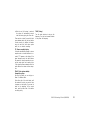
SU11014
1. Service reminder indicators and
indicator lights
2. Speedometer
3. Fuel gauge
4. Odometer and two trip meters
5. Trip meter reset knob
Type B

6
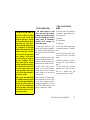
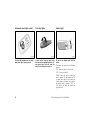
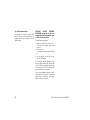
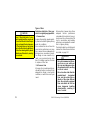
2005 ECHO from Aug. ’04 Prod. (OM52636U)
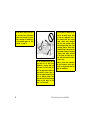
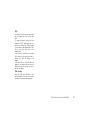
SU11009b
1. Service reminder indicators and
indicator lights
2. Speedometer
3. Extinction canceling button
4. Odometer and two trip meters
5. Fuel gauge
6. Trip meter reset button
7. Tachometer
Type C

7
2005 ECHO from Aug. ’04 Prod. (OM52636U)
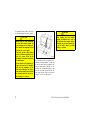
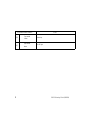
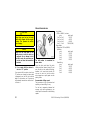
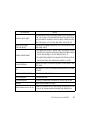
Indicator symbols on the instrument panel
or
Brake system warning light
∗
1
Driver’s seat belt reminder light
∗
1
Discharge warning light
∗
1
Malfunction indicator lamp
∗
1
Low engine oil pressure warning light
∗
1
Anti-lock brake system warning light
∗
1
SRS warning light
∗
1
Low windshield washer fluid level warning light
∗
1
Low fuel level warning light
∗
1
(type A)
Turn signal indicator lights
Headlight high beam indicator light
Overdrive- off indicator light
Low engine coolant temperature indicator light
(in blue)
∗
2
High engine coolant temperature warning light
(in red)
∗
1
Front passenger’s seat belt reminder light
∗
1
Open door warning light
∗
1
or
Low fuel level indicator light
∗
1
(type B)
∗
1
: For details, see “Service reminder indicators and warning
buzzers” on page 90 in Section 1- 6.
∗
2
: For details, see “Engine coolant temperature indicator and
warning light” on page 87 in Section 1-6.

8
2005 ECHO from Aug. ’04 Prod. (OM52636U)

139
2005 ECHO from Aug. ’04 Prod. (OM52636U)
OPERATION OF INSTRUMENTS AND
CONTROLS
Other equipment
Clock 140. . . . . . . . . . . . . . . . . . . . . . . . . . . . . . . . . . . . . . . . . . . . . . . . . . . . . .
Cigarette lighter and ashtray 140. . . . . . . . . . . . . . . . . . . . . . . . . . . . . . . . .
Power outlet 141. . . . . . . . . . . . . . . . . . . . . . . . . . . . . . . . . . . . . . . . . . . . . . .
Glove box 142. . . . . . . . . . . . . . . . . . . . . . . . . . . . . . . . . . . . . . . . . . . . . . . . . .
Auxiliary boxes 142. . . . . . . . . . . . . . . . . . . . . . . . . . . . . . . . . . . . . . . . . . . . .
Cup holders 143. . . . . . . . . . . . . . . . . . . . . . . . . . . . . . . . . . . . . . . . . . . . . . . .
Floor mat 144. . . . . . . . . . . . . . . . . . . . . . . . . . . . . . . . . . . . . . . . . . . . . . . . . .
SECTION
1
-
10

140
2005 ECHO from Aug. ’04 Prod. (OM52636U)
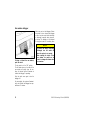
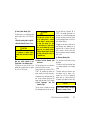
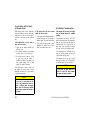
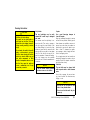
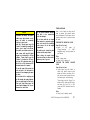
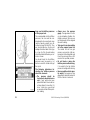
Clock
SY19008a
To reset the hour: Push the “H” button.
To reset the minutes: Push the “M” button.
The key must be in the “ACC” or “ON”
position.
If quick adjustment to a full hour is de-
sired, push the “:00” button.
For example, if the “:00” button is de-
pressed when the time is between
1:01—1:29, the time will change to 1:00. If
the time is between 1:30—1:59, the time
will change to 2:00.
If the electrical power source has been
disconnected from the clock, the time dis-
play will automatically be set to 1:00 (one
o’clock).
When the instrument panel lights are
turned on, the brightness of the time in-
dication will be reduced.
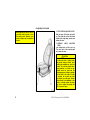
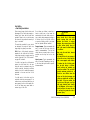
Cigarette lighter and ashtray
SU19002
CIGARETTE LIGHTER
To use the cigarette lighter, press it in.
After it finishes heating up, it automati-
cally pops out ready for use.
If the engine is not running, the key must
be in the “ACC” position to use the light-
er.
Do not hold the cigarette lighter pressed
in.
Use a Toyota genuine cigarette lighter or
equivalent for replacement.

141
2005 ECHO from Aug. ’04 Prod. (OM52636U)
ASHTRAY
To use the ashtray, open out.
When finished with your cigarette, thor-
oughly extinguish it in the ashtray to pre-
vent other cigarette butts from catching
fire. After using the ashtray, push it back
in completely.
To remove the ashtray, press down on the
lock spring plate and pull out.
CAUTION
To reduce the chance of injury in
case of an accident or sudden stop
while driving, always completely close
the ashtray after use.
SU19011
The power outlet is designed for power
supply for car accessories.
The key must be in the “ACC” or “ON”
position for the power outlet to be used.
NOTICE
To prevent the fuse from being
blown, do not use the electricity
over the total vehicle capacity of
12V/120W.
To prevent the battery from being
discharged, do not use the power
outlet longer than necessary when
the engine is not running.
Close the power outlet lid when the
power outlet is not in use. Inserting
anything other than an appropriate
plug that fits the outlet, or allowing
any liquid to get into the outlet may
cause electrical failure or short cir-
cuits.
Power outlet
(without cigarette lighter)

142
2005 ECHO from Aug. ’04 Prod. (OM52636U)
Glove box
SU19003
To open the glove box door, pull the
lever.
CAUTION
To reduce the chance of injury in
case of an accident or a sudden stop,
always keep the glove box door
closed while driving.
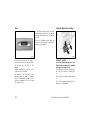
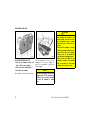
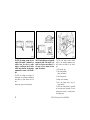
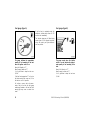
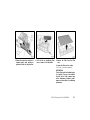
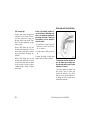
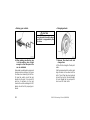
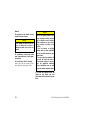
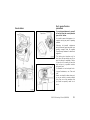
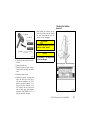
Auxiliary boxes
SU19004
Instrument panel
To use the box, pull on the handle.
This auxiliary box can be used to store
the first- aid kit.
SU19005
Passenger’s seat
To use the box, slightly lift up the box
and pull it out as shown in the illustra-
tion.
CAUTION
To reduce the chance of injury in
case of an accident or a sudden stop,
always keep the auxiliary box closed
while driving.

143
2005 ECHO from Aug. ’04 Prod. (OM52636U)
NOTICE
Instrument panel: During hot weather,
the interior of the vehicle becomes
very hot. Do not leave anything flam-
mable or deformable such as a light-
er, glasses, etc. inside.
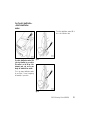
Cup holders
SZ19005
Front
SZ19006
Rear (center)
SU19008
Rear (2- door models: for right and left
sides)
The cup holder is designed for holding
cups or drink- cans securely in its
holes.
CAUTION
Do not place anything else other than
cups or drink-cans in the cup holder,
as such items may be thrown about
and possibly injure people in the ve-
hicle during sudden braking or in an
accident.

144
2005 ECHO from Aug. ’04 Prod. (OM52636U)
Floor mat
SX19001
Use a floor mat of the correct size.
If the floor carpet and floor mat have two
holes, then it is designed for use with a
locking clip. Fix the floor mat with locking
clip into the holes in the floor carpet.
SP19003
CAUTION
Make sure the floor mat is properly
placed on the floor carpet. If the floor
mat slips and interferes with the
movement of the pedals during driv-
ing, it may cause an accident.

9
2005 ECHO from Aug. ’04 Prod. (OM52636U)
OPERATION OF INSTRUMENTS AND
CONTROLS
Keys and Doors
Keys 10. . . . . . . . . . . . . . . . . . . . . . . . . . . . . . . . . . . . . . . . . . . . . . . . . . . . . . .
Wireless remote control 11. . . . . . . . . . . . . . . . . . . . . . . . . . . . . . . . . . . . . .
Side doors 15. . . . . . . . . . . . . . . . . . . . . . . . . . . . . . . . . . . . . . . . . . . . . . . . . .
Power windows 17. . . . . . . . . . . . . . . . . . . . . . . . . . . . . . . . . . . . . . . . . . . . . .
Trunk lid 19. . . . . . . . . . . . . . . . . . . . . . . . . . . . . . . . . . . . . . . . . . . . . . . . . . . .
Hood 21. . . . . . . . . . . . . . . . . . . . . . . . . . . . . . . . . . . . . . . . . . . . . . . . . . . . . . .
Theft deterrent system 23. . . . . . . . . . . . . . . . . . . . . . . . . . . . . . . . . . . . . . .
Fuel tank cap 24. . . . . . . . . . . . . . . . . . . . . . . . . . . . . . . . . . . . . . . . . . . . . . .
04 07.14
SECTION
1
-
2

10
2005 ECHO from Aug. ’04 Prod. (OM52636U)
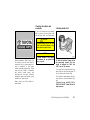
Keys (type A)
SU12062
These keys work in every lock.
1. Master keys—These keys work in ev-
ery lock.
Since the doors and trunk lid can be
locked without a key, you should always
carry a spare key in case you accidentally
lock your keys inside the vehicle.
Keys (type B)
SU12063
Your vehicle is supplied with two kinds
of key.
1. Master keys—These keys work in ev-
ery lock.
2. Sub key—This key will not work in the
trunk.
To protect items locked in the trunk when
using valet parking, leave the sub key
with the attendant.
Since the doors and trunk lid can be
locked without a key, you should always
carry a spare master key in case you
accidentally lock your keys inside the ve-
hicle.
SU12002
KEY NUMBER PLATE
Your key number is shown on the plate.
Keep the plate in a safe place such as
your wallet, not in the vehicle.
If you should lose your keys or if you
need additional keys, duplicates can be
made by a Toyota dealer using the key
number.
We recommend writing down the key num-
ber and storing it in a safe place.
04 07.14

11
2005 ECHO from Aug. ’04 Prod. (OM52636U)
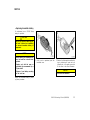
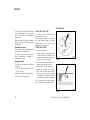
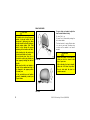
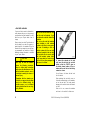
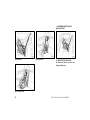
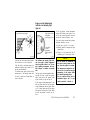
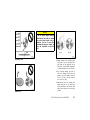
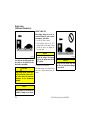
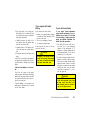
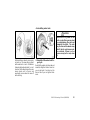
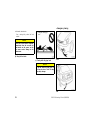
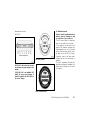
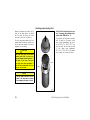
Wireless remote control—
SU12072
1. “LOCK” switch
2. “UNLOCK” switch
3. “PANIC” switch
The wireless remote control system is
designed to lock or unlock all the
doors, or activate the “PANIC” mode
from a distance within approximately 1
m (3 ft.) of the vehicle.
When you operate any switch, push it
slowly and securely.
The wireless remote control transmitter is
an electronic component. Observe the fol-
lowing instructions in order not to cause
damage to the transmitter.
Do not leave the transmitter in places
where the temperature becomes high
such as on the dashboard.
Do not disassemble it.
Avoid knocking it hard against other
objects or dropping it.
Avoid putting it in water.
You can use up to 2 wireless remote con-
trol transmitters for the same vehicle.
Contact your Toyota dealer for detailed
information.
If the wireless remote control transmitter
does not actuate the doors or alarm, or
operate from a normal distance:
Check for closeness to a radio trans-
mitter such as a radio station or an
airport which can interfere with normal
operation of the transmitter.
The battery may have been consumed.
Check the battery in the transmitter. To
replace the battery, see “—Replacing
transmitter battery” on page 13.
If you lose your wireless remote control
transmitter, contact your Toyota dealer as
soon as possible to avoid the possibility
of theft, or an accident. (See “If you lose
your wireless remote control transmitter”
on page 200 in Section 4.)
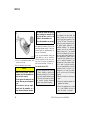
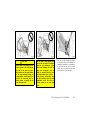
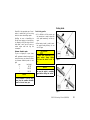
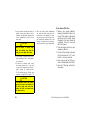
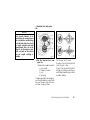
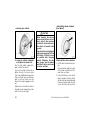
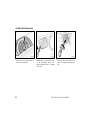
—Locking and unlocking doors
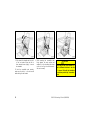
SU12023a
Locking operation
SU12024a
Unlocking operation
04 07.14

12
2005 ECHO from Aug. ’04 Prod. (OM52636U)
To lock and unlock all the doors, push
the switches of the transmitter slowly
and securely.
To lock: Push the “LOCK” switch. All the
doors are locked simultaneously. At this
time, parking lights, side marker lights and
tail lights flash.
Check to see that the doors are securely
locked.
If any of the doors is not securely closed,
or if the key is in the ignition switch,
locking cannot be performed by the
“LOCK” switch.
To unlock: Push the “UNLOCK” switch
once to unlock the driver’s door alone.
Pushing the switch twice within 3 seconds
unlocks all the doors simultaneously. At
this time, parking lights, side marker lights
and tail lights flash twice.
You have 30 seconds to open a door after
using the wireless remote unlock feature.
If a door is not opened by then, all the
doors will be automatically locked again.
If the “LOCK” or “UNLOCK” switch is kept
pressed in, the locking or unlocking opera-
tion is not repeated. Release the switch
and then push again.
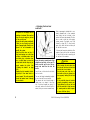
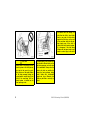
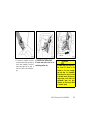
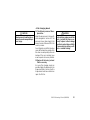
—Activating panic mode
SU12026
Pushing the “PANIC” switch blows the
horn intermittently and flashes the
headlights and tail lights.
The “PANIC” switch is used to deter ve-
hicle theft when you witness anyone at-
tempting to break into or damage your
vehicle.
The alarm will last for one minute. To stop
this midway, push the “PANIC” switch
once again, unlock any door with the key
or transmitter, open the trunk with the key
or turn the ignition key from the “LOCK”
to “ON” position.
To cancel the “PANIC” mode, unlock any
door with the key or wireless remote con-
trol transmitter, or open the trunk with the
key from the “LOCK” to “ON” position.
The “PANIC” mode does not work when
the key is inserted in the ignition switch.
04 07.14

13
2005 ECHO from Aug. ’04 Prod. (OM52636U)
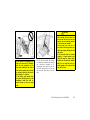
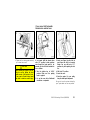
—Replacing transmitter battery
For replacement, use a CR2016 lithium
battery or equivalent.
CAUTION
Special care should be taken to pre-
vent small children from swallowing
the removed transmitter battery or
components.
NOTICE
When replacing the transmitter bat-
tery, be careful not to lose the com-
ponents.
Replace only with the same or
equivalent type recommended by a
Toyota dealer.
Dispose of used battery according
to the local laws.
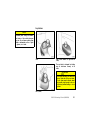
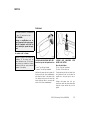
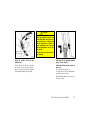
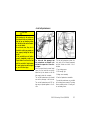
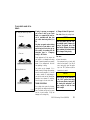
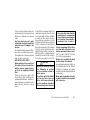
Replace the transmitter battery by follow-
ing these procedures:
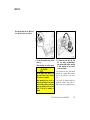
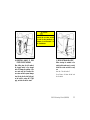
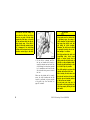
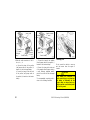
SU12051a
1. Using a coin or equivalent, open the
transmitter case.
SU12058a
2. Remove the discharged transmitter bat-
tery by ballpoint pen. Insert the tip of
ballpoint pen at the guide groove and
lift as shown in the above illustration.
NOTICE
Do not bend the terminals.
04 07.14

14
2005 ECHO from Aug. ’04 Prod. (OM52636U)
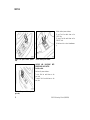
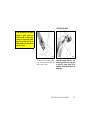
SU12059a
3. Put in a new transmitter battery with
positive (+) side up.
Close the transmitter case securely.
NOTICE
Make sure the positive side and
negative side of the transmitter bat-
tery are faced correctly.
Do not replace the battery with wet
hands. Water may cause unexpected
rust.
Do not touch or move any compo-
nents inside the transmitter, or it
may interfere with proper operation.
Be careful not to bend the electrode
when inserting the transmitter bat-
tery and that dust or oils do not
adhere to the transmitter case.
Close the transmitter case securely.
After replacing the battery, check that the
transmitter operates properly. if the trans-
mitter still does not operate properly, con-
tact your Toyota dealer.
If you lose your transmitter, contact your
Toyota dealer as soon as possible to
avoid the possibility of theft, or an acci-
dent. (See “If you lose your wireless re-
mote control transmitter” in Section 4.)
For vehicles sold in U.S.A.
This device complies with Part 15 of the
FCC Rules. Operation is subject to the
following two conditions: (1) This device
may not cause harmful interference, and
(2) this device must accept any interfer-
ence received, including interference
that may cause undesired operation.
NOTICE:
This equipment has been tested and
found to comply with the limits for a
Class B digital device, pursuant to Part
15 of the FCC Rules. These limits are
designed to provide reasonable protec-
tion against harmful interference in a
residential installation. This equipment
generates, uses and can radiate radio
frequency energy and, if not installed
and used in accordance with the instruc-
tions, may cause harmful interference to
radio communications. However, there is
no guarantee that interference will not
occur in a particular installation. If this
equipment does cause harmful interfer-
ence to radio or television reception,
which can be determined by turning the
equipment off and on, the user is en-
couraged to try to correct the interfer-
ence by one or more of the following
measures:
Reorient or relocate the receiving an-
tenna.
Increase the separation between the
equipment and receiver.
Connect the equipment into an outlet
on a circuit different from that to
which the receiver is connected.
04 07.14
Page is loading ...
Page is loading ...
Page is loading ...
Page is loading ...
Page is loading ...
Page is loading ...
Page is loading ...
Page is loading ...
Page is loading ...
Page is loading ...
Page is loading ...
Page is loading ...
Page is loading ...
Page is loading ...
Page is loading ...
Page is loading ...
Page is loading ...
Page is loading ...
Page is loading ...
Page is loading ...
Page is loading ...
Page is loading ...
Page is loading ...
Page is loading ...
Page is loading ...
Page is loading ...
Page is loading ...
Page is loading ...
Page is loading ...
Page is loading ...
Page is loading ...
Page is loading ...
Page is loading ...
Page is loading ...
Page is loading ...
Page is loading ...
Page is loading ...
Page is loading ...
Page is loading ...
Page is loading ...
Page is loading ...
Page is loading ...
Page is loading ...
Page is loading ...
Page is loading ...
Page is loading ...
Page is loading ...
Page is loading ...
Page is loading ...
Page is loading ...
Page is loading ...
Page is loading ...
Page is loading ...
Page is loading ...
Page is loading ...
Page is loading ...
Page is loading ...
Page is loading ...
Page is loading ...
Page is loading ...
Page is loading ...
Page is loading ...
Page is loading ...
Page is loading ...
Page is loading ...
Page is loading ...
Page is loading ...
Page is loading ...
Page is loading ...
Page is loading ...
Page is loading ...
Page is loading ...
Page is loading ...
Page is loading ...
Page is loading ...
Page is loading ...
Page is loading ...
Page is loading ...
Page is loading ...
Page is loading ...
Page is loading ...
Page is loading ...
Page is loading ...
Page is loading ...
Page is loading ...
Page is loading ...
Page is loading ...
Page is loading ...
Page is loading ...
Page is loading ...
Page is loading ...
Page is loading ...
Page is loading ...
Page is loading ...
Page is loading ...
Page is loading ...
Page is loading ...
Page is loading ...
Page is loading ...
Page is loading ...
Page is loading ...
Page is loading ...
Page is loading ...
Page is loading ...
Page is loading ...
Page is loading ...
Page is loading ...
Page is loading ...
Page is loading ...
Page is loading ...
Page is loading ...
Page is loading ...
Page is loading ...
Page is loading ...
Page is loading ...
Page is loading ...
Page is loading ...
Page is loading ...
Page is loading ...
Page is loading ...
Page is loading ...
Page is loading ...
Page is loading ...
Page is loading ...
Page is loading ...
Page is loading ...
Page is loading ...
Page is loading ...
Page is loading ...
Page is loading ...
Page is loading ...
Page is loading ...
Page is loading ...
Page is loading ...
Page is loading ...
Page is loading ...
Page is loading ...
Page is loading ...
Page is loading ...
Page is loading ...
Page is loading ...
Page is loading ...
Page is loading ...
Page is loading ...
Page is loading ...
Page is loading ...
Page is loading ...
Page is loading ...
Page is loading ...
Page is loading ...
Page is loading ...
Page is loading ...
Page is loading ...
Page is loading ...
Page is loading ...
Page is loading ...
Page is loading ...
Page is loading ...
Page is loading ...
Page is loading ...
Page is loading ...
Page is loading ...
Page is loading ...
Page is loading ...
Page is loading ...
Page is loading ...
Page is loading ...
Page is loading ...
Page is loading ...
Page is loading ...
Page is loading ...
Page is loading ...
Page is loading ...
Page is loading ...
Page is loading ...
Page is loading ...
Page is loading ...
Page is loading ...
Page is loading ...
Page is loading ...
Page is loading ...
Page is loading ...
Page is loading ...
Page is loading ...
Page is loading ...
Page is loading ...
Page is loading ...
Page is loading ...
Page is loading ...
Page is loading ...
Page is loading ...
Page is loading ...
Page is loading ...
Page is loading ...
Page is loading ...
Page is loading ...
Page is loading ...
Page is loading ...
Page is loading ...
Page is loading ...
Page is loading ...
Page is loading ...
Page is loading ...
Page is loading ...
Page is loading ...
Page is loading ...
Page is loading ...
Page is loading ...
Page is loading ...
Page is loading ...
Page is loading ...
Page is loading ...
Page is loading ...
Page is loading ...
Page is loading ...
Page is loading ...
Page is loading ...
Page is loading ...
Page is loading ...
Page is loading ...
Page is loading ...
Page is loading ...
Page is loading ...
Page is loading ...
Page is loading ...
Page is loading ...
Page is loading ...
Page is loading ...
Page is loading ...
Page is loading ...
Page is loading ...
Page is loading ...
Page is loading ...
Page is loading ...
Page is loading ...
Page is loading ...
Page is loading ...
Page is loading ...
Page is loading ...
Page is loading ...
Page is loading ...
Page is loading ...
Page is loading ...
Page is loading ...
Page is loading ...
Page is loading ...
Page is loading ...
Page is loading ...
-
 1
1
-
 2
2
-
 3
3
-
 4
4
-
 5
5
-
 6
6
-
 7
7
-
 8
8
-
 9
9
-
 10
10
-
 11
11
-
 12
12
-
 13
13
-
 14
14
-
 15
15
-
 16
16
-
 17
17
-
 18
18
-
 19
19
-
 20
20
-
 21
21
-
 22
22
-
 23
23
-
 24
24
-
 25
25
-
 26
26
-
 27
27
-
 28
28
-
 29
29
-
 30
30
-
 31
31
-
 32
32
-
 33
33
-
 34
34
-
 35
35
-
 36
36
-
 37
37
-
 38
38
-
 39
39
-
 40
40
-
 41
41
-
 42
42
-
 43
43
-
 44
44
-
 45
45
-
 46
46
-
 47
47
-
 48
48
-
 49
49
-
 50
50
-
 51
51
-
 52
52
-
 53
53
-
 54
54
-
 55
55
-
 56
56
-
 57
57
-
 58
58
-
 59
59
-
 60
60
-
 61
61
-
 62
62
-
 63
63
-
 64
64
-
 65
65
-
 66
66
-
 67
67
-
 68
68
-
 69
69
-
 70
70
-
 71
71
-
 72
72
-
 73
73
-
 74
74
-
 75
75
-
 76
76
-
 77
77
-
 78
78
-
 79
79
-
 80
80
-
 81
81
-
 82
82
-
 83
83
-
 84
84
-
 85
85
-
 86
86
-
 87
87
-
 88
88
-
 89
89
-
 90
90
-
 91
91
-
 92
92
-
 93
93
-
 94
94
-
 95
95
-
 96
96
-
 97
97
-
 98
98
-
 99
99
-
 100
100
-
 101
101
-
 102
102
-
 103
103
-
 104
104
-
 105
105
-
 106
106
-
 107
107
-
 108
108
-
 109
109
-
 110
110
-
 111
111
-
 112
112
-
 113
113
-
 114
114
-
 115
115
-
 116
116
-
 117
117
-
 118
118
-
 119
119
-
 120
120
-
 121
121
-
 122
122
-
 123
123
-
 124
124
-
 125
125
-
 126
126
-
 127
127
-
 128
128
-
 129
129
-
 130
130
-
 131
131
-
 132
132
-
 133
133
-
 134
134
-
 135
135
-
 136
136
-
 137
137
-
 138
138
-
 139
139
-
 140
140
-
 141
141
-
 142
142
-
 143
143
-
 144
144
-
 145
145
-
 146
146
-
 147
147
-
 148
148
-
 149
149
-
 150
150
-
 151
151
-
 152
152
-
 153
153
-
 154
154
-
 155
155
-
 156
156
-
 157
157
-
 158
158
-
 159
159
-
 160
160
-
 161
161
-
 162
162
-
 163
163
-
 164
164
-
 165
165
-
 166
166
-
 167
167
-
 168
168
-
 169
169
-
 170
170
-
 171
171
-
 172
172
-
 173
173
-
 174
174
-
 175
175
-
 176
176
-
 177
177
-
 178
178
-
 179
179
-
 180
180
-
 181
181
-
 182
182
-
 183
183
-
 184
184
-
 185
185
-
 186
186
-
 187
187
-
 188
188
-
 189
189
-
 190
190
-
 191
191
-
 192
192
-
 193
193
-
 194
194
-
 195
195
-
 196
196
-
 197
197
-
 198
198
-
 199
199
-
 200
200
-
 201
201
-
 202
202
-
 203
203
-
 204
204
-
 205
205
-
 206
206
-
 207
207
-
 208
208
-
 209
209
-
 210
210
-
 211
211
-
 212
212
-
 213
213
-
 214
214
-
 215
215
-
 216
216
-
 217
217
-
 218
218
-
 219
219
-
 220
220
-
 221
221
-
 222
222
-
 223
223
-
 224
224
-
 225
225
-
 226
226
-
 227
227
-
 228
228
-
 229
229
-
 230
230
-
 231
231
-
 232
232
-
 233
233
-
 234
234
-
 235
235
-
 236
236
-
 237
237
-
 238
238
-
 239
239
-
 240
240
-
 241
241
-
 242
242
-
 243
243
-
 244
244
-
 245
245
-
 246
246
-
 247
247
-
 248
248
-
 249
249
-
 250
250
-
 251
251
-
 252
252
-
 253
253
-
 254
254
-
 255
255
-
 256
256
-
 257
257
-
 258
258
-
 259
259
-
 260
260
-
 261
261
-
 262
262
-
 263
263
-
 264
264
-
 265
265
-
 266
266
-
 267
267
-
 268
268


Toyota 2005 Echo Owner's manual
- Category
- Cars
- Type
- Owner's manual
Ask a question and I''ll find the answer in the document
Finding information in a document is now easier with AI
