Tefal FV9788 Ultimate Anti-scale Steam Iron User manual
- Category
- Irons
- Type
- User manual
This manual is also suitable for

1
2
3
5
4
6
16
7
8
9
11
10
12
13
14
15
GB

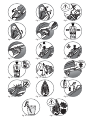
fig.1 fig.2 fig.3
fig.4 fig.5 fig.6
fig.7 fig.8 fig.9
fig.10 fig.11 fig.12
fig.13 fig.14 fig.15
fig.16 fig.17

For your safety
This appliance complies with the technical rules and standards for safety currently in force
(Electromagnetic Compatibility, Low Voltage, Environnement).
• Please read these instructions carefully and keep them for future reference.
• This appliance is not designed to be used by people (including children) with a physical,
sensory or mental impairment, or people without knowledge or experience, unless they are
supervised or given prior instructions concerning the use of the appliance by someone
responsible for their safety. Children must be supervised to ensure that they do not play with
the appliance.
• Warning ! The voltage of your electrical installation must correspond to that of the iron
(220V-240V or 127V depending on model). Connecting to the wrong voltage may cause
irreversible damage to the iron and will invalidate the guarantee.
• This iron must always be plugged into an earthed socket. If using a mains extension lead,
ensure that it is correctly rated (16A, depending on model), with an earth connection.
• If the electrical cord becomes damaged, it must be immediately replaced by an Approved
Service Centre to avoid any danger.
• The appliance should not be used if it has fallen, if it has obvious damage, if it leaks or has
functional anomalies. Never dismantle your appliance : have it inspected by an Approved
Service Centre, so as to avoid any danger.
• Never immerse your iron in water !
• Do not unplug your appliance by pulling on the cord.Always unplug your appliance: before
filling
- fig. 3 or rinsing the reservoir, before cleaning it, after each use.
• Never leave the appliance unattended when it is connected to a power source; if it has not
cooled down for approximately 1 hour.
• Your appliance gives off steam, which may cause burns, especially when you are ironing on a
corner of your ironing board. Never direct the steam towards people or animals.
• Your iron should be used and placed on a flat, stable, heat-resistant surface.When you put
your iron onto its iron rest, make sure that the surface on which you put it is stable.
• This product has been designed for domestic use only. Any commercial use, inappropriate
use or failure to comply with the instructions, the manufacturer accepts no responsibility and
the guarantee will not apply.
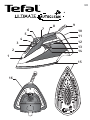
Description
1 Spray
2 Thermostat indicator
3 Antiscale valve grip
4 Dry/Steam control
5 Spray Button
6 Shot of Steam Button
7 Auto-Stop safety warning light
(depending on model)
8 Gel comfort handle
(depending on model)
9 Electric power cord
10 Extra-large heel with non-slip pad
11 Opening button to water tank
12 Integral anti-scale system
13 Thermostat indicator light
14 Autosteam Control Thermostat
15 Autoclean Catalys
®
Soleplate
16 Water tank filler hole
3

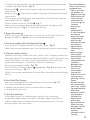
Before using for the first time
Warning! Before using your iron with the steam function for the first
time, we recommend
that you operate it in a horizontal position for a few moments, away
from your linen, i.e. press the Shot of Steam button a few times.
During the first few uses, a harmless odour and a small amount of smoke
may be given off.
This has no effect on the use of the iron and will disappear quickly.
What water to use?
Your appliance has been designed to function with untreated tap water. However, it is
necessary to operate the Self-Clean function regularly in order to eliminate hard water
deposits from the steam chamber.
If your water is very hard (check with your local water authority), it is possible to mix tap water
with store-bought distilled or demineralised water in the following proportions :
- 50% tap water, - 50% distilled or demineralised water.
Types of water not to use?
Heat concentrates the elements contained in water during evaporation.The types of water
listed below contain organic waste or mineral elements that can cause spitting, brown
staining, or premature wear of the appliance : water from clothes dryers, scented or softened
water, water from refrigerators, batteries or air conditioners, pure distilled or demineralised
water or rain water should not be used in your Tefal iron. Also do not to use boiled, filtered or
bottled water.
Use
Steam ironing
1. Filling the water tank
- Unplug your iron before filling it.
- Set the steam control to DRY
- fig. 1.
- Take the iron in one hand and tilt it slightly, so that you can see the
water tank filling hole
- fig. 3.
- To open the water tank, press the button
- fig. 2.
- Fill the water tank
- fig. 3 up to the mark “MAX”. The mark MAX
corresponds to a capacity of 350 cc.
- Close the water tank cover until you hear a click
- fig. 4.
- You can now plug in your iron.
2. Choose your ironing programme
- Your iron has the Autosteam Control function, which recommends 8
different ironing programmes:
• Set the Autosteam Control Thermostat to match the type of textile you
wish to iron. Your iron automatically and accurately determines the
exact temperature and steam flow that are suitable, in order to
guarantee the best results.
Warning !
Remove any labels
from the soleplate
before heating up
the iron
(depending on
model).
4

• To select the appropriate ironing programme, activate the thermostat
located under the handle
- fig. 5.
- Rotation left : selects the programs requiring low temperature and
steam levels.
- Rotation right : selects the programs requiring high temperature and
steam levels.
- The program selected appears automatically on the indicator panel at
the front of the iron
- fig. 6.
- Set the steam control to STEAM
- fig. 1.
- When your iron reaches the required temperature, the thermostat
indicator goes out
- fig. 7. You can start ironing.
3. Spray Function
- While ironing, press a few times in succession on the Spray button to
dampen the fabric
- fig. 8 and iron out awkward creases.
4. For more steam (shot of steam button)
- Press the Shot of Steam button from time to time
- fig. 9.
- Wait a few seconds between each shot before pressing the button again.
5. Vertical steam ironing
- Ideal for removing creases from suits, jackets, skirts, hanging curtains etc
- Hang the garment on a hanger and hold the fabric slightly taut with one
hand. The steam is very hot, so you should always do this with the
garment on a hanger – never while someone is wearing it.
- Set your thermostat to MAX
- fig. 10.
- Press the Shot of Steam button ( ) repeatedly - fig. 9 moving the iron
from top to bottom
- fig. 11.
- Hold the iron a few centimetres from the fabric to avoid burning delicate
fabrics.
6. Anti-Calc Plus System
- You iron is equipped with an integral anti-scale system
- fig. 12.
- This system will help to provide :
• a better ironing quality with a constant flow of steam,
• a longer life for your iron.
7. Anti-drip function
- Autosteam Control, i.e. the automatic selection of the ironing
programme depending on the fabrics elected, makes it possible to
reduce steam flow at low temperatures and prevents your iron from
dripping water onto your linen.
Recommendations:
Fabrics and ironing
temperatures:
• Your iron heats
up quickly: so
begin by ironing
fabrics that are
ironed at low
temperatures
first, then go on
to those
requiring a
higher
temperature,
• if you change to
a program
requiring lower
temperatures,
wait for the
thermostat light
to come on
again before
continuing to
iron.
• when ironing
fabrics with
mixed fibres, set
the ironing
temperature for
the most
delicate fibre.
For delicate
fabrics we
recommend
testing the
fabric first on an
inconspicious
place eg (inside
them).
• For best results
we recommend
you use a vented
ironing board to
allow the
powerful steam
to penetrate
through the
fabric more
efficiently.
• Ensure that the
fabric you are
ironing is flat to
avoid steam
venting
sideways whilst
ironing.
5

When the
Auto-Stop
warning light is
on, it is normal for
the thermostat
light to remain
off.
8. Auto-Stop safety feature (depending on model)
- For your safety, the electronic system cuts off the power and the auto-
stop indicator light flashes
- fig. 13
when :
• The iron remains motionless for more than 8 minutes on its heel.
• The iron remains flat or on its side for more than 30 seconds.
- To restart the iron, just move it gently until the warning light stops flashing.
9. Autoclean Catalys
®
Soleplate
-
Your iron is equipped with a self-cleaning soleplate - fig. 14 which works
by catalysis.
- Its exclusive coating helps continuously eliminate all the impurities
generated by normal use. It is recommended that you always stand your
iron on his heel to preserve its self-cleaning coating.
Dry Ironing
- Choose your ironing program.
- Set the steam control to DRY
- fig. 1.
- You may start ironing when the thermostat light goes out.
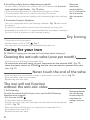
Caring for your iron
BE CAREFUL ! Unplug your iron and let it cool down before cleaning it.
Cleaning the anti-calc valve (once per month)
- Unplug your iron and empty the water tank.
- To remove the antiscale valve, set your thermostat on the position MAX
- fig. 10,
place the steam control on STEAM , and the valve can now be removed from your
iron
- fig. 15.
Never touch the end of the valve
- Soak the valve in a cup of white vinegar or plain lemon juice for 4 hours - fig. 16.
- Rinse the valve under running water.
- Replace the anti-calc valve.
The iron will not function
without the anti-calc valve
1. Self-cleaning
In order to extend the life of your iron, use the Self-Cleaning
function once a month.
- Set the iron to DRY .
- Fill the water tank to maximum.
- Set the iron on his heel, with the water tank full, and set the thermostat
to MAX
- fig. 10.
- When the thermostat light goes out, unplug the iron and hold it in a
horizontal position, over a sink.
- Remove the anti-calc valve.
Recommendations:
the self-cleaning
function helps to
slow down the
scaling up of your
iron.
6

- Shake the iron gently, over the sink, until some of the water in the water
tank (with the impurities) has flowed out through the soleplate.
- At the end of the operation, push the anti-calc valve back into position.
- Turn the iron back on for 2 minutes, setting it on its heel, to dry the
soleplate.
- Unplug the iron, and when the soleplate is just warm, wipe it with a soft
cloth.
2. Cleaning the soleplate
Your iron is equipped with a self-cleaning soleplate, which works by
catalysis.
Its exclusive active coating helps continuously eliminate all the impurities
generated by the normal day-to-day use of the iron.
However, if you iron using an unsuitable programme, some traces may be
left which require manual cleaning. In this case, it is recommended that
you use a soft damp cloth on the warm soleplate, in order not to damage
the surface.
Storing your iron
- Unplug the iron and wait for the soleplate to cool down.
- Empty the water tank and set the steam control to DRY . A little water may remain in the
tank.
- Wind the cord not too tightly around the heel at the back of the iron.
- Store the iron on its heel.
Environment
Environment protection first !!
Your appliance contains valuable materials which can be recovered or recycled.
Leave it at a local civic waste collection point.
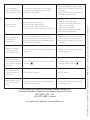
If there is a problem?
Problem Possible causes Solutions
• Water drips from
the holes in the
soleplate.
• You are using the Shot of Steam button
too often.
• You have stored the iron horizontally,
without emptying it and without setting
it to DRY.
• Wait a few seconds between each
use of the button.
• See the section "Storing your
iron".
• Brown streaks
come through the
holes in the
soleplate and stain
the linen.
• You are using chemical descaling agents.
•
You are using pure distilled/demineralised
or softened water.
• Your linen is not rinsed sufficiently or you
have ironed a new garment before
washing it.
• Do not add any descaling agents
to the water in the water tank.
• See section “Types of water not to
use?”.
• See section "Cleaning the soleplate"
• Ensure linen is rinsed thoroughly
to remove any soap deposits or
chemicals on new garments
which may be sucked up by the
iron.
Note!
The steam control
position must
necessarily be on
STEAM in order
to remove or
replace the iron's
antiscale rod.
Attention!
The use of a
scouring pad will
cause damage to
your soleplate's
self-cleaning
coating
- fig. 17
7

Réf. 1800113017 • 05/2008 • Subject to modifications • JPM & Associés • marketing-design-communication • 33 (0)3 80 56 28 11
If you have any problem or queries, please contact our
Customer Relations team first for expert help and advice.
845 602 1454 - UK
(01) 677 4003 - Ireland
or consult our website - www.tefal.co.uk
• The soleplate is
dirty or brown and
can stain the linen.
• You have ironed with an unsuitable
programme (temperature too high).
• You are using starch.
• Select the appropriate program.
Refer to the chapter “Clean the
soleplate“
• Spray starch on the underside of
the fabric to be ironed.
• There is little
or no steam.
• The water tank is empty.
• The anti-calc valve is dirty.
• Your iron has a build-up of scale.
• Your iron has been used dry for too long.
• Fill it.
• Clean the anti-calc valve.
• Clean the anti-calc valve and
carry out a self-clean.
• Carry out a self-clean.
• Wait for the soleplate to reach
the correct temperature.
• The soleplate is
scratched or
damaged.
• You have placed your iron flat on a
metallic rest-plate or ironed over a zip.
• You have cleaned your soleplate with an
abrasive or metal pad.
• Always set your iron on its heel.
• Try to avoid ironing over zips.
• Refer to the chapter “Clean the
soleplate”.
• Water is leaking
out through the
water tank cover.
• You have not closed the water tank cover
properly.
• Make sure the water tank cover
has clicked shut.
• Steam or water
come from the iron
as you finish filling
the tank.
• The steam control is not set to the DRY
position .
• Check that the steam control is
set to the DRY position .
• The spray and/or
shot of steam do
not work.
• The water is empty. • Fill the water.
• Water leaks out of
the front of the
iron.
• You have exceeded the level MAX when
filling the water tank.
• Empty the surplus water out of
the water tank.
-
 1
1
-
 2
2
-
 3
3
-
 4
4
-
 5
5
-
 6
6
-
 7
7
-
 8
8


Tefal FV9788 Ultimate Anti-scale Steam Iron User manual
- Category
- Irons
- Type
- User manual
- This manual is also suitable for
Ask a question and I''ll find the answer in the document
Finding information in a document is now easier with AI
Related papers
Other documents
-
Amazon Steam Iron FAQs and Troubleshooting Owner's manual
-
T-Fal FV3056 User manual
-
Philips GC8616/30 Owner's manual
-
Philips GC9405/80 Quick start guide
-
Rowenta DZ 9020 User manual
-
-
Hoover PRB2500B 001 User manual
-
Groupe SEB USA - T-FAL FV4020 User manual
-
-