Bosch KAD92AI20A/05 User manual

Category
Fridges
Type
User manual
en Installation instructions and instructions for useFridge-freezer 2
Fridge-freezer
KAD..
en
2
en Table of contents
enInstallation instructions and instructions for useFridge-freezer
Safety instructions ................................................ 3
Information concerning disposal ....................... 4
Scope of delivery .................................................. 4
Installing the appliance ....................................... 4
Installation dimensions ........................................ 5
Door opening angle ............................................. 6
Aligning the appliance ......................................... 7
Connecting the appliance ................................... 7
Removing appliance doors and handles ......... 8
Getting to know your appliance ........................ 9
Switching on the appliance ............................. 11
Setting the temperature unit ............................ 11
Setting the temperature .................................... 11
Special functions ............................................... 11
Sabbatical mode ............................................... 12
Alarm function .................................................... 12
Usable capacity ................................................. 13
Freezer compartment ....................................... 13
Max. freezing capacity ...................................... 13
Freezing fresh food ........................................... 13
Super freezing .................................................... 14
Thawing frozen food ......................................... 14
Refrigerator compartment ............................... 15
Super cooling ..................................................... 15
Ice and water dispenser .................................. 16
Water filter ........................................................... 17
Specification and Performance Data Sheet . 19
Features of the freezer compartment ............ 20
Variable interior design .................................... 20
Switching off and disconnecting
the appliance ..................................................... 21
Defrosting ........................................................... 21
Cleaning the appliance .................................... 21
Light (LED) .......................................................... 23
Tips for saving energy ...................................... 23
Operating noises ............................................... 23
Eliminating minor faults yourself ..................... 24
Appliance self-test ............................................. 26
Customer service .............................................. 26
en
3
m Safety instructions
Safety instructions
This appliance complies with the relevant
safety regulations for electrical appliances
and is fitted with noise suppression.
The refrigeration circuit has been checked
for leaks.
About these instructions
Read and follow the operating and
installation instructions. They contain
important information on how to install,
use and maintain the appliance.
The manufacturer is not liable if you
disregard the instructions and warnings in
the operating and installation instructions.
Retain all documents for subsequent use
or for the next owner.
Risk of explosion
Never use electric appliances inside the
appliance (e.g. heaters or electric ice
makers).
Do not store products which contain
flammable propellant (e.g. spray cans) or
explosive substances in the appliance.
Store high-percentage alcohol tightly
sealed and in an upright position.
Do not use additional means to
accelerate the defrosting process other
than those recommended by the
manufacturer.
Risk of electric shock
Improper installations and repairs may put
the user at considerable risk.
When installing the appliance, ensure that
the mains cable is not trapped or
damaged.
If the mains cable is damaged:
immediately disconnect the appliance
from the electricity supply.
Do not use multiple sockets, extension
leads or adapters.
Have the appliance repaired by the
manufacturer, Customer Service or a
similarly qualified person only.
Use original parts supplied by the
manufacturer only.
The manufacturer guarantees that these
parts satisfy the safety requirements.
Risk of cold burns
Never put frozen food straight from the
freezer compartment into your mouth.
Avoid prolonged contact of skin with
frozen food, ice and the tubes in the
freezer compartment.
Risk of injury
Containers which contain carbonated drinks
may burst.
Do not store containers which contain
carbonated drinks in the freezer
compartment.
Fire hazard
Portable multiple outlets or power
supplies may overheat, causing a fire.
Never leave portable multiple outlets or
portable power supplies behind the
appliance.
Avoiding placing children and vulnerable
people at risk
At risk are:
Children,
People who have limited physical, mental
or sensory abilities,
People who have inadequate knowledge
concerning safe operation of the
appliance.
Measures:
Ensure that children and vulnerable
people have understood the hazards.
Children or vulnerable people must be
supervised by a responsible person when
using the appliance.
Only children from 8 years and above
may use the appliance.
Supervise children while the appliance is
being cleaned or maintained.
Never allow children to play with the
appliance.
Risk of suffocation
If the appliance features a lock: keep the
key out of the reach of children.
Keep children away from the packaging
and its parts.
en
4
Damage
To prevent damage:
Do not stand or support yourself on the
base, runners or doors.
Keep plastic parts and door seals free of
oil and grease.
Pull the mains plug – not the power cord.
Weight
When installing and transporting the
appliance, note that it may be very heavy.
Information concerning
disposal
* Disposal of packaging
The packaging protects your appliance from damage
during transit. All utilised materials are environmentally
safe and recyclable. Please help us by disposing of the
packaging in an environmentally friendly manner.
Please ask your dealer or inquire at your local authority
about current means of disposal.
* Disposal of your old appliance
Old appliances are not worthless rubbish! Valuable raw
materials can be reclaimed by recycling old appliances.
m Warning
Redundant appliances
1. Pull out the mains plug.
2. Cut off the power cord and discard with the mains
plug.
3. Do not take out the trays and receptacles: children
are therefore prevented from climbing in!
4. Do not allow children to play with the appliance once
it has spent its useful life. Danger of suffocation!
Refrigerators contain refrigerant and gases
in the insulation. Refrigerant and gases must be
disposed of professionally. Ensure that tubing
of the refrigerant circuit is not damaged prior to proper
disposal.
Scope of delivery
After unpacking all parts, check for any damage in
transit.
If you have any complaints, please contact the dealer
from whom you purchased the appliance or our
customer service.
The delivery consists of the following parts:
Free-standing appliance
Interior fittings (depending on model)
Bag containing installation materials
Operating instructions
Installation manual
Customer service booklet
Warranty enclosure
Information on the energy consumption and noises
Installing the appliance
The installation of this product must comply with the
Australian plumbing installation standards AS/
NZS 3500.1 and AS/NZS 3500.2.
Transporting
The appliance is heavy. Secure in position during
transportation and installation.
Due to the weight/dimensions of the appliance and to
minimise the risk of injury and damage to the appliance
at least two persons are necessary to set-up the
appliance safely.
Installation location
Install the appliance in a dry, well ventilated room.
The installation location should neither be exposed
to direct sunlight nor near a heat source, e.g. a cooker,
radiator, etc. If installation next to a heat source is
unavoidable, use a suitable insulating plate or observe
the following minimum distances to a heat source:
3 cm to electric or gas cookers.
30 cm to an oil or coal-fired cooker.
If installing the appliance next to another refrigerator
or freezer, ensure a minimum lateral distance of 25 mm
to prevent the formation of condensation.
If a panel or cupboard is installed above the appliance,
ensure that a gap of 30 mm is left so that the appliance
can be pulled out of the recess if required.
The air heated on the rear side of the appliance must
be allowed to escape unhindered.
This appliance is labelled in accordance with
European Directive 2012/19/EU concerning
used electrical and electronic appliances (waste
electrical and electronic equipment - WEEE).
The guideline determines the framework for the
return and recycling of used appliances as
applicable throughout the EU.
en
5
Subsurface
m Caution
The appliance is very heavy.
The weight of the appliance may be up to 165 kg
depending on the model.
The floor of the installation location must not give way;
if required, reinforce floor.
To ensure that the doors can open all the way, observe
lateral minimum distances when installing
the appliance in a corner or recess (see chapter
“Installation dimensions”).
If the depth of the adjacent kitchen equipment is more
than 60 cm, observe lateral minimum distances
in order to utilise the full door opening angle (see
chapter “Door opening angle“).
Observe ambient temperature
and ventilation
Ambient temperature
The climate class can be found on the rating plate.
The climate class indicates within which ambient
temperatures the appliance can be operated.
The rating plate is located in the refrigerator
compartment at the right side.
Note
The appliance is fully functional within the room
temperature limits of the indicated climatic class. If
an appliance of climatic class SN is operated at colder
room temperatures, the appliance will not be damaged
up to a temperature of +5 °C.
Ventilation
Never cover the ventilation openings on the rear
of the appliance. Conduction of the heated air must not
be obstructed. Otherwise, the refrigeration unit must
work harder. This increases power consumption.
Place the enclosed spacers in the designated holders
on the back of the appliance. This ensures that there is
a minimum distance between the appliance and
the wall.
Installation dimensions
Climate class Permitted ambient temperature
SN +10 °C to 32 °C
N +16 °C to 32 °C
ST +16 °C to 38 °C
T +16 °C to 43 °C
en
6
Door opening angle






  
 
 
 
en
7
Aligning the appliance
To ensure that the appliance functions correctly, it must
be set level with a spirit level.
If the appliance is not level, water may flow out
of the ice maker, ice cubes may be irregular
or the doors may not close properly.
Connecting the appliance
Have a technician install and connect the appliance
according to the enclosed installation instructions.
Do not remove the transportation protection devices
from the shelves and storage compartments until
the appliance has been installed.
Always connect the water before the power.
Apart from statutory national regulations, you should
stick to the connection terms relating to the local
electricity and water companies.
After installing the appliance, wait at least 1 hour until
the appliance starts up. During transportation the oil
in the compressor may have flowed into
the refrigeration system.
Before switching on the appliance for the first time,
clean the interior of the appliance (see chapter
“Cleaning the appliance”).
Water connection
The water may be connected only by a competent fitter
according to the local regulations of the appropriate
water supply company.
m Caution
Use only the enclosed hose set for connection to the
drinking water mains. Do not use existing or already
used hose sets.
Connect the appliance to a drinking water line only:
Minimum pressure: 0.2 Mpa (2 bar)
Maximum pressure: 0.8 Mpa (8 bar)
Pressure over 0.8 MPa (8 bar): install a pressure
limiter between drinking water connection and hose
set
Note
The maximum outside diameter of the water mains
(without connecting pieces) is 10 mm.
Electrical connection
m Warning
Risk of electric shock!
If the length of the mains cable is inadequate, never
use multiple sockets or extension leads. Instead,
please contact Customer Service for alternatives.
The appliance must be connected to a permanently
installed socket.
The socket must be near the appliance and also freely
accessible following installation of the appliance.
The appliance complies with protection class I. Connect
the appliance to 220–240 V/50 Hz alternating current
via a correctly installed socket with protective
conductor. The socket must be protected by a 10 A to
16 A fuse or higher.
For appliances operated in non-European countries,
check whether the indicated voltage and current type
match the values of your electricity supply. The rating
plate is situated in the bottom right-hand side of the
appliance. The mains cable may be replaced by
a technician only.
m Warning
Never connect the appliance to electronic energy saver
plugs.
Our appliances can be used with mains and sine-
controlled inverters. Mains-controlled inverters are used
for photovoltaic systems which are connected directly
to the national grid. Sine-controlled inverters must be
used for isolated applications (e.g. on ships or in
mountain lodges) which are not connected directly to
the national grid.
en
8
Removing appliance doors and
handles
If the appliance will not fit through the house door, the appliance doors and handles can be unscrewed.
m Caution
Only customer service may unscrew the appliance doors.
en
9
Getting to know your appliance
These operating instructions refer to several models. The diagrams may differ.
* Not all models.
A Freezer compartment
B Refrigerator compartment
1 Light switch for refrigerator and freezer
compartments
2 Control and display panel
3 Ice maker/Ice cube container
4 Air outlet opening
5 Ice and water dispenser
6 Freezer calendar
7 Glass shelf in the freezer
compartment
8 Door shelf
9 Frozen food container
10 Light
11 Particle filter/Water filter
12 Butter and cheese compartment
13 Air outlet opening
14 Bottle shelf *
15 Adjustable glass shelf
16 Glass shelf in the refrigerator
compartment
17 “Cool-fresh” container
18 Shelf for large bottles
19 Vegetable container with humidity control
20 Height-adjustable feet
en
10
Control and display panel
The display panel and display panel on the door consists of a touch pad.
Touch the keypad to actuate the corresponding function.
1 “options” button
For selecting the special functions. Keep
pressing the button until the required function
is selected with an arrow (see chapter entitled
“Special functions”).
2 “select” button
For making settings in the different
temperature zones (freezer compartment,
refrigerator compartment). Keep pressing
the button until the required zone is marked
with an arrow.
3 Freezer compartment display
Indicates the current temperature setting
in the freezer compartment.
4 Time display
Displays the current time or the time
sequence when a special function
of the timer is activated.
5 Special functions display
Indicates the available special functions (see
chapter “Special functions”).
6 Refrigerator compartment display
Indicates the current temperature setting
in the refrigerator compartment.
7 Super button
This button is used to switch on the super
cooling (refrigerator compartment) or super
freezing (freezer compartment) functions (see
chapter entitled “Super cooling” or “Super
freezing”).
8 “alarm off/lock” button
The button is used to
switch off the warning signal (see chapter
“Alarm function”),
switch the button lock on and off.
To switch the button lock on and off, press
button for 5 seconds. When the function is
switched on, “lock” is indicated
on the display panel.
9 Setting buttons +/–
The buttons are used to
set the temperatures in the different
cooling zones,
switch the special functions on and off,
change the time setting of the “timer”
special function.
10 On/Off “light” button for ice and water
dispenser
11 Ice dispenser button
12 Dispenser button for crushed ice
13 Water dispenser button
en
11
Switching on the appliance
When connected, the appliance is switched on. A
warning signal sounds.
Press the “alarm off/lock” button. The warning signal
switches off.
Display “alarm” goes out when the appliance has
reached the set temperature.
The preset temperatures are reached after several
hours. Do not put any food in the appliance
beforehand.
The factory has recommended the following
temperatures:
Freezer compartment: -18 °C
Refrigerator compartment: +4 °C
Setting the temperature unit
The temperature can be displayed in degrees Celsius
(°C) or degrees Fahrenheit (°F).
Setting the temperature unit
To set the temperature unit, simultaneously press the
“super” button and the “options” button for 5 seconds.
Depending on the previous setting, the display
switches to the other temperature unit.
Setting the temperature
The required area must be selected before
temperatures can be set for the different climatic zones
(refrigerator compartment, freezer compartment):
1. Keep pressing the “select” button until the required
climatic zone is marked with an arrow.
2. Set the temperature with the + (warmer) or - (cooler)
setting buttons.
The value last indicated is saved by the system.
Freezer compartment
The freezer compartment can be set from -14 °C to
-24 °C.
We recommend a setting of -18 °C.
Refrigerator compartment
The refrigerator compartment can be set from +2 °C
to +8 °C.
The temperature can be set at 1 °C intervals.
Perishable food should not be stored above +4 °C.
We recommend a setting of +4 °C.
Special functions
[timer]
You can use this function to set a period of time of 0-
99 minutes. A signal reminds you, e.g. when food is
to be taken out of the compartment after a certain time.
A value of 20 minutes has been preset at the factory.
m Caution
Drinks bottles may crack if they are stored for longer
than 20 minutes in the freezer compartment.
Switching on [timer]
1. Keep the Options button pressed until the [timer]
function is marked with an arrow.
2. Activate by pressing the setting button + or -
(function is framed).
3. Press the setting buttons +/- to set the desired time.
Note
Repeatedly press the button to change the time in
one-minute intervals. If the button is held down, the
time changes in 3-minute intervals.
4. Press the Options button to start the time cycle.
Switching off [timer]
To deactivate the function, simultaenously press
the setting buttons + and - for 3 seconds.
[eco]
This function switches the appliance to energy-saving
mode.
The appliance automatically sets the following
temperatures:
Freezer compartment: : -16 °C
Refrigerator compartment: +6 °C
Switching on the [eco]
1. Keep pressing the “options” button, until the [eco]
function is marked with an arrow.
en
12
2. Activate by pressing the setting button + (function is
framed).
Switching off the [eco]
1. Keep pressing the “options” button, until the [eco]
function is marked with an arrow.
2. Deactivate by pressing the setting button - (function
is no longer framed).
[vacation]
If leaving the appliance for a long period of time, you
can switch the appliance over to the energy-saving
vacation mode. The refrigerator compartment
temperature is automatically switched to +14 °C.
m Caution
Do not store any food in the refrigerator compartment
during this time!
Switching on the [vacation]
1. Keep pressing the “options” button, until
the [vacation] function is marked with an arrow.
2. Activate by pressing the setting button + (function is
framed).
Switching off the [vacation]
1. Keep pressing the “options” button, until
the [vacation] function is marked with an arrow.
2. Deactivate by pressing the setting button - (function
is no longer framed).
[clock]
The time is indicated on the time display panel. You
can set the time with the [clock] function.
Setting the time
1. Keep pressing the “options” button, until the [clock]
function is marked with an arrow.
2. Activate by pressing the setting button + (function is
framed).
3. Press the setting buttons +/- to set the required time.
4. Save the set time with the “options” button.
Note
If the [timer] function is switched on, the time is not
displayed.
[IWD off]
You can use this function to switch off the ice and water
dispenser.
m Caution
Before switching off the ice maker, it is most
important that you switch the water supply
to the appliance off for a few hours.
Empty and clean ice cube container. Re-attach
the ice cube container. Ensure that the ice cube
container engages with the support.
Switching on [IWD off]
1. Keep pressing the “options” button, until
the [IWD off] function is marked with an arrow.
2. Activate by pressing the setting button + (function is
framed).
Switching off [IWD off]
1. Keep pressing the “options” button, until
the [IWD off] function is marked with an arrow.
2. Deactivate by pressing the setting button - (function
is no longer framed).
[filter change]
After 6 months you are prompted via the [filter change]
display message to replace the filter cartridge.
Activating new filter cartridge
When the filter cartridge has been replaced,
the [filter change] function must be re-activated.
1. Change filter cartridge (see chapter “Water filter”).
2. Keep pressing the “options” button, until the [filter
change] function is marked with an arrow.
3. Activate by pressing the setting buttons +/-. [filter
change] display goes out.
Sabbatical mode
Sabbatical mode settings:
Accoustic signal is switched off.
Super cooling or super freezing is then ended
(if activated).
The light is switched off.
The light on the display panel is reduced to basic
lighting.
Buttons are locked (except “options” button and
setting button +).
Switching sabbatical mode on and off
1. To activate, simultaneously press the Options button
and setting button + for 5 seconds.
The display field indicates that the sabbatical mode
is switched on.
2. To deactivate, simultaneously press the Options
button and setting button + for 5 seconds.
Alarm function
Press the “alarm/lock” button to switch off the warning
signal.
en
13
In the following cases an alarm may be actuated:
Door opening alarm
If the appliance is left open for longer than one minute,
the door alarm switches on. Close the door or press the
Alarm button to switch the warning signal off again.
Temperature alarm
The temperature alarm switches on if the freezer
compartment is too warm and the food is at risk of
thawing.
The acoustic and optical signal may be actuated
without risk to the frozen food:
When switching on the appliance for initial use.
When large quantities of fresh food are placed in the
appliance.
Freezer compartment
“AL” flashes on the freezer compartment display panel
and “alarm” is displayed.
The temperature display indicates for 10 seconds
the warmest temperature which was reached
in the freezer compartment. Then the set temperature is
displayed again.
The alarm display goes out as soon as the set
temperature has been reached again.
Note
Do not refreeze thawing or thawed food. Only ready
meals (boiled or fried) may be refrozen.
No longer store the frozen produce for the max.
storage period.
Refrigerator compartment
m Caution
If the refrigerator compartment has become too warm,
cook warmed refrigerated food before consumption. If
in doubt, do not use raw food.
Usable capacity
Information on the usable capacity can be found inside
your appliance on the rating plate (see diagram at
chapter “Customer service”).
Fully utilising the freezer volume
To place the maximum amount of food in the freezer,
the top frozen food container can be taken out of
the appliance. The food can then be placed directly on
the shelves and stacked in the lower frozen food
container.
Freezer compartment
Use the freezer compartment
To store deep-frozen food.
To make ice cubes.
To freeze food.
Note
Ensure that the freezer compartment door has been
closed properly. If the door is open, the frozen food will
thaw. The freezer compartment will become covered in
thick ice. Also: waste of energy due to high power
consumption!
When the freezer compartment door is closed, a low
pressure occurs, causing a sucking noise. Wait two
to three minutes until the low pressure has adjusted
itself.
We recommend leaving the ice cube container
in the appliance. This ensures optimum temperature
distribution in the freezer compartment.
Purchasing frozen food
Packaging must not be damaged.
Use by the “use by” date.
Temperature in the supermarket freezer must be
-18 °C or lower.
If possible, transport deep-frozen food in an
insulated bag and place quickly in the freezer
compartment.
Max. freezing capacity
Information about the max. freezing capacity within
24 hours can be found on the rating plate (see diagram
at chapter “Customer service”).
Freezing fresh food
Freeze fresh and undamaged food only.
To retain the best possible nutritional value, flavour and
colour, vegetables should be blanched before freezing.
Aubergines, peppers, zucchini and asparagus do not
require blanching.
Literature on freezing and blanching can be found
in bookshops.
Note
Keep food which is to be frozen away from food which
is already frozen.
en
14
The following foods are suitable for freezing:
Cakes and pastries, fish and seafood, meat, game,
poultry, vegetables, fruit, herbs, eggs without shells,
dairy products such as cheese, butter and quark,
ready meals and leftovers such as soups, stews,
cooked meat and fish, potato dishes, soufflés and
desserts.
The following foods are not suitable for freezing:
Types of vegetables, which are usually consumed
raw, such as lettuce or radishes, eggs in shells,
grapes, whole apples, pears and peaches, hard-
boiled eggs, yoghurt, soured milk, sour cream,
crème fraîche and mayonnaise.
Packing frozen food
To prevent food from losing its flavour or drying out,
place in airtight containers.
1. Place food in packaging.
2. Remove air.
3. Seal the wrapping.
4. Label packaging with contents and date of freezing.
Suitable packaging:
Cling wrap, tubular film made of polyethylene,
aluminium foil, freezer containers.
These products are available from specialist outlets.
Unsuitable packaging:
Wrapping paper, greaseproof paper, cellophane, bin
liners and used shopping bags.
Items suitable for sealing packaged food:
Rubber bands, plastic clips, string, cold-resistant
adhesive tape, etc.
Bags and tubular film made of polyethylene (PE) can
be sealed with a film heat sealer.
Shelf life of frozen food
Storage duration depends on the type of food.
At a temperature of -18 °C:
Fish, sausage, ready meals and cakes and pastries:
up to 6 months
Cheese, poultry and meat:
up to 8 months
Vegetables and fruit:
up to 12 months
Super freezing
Food should be frozen solid as quickly as possible
in order to retain vitamins, nutritional value, appearance
and flavour.
Several hours before placing fresh food in the freezer
compartment, switch on super freezing to prevent
an unwanted temperature rise.
As a rule, 4–6 hours is adequate.
This appliance runs constantly and the freezer
compartment drops to a very low temperature.
If the max. freezing capacity is to be used, super
freezing must be switched on for 24 hours before the
fresh produce is placed in the freezer compartment.
You can freeze smaller quantities of food (up to 2 kg)
without fast freezing.
Note
When super freezing is switched on, increased
operating noises may occur.
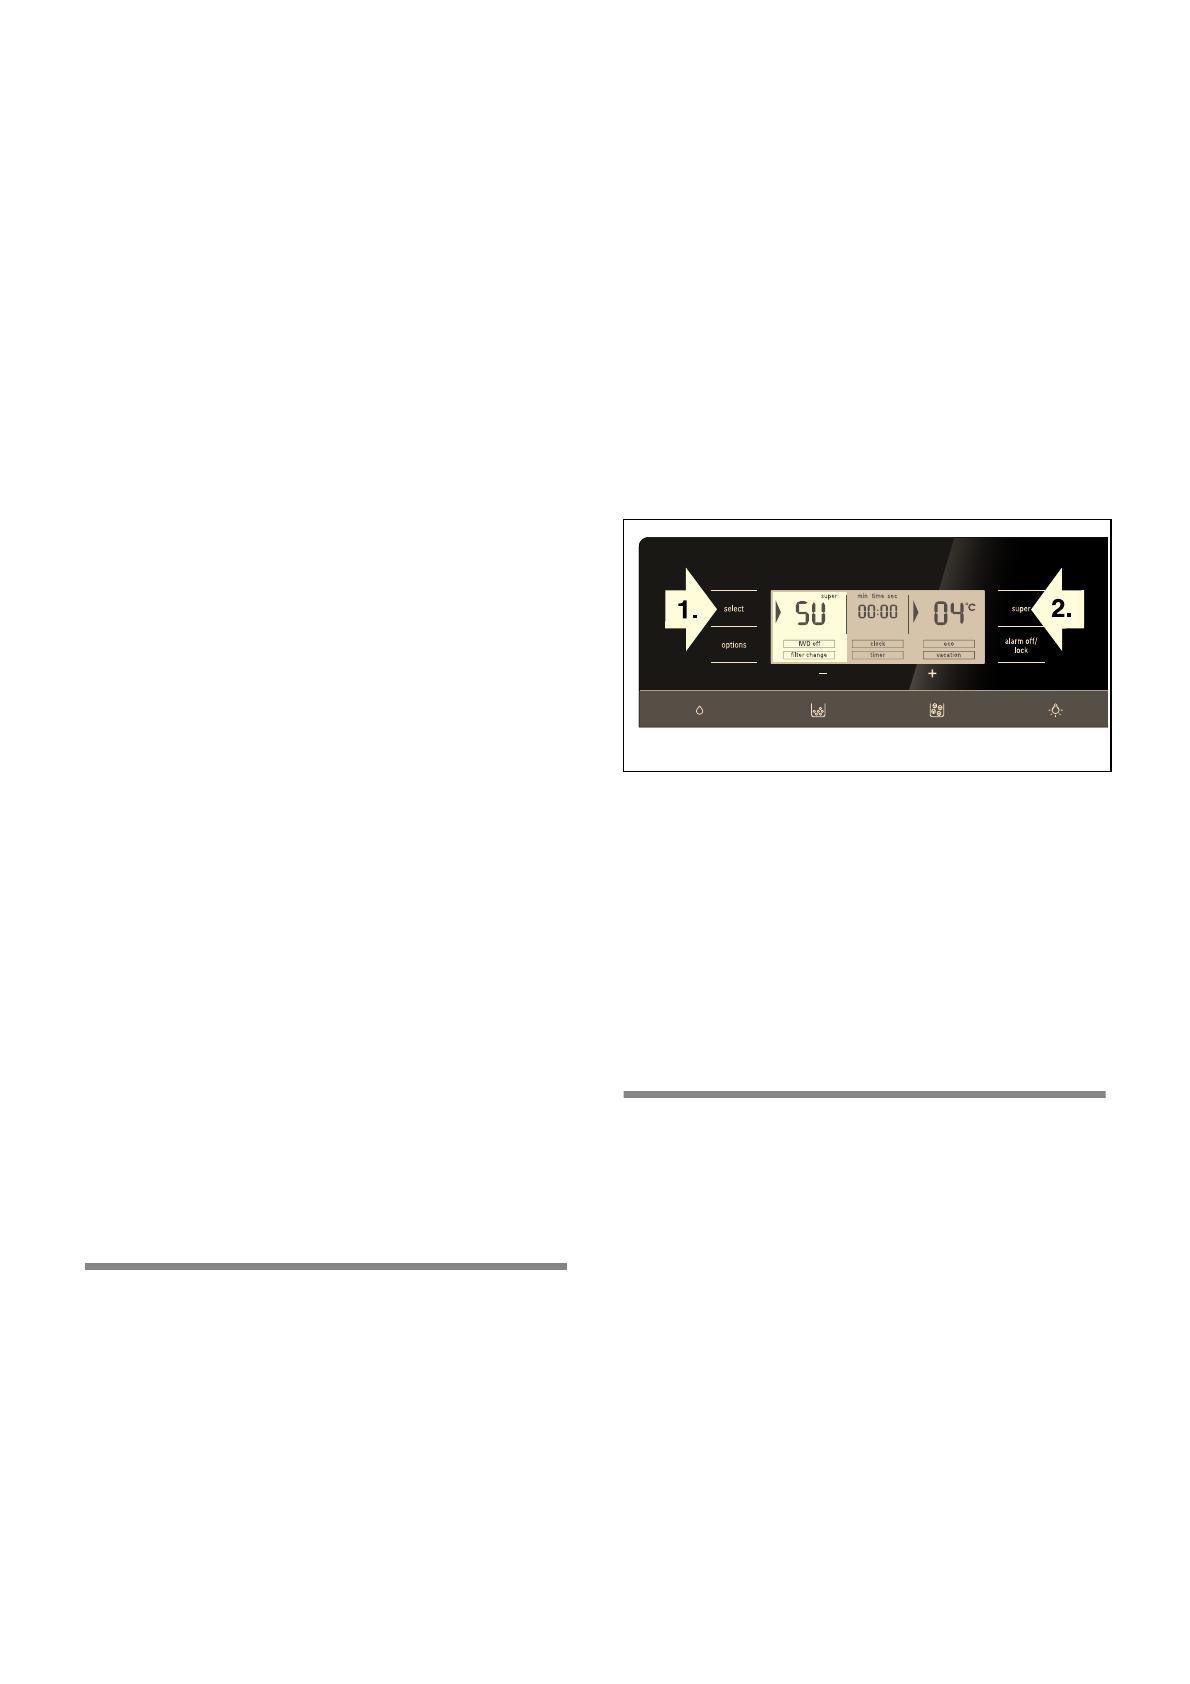
Switching on super freezing
1. Keep pressing the “select” button until the freezer
compartment climate zone is marked with an arrow.
2. Press “super” button.
If “super freezing” is switched on, “SU” and “super” are
indicated on the display panel.
Switching off super freezing
1. Keep pressing the “select” button until the freezer
compartment climate zone is marked with an arrow.
2. Press “super” button.
If super freezing is switched off, the “SU” and “super”
displays go out on the display panel.
Note
Super freezing automatically switches off after approx.
2^ days.
Thawing frozen food
Depending on the type and application, select one
of the following options:
at room temperature
in the refrigerator
in an electric oven, with/without fan assisted hot-air
in the microwave
m Caution
Do not refreeze thawing or thawed food. Only ready
meals (boiled or fried) may be refrozen.
No longer store the frozen produce for the max.
storage period.
en
15
Refrigerator compartment
The refrigerator compartment is the ideal storage
location for meat, sausage, fish, dairy products, eggs,
ready meals and pastries.
Storing food
Store fresh, undamaged food. The quality and
freshness will then be retained for longer.
In the case of ready-made products and bottled
goods, observe the best-before date or use-by date
specified by the manufacturer.
To retain aroma, colour and freshness, pack
or cover food well before placing in the appliance.
This will prevent the transfer of flavours and the
discolouration of plastic parts in the refrigerator
compartment.
Allow warm food and drinks to cool down before
placing in the appliance.
Note
Avoid contact between food and rear panel. Otherwise
the air circulation will be impaired.
Food or packaging could freeze to the rear panel.
Note the chill zones in the refrigerator
compartment
The air circulation in the refrigerator compartment
creates different chill zones:
Coldest zone is between the vegetable container and
the glass shelf situated above.
Note
Store perishable food (e.g. fish, sausage, meat)
in the coldest zone above the vegetable container.
Warmest zone is at the very top of the door.
Note
Store e.g. hard cheese and butter in the warmest
zone. Cheese can then continue to release its flavour
and the butter will still be easy to spread.
“Cool-fresh” container
Foods suitable for “cool-fresh” container:
In principle all foods which are fresh and are to remain
fresh for even longer, such as: fish, seafood, meat
and sausage, dairy products, and ready meals.
Foods not suitable for the “cool-fresh” drawer:
Fruit and vegetables sensitive to cold (e.g.: tropical fruit
such as pineapples, bananas, papaya, citrus fruits,
melons as well as tomatoes, aubergines, zucchini,
capsicums, cucumbers, potatoes).
The ideal storage location for these foods is
the refrigerator compartment.
Vegetable container with humidity
controller
To create the optimum storage climate for fruit and
vegetables, you can set the air humidity in the
vegetable container depending on the quantity stored:
smaller quantities of fruit and vegetables – high air
humidity
large quantities of fruit and vegetables – low air
humidity
Notes
Fruit sensitive to cold (e.g. pineapple, banana,
papaya and citrus fruit) and vegetables sensitive
to cold (e.g. aubergines, cucumbers, zucchini,
peppers, tomatoes and potatoes) should be stored
outside the refrigerator at temperatures of approx.
+8 °C to +12 °C for optimum preservation of quality
and flavour.
Condensation may form in the vegetable container
depending on the type and quantity of products
stored. Remove condensation with a dry cloth and
adjust air humidity in the vegetable container with
the humidity controller.
Super cooling
Super cooling sets the refrigerator temperature
to the coldest temperature setting for approx. 6 hours.
Then the appliance automatically switches
to the temperature set prior to super cooling mode.
Switch on super cooling mode, e.g.
en
16
before placing large quantities of food
in the refrigerator compartment.
for the fast cooling of drinks.
Note
When super cooling is switched on, increased
operating noises may occur.
Switching on super cooling
1. Keep pressing the “select” button until the
refrigerator compartment climate zone is marked
with an arrow.
2. Press “super” button.
If “super cooling” is switched on, “SU” and “super” are
indicated on the display panel.
Switching off super cooling
1. Keep pressing the “select” button until the
refrigerator compartment climate zone is marked
with an arrow.
2. Press “super” button.
If super cooling is switched off, the “SU” and “super”
displays go out on the display panel.
Ice and water dispenser
The following can be dispensed as required:
cooled water,
crushed ice,
ice cubes.
m Warning
Never reach into the ice cube dispenser opening! Risk
of injury!
m Caution
Do not place bottles or food in the cube container
in order to cool them quickly. The ice maker may block
and be damaged.
* Not all models.
Using the ice and water dispenser
The ice and water dispenser only works when
the appliance is connected to the water mains.
When the appliance has been switched on, it takes
approx. 24 hours until the first batch of ice cubes are
ready.
When the appliance has been connected, there are still
air bubbles in the lines.
Run off drinking water and pour away until water can be
dispensed without bubbles. Pour away the first 5
glasses.
When using the ice maker for the first time, do not use
the first 30-40 ice cubes for reasons of hygiene.
Operating the ice maker
As soon as the freezer compartment has reached its
freezing temperature, ice cube production starts. After
2–3 hours the ready ice cubes are automatically
discharged into the ice cube container.
Note
The appliance produces more ice if you lower the
freezer compartment temperature. This will slightly
increase the energy consumption of your appliance.
Occasionally ice cubes will freeze together and block
the dispenser:
1. Open the door and check inside whether ice cubes
are sticking to the ice and water dispenser.
2. If the ice and water dispenser is not blocked:
m Caution
A full ice cube container is heavy!
Carefully pull out ice cube container and remove ice
cubes which are frozen together.
When the ice cube container is full, ice making
switches off automatically.
When ice cubes are being made, the buzzing water
valve, the water flowing into the ice cube tray and
the falling ice cubes can be heard.
Observing drinking water quality
All materials used in the drinks dispenser are odourless
and tasteless.
If the water has an aftertaste, this may be caused by:
Mineral and chlorine content of the drinking water.
Material of the domestic water line and connection
line.
Freshness of the drinking water. If water has not
been dispensed for a long time, the water may have
a “stale” taste. In this case fill approx. 15 glasses
of water and throw away.
We recommend that you regularly dispense a little
fresh water from the water maker and that you do not
switch off the appliance. This will ensure that the best
water quality is retained.
The enclosed water filter will filter only particles out
of the supply water, not bacteria or microbes.
Dispensing ice/water
Select the ice and water dispenser button (water,
crushed ice or ice cubes).
Keep pressing the button until the required quantity
is in the glass.
en
17
Dispensing water
Note
The water from the water dispenser is cooled
to a palatable temperature. If you would like the water
colder, place ice cubes in the glass before dispensing
the water.
Note
When dispensing fairly large amounts of water, the
dispensed water may become warmer.
Dispensing ice
Disconnecting the ice maker
If ice cubes are not to be dispensed for longer than
1 week (e.g. holiday), temporarily disconnect the ice
cube maker to prevent the ice cubes from freezing
together.
To disconnect the ice maker:
1. Remove the ice cube container.
2. Keep pressing the “options” button, until
the [IWD off] function is marked with an arrow.
3. Activate by pressing the setting button + (function is
framed).
4. Empty and clean ice cube container. Re-attach
the ice cube container. Ensure that the ice cube
container engages with the support.
Switching on the ice cube maker again:
1. Keep pressing the “options” button, until
the [IWD off] function is marked with an arrow.
2. Deactivate by pressing the setting button - (function
is no longer framed).
Water filter
m Warning
Do not use the appliance in places where the water
quality is risky or not sufficiently known about without
suitable disinfection, before and after filtering.
A filter cartridge for filtering particles can be obtained
from customer service or a specialist dealer.
m Caution
After installing a new filter, always discard the ice
produced within the first 24 hours after switching on
the ice maker.
If the ice has not been used for a prolonged period,
pour all ice cubes out of the container and also
discard the ice produced within the next 24 hours.
If the appliance or the ice has not been used actively
for several weeks or months or if the ice cubes have
an unpleasant taste or odor, change the water filter.
Air trapped in the system may cause water
to escape and the filter cartridge to be ejected.
Caution when removing.
The filter must be changed at least every 6 months.
Important information concerning
the water filter
After use, the water system is subject to low
pressure. Be careful when removing the filter!
Rinse the water system through if the appliance has
not been used for a long period, or if the water
tastes or smells unpleasant. In addition to this, draw
water from the water dispenser for several minutes. If
the unpleasant taste or smell persists exchange
the filter.
The term ‘bacteriostatic’ indicates that the system
limits the passage or growth of bacteria that may
already exist in the incoming water. It does not mean
that water leaving the system is microbiologically
safer to drink than the water entering the system.
en
18
Exchanging the filter cartridge
After 6 months you are prompted via the [filter change]
display message to change the filter cartridge (see
chapter “Special functions”).
Take out the filter cartridge as follows:
Insert new filter cartridge.
Draw a few litres of water from the water dispenser.
Doing this removes air from the water system.
Pour water out of the used filter cartridge. The filter
cartridge can be disposed of in the household
rubbish.
Use locking cap
The ice and water dispenser can also be used without
a water filter. In this case, fit the locking cap.
Note
The locking cap and the filter screen inside should be
rinsed out under running water at regular intervals.
en
19
Specification and Performance
Data Sheet
Only for appliances with filter model: 9000 777 508
When using replacement cartridge: 9000 674 655
The concentration of the indicated substances
dissolved in water entering the system was reduced to
a concentration less than or equal to the permissible
limit for water leaving the system as specified in ANSI/
NSF Standard 42 and Standard 53.
Rated capacity: 739.68 gallons/2,800 litres
Contaminant reduction determined by NSF testing.
* Based on the use of Cryptosporium parvum oocysts.
It is essential that the manufacturer’s recommended
installation, maintenance and filter replacement
requirements be carried out. See manufacturer's
documentation for warranty information.
Note
While the testing was performed under standard
laboratory conditions, actual performance may vary.
More detailed information on the prices of spare parts
is available from your appliance dealer or parts
salesman on site.
m Warning
To reduce the risk associated with
ingestion of contaminants:
Do not use the system with water that is
microbiologically unsafe or of unknown quality without
adequate disinfection before and after connecting to
the system. Systems certified for cyst reduction may be
used on disinfected water that may contain filterable
cysts.
EPA Establishment Number 10350-MN-005
m Caution
To reduce the risks associated with property damage
due to water leakage:
Read and follow User Instructions before installation
and use of this system.
Installation and use must comply with all state and
local plumbing codes.
Do not install the system if water pressure exceeds
120 psi/827 kPa. If your water pressure exceeds 80
psi, you must install a pressure limiting valve.
Contact a plumbing professional if you are uncertain
how to check your water pressure.
Do not install the system where water hammer
conditions may occur. If water hammer conditions
exist, you must install a water hammer arrester.
Contact a plumbing professional if you are uncertain
how to check for this condition.
Do not connect the system to hot water supply lines.
The maximum operating water temperature of this
filter system is 100 ºF/33 ºC.
Protect filter from freezing. Drain filter system when
temperature drops below 33 °F/1 °C.
Change the disposable filter cartridge in the
following cases:
Once the rated capacity has been reached, if there is
a noticeable reduction in flow rate, or after six
months at the latest.
Manufactured by:
3M Purification Inc.
400 Research Parkway
Meriden, CT 06450
Tel. (800) 222-7880
Tel. (203) 237-5541
3M is a trademark of the 3M Company used under
license.
NSF is a trademark of NSF International.
© 2013 3M Company. All rights reserved.
System tested and certified by NSF
International against ANSI/NSF
Standard 53 and Standard 42 for the
fulfilment of the requirements
specified on this Specification and
Performance Data Sheet.
Contaminant Reduction Chlorine Taste and Odour Particle Class 1 Particle Size >/= 0.5 to
<1.0 μm
Cysts* Turbidity
Average Influent 2.1 mg/l 9,100,000 pts/ml 170,000 cysts/l 11 NTU
Influent Concentration 2.0 mg/l +/- 10% At least 10,000 particles/ml Minimum 50,000 cysts/l 11 +/- 1 NTU
Avg. % Reduction 97.6% 98.8% 99.99% 98.1%
Average Product Water Concentration 0.05 mg/l 111,817 pts/ml 0.001 cysts/l <1 NTU
Max Permissible Product Water Concentration N/A N/A N/A 0.5 NTU
NSF Reduction Requirements >/=50% >/=85% >/=99.95% 95%
NSF Test Report J-00121313 J-00099871 J-00109715 J-00099885
Application Guidelines/Water Supply Parameters:
Service Flow 0.75 gpm
2.83 lpm
Water Supply Potable Water
Water Pressure 30 - 120 psi
207 - 827 kPa
Water Temperature* 33 °F - 100 °F
0.6 °C - 38 °C
en
20
Features of the freezer
compartment
(not all models)
Freezer calendar
To prevent the quality of the frozen food from
deteriorating, do not exceed the storage
duration.The storage period depends on the type
of produce. The figures next to the symbols indicate
the permitted storage period of the produce in months.
In the case of commercially available frozen food
observe the date of manufacture or use-by date.
Variable interior design
You can vary the shelves inside the appliance
and the door shelves as required.
Pull shelf forwards, lower and swing out to the side.
Lift the door shelf and remove.
Special features
(not all models)
Adjustable glass shelf “easy Lift”
The height of the shelf can be adjusted without taking it
out. Take food off the shelf beforehand.
The max. shelf load: 3 kg
  • Page 1 1
  • Page 2 2
  • Page 3 3
  • Page 4 4
  • Page 5 5
  • Page 6 6
  • Page 7 7
  • Page 8 8
  • Page 9 9
  • Page 10 10
  • Page 11 11
  • Page 12 12
  • Page 13 13
  • Page 14 14
  • Page 15 15
  • Page 16 16
  • Page 17 17
  • Page 18 18
  • Page 19 19
  • Page 20 20
  • Page 21 21
  • Page 22 22
  • Page 23 23
  • Page 24 24
  • Page 25 25
  • Page 26 26
  • Page 27 27
  • Page 28 28

Bosch KAD92AI20A/05 User manual

Category
Fridges
Type
User manual

Ask a question and I''ll find the answer in the document

Finding information in a document is now easier with AI